Table of Contents
Advertisement
Quick Links
Advertisement
Table of Contents

Related Manuals for Sennheiser EW 300 IEM G3 - 01-09


Summary of Contents for Sennheiser EW 300 IEM G3 - 01-09
- Page 1 IEM Series Instruction manual...
-
Page 3: Table Of Contents
......................32 EK 300 IEM G3 diversity receiver ..........................33 Connector assignment ..............................33 Accessories .......................... 34 Manufacturer Declarations For more detailed information on the individual sections of this instruction manual, visit the corresponding product page on our website at www.sennheiser.com. -
Page 4: Important Safety Instructions
• Heed all warnings and follow all instructions in this instruction manual. • Only clean the products when they are not connected to the mains. Use a cloth for cleaning. • Only use attachments/accessories specified by Sennheiser. -
Page 5: The Evolution Wireless Series Ew 300 Iem G3
– You can hear ringing or whistling sounds in your ears. – You have the impression (even for a short time only) that you can no longer hear high notes. EK 300 IEM G3 diversity receiver Do not place the product near any heat sources such as radiators, heat registers, stoves, or other devices (including amplifiers) that produce heat. -
Page 6: The Frequency Bank System
Frequency bank U1 ... U6 Channel 16 – freely selectable frequency Each of the channels in the frequency banks “1” to “20” has been factory-preset to a fixed frequency (frequency preset). The factory-preset frequencies within one frequency bank are intermodulation-free. These frequencies cannot be changed. -
Page 7: Product Overviews
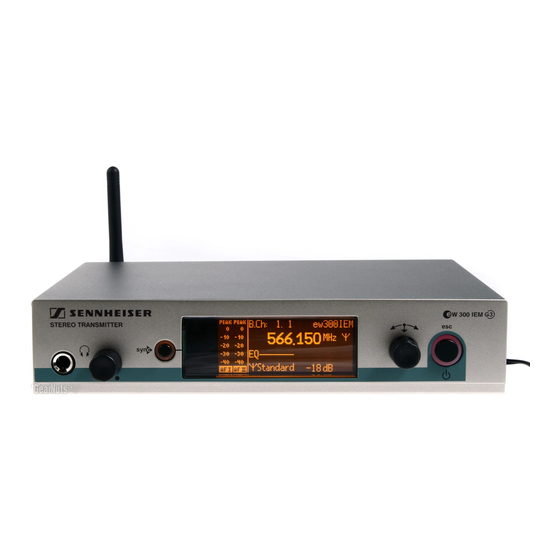
Product overviews Product overviews Overview of the SR 300 IEM G3 transmitter B.Ch: 1. 1 PEAK ew300IEM Stereo Transmitter 519.150 Standard -18dB AF I AF II PUSH PUSH Stereo Transmitter SR 300 IEM FREQ Range-D 780-822 MHz IDENT NO 627925... -
Page 8: Overview Of The Displays Of The Sr 300 Iem G3 Transmitter
Product overviews Overview of the displays of the SR 300 IEM G3 transmitter After switch-on, the transmitter displays the standard display. B.Ch: 1. 1 ew300IEM 519.150 Standard -18dB Display Meaning Audio level Modulation of the left I) and right = Audio Frequency) -
Page 9: Overview Of The Ek 300 Iem G3 Diversity Receiver
Product overviews Overview of the EK 300 IEM G3 diversity receiver » On/off/volume control Charging contacts 3.5 mm stereo jack socket (PHONES), button lockable rocker button (UP/DOWN) (the shield is used by antenna II) Battery compartment Antenna I Battery compartment cover... -
Page 10: Overview Of The Displays Of The Ek 300 Iem G3 Diversity Receiver
After switch-on, the diversity receiver displays the standard display “Frequency/Name”. For further illustrations and examples of the different standard displays, refer to page 18. The standard display displays the operating states of the diversity receiver. The display backlighting is automatically reduced after approx. 20 seconds. -
Page 11: Putting The Devices Into Operation
G3 product page at www.sennheiser.com. Setting up the transmitter on a flat surface Place the transmitter on a flat, horizontal surface. Please note that the device feet can leave stains on delicate surfaces. The rack mount “ears” are designed to help protect the operating elements from damage or deformation, e.g. - Page 12 – You can use the AM 2 antenna front mount kit (optional accessory) and mount the rod antenna to the blanking plate – You can use a remote antenna, if necessary in conjunction with the AC 3 antenna combiner.
- Page 13 Secure the rack mount “ears” to the 19” rack. Connecting the mains unit Only use the supplied mains unit. It is designed for the transmitter and ensures safe operation. Insert the yellow connector of the NT 2-3 mains unit into the yellow socket of the transmitter.
- Page 14 Putting the devices into operation Connecting devices to the input sockets Use a suitable cable to connect the output of an external device (e.g. a mixing console or an PUSH PUSH additional SR 300 IEM G3) to the input socket...
- Page 15 Putting the devices into operation Daisy chaining audio signals You can transmit the same audio signal (e.g. the sum of all audio signals) to several diversity receivers of a multi-channel system. To do so, you have to daisy chain this audio signal from...
-
Page 16: Putting The Ek 300 Iem G3 Diversity Receiver Into Operation
Putting the EK 300 IEM G3 diversity receiver into operation Inserting the batteries/accupack For powering the diversity receiver, you can either use two 1.5 V AA size batteries or the rechargeable Sennheiser BA 2015 accupack. Open the battery compartment by pushing the two catches... - Page 17 The belt clip is detachable so that you can also attach the diversity receiver with the antenna pointing downwards. To do so, withdraw the belt clip from its fixing points and attach it the other way round. The belt clip is secured so that it cannot slide out of its fixing points accidentally.
-
Page 18: Using The Devices
If you cannot establish a transmission link between transmitter and receiver: Make sure that transmitter and receiver are set to the same frequency bank and to the same channel – the easiest way is to synchronize the devices (see page 20). -
Page 19: Monitoring The Audio Signal Via Headphones
To completely switch the transmitter off: Disconnect the transmitter from the mains by unplugging the mains unit from the wall socket. The backlighting of the STANDBY button goes off. -
Page 20: Selecting A Standard Display On The Diversity Receiver
You can activate or deactivate the automatic lock mode via the “Auto Lock” menu item. If the lock mode is activated, you have to temporarily deactivate it In order to be able to operate the devices: SR 300 IEM G3 transmitter EK 300 IEM G3 receiver Press the jog dial. -
Page 21: Adjusting The Audio Channels On The Transmitter
Select “Stereo” if you want to transmit two separate audio signals on channel I and channel II (e.g. channel I = audio signal of the presenter/musician, channel II = sum of all audio signals). Make sure that the receiver’s pilot tone evaluation (“Pilot... -
Page 22: Synchronizing Transmitters And Ek 300 Iem G3 Receivers Via The Infra-Red Interface
Synchronizing transmitters and EK 300 IEM G3 receivers via the infra-red interface Synchronization allows you to quickly and easily transfer transmitter and receiver settings from one device to the other, especially if you want to configure a multi-channel system. There are two transfer directions: Easy Setup... - Page 23 You can also you the Easy Setup Sync function for establishing a transmission link between one transmitter and one EK 300 IEM G3 receiver. Easy Setup Sync Sync Switch all transmitters and one diversity Switch your transmitter and your diver- receiver on.
- Page 24 The transmission link between transmit- ters and receivers is established. – To cancel the transfer: Press the STANDBY button on the transmitter. “ ” appears on the display panel of the transmitter. “ ” also appears if no suit- able receiver was found.
-
Page 25: Using The Operating Menus
Function of the button Press the button • Selects a standard display (see page 18) • Cancels the entry and returns to the current standard display (ESC function) Press the button • Changes from the standard display to the operating menu •... -
Page 26: Overview Of The Operating Menus
RF Mute Exit Operating menu of the SR 300 IEM G3 transmitter When the standard display is shown on the display panel, you can get into the main menu by pressing the jog dial. The extended menu “Advanced Menu” and the other menus can be accessed via the corresponding menu items. - Page 27 Danger of hearing damage and material damage! If you switch the squelch off or adjust the squelch threshold to a very low value, loud hissing noise can occur in the receiver. The hissing noise can be loud enough to cause hearing damage or overload the loudspeakers of your system! Always make sure that the squelch is switched on (see above).
- Page 28 Tune Sets the receiving frequencies for the frequency banks “U1” to “U6” Special function: Sets a channel and a receiving frequency for the frequency banks “U1” to “U6”: Select this menu item and call it up by pressing the button until the channel selection appears.
-
Page 29: Synchronizing The Transmitter With The Diversity Receiver
This establishes a transmission link between transmitter and receiver. Alternatively, you can set the channel on the transmitter manually: Make sure that you set the transmitter to the same frequency bank and the same channel as the receiver. Synchronizing transmitters with receivers – multi-channel operation... -
Page 30: Cleaning The Devices
SR 300 IEM G3 transmitter Before cleaning, disconnect the device from the mains. Use a slightly damp cloth to clean the device from time to time. Do not use any solvents or cleansing agents. EK 300 IEM G3 diversity receiver Use a slightly damp cloth to clean the device from time to time. -
Page 31: If A Problem Occurs
Increase the transmission power (see page 24). Reduce the squelch threshold (see table on page 20). RF signal available, No input signal at the transmitter Check the audio level on the transmitter display no audio signal at the (see page 6). - Page 32 If a problem occurs that is not listed in the above table or if the problem cannot be solved with the proposed solutions, please contact your local Sennheiser partner for assistance. To find a Sennheiser partner in your country, search at www.sennheiser.com under “Service & Support”.
-
Page 33: Specifications
> 90 dB Temperature range –10°C to +55°C SR 300 IEM G3 transmitter BNC socket, 50 Ω with remote power supply input 12 V DC Antenna output RF output power at 50 Ω typ. 10/30 mW (Low/Standard), switchable AF input BAL AF IN L (I)/BAL AF IN R (II) 2 x XLR-3/¼’’... -
Page 34: Nt 2-3 Mains Unit
EN 60065 47 CFR 15 subpart B Canada ICES 003 The mains unit is certified in accordance with the legal safety requirements of Europe, the United States, Canada, Russia and Japan. EK 300 IEM G3 diversity receiver Receiver principle adaptive diversity <... -
Page 35: Connector Assignment
Power supply for powering the AC 3 antenna combine and four transmitters, EU version 503873 NT 3-1 US: Power supply for powering the AC 3 antenna combine and four transmitters, 120 V version 503874 NT 3-1 UK: Power supply for powering the AC 3 antenna combine and four transmitters, UK version... -
Page 36: Manufacturer Declarations
Manufacturer Declarations Manufacturer Declarations Warranty Sennheiser electronic GmbH & Co. KG gives a warranty of 24 months on this product. For the current warranty conditions, please visit our web site at www.sennheiser.com or contact your Sennheiser partner. In compliance with the following requirements •... - Page 37 (2) these devices must accept any interference received, including interference that may cause undesired operation. This equipment has been tested and found to comply with the limits for a Class B digital device, pursuant to Part 15 of the FCC Rules. These limits are designed to provide reasonable protection against harmful interference in a residential installation.
- Page 38 Sennheiser electronic GmbH & Co. KG Printed in Germany Am Labor 1, 30900 Wedemark, Germany Publ. 01/09 www.sennheiser.com 529679/A01...