Advertisement
Table of Contents
- 1 Table of Contents
- 2 Instructions for Use
- 3 Safety Precautions
- 4 Environmental Responsibility
- 5 Get to Know Your Oven
- 6 Available Accessories
- 7 Front Panel
- 8 Electronic Programmer
- 9 Using the Oven
- 10 Cooking with the Oven
- 11 Cleaning and Maintenance
- 12 Extraordinary Maintenance
- 13 Installing the Appliance
- 14 Instructions for the Installer
- Download this manual
1.
INSTRUCTIONS FOR USE ........................................................................... 4
2.
SAFETY PRECAUTIONS .............................................................................. 6
3.
ENVIRONMENTAL RESPONSIBILITY .......................................................... 8
4.
GET TO KNOW YOUR OVEN........................................................................ 9
5.
AVAILABLE ACCESSORIES ....................................................................... 10
6.
FRONT PANEL ............................................................................................ 11
7.
ELECTRONIC PROGRAMMER .................................................................. 14
8.
USING THE OVEN ...................................................................................... 19
9.
COOKING WITH THE OVEN....................................................................... 22
10. CLEANING AND MAINTENANCE ............................................................... 28
11. EXTRAORDINARY MAINTENANCE ........................................................... 30
12. INSTALLING THE APPLIANCE ................................................................... 34
INSTRUCTIONS FOR THE USER: these instructions contain user
recommendations, a description of the controls and the correct
procedures for cleaning and maintenance of the appliance.
authorized person who must install the appliance, set it functioning and
carry out an inspection test.
@
Further product information is available from the website www.smeg.com
Contents
EN
3
Advertisement
Table of Contents

Related Manuals for Smeg DOSCA36X


Summary of Contents for Smeg DOSCA36X
-
Page 1: Table Of Contents
INSTRUCTIONS FOR THE INSTALLER: these are intended for the authorized person who must install the appliance, set it functioning and carry out an inspection test. Further product information is available from the website www.smeg.com Contents... -
Page 2: Instructions For Use
General instructions 1. INSTRUCTIONS FOR USE This manual is an integral part of the appliance and must therefore be kept in its entirety and in an accessible place for the whole working life of the appliance. It is important to carefully read this manual and all the instructions contained herein before using the appliance. - Page 3 General instructions Do not use plastic kitchenware or containers. The high temperatures inside the oven could melt the plastic, damaging the appliance. Do not use sealed tins or containers in the appliance. Overpressure may occur inside the containers during cooking, creating a danger of explosion. Do not leave the appliance unattended during cooking processes where fats or oils could be released.
-
Page 4: Safety Precautions
General instructions 2. SAFETY PRECAUTIONS Refer to the installation instructions for the safety regulations for electric or gas appliances and ventilation functions. In your interests and for your safety the law requires that the installation and servicing of all electrical appliances is carried out by qualified personnel in accordance with the regulations in force. - Page 5 General instructions Do not let children go near the appliance when it is in operation or play with it at any time. Do not insert pointed metal objects (cutlery or utensils) into the slits in the appliance. If the appliance is installed on caravans or boats, it must not be used to heat rooms.
-
Page 6: Environmental Responsibility
Instructions for disposal 3. ENVIRONMENTAL RESPONSIBILITY Your environmental responsibility Our product’s packing is made of non-polluting materials, which are therefore compatible with the environment and recyclable. Please help by disposing of the packaging correctly. You can obtain the addresses of collection, recycling and disposal centres from your retailer or from the competent local organisations. -
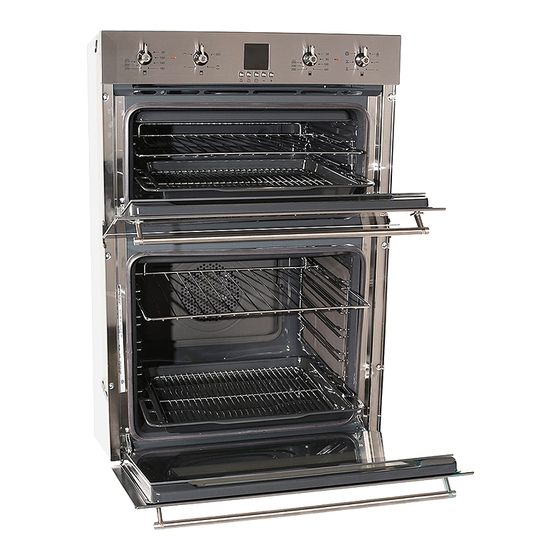
Page 7: Get To Know Your Oven
Instructions for the user 4. GET TO KNOW YOUR OVEN Control panel Roof liner (mobile) Bulb Oven seal Roof liner (fixed) Pan and rack runners Oven fan Self-cleaning panels... -
Page 8: Available Accessories
Accessories available on request: Original supplied and optional accessories may be ordered from any Authorised Support Centre. Use original SMEG accessories only. For the functions of the available accessories and their use, see chapter "8. USING THE OVEN". -
Page 9: Front Panel
Instructions for the user 6. FRONT PANEL All the controls and indicator lights can be seen on the front panel. The symbol under each knob indicates the oven which it controls. The tables below describe the symbols used. SMALL OVEN THERMOSTAT KNOB The cooking temperature is selected by turning the knob clockwise to the desired setting, between 50°C and 270°C. - Page 10 Instructions for the user LARGE OVEN THERMOSTAT KNOB LARGE OVEN FUNCTION KNOB THAWING FUNCTION LARGE GRILL FUNCTION SMALL GRILL FUNCTION In the large oven the function with the least energy consumption is The cooking temperature is selected by turning the knob clockwise to the desired setting, between 50°C and 250°C.
- Page 11 Instructions for the user ELECTRONIC PROGRAMMER - ANALOGUE CLOCK TIMER BUTTON TIMED COOKING AND SCHEDULED COOKING BUTTON CLOCK ADJUSTMENT AND RESET THERMOSTAT INDICATOR LIGHT (orange) During the oven heating phase the thermostat light remains on. Once the oven has reached the set temperature the light turns off. The programming clock can be used to display the current time or to set a timer or cooking programme.
-
Page 12: Electronic Programmer
Instructions for the user 7. ELECTRONIC PROGRAMMER THE ELECTRONIC PROGRAMMER ONLY CONTROLS THE LARGE OVEN AND HAS NO CONTROL OVER THE SMALL OVEN At the end of each completed programming operation, 10 beeps will sound 3 times at intervals of about 1 minute. This sequence can be stopped at any time by pressing any key. - Page 13 Instructions for the user Timer The timer does not stop the cooking process. It only warns the user that the preset number of minutes have passed. • Press and the display will light up as shown in figure 1; • Within 5 seconds press the value modification buttons decrease by one minute for each pressure until...
- Page 14 Instructions for the user Cooking duration This function allows a cooking operation to be started and then stopped after a specific length of time set by the user. To set the cooking duration, proceed as follows: • Rotate the oven thermostat knob to the desired temperature •...
- Page 15 Instructions for the user End of cooking This function allows, as well as setting a cooking duration, a cooking end time to be set (with a maximum delay of 12 hours in relation to the current time). To set the cooking end time, proceed as follows: •...
- Page 16 Instructions for the user Modifying the set data The set cooking data can be modified at any time by pressing the function button and then pressing the buttons Reduced display brightness In order to reduce energy consumption in stand-by, the brightness of the display can be set to reduced mode by briefly pressing brightness, press to change the value.
-
Page 17: Using The Oven
Instructions for the user 8. USING THE OVEN Before using the appliance Remove any labels (apart from the technical data plate) from trays, dripping pans and the cooking compartment. Remove any protective film from the outside or inside of the appliance, including from accessories such as trays, dripping pans, the pizza plate or the base cover. - Page 18 Instructions for the user 8.2.2 Oven inside lights The oven lights come on when the door is opened or any function is selected. If the oven light fails, replace it as described in “11.1 Replacing the light bulb”. 8.2.3 Oven runners The oven features 5 runners and 3 shelves for positioning trays and racks at different heights.
- Page 19 Instructions for the user 8.2.5 Using the support rack The support rack is inserted into the tray (as shown in the figure). Using this, foods can be cooked and the fat can be collected separately from the food which is being cooked. Warnings and general advice for usage All cooking operations must be carried out with the door closed.
-
Page 20: Cooking With The Oven
Instructions for the user 9. COOKING WITH THE OVEN ECO: Using the grill and the lower heating element in combination is particularly suitable for cooking on a single runner only, as it provides low energy consumption. STATIC: As the heat comes from above and below at the same time, this system is particularly suitable for certain types of food. - Page 21 Instructions for the user CIRCULAR: The combination of the fan and the circular element (incorporated in the rear of the oven) enables different foods to be cooked on several levels, as long as they need the same temperature and cooking time. Hot air circulation ensures instant and uniform distribution of heat.
- Page 22 Instructions for the user 9.1.4 Advice for defrosting and proving The defrosting function enables any type of food to be defrosted. To start defrosting, turn the oven function knob to into operation to ensure uniform distribution of the ambient temperature inside the oven.
- Page 23 Instructions for the user Cooking tables The times indicated in the following tables do not include the preheating times and are provided as a guide only. 9.3.1 Large oven DISHES FUNCTION FIRST COURSES LASAGNE OVEN-BAKED PASTA MEAT ROAST VEAL LOIN OF PORK SHOULDER OF PORK ROAST RABBIT TURKEY BREAST...
- Page 24 Instructions for the user DISHES FISH SALMON TROUT PIZZA BREAD FOCACCIA DESSERTS DOUGHNUT FRUIT TART SHORT PASTRY PARADISE CAKE LIGHT SPONGE CAKE RICE PUDDING POS. OF FUNCTION RUNNER FROM BOTTOM TEMP. TIME (°C) (minutes) 150 / 160 35 / 40 6 / 10 190 / 200 25 / 30...
- Page 25 Instructions for the user 9.3.2 Small oven DISHES FUNCTION FIRST COURSES LASAGNE OVEN-BAKED PASTA MEAT LOIN OF PORK ROAST RABBIT TURKEY BREAST ROAST CHICKEN GRILLED MEATS * PORK CHOPS PORK CHOPS SAUSAGE BACON FISH SALMON TROUT PIZZA FOCACCIA DESSERTS FRUIT TART SHORT PASTRY *For this type of food the indicated cooking time is understood to be "per side"...
-
Page 26: Cleaning And Maintenance
Instructions for the user 10.CLEANING AND MAINTENANCE NEVER USE A STEAM JET FOR CLEANING THE APPLIANCE. 10.1 Cleaning stainless steel To keep stainless steel in good condition it should be cleaned regularly after use. Let it cool first. 10.2 Ordinary daily cleaning To clean and preserve the stainless steel surfaces, always use only specific products that do not contain abrasives or chlorine-based acids. - Page 27 Instructions for the user The oven should be operated at the maximum heat setting for 15/20 minutes after use of specific products, to burn off the residues left inside the oven. When the operation is complete, damp parts should be dried thoroughly. 10.6 Removing guide frames Removing the guide frames makes it easier to clean the side walls of the oven.
-
Page 28: Extraordinary Maintenance
Instructions for the user 11.EXTRAORDINARY MAINTENANCE The oven may require extraordinary maintenance or replacement of parts subject to wear such as gaskets, bulbs, etc. The following instructions describe how to carry out these minor maintenance operations. Before any intervention that requires access to live parts, disconnect the appliance from the power supply. - Page 29 Instructions for the user 11.2 Removing the door • Open the door completely; • Insert pins in the hinge holes • Lift the door about 30°; • Remove the door by gripping it on the sides; Repositioning of the door: •...
- Page 30 Instructions for the user 11.3 Removing the door seal To permit thorough cleaning of the oven, the door seal may be removed. There are fasteners on all four sides to attach it to the edge of the oven. Pull the edges of the seal outwards to detach the fasteners.
- Page 31 Instructions for the user Removing the internal glass panel: to disconnect the glass securing pins: • Lift the rear part following the motions indicated (1). • Lift the front part following the motions indicated (2) • Remove the middle pane by lifting it upwards;...
-
Page 32: Installing The Appliance
Instructions for the user 12.INSTALLING THE APPLIANCE 12.1 Electrical connection The identification plate bearing the technical data, serial number and brand name is visibly positioned on the appliance. Do not remove this plate for any reason. The appliance must be connected to earth in compliance with electrical system safety regulations. - Page 33 Instructions for the installer 12.2 Cable replacement • Unscrew the securing screws from the cover terminal; • Remove the tabs cover terminals; • Loosen the cable securing screws from the lower part of the rear of the oven • Loosen the terminal cables; •...
- Page 34 Instructions for the installer 12.3 Positioning the oven Never use the oven door to lever the oven into place when fitting. Avoid exerting too much pressure on the oven door when open. It is recommended to install the oven with the help of a second person. The base on which the oven is resting must be complete as shown in the illustrations below.
- Page 35 Instructions for the installer FIG. 1 490-500 min. 550 FIG. 3 554 - 564 FIG. 2 35-40 min. 550 200 cm² FIG. 4...
-
Page 36: Instructions For The Installer
Instructions for the installer FIG. 5 FIG. 6 9 1 4 7 7 4 6 1 6 / A...