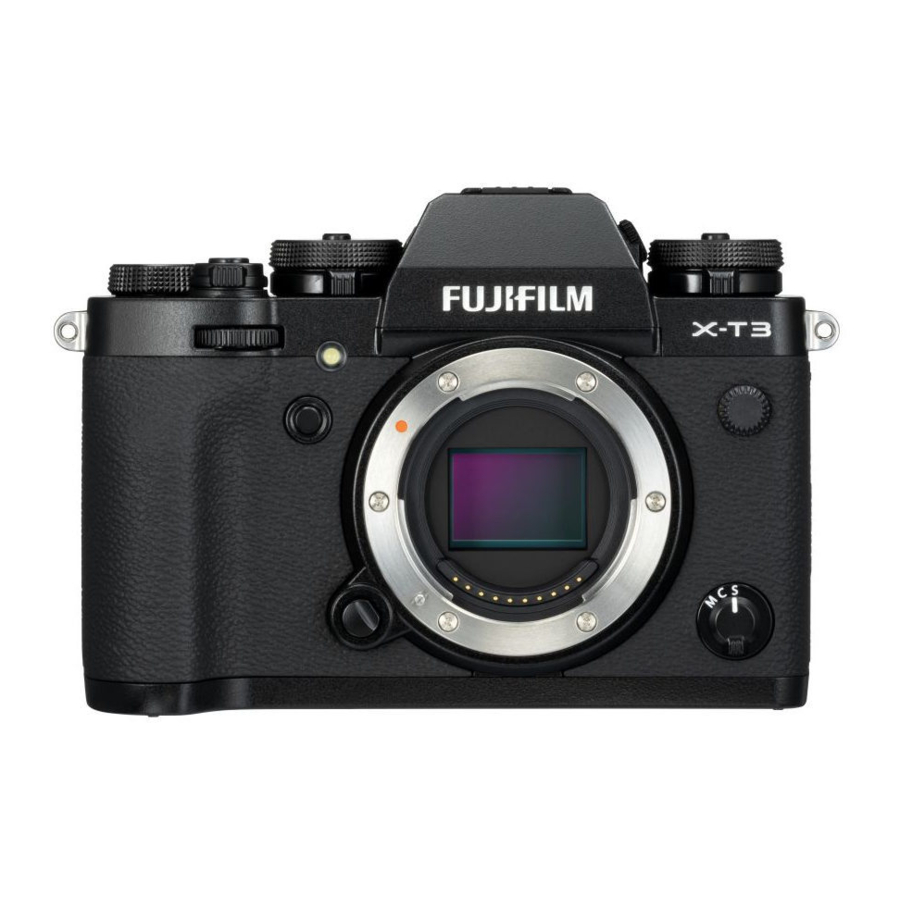
FujiFilm X-T3 - Digital Camera Manual
- Owner's manual (324 pages) ,
- New features manual (22 pages) ,
- New features manual (8 pages)
Advertisement

Contents
X-T3 firmware version 5.00 adds or updates the features listed below. For information on earlier versions, visit the following website.
http://fujifilm-dsc.com/en/manual/
| No. | Description | X-T3 | Ver. |
| 1 | The chosen value is now displayed when a color temperature is selected for white balance. | 10,12 | 2.00 |
| 2 | The camera now displays a "charging" icon when powered via USB or by the AC-9VS AC adapter supplied with the VG-XT3 vertical battery grip. | 10,12 | 2.00 |
| 3 | Touch zoom is now available with compatible lenses. A TOUCH ZOOM option has consequently been added to  BUTTON/DIAL SETTING > TOUCH SCREEN SETTING in the setup menu. BUTTON/DIAL SETTING > TOUCH SCREEN SETTING in the setup menu. | 24, 211 | 4.40 |
| 4 | In focus mode C (AF-C), users can now refocus during movie recording by pressing the shutter button halfway or by pressing the button to which AF-ON is assigned. | 54 | 4.00 |
| 5 | Focus-point selection is now available while AE lock is in effect. | 82 | 4.00 |
| 6 | Changes have been made to the  AF/MF SETTING > FACE/EYE DETECTION SETTING item in the shooting menu. AF/MF SETTING > FACE/EYE DETECTION SETTING item in the shooting menu. | 121 | 3.00 |
| 7 | Improved the performance of  AF/MF SETTING > FACE/EYE DETECTION SETTING in the shooting menu. AF/MF SETTING > FACE/EYE DETECTION SETTING in the shooting menu. | 121 | 4.00 |
| 8 | The default for  AF/MF SETTING > RELEASE/ FOCUS PRIORITY > AF-S PRIORITY SELECTION in the shooting menu has changed from RELEASE to FOCUS. AF/MF SETTING > RELEASE/ FOCUS PRIORITY > AF-S PRIORITY SELECTION in the shooting menu has changed from RELEASE to FOCUS. | 125 | 4.00 |
| 9 | An AF RANGE LIMITER option has been added to the  AF/MF SETTING item in the shooting menu. AF/MF SETTING item in the shooting menu. | 125 | 4.00 |
| 10 | Changes have been made to the  SHOOTING SETTING > FLICKER REDUCTION item in the shooting menu. SHOOTING SETTING > FLICKER REDUCTION item in the shooting menu. | 136 | 3.00 |
| 11 | The MOVIE SETTING > F-Log RECORDING item in the shooting menu has been renamed F-Log/HLG RECORDING. MOVIE SETTING > F-Log RECORDING item in the shooting menu has been renamed F-Log/HLG RECORDING. | 149 | 2.00 |
| 12 | The procedure for rating pictures has changed. As a result, the content of the playback information displays has changed and a RATING item has been added to the playback menu. | 160, 161, 175 | 4.00 |
| 13 | Movies over 4 GB in size are now recorded to a single file. | 176, 261, 295 | 2.10 |
| 14 | An  AREA SETTING option has been added under AREA SETTING option has been added under  USER SETTING in the setup menu, resulting in a change to the basic setup procedure and adjustments to TIME DIFFERENCE. In addition, DATE/TIME now off ers a 24-hour clock. USER SETTING in the setup menu, resulting in a change to the basic setup procedure and adjustments to TIME DIFFERENCE. In addition, DATE/TIME now off ers a 24-hour clock. | 187 | 5.00 |
| 15 | The items listed in the setup menu under  USER SETTING > RESET have changed. USER SETTING > RESET have changed. | 189 | 5.00 |
| 16 | The  CONNECTION SETTING > Bluetooth SETTINGS item in the setup menu has been renamed Bluetooth/SMARTPHONE SETTING and now off ers an IMAGE TRANSFER WHILE POWER OFF option. In addition, AUTO IMAGE TRANSFER and SMARTPHONE SYNC. SETTING have respectively been renamed AUTO IMAGE TRANSFER ORDER and SMARTPHONE LOCATION SYNC. CONNECTION SETTING > Bluetooth SETTINGS item in the setup menu has been renamed Bluetooth/SMARTPHONE SETTING and now off ers an IMAGE TRANSFER WHILE POWER OFF option. In addition, AUTO IMAGE TRANSFER and SMARTPHONE SYNC. SETTING have respectively been renamed AUTO IMAGE TRANSFER ORDER and SMARTPHONE LOCATION SYNC. | 216 | 5.00 |
| 17 | Upload timing has changed. Pictures can now be uploaded not only during playback or when the camera is off but also while shooting is in progress. | 216 | 5.00 |
| 18 |  CONNECTION SETTING > GENERAL SETTINGS has been reorganized as follows: CONNECTION SETTING > GENERAL SETTINGS has been reorganized as follows:
| 201, 210, 215, 216 | 5.00 |
| 19 | The procedure for connecting wirelessly to smartphones has changed. | 254 | 5.00 |
| 20 | The roles that can be assigned to the function buttons have changed. | 204, 228 | 3.00 |
| 21 | Digital zoom lenses equipped with lens function buttons are now supported. A POWER ZOOM LENS FUNCTION (Fn) SETTING option has consequently been added to  BUTTON/DIAL SETTING in the set- up menu. In addition, the roles that can be assigned to the function buttons have changed. BUTTON/DIAL SETTING in the set- up menu. In addition, the roles that can be assigned to the function buttons have changed. | 204, 205, 228, 229, 249 | 4.40 |
| 22 | A LENS ZOOM/FOCUS SETTING item has been added to  BUTTON/DIAL SETTING in the setup menu to control the behavior of digital zoom lenses equipped with lens function buttons. BUTTON/DIAL SETTING in the setup menu to control the behavior of digital zoom lenses equipped with lens function buttons. | 209 | 4.40 |
| 23 | FOCUS RING has consequently been renamed FOCUS RING ROTATE and has, together with FOCUS RING OPERATION, been moved to LENS ZOOM/FOCUS SETTING. | 209 | 4.40 |
| 24 | Changes have been made to the  BUTTON/DIAL SETTING > TOUCH SCREEN SETTING item in the setup menu. BUTTON/DIAL SETTING > TOUCH SCREEN SETTING item in the setup menu. | 211 | 3.00 |
| 25 | A Bluetooth DEVICE LIST item has been added to  CONNECTION SETTING > Bluetooth SETTINGS in the setup menu. CONNECTION SETTING > Bluetooth SETTINGS in the setup menu. | 216 | 4.50 |
| 26 | The  CONNECTION SETTING > PC CONNECTION MODE item in the setup menu has been renamed CONNECTION MODE. CONNECTION SETTING > PC CONNECTION MODE item in the setup menu has been renamed CONNECTION MODE. | 218 | 3.10 |
| 27 | The TG-BT1 tripod grip has been added to the optional accessory list. | 266 | 4.50 |
Changes and Additions
Changes and additions are as follows.
The Electronic Viewfinder
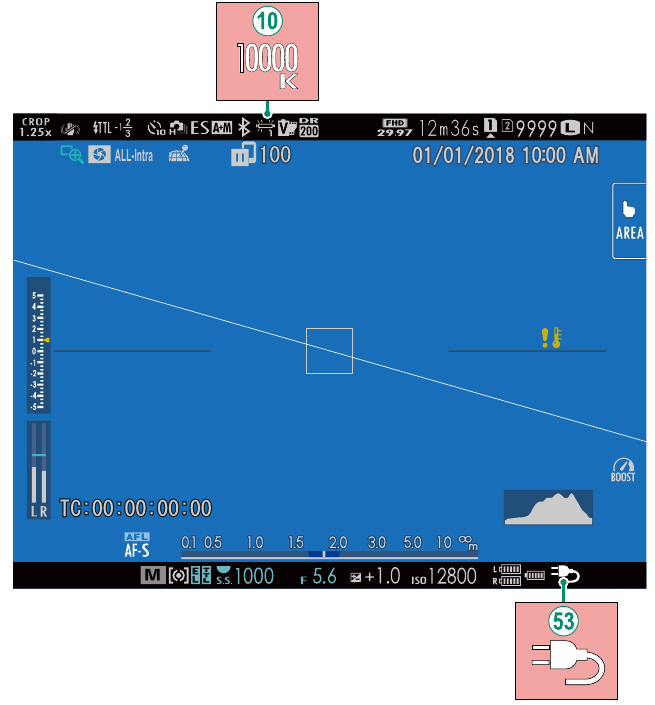

When a color temperature is selected for white balance, the chosen value now appears in the display.

The camera now displays a "charging" icon when powered via USB or by the AC‐9VS AC adapter supplied with the VG‐XT3 vertical battery grip.
The LCD Monitor


When a color temperature is selected for white balance, the chosen value now appears in the display.
 The camera now displays a "charging" icon when powered via USB or by the AC‐9VS AC adapter supplied with the VG‐XT3 vertical battery grip.
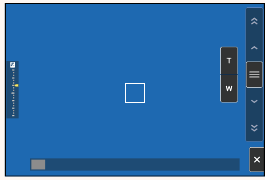
| Button | Description |
 Touch zoom | Enable touch zoom. |
 Zoom in | Zoom in or out. Touch and hold to zoom in or out at a constant speed. |
 Zoom out | |
 Rocker switch | Swipe to choose a zoom position. Touch and hold to zoom in or out at a speed corresponding where you put your finger. |
 Disable | Disable touch zoom. |
Shooting Touch Controls
Touch Zoom
If the lens supports touch zoom, you can zoom in and out by touching the display. Tap the touch zoom button in the display to enable touch zoom.
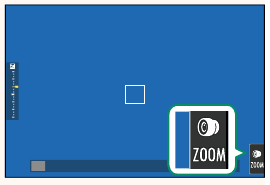
Touch zoom is controlled using the buttons in the display.
Adjusting Movie Settings
![]()
The indicator lamp lights while recording is in progress (the![]() MOVIE SETTING > TALLY LIGHT option can be used to choose the lamp— indicator or AF-assist—that lights during movie recording and whether the lamp blinks or remains steady). During recording, you can change exposure compensation by up to ±2 EV and adjust zoom using the zoom ring on the lens (if available).
MOVIE SETTING > TALLY LIGHT option can be used to choose the lamp— indicator or AF-assist—that lights during movie recording and whether the lamp blinks or remains steady). During recording, you can change exposure compensation by up to ±2 EV and adjust zoom using the zoom ring on the lens (if available).- If the lens is equipped with an aperture mode switch, select the aperture mode before beginning recording. If an option other than A is selected, shutter speed and aperture can be adjusted while recording is in progress.
- While recording is in progress, you can:
- Adjust sensitivity
- Use the VIEW MODE button and the eye sensor to switch between the EVF and LCD monitor displays
- Refocus using any of the following methods:
- Press the shutter button halfway
- Press a function button to which AF-ON is assigned
- Use touch screen controls
- Display a histogram or artificial horizon by pressing the button to which HISTOGRAM or ELECTRONIC LEVEL has been assigned
- Recording may be unavailable at some settings, while in other cases settings may not apply during recording.
- The slot to which movies are recorded can be selected using the
![]() SAVE DATA SET-UP > SELECT SLOT(
SAVE DATA SET-UP > SELECT SLOT(![]() SEQUENTIAL) option in the
SEQUENTIAL) option in the ![]() (setup) menu.
(setup) menu. - To choose the focus area for movie recording, select
![]() MOVIE SETTING >
MOVIE SETTING > ![]() FOCUS AREA and use the focus stick (focus lever) and rear command dial.
FOCUS AREA and use the focus stick (focus lever) and rear command dial. - In focus mode C (AF-C), the camera can be refocused during movie recording by pressing the shutter button halfway or by pressing the button to which AF-ON is assigned.
Focus/Exposure Lock
Compose photographs with off -center subjects.
- Position the subject in the focus frame and press the shutter button halfway to lock focus and exposure. Focus and exposure will remain locked while the shutter button is pressed halfway (AF/AE lock).
![]()
- Keep the shutter button pressed halfway.
![]()
- Press the button all the way down.
![]()
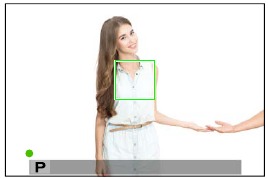
Focus lock using the shutter button is only available when ON is selected for![]() BUTTON/DIAL SETTING > SHUTTER AF, SHUTTER AE.
BUTTON/DIAL SETTING > SHUTTER AF, SHUTTER AE. - The focus lever (focus stick) can be used to reposition the focus point during exposure lock.
FACE/EYE DETECTION SETTING
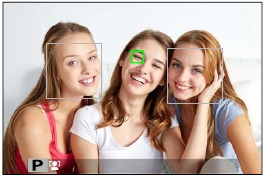
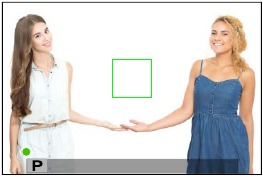
Intelligent Face Detection sets focus and exposure for human faces anywhere in the frame, preventing the camera from focusing on the background in group portraits. Choose for shots that emphasize portrait subjects. You can also choose whether the camera detects and focuses on either the left or right eye when Intelligent Face Detection is on.
| Option Option | Description Description |
| FACE DETECTION ON | Adjust settings for Intelligent Face Detection. You can also adjust eye detection settings.
|
| OFF | Intelligent Face Detection and eye priority off. |
![]()
If the subject moves as the shutter button is pressed, the face may not be in the area indicated by the green border when the picture is taken.- In some modes, the camera may set exposure for the frame as a whole rather than the portrait subject.
- The face selected by the camera is indicated by a green border. Any other faces detected by the camera are indicated by gray borders. To have the camera focus on a different subject, tap inside the gray border. The
![]() icon will change from white to green.
icon will change from white to green. - You can also switch subjects by pressing the function button to which FACE SELECT
![]() is assigned and then using the focus stick (focus lever) or (during viewfinder photography) touch controls.
is assigned and then using the focus stick (focus lever) or (during viewfinder photography) touch controls. - To switch from face detection to manual focus-area selection, press the center of the focus stick (focus lever). Press again to re-enable face detection.
- If the selected subject leaves the frame, the camera will wait a set time for its return and consequently the green frame may sometimes appear in locations where no face is seen.
- You cannot switch subjects during burst photography.
- Depending on shooting conditions, face selection may be suspended at the close of burst shooting.
- Faces can be detected with the camera in vertical or horizontal orientation.
- If the camera is unable to detect the subject's eyes because they are hidden by hair, glasses, or other objects, the camera will instead focus on faces.
- Face/eye detection options can also be accessed via shortcuts.
RELEASE/FOCUS PRIORITY

Choose how the camera focuses in focus mode AF-S or AF-C.
| Option | Description |
| RELEASE | Shutter response is prioritized over focus. Pictures can be taken when the camera is not in focus. |
| FOCUS | Focus is prioritized over shutter response. Pictures can be only taken when the camera is in focus. |
From firmware version 4.00, the default for AF-S PRIORITY SELECTION has changed to FOCUS.
AF RANGE LIMITER
Limit the range of available focus distances for increased focus speed.
| Option | Description Description |
| OFF | Focus limiter disabled. |
| CUSTOM | Limit focus to a range of distances defined by a minimum and maximum.
|
| PRESET1 | Limit focus to a preset range. |
| PRESET2 |
Choosing a focus range that includes distances shorter than the minimum focus distance of the lens disables the focus limiter.- The values listed and displayed for the focus limiter may diff er from the actual focus distance.

The following additional operations can be performed when CUSTOM is selected:
- You can tap objects in the touch screen display to choose the focus range.
- Instead of tapping an object in the display, you set the maximum focus distance to infinity by rotating the focus ring.
FLICKER REDUCTION
Reduce flicker in pictures and the display when shooting under fluorescent lighting and other similar light sources.
| Option | Description |
| ALL FRAMES | Flicker reduction is applied to all frames continuous shooting frame rate reduces. |
| FIRST FRAME | Flicker measurement is taken prior to the fi rst frame only and the same reduction amount is applied to all subsequent frames that fl icker may occur. |
| OFF | Flicker reduction disabled. |
Flicker reduction increases the time needed to record pictures.- OFF is selected for FLICKER REDUCTION when the electronic shutter is used.
- Flicker reduction is not available during movie recording.
F-Log/HLG RECORDING
Choose the destination for F‐Log and HLG (Hybrid Log-Gamma) movies shot while the camera is connected to an HDMI device.
| Option | Description |
 | The footage is processed using fi lm simulation and both saved to the memory card and output to the HDMI device. |
 | The footage is recorded to the memory card and output to the HDMI device in F-Log format. |
 | The footage is output to the HDMI device in F-Log format but saved to the memory card with fi lm simulation applied. |
 | The footage is recorded to the memory card in F-Log format but output to the HDMI device with fi lm simulation applied. |
 | The footage is recorded to the memory card and output to the HDMI device in HLG format. |
![]()
F-Log off ers a gentle gamma curve with a wide gamut suitable for further processing post-production. Sensitivity is restricted to values between ISO 640 and ISO 12800.- The HLG (Hybrid Log-Gamma) recording format conforms to the international ITU-R BT2100 standard. When viewed on HLG-compatible displays, high-quality HLG footage faithfully captures high-contrast scenes and vivid colors. Sensitivity is restricted to values between ISO 1000 and ISO 12800. HLG recording is available when H.265 (HEVC) is selected for
![]() MOVIE SETTING > H.265 (HEVC)/H.264 in the shooting menu.
MOVIE SETTING > H.265 (HEVC)/H.264 in the shooting menu. - Film simulation (
![]() ) footage is recorded using the option selected for
) footage is recorded using the option selected for ![]() MOVIE SETTING >
MOVIE SETTING > ![]() FILM SIMULATION in the shooting menu.
FILM SIMULATION in the shooting menu. - Footage shot with
![]() or
or ![]() cannot be recorded to the memory card and output to the HDMI at diff erent frame sizes (4K, Full HD). In addition, the following
cannot be recorded to the memory card and output to the HDMI at diff erent frame sizes (4K, Full HD). In addition, the following ![]() MOVIE SETTING options are unavailable:
MOVIE SETTING options are unavailable: - MOVIE MODE frame rate options of 59.94P and 50P
- FULL HD HIGH SPEED REC
![]() INTERFRAME NR
INTERFRAME NR - HDMI OUTPUT INFO DISPLAY
The Playback Display
This section lists the indicators that may be displayed during playback.
For illustrative purposes, displays are shown with all indicators lit.
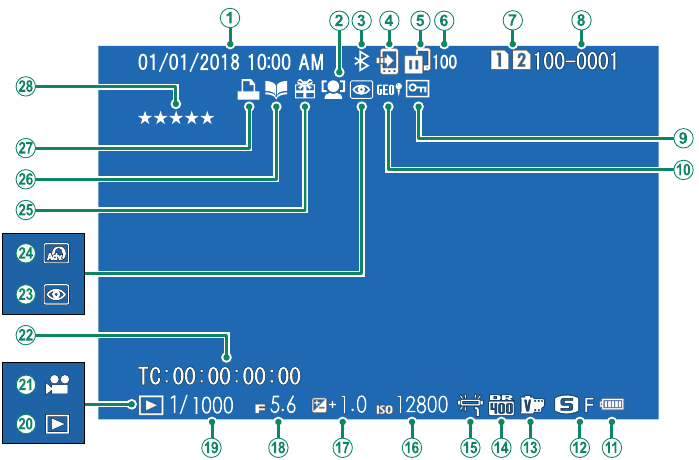
- Date and time
- Face detection indicator
- Bluetooth ON/OFF
- Image transfer order
- Image transfer status
- Number of frames selected for upload
- Card slot
- Frame number
- Protected image
- Location data
- Battery level
- Image size/quality
- Film simulation
- Dynamic range
- White balance
- Sensitivity
- Exposure compensation
- Aperture
- Shutter speed
- Playback mode indicator
- Movie icon
- Time code
- Red-eye removal indicator
- Advanced filter
- Gift image
- Photobook assist indicator
- DPOF print indicator
- Rating
The DISP/BACK Button
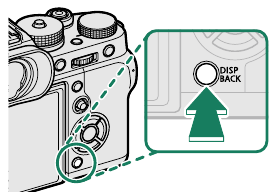
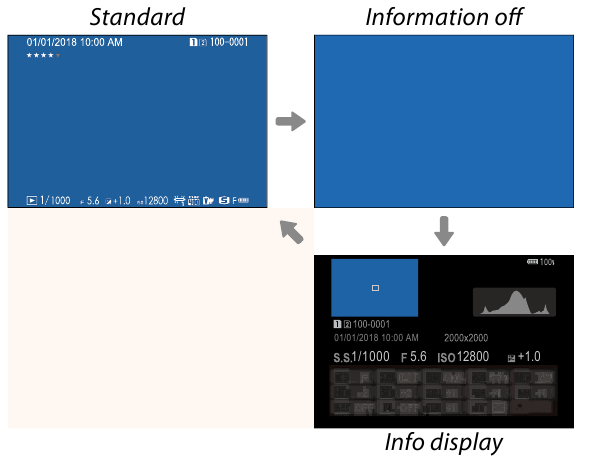
The DISP/BACK button controls the display of indicators during playback.
Favorites: Rating Pictures
Pictures can be rated via the RATING item in the playback menu.
RATING
Rate pictures using stars.
- Select RATING in the playback menu.
- Rotate the front command dial to choose a picture and the rear command dial to choose a rating of from 0 to 5 stars ("
![]() ").
").
![]()
The selector can be used in place of the front command dial to choose a picture.- The rating dialog can also be displayed by pressing the AE-L button in single-frame, nine-frame, or hundred-frame playback.
- Use touch controls to zoom in or out.
COPY
Copying ends when the destination is full.- If you attempt to copy a file over 4 GB in size to a memory card with a capacity of 32 GB or less, copying will end and the file will not be copied.
Mac OS X/macOS
Pictures can be copied to your computer using Image Capture (supplied with your computer) or other software.
Use a card reader to copy files over 4 GB in size.
Memory Card Capacity
If the memory card has a capacity of over 32 GB, movies will be recorded in single files, regardless of size. If the card has a capacity of 32 GB or less, movies over 4 GB in size will be recorded uninterrupted across multiple files.
AREA SETTING
Adjust settings for your current time zone.
AREA SETTING
Choose your time zone from a map.
DAYLIGHT SAVINGS
Turn daylight saving time on or off.
| Option | Description |
| ON | Daylight saving time on. |
| OFF | Daylight saving time off. |
TIME DIFFERENCE
Switch the camera clock instantly from your home time zone to the local time at your destination when traveling. To specify the diff erence between your local and home time zone:
Use  AREA SETTING to choose your home time zone before selecting a local time zone using
  LOCAL.
- Highlight
![]() LOCAL and press MENU/OK.
LOCAL and press MENU/OK. - Use the selector to choose the local time zone. Press MENU/OK when settings are complete.

Select ON to enable daylight saving time.
To set the camera clock to local time, highlight  LOCAL and press MENU/OK. To set the clock to the time in your home time zone, select
  HOME.
HOME.
| Options | |
 LOCAL LOCAL |  HOME HOME |

If  LOCAL is selected,
  will be displayed in yellow for about three seconds when the camera is turned on.
RESET
Reset shooting or setup menu options to default values.
- Highlight the desired option and press MENU/OK.
| Option Option | Description Description |
| SHOOTING MENU RESET | Reset all shooting menu settings other than custom white balance and custom settings banks created using EDIT/SAVE CUSTOM SETTING to default values. |
| SET-UP RESET | Reset all setup menu settings other than DATE/TIME,  AREA SETTING, TIME DIFFERENCE, and COPYRIGHT INFO to default values. AREA SETTING, TIME DIFFERENCE, and COPYRIGHT INFO to default values. |
| INITIALIZE | Reset all settings other than custom white balance to default values. |
- A confirmation dialog will be displayed; highlight OK and press MENU/OK.
LOCATION INFO
Select ON to display location info downloaded from a smartphone.
| Options | |
| ON | OFF |
Fn1 BUTTON SETTING
Choose the role performed by the Fn1 button during playback.
| Option | Description Description |
 SMARTPHONE TRANSFER ORDER SMARTPHONE TRANSFER ORDER | Pressing the button marks the current picture for transfer. If the camera is not currently paired with a smartphone, Bluetooth/ SMARTPHONE SETTING options will be displayed. |
 SELECT & SMARTPHONE TRANSFER ORDER SELECT & SMARTPHONE TRANSFER ORDER | Pressing the button displays a dialog where pictures can be selected for upload to a smartphone with which the camera is paired. If the camera is not currently paired with a smartphone, Bluetooth/SMARTPHONE SETTING options will be displayed instead. |
 WIRELESS COMMUNICATION WIRELESS COMMUNICATION | The button can be used for wireless connections. |
GEOTAGGING
If ON is selected, location data downloaded from a smartphone will be embedded in pictures as they are taken.
| Options | |
| ON | OFF |
FUNCTION (Fn) SETTING
Choose the roles played by the function buttons.
- Select D BUTTON/DIAL SETTING > FUNCTION (Fn) SETTING in the D (SET UP) tab.
- Highlight the desired control and press MENU/OK.
- Highlight any of the following options and press MENU/OK to assign it to the selected control.
- IMAGE SIZE
- IMAGE QUALITY
- RAW
- FILM SIMULATION
- GRAIN EFFECT
- COLOR CHROME EFFECT
- DYNAMIC RANGE
- D RANGE PRIORITY
- WHITE BALANCE
- SELECT CUSTOM SETTING
- FOCUS AREA
- FOCUS CHECK
- AF MODE
- AF-C CUSTOM SETTINGS
- FACE SELECT
![]()
- FACE DETECTION ON/OFF
- AF RANGE LIMITER
- DRIVE SETTING
- SPORTS FINDER MODE
- PRE-SHOT
![]()
- SELF-TIMER
- SHUTTER TYPE
- FLICKER REDUCTION
- ISO AUTO SETTING
- IS MODE
- WIRELESS COMMUNICATION
- FLASH FUNCTION SETTING
- TTL-LOCK
- MODELING FLASH
- FULL HD HIGH SPEED REC
- ZEBRA SETTING
- INTERNAL/EXTERNAL MIC LEVEL ADJUSTMENT
- MOVIE SILENT CONTROL
- PREVIEW DEPTH OF FIELD
- PREVIEW EXP./WB IN MANUAL MODE
- NATURAL LIVE VIEW
- HISTOGRAM
- ELECTRONIC LEVEL
- LARGE INDICATORS MODE
- ZOOM/FOCUS CONTROL RING
- CONSTANT SPEED ZOOM (T)
- CONSTANT SPEED ZOOM (W)
![]() CONSTANT SPEED FOCUS (N)
CONSTANT SPEED FOCUS (N)![]() CONSTANT SPEED FOCUS (F)
CONSTANT SPEED FOCUS (F)- AE LOCK ONLY
- AF LOCK ONLY
- AE/AF LOCK
- AF-ON
- AWB LOCK ONLY
- APERTURE SETTING
- PERFORMANCE
- AUTO IMAGE TRANSFER
- SELECT PAIRING DESTINATION
- Bluetooth ON/OFF
- PLAYBACK
- NONE (control disabled)
- The selector cannot be assigned more than one role at a time.
- Function button assignment options can also be accessed by holding the DISP/BACK button.
FACE SELECT 
FACE SELECT  can be enabled or disabled by pressing the button to which FACE SELECT op is assigned. Enabling
FACE SELECT  is assigned. Enabling FACE SELECT op allows the focus stick (focus lever) or (during viewfinder photography) touch controls to be used to select the face that will be used for focus.
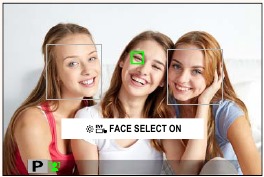
The following features can be accessed using the focus stick or during viewfi nder photography when FACE SELECT  is enabled:
- The face used to set focus can be selected using the focus stick. To switch from face detection to manual focus-area selection, press the center of the focus stick (focus lever). Press again to re-enable face detection.
- The touch screen (monitor) or focus stick can be used to select the face used to set focus during viewfinder photography.
POWER ZOOM LENS FUNCTION (Fn) SETTING
Choose the roles played by the function buttons available on some power zoom lenses.
LENS ZOOM/FOCUS SETTING
Adjust settings for compatible lenses with focus rings or power zoom.
FOCUS RING ROTATE
Choose the direction in which the focus ring is rotated to increase the focus distance.
| Options | |
 CW (clockwise) CW (clockwise) |  CCW (counterclockwise) CCW (counterclockwise) |
FOCUS RING OPERATION
Choose how the camera adjusts focus in response to the movement of the focus ring.
| Option | Description Description |
| NONLINEAR | Focus is adjusted at the same rate as the ring is rotated. |
| LINEAR | Focus is adjusted linearly according to the amount the ring is rotated, but the focusing speed is uneffected by the speed the ring is rotated. |
 CONSTANT SPEED FOCUS (Fn)
Choose the rate at which the focus distance changes when adjusted using function buttons during manual focus with compatible power zoom lenses. The higher the number, the higher the rate.
| Options | |||||||
| 1(SLOW) | 2 | 3 | 4 | 5 | 6 | 7 | 8(FAST) |
CONSTANT SPEED ZOOM (Fn)
Choose the rate at which compatible power zoom lenses can be zoomed in or out using function buttons. The higher the number, the higher the rate.
| Options | |||||||
| 1(SLOW) | 2 | 3 | 4 | 5 | 6 | 7 | 8(FAST) |
CONSTANT SPEED ZOOM/FOCUS (Fn) OPERATION
Choose whether the function buttons on compatible power zoom lenses need only be pressed once to start and stop power focus or power zoom.
| Option | Description |
| START/STOP SWITCH | The operation starts when the button is pressed and stops when it is pressed a second time. |
| ACTIVE WHILE PRESSING | The operation continues while the button is pressed and stops when the button is released. |
ZOOM RING ROTATE
Choose whether to reverse the rotation of the zoom ring on compatible power zoom lenses.
| Options | |
 CW (clockwise) CW (clockwise) |  CCW (counterclockwise) CCW (counterclockwise) |
ZOOM/FOCUS CONTROL RING
Choose role played by the zoom/focus control ring on compatible power zoom lenses.
| Options | |
| ZOOM | FOCUS |
TOUCH SCREEN SETTING
Enable or disable touch-screen controls.
| Option | Description |
 TOUCH SCREEN SETTING TOUCH SCREEN SETTING |
|
 DOUBLE TAP SETTING DOUBLE TAP SETTING |
|
| TOUCH FUNCTION | Enable or disable touch function gestures. |
 TOUCH ZOOM TOUCH ZOOM |
|
| TOUCH SCREEN SETTING |
|
| EVF TOUCH SCREEN AREA SETTINGS | Select the area of the LCD monitor used for touch controls while the viewfinder is active.
|
Bluetooth/SMARTPHONE SETTING
Adjust Bluetooth settings.
| Option | Description |
| PAIRING REGISTRATION | Pair the camera with a smartphone or tablet to which the smartphone app has been installed. |
| SELECT PAIRING DESTINATION | Choose a connection from a list of devices with which the camera has been paired using PAIRING REGISTRATION. Select NO CONNECTION to exit without connecting. |
| DELETE PAIRING REG. | Delete pairing information for selected devices. Choose the device in the device list. The selected device will also be removed from the devices listed in SELECT PAIRING DESTINATION. |
| Bluetooth DEVICE LIST | List the devices with which the camera is paired (other than the smartphone) or end pairing with selected devices. |
| Bluetooth ON/OFF |
|
| AUTO IMAGE TRANSFER ORDER | Choose whether pictures are automatically marked for upload as they are taken. |
| SMARTPHONE LOCATION SYNC. | Choose whether to synchronize the camera to the location provided by a paired smartphone. |
| NAME | Choose a name (NAME) to identify the camera on the wireless network (the camera is assigned a unique name by default). |
| IMAGE TRANSFER WHILE POWER OFF | Choose whether the camera uploads pictures to paired smartphones while off. |
| RESIZE IMAGE FOR SMARTPHONE H | Choose whether to resize images for upload to smartphones. Resizing applies only to the copy uploaded to the smartphone; the original is not affected.
|
![]() Be sure your smartphone is running the latest version of the applicable smartphone app. Diff erent operating systems use diff erent apps; for more information, visit: https://app.fujifilm-dsc.com/
Be sure your smartphone is running the latest version of the applicable smartphone app. Diff erent operating systems use diff erent apps; for more information, visit: https://app.fujifilm-dsc.com/- Pictures will be uploaded during shooting and playback and while the camera is off if ON is selected for both Bluetooth ON/OFF and AUTO IMAGE TRANSFER ORDER or if images are currently selected for upload using the IMAGE TRANSFER ORDER option in the playback menu.
- The camera clock will automatically be set to the time reported by paired smartphones whenever the app is launched.
CONNECTION MODE
Adjust settings for connection to external devices.
| Option Option | Description Description |
| USB CARD READER | Connecting the camera to a computer via USB automatically enables data transfer mode, allowing data to be copied to the computer. The camera functions normally when not connected. |
| USB TETHER SHOOTING AUTO | The camera can be controlled from computers, gimbals, drones, or other devices connected via USB. The camera automatically enters "tethered shooting" (i.e., remote-control) mode when the external device is turned on and returns to normal operation when the external device turned off or disconnected.
|
| USB TETHER SHOOTING FIXED | As for USB TETHER SHOOTING AUTO, except that the camera remains in "tethered shooting" (remote-control) mode when the external device is off or not connected, allowing the device to resume control when the connection is re-established after an accidental disconnection or other disruption. At default settings, pictures are not recorded to the memory card. |
| WIRELESS TETHER SHOOTING FIXED | Choose this option for wireless remote photography. Select a network using  CONNECTION SETTING > NETWORK SETTING. CONNECTION SETTING > NETWORK SETTING. |
| USB RAW CONV./ BACKUP RESTORE | Connecting the camera to a computer via USB automatically enables USB RAW conversion/backup restore mode. The camera functions normally when not connected.
|
 POWER MANAGEMENT > AUTO POWER OFF settings also apply during tethered shooting. To prevent the camera turning off automatically, select OFF for AUTO POWER OFF.

Visit the websites below to learn more about or download the following computer software:
- Capture One Express Fujifi lm: https://www.captureone.com/products-plans/capture-one-express/fujifilm
- Capture One Pro Fujifilm: https://www.captureone.com/explore-features/fujifilm
- Adobe® Photoshop® Lightroom® + Tether Plugin: https://fujifilm-x.com/global/products/software/adobe-photoshop-lightroom-tether-plugin/
- FUJIFILM X Acquire: https://fujifilm-x.com/products/software/x-acquire/
- FUJIFILM X RAW STUDIO: https://fujifilm-x.com/products/software/x-raw-studio/
- RAW FILE CONVERTER EX powered by SILKYPIX: https://fujifilm-x.com/support/download/software/raw-file-converter-ex-powered-by-silkypix/
Lens Function Buttons
Choose the roles played by the function buttons on the lens (where applicable).
Lens Function Button Defaults
The default assignments are:

A XF18-120mmF4 LM PZ WR lens is used here for illustrative purposes.
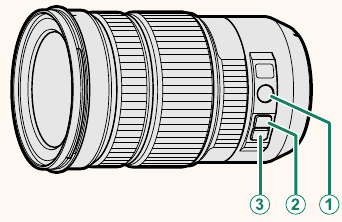
| Lens function button | Default |
 Z/F Z/F Z/F Z/F | ZOOM/FOCUS CONTROL RING |
 L-Fn1 (rocker zoom button pressed up) L-Fn1 (rocker zoom button pressed up) | CONSTANT SPEED ZOOM (T) |
 L-Fn2 (rocker zoom button pressed down) L-Fn2 (rocker zoom button pressed down) | CONSTANT SPEED ZOOM (W) |
Assigning Roles to the Lens Function Buttons
The roles played by the lens function buttons can be selected using the  BUTTON/DIAL SETTING > POWER ZOOM LENS FUNCTION (Fn) SETTING option in the setup menu.
- IMAGE SIZE
- IMAGE QUALITY
- RAW
- FILM SIMULATION
- GRAIN EFFECT
- COLOR CHROME EFFECT
- DYNAMIC RANGE
- D RANGE PRIORITY
- WHITE BALANCE
- SELECT CUSTOM SETTING
- FOCUS AREA
- FOCUS CHECK
- AF MODE
- AF-C CUSTOM SETTINGS
- FACE SELECT
![]()
- FACE DETECTION ON/OFF
- AF RANGE LIMITER
- DRIVE SETTING
- SPORTS FINDER MODE
- PRE-SHOT
![]()
- SELF-TIMER
- SHUTTER TYPE
- FLICKER REDUCTION
- ISO AUTO SETTING
- IS MODE
- WIRELESS COMMUNICATION
- FLASH FUNCTION SETTING
- TTL-LOCK
- MODELING FLASH
- FULL HD HIGH SPEED REC
- ZEBRA SETTING
- INTERNAL/EXTERNAL MIC LEVEL ADJUST- MENT
- MOVIE SILENT CONTROL
- PREVIEW DEPTH OF FIELD
- PREVIEW EXP./WB IN MANUAL MODE
- NATURAL LIVE VIEW
- HISTOGRAM
- ELECTRONIC LEVEL
- LARGE INDICATORS MODE
- ZOOM/FOCUS CONTROL RING
- CONSTANT SPEED ZOOM (T)
- CONSTANT SPEED ZOOM (W)
![]() CONSTANT SPEED FOCUS (N)
CONSTANT SPEED FOCUS (N)![]() CONSTANT SPEED FOCUS (F)
CONSTANT SPEED FOCUS (F)- AE LOCK ONLY
- AF LOCK ONLY
- AE/AF LOCK
- AF-ON
- AWB LOCK ONLY
- APERTURE SETTING
- PERFORMANCE
- AUTO IMAGE TRANSFER
- SELECT PAIRING DESTINATION
- Bluetooth ON/OFF
- PLAYBACK
- NONE
![]() To disable the function button, choose NONE.
To disable the function button, choose NONE.- Selected function lock is not available when CONSTANT SPEED ZOOM (T) or CONSTANT SPEED ZOOM (W) is assigned to a lens function button.
Power Zoom Lenses
Zoom can be adjusted on power zoom lenses using the zoom/ focus control ring, zoom button, or zoom ring.
Adjusting zoom while the lens is wet makes it easier for water to fi nd its way inside the lens. Wipe any water from the lens before adjusting zoom.

A XF18-120mmF4 LM PZ WR lens is used here for illustrative purposes.
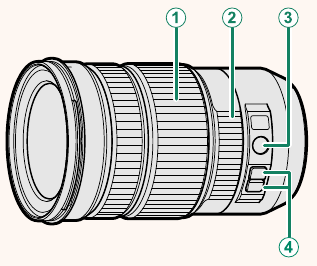
| Control | Description |
 Zoom ring Zoom ring | Rotate the zoom ring to zoom in or out manually. |
 Zoom/focus control ring Zoom/focus control ring | Rotate the zoom/focus control ring to zoom in or out using powered zoom. The zoom speed is proportional to the speed with which the ring is rotated. |
 Z/F (zoom/focus) button Z/F (zoom/focus) button | Switch the role of zoom/focus control ring from focus to zoom or vice versa. |
 Zoom buttons Zoom buttons | Press a zoom button to zoom in or out at a steady speed using powered zoom. Zoom ends when the button is pressed a second time. |
- The Z/F and zoom buttons can be assigned other roles using
![]() BUTTON/DIAL SETTING > POWER ZOOM LENS FUNCTION (Fn) SETTING.
BUTTON/DIAL SETTING > POWER ZOOM LENS FUNCTION (Fn) SETTING. - The speed at which zoom can be adjusted via the zoom buttons can be chosen using
![]() BUTTON/DIAL SETTING > LENS ZOOM/FOCUS SETTING.
BUTTON/DIAL SETTING > LENS ZOOM/FOCUS SETTING.
Connecting to Smartphones
Access wireless networks and connect to computers, smartphones, or tablets. For more information, visit: http://fujifilm-dsc.com/wifi/
Smartphones and Tablets
Installing Smartphone Apps
Before establishing a connection between the smartphone and camera, you will need to install at least one dedicated smartphone app. Visit the following website and install the desired apps on your phone.

https://app.fujifilm-dsc.com/

The apps available vary with the smartphone operating system.
Connecting to a Smartphone
Pair the camera with the smartphone and connect via Bluetooth®.
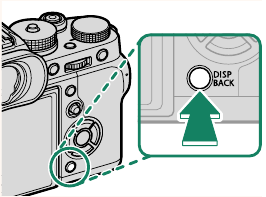
- Press DISP/BACK while shooting information is displayed.
![]()
![]()
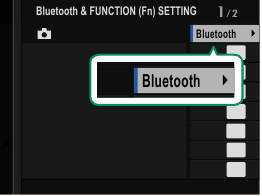
You can also proceed directly to Step 3 by holding the DISP/BACK button during playback. - Highlight Bluetooth and press MENU/OK.
![]()
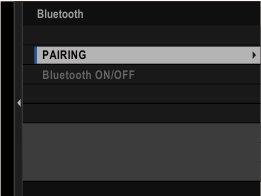
- Highlight PAIRING and press MENU/OK.
![]()
- Launch the app on the smartphone and pair the smartphone with the camera. More information is available at the following website: https://app.fujifilm-dsc.com/
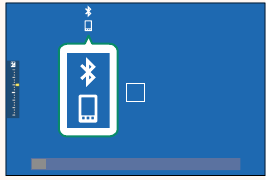
When pairing is complete, the camera and smartphone will automatically connect via Bluetooth. A smartphone icon and a white Bluetooth icon will appear in the camera display when a connection is established.
![]()
![]()
Once the devices have been paired, the smartphone will automatically connect to the camera when the app is launched.- Disabling Bluetooth when the camera is not connected to a smartphone reduces the drain on the battery.
Using the Smartphone App
Read this section for information on the options available for downloading pictures to your smartphone using the smartphone app.

Before proceeding, select ON for Bluetooth/SMARTPHONE SETTING > Bluetooth ON/OFF.
Selecting and Downloading Pictures Using the Smartphone App
You can download selected pictures to a smartphone using the smartphone app.

More information is available from the following website: https://app.fujifilm-dsc.com/
Uploading Pictures as They Are Taken
Pictures taken with ON selected for  CONNECTION SETTING > Bluetooth/SMARTPHONE SETTING > AUTO IMAGE TRANSFER ORDER will automatically be marked for upload to the paired device.
- If ON is selected for both Bluetooth/SMARTPHONE SETTING > Bluetooth ON/OFF and IMAGE TRANSFER WHILE POWER OFF in the
![]() CONNECTION SETTING menu, upload to the paired device will continue even while the camera is off.
CONNECTION SETTING menu, upload to the paired device will continue even while the camera is off. - Selecting ON for
![]() CONNECTION SETTING > Bluetooth/ SMARTPHONE SETTING > RESIZE IMAGE FOR SMARTPHONE
CONNECTION SETTING > Bluetooth/ SMARTPHONE SETTING > RESIZE IMAGE FOR SMARTPHONE ![]() enables compression, reducing file size for upload.
enables compression, reducing file size for upload.
Selecting Pictures for Upload in the Playback Menu
Use IMAGE TRANSFER ORDER > SELECT FRAMES to select pictures for upload to a paired smartphone or tablet via Bluetooth®.
Copying Pictures to a Computer: PC AutoSave
Install the latest version of FUJIFILM PC AutoSave to your computer to upload pictures from the camera over wireless networks (Wi-Fi).
FUJIFILM PC AutoSave
For downloads and other information, visit: http://app.fujifilm-dsc.com/en/pc_autosave/
Computers: Wireless Connections
You can upload pictures from the camera using the PC AUTO SAVE option in the playback menu.

Accessories from Fujifilm
The following optional accessories are available from Fujifilm. For the latest information on the accessories available in your region, check with your local Fujifilm representative or visit http://www.fujifilm.com/products/digital_cameras/index.html.
Rechargeable Li-ion batteries
Rechargeable Li-ion batteries NP-W126/NP-W126S: Additional high-capacity NP-W126/NP-W126S rechargeable batteries can be purchased as required.
Battery chargers
Battery chargers BC-W126/BC-W126S: Replacement battery chargers can be purchased as required. At +20°C/+68°F, the BC-W126/BC-W126S charges an NP-W126/NP-W126S in about 150 minutes.
DC couplers
DC couplers CP-W126: For extended shooting or playback or when using the camera with a computer, use the CP-W126 to connect the camera to the AC-9VS power adapter supplied with optional vertical battery grips.
Remote releases
Remote releases RR-100: Use to reduce camera shake or keep the shutter open during a time exposure ( ⌀ 2.5 mm).
Stereo microphones
Stereo microphones MIC-ST1: An external microphone for movie recording.
FUJINON lenses
FUJINON lenses XF-/XC-series lenses: Interchangeable lenses for use exclusively with the FUJIFILM X-mount.
FUJINON MKX-series lenses: Cinema lenses for the FUJIFILM X-mount.
Macro extension tubes
Macro extension tubes MCEX-11/16: Attach between the camera and the lens to shoot at high reproduction ratios.
Teleconverters
Teleconverters XF1.4X TC WR: Increases the focal length of the compatible lenses by about 1.4×.
XF2X TC WR: Increases the focal length of the compatible lenses by about 2.0×.
Mount adapters
Mount adapters FUJIFILM M MOUNT ADAPTER: Allows the camera to be used with a wide selection of M-mount lenses.
Body caps
Body caps BCP-001: Cover the camera lens mount when no lens is attached.
Eye cups
Eye cups EC-XH W/EC-XT L/EC-XT M/EC-XT S/EC-GFX: Attach viewfinder eyecups to prevent light leaking into the viewfinder window.
Shoe-mounted flash units
EF-X500: In addition to manual and TTL flash control, this clip-on flash unit has a Guide Number of 50/164 (ISO 100, m/ft.) and supports FP (high-speed sync), allowing it to be used at shutter speeds that exceed the flash sync speed. Featuring support for the optional EF-BP1 battery pack and Fujifi lm optical wireless flash control, it can be used as a master or remote flash unit for remote wireless flash photography.
EF-BP1: A battery pack for shoe-mounted flash units. Takes up to 8 AA batteries. EF-42: This clip-on fl ash unit has a Guide Number of 42/137 (ISO 100, m/ft.) and supports manual and TTL flash control.
EF-X20: This clip-on flash unit has a Guide Number of 20/65 (ISO 100, m/ft.) and supports manual and TTL flash control.
EF-20: This clip-on flash unit has a Guide Number of 20/65 (ISO 100, m/ft.) and supports TTL flash control (manual flash control is not supported).
Vertical battery grips
VG-XT3: See "Vertical battery grips".
Tripod grips
TG-BT1: Record movies, take photographs, or adjust zoom on compatible power zoom lenses while holding this Bluetooth tripod grip.
Hand grips
MHG-XT3: Features an improved grip. Batteries and memory cards can be removed with the grip in place, and the grip is equipped with a rail for quick-shoe camera mounts.
Leather cases
BLC-XT3: This case combines practicality with the luxury of leather and comes with a cloth that can be used to wrap the camera before putting it in the case and on other occasions. Pictures can be taken and batteries inserted or removed with the camera still in its case.
Grip belts
GB-001: Improves grip. Combine with a hand grip for more secure handling.
Cover kits
CVR-XT3: A set of covers for the X-T3. Contains a sync terminal cap, a hot-shoe cover, and a connector cover, as well as two vertical battery grip connector covers (one black and one silver).
instax SHARE printers
SP-1/SP-2/SP-3: Connect via wireless LAN to print pictures on instax fi lm.
This camera is not compatible with the AC-9V AC power adapter.
FUJIFILM Corporation
7-3, AKASAKA 9-CHOME, MINATO-KU, TOKYO 107-0052, JAPAN
https://fujifilm-x.com

Documents / Resources
References
https://app.fujifilm-dsc.com
Free photo editing software for Fujifilm
Discover Capture One for Fujifilm
![fujifilm-x.com]() Adobe Photoshop Lightroom Classic + Tether Plugin | Software | FUJIFILM X Series & GFX – Global
Adobe Photoshop Lightroom Classic + Tether Plugin | Software | FUJIFILM X Series & GFX – Global![fujifilm-x.com]() FUJIFILM X Acquire | Software | FUJIFILM Digital Camera X Series & GFX – USA
FUJIFILM X Acquire | Software | FUJIFILM Digital Camera X Series & GFX – USA![fujifilm-x.com]() FUJIFILM X RAW STUDIO | Software | FUJIFILM Digital Camera X Series & GFX – USA
FUJIFILM X RAW STUDIO | Software | FUJIFILM Digital Camera X Series & GFX – USA![fujifilm-x.com]() RAW FILE CONVERTER EX 3.0 powered by SILKYPIX | Software | FUJIFILM Digital Camera X Series & GFX – USA
RAW FILE CONVERTER EX 3.0 powered by SILKYPIX | Software | FUJIFILM Digital Camera X Series & GFX – USAhttp://fujifilm-dsc.com/wifi/
Application Software PC AutoSave | FUJIFILM Corporation
Model Selection
![www.fujifilm.com]() FUJIFILM X Series & GFX – Global
FUJIFILM X Series & GFX – Global![fujifilm-x.com]() FUJIFILM Digital Camera X Series & GFX – USA
FUJIFILM Digital Camera X Series & GFX – USA
Download manual
Here you can download full pdf version of manual, it may contain additional safety instructions, warranty information, FCC rules, etc.
Advertisement
Thank you! Your question has been received!
 BUTTON SETTING has been moved to
  Fn1 BUTTON SETTING,
 have been moved to Bluetooth/SMARTPHONE SETTING.
 MOVIE SETTING > TALLY LIGHT option can be used to choose the lamp— indicator or AF-assist—that lights during movie recording and whether the lamp blinks or remains steady). During recording, you can change exposure compensation by up to ±2 EV and adjust zoom using the zoom ring on the lens (if available).
 SAVE DATA SET-UP > SELECT SLOT(
 SEQUENTIAL) option in the
 BUTTON/DIAL SETTING > SHUTTER AF, SHUTTER AE.
  EYE OFF: Intelligent Face Detection only.
 EYE AUTO: The camera automatically chooses which eye to focus on when a face is detected.
 RIGHT EYE PRIORITY: The camera focuses on the right eye of subjects detected using Intelligent Face Detection.
 LEFT EYE PRIORITY: The camera focuses on the left eye of subjects detected using Intelligent Face Detection.
 icon will change from white to green.
 is assigned and then using the focus stick (focus lever) or (during viewfinder photography) touch controls.
 MOVIE SETTING > H.265 (HEVC)/H.264 in the shooting menu.
 ) footage is recorded using the option selected for
  FILM SIMULATION in the shooting menu.
 or
or  cannot be recorded to the memory card and output to the HDMI at diff erent frame sizes (4K, Full HD). In addition, the following
  INTERFRAME NR
  ").
").


 CONSTANT SPEED FOCUS (N)
 (all)
(all) (left half)
 (right half)
 (top left quarter)
 (top right quarter)
 (bottom left quarter)
 (bottom right quarter)
 for upload.
 Be sure your smartphone is running the latest version of the applicable smartphone app. Diff erent operating systems use diff erent apps; for more information, visit:

 CONSTANT SPEED FOCUS (N)
 BUTTON/DIAL SETTING > POWER ZOOM LENS FUNCTION (Fn) SETTING.

 enables compression, reducing file size for upload.


Need Assistance?
Do you have a question about the X-T3 that isn't answered in the manual? Leave your question here.