Fujifilm INSTAX mini LiPlay Instant Camera Manual
- User's manual/safety precautions (116 pages) ,
- User manual (36 pages) ,
- User manual (25 pages)
Advertisement
- 1 Before Use
- 2 Notes on Disposing of the Camera
- 3 About This Camera
- 4 Part Names
- 5 LCD Monitor
- 6 Using the Cross Key
- 7 Attaching the Strap
- 8 Charging the Battery
- 9 Powering on/off
- 10 Initial Settings
- 11 Loading/Unloading the Film Pack
- 12 Basic Shooting and Playback
- 13 Printing
- 14 Selecting the Frame and Filter
- 15 Recording Sound in Images
- 16 Various Types of Shooting
- 17 Printing from Print History
- 18 Using a Memory Card
- 19 Using the Shooting Menu
- 20 Using the Playback Menu
- 21 Using the Set-up Menu
- 22 Functions Available by Linking with the Smartphone App
- 23 Specifications
- 24 Troubleshooting
- 25 Documents / Resources
Before Use
Before using the camera, check the following has been included.
Supplied Accessories

Notes on Disposing of the Camera
A built-in lithium ion battery is used for this camera.
When you dispose of the camera, follow your local regulations and dispose of it properly.
Please refer to the supplied CONTACT INFORMATION sheet for inquiry.

Do not remove the built-in battery by yourself; otherwise, you may be injured.
Disposal of Electric and Electronic Equipment inPrivate Households
Disposal of used Electrical & ElectronicEquipment
(Applicable in the European Union and other European countries with separate collection systems)

For customers in Turkey:
EEE Complies with Directive
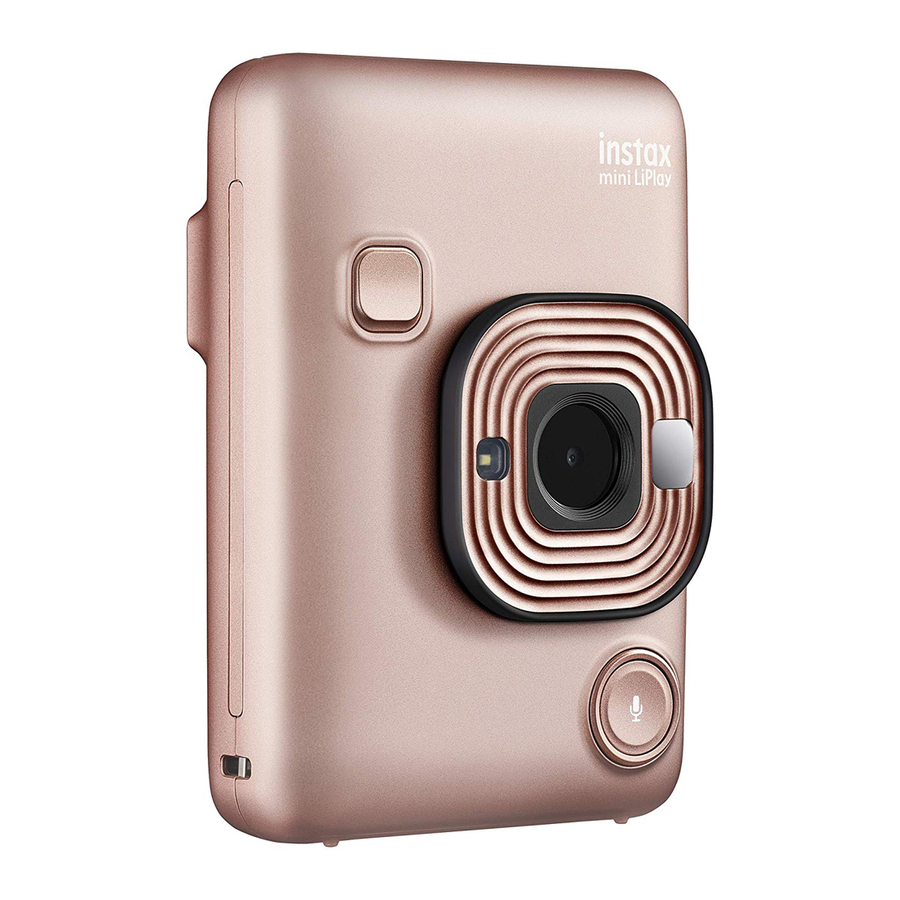
About This Camera
Main Features
- The "INSTAX mini LiPlay" is the most compact INSTAX product available on the market
- You can perfectly position your photo using the LCD monitor and save the image onto the camera memory or micro SD card
- You can select a photo from your photo library and print it using the INSTAX print feature
- You can edit your photos by using 10 photo frames and 6 filters
- You can save your photos with the recorded sound
- Stylish and luxurious design
- Equipped with selfie mirror to easily position selfies
Functions Available with the Smartphone App
- Sound function
Record sound with the camera, convert it to QR code and print the QR code on a photo (Print with sound). Sound is played when QR codes printed with the INSTAX print feature are read with your smartphone. - Remote shooting function
Control the camera with your smartphone for remote shooting of photos. - Shortcut function
You can select photo frames on your smartphone and assign the frames to the 3 shortcut buttons located on the side of the camera. - Direct print
Transfer a photo from your smartphone to the camera, and print it with the INSTAX print feature. Before sending the photo, you can use the smartphone app to move, rotate, zoom in, zoom out, or crop the photo.
Part Names

- Film ejection slot
- Shutter button
- Flash/Self-timer lamp
- Strap hook
- USB port
![]() (Sound) button
(Sound) button- Lens
- Selfie mirror
- Film door lock
- Film door
![]() (Shortcut 1) button
(Shortcut 1) button- Reset button*
![]() (Shortcut 2) button
(Shortcut 2) button![]() (Shortcut 3) button
(Shortcut 3) button- Micro SD card slot
![]() (Power) button
(Power) button- Microphone
- Speaker
- Cross key (
![]() )
) - MENU/OK button
![]() (Back) button
(Back) button![]() (Playback) button
(Playback) button![]() (Print) button
(Print) button- LCD monitor
 (Sound) button
 (Shortcut 1) button
 (Shortcut 2) button
 (Shortcut 3) button
 )
) (Back) button
 (Playback) button
 (Print) button
LCD Monitor
The shooting screen displays on the LCD monitor when the power is switched on.
- To switch from the shooting screen to the playback screen, press
![]() (Playback).
(Playback). - To switch from the playback screen to the shooting screen, press the shutter button.
While the shooting screen or playback screen is displayed, press ![]() (Back) to display the following information on the LCD monitor.
(Back) to display the following information on the LCD monitor.

- Current date and time
- Exposure
- Frame name
- Filter name
- Number of images available*
- Number of prints with sound images waiting to be sent
- Remaining film indicator
- Bluetooth connection status indicator
- Battery level indicator
- Flash indicator
- Frame No. indicator
- Shooting date/time information
- Transmission status indicator of print with sound images
*When using the internal memory,  is displayed. The icon displays in red when the number of available images is 10 or less.
Cross Key Guide Display
When starting up or switching screens (Shooting screen ![]() Playback screen), the cross key guide appears for a short time.
Playback screen), the cross key guide appears for a short time.

Using the Cross Key
The (  ) keys are used to select menu items, or to recall the functions assigned to the keys. The [MENU/OK] button is used to display the menu or to make a selection.

![]() Move up
Move up![]() Move left
Move left![]() Move down
Move down![]() Move right
Move right- Menu display/Make selection
 Move up
 Move left
 Move down
 Move right
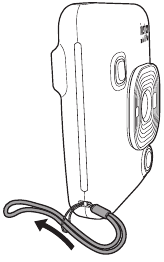
Attaching the Strap
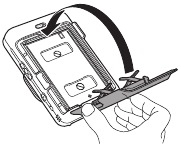
Attach the strap as shown below.
- Put the strap around your wrist when carrying the camera or taking photos to avoid dropping the camera.
![]()
Charging the Battery
 Turn off the camera before charging the battery. Battery will not charge if the camera is powered on.
Ensure USB is correctly attached as indicated.
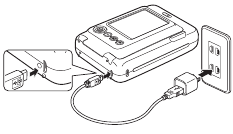
Connect the camera and a USB AC adapter supplied with your smartphone using the supplied USB cable, then connect the USB AC adapter to an indoor power outlet.
- Charging time is approximately 2 to 3 hours.
Charging Status Indication
| While charging | Self-timer lamp lights up. |
| Charging finished | Self-timer lamp goes off. |
| Charging error | Self-timer lamp flashes. |
Charging from a PC:
- Connect the camera and PC directly. Do not connect via a USB hub or keyboard.
- If the PC goes into sleep mode while charging, charging is discontinued. To continue charging, exit sleep mode and then reconnect the USB cable.
- The battery may not charge depending on the specifications, settings or conditions of the PC.
Note
- The battery cannot be removed.
- The battery has not been charged during manufacture. Please charge the battery fully before use.
- For notes about the battery, please refer to "Simple Camera Care".
Powering on/off
Press and hold  (Power) to power on or off.

Checking the Battery Level
The battery level is displayed on the LCD monitor when pressing ![]() (Back) on the shooting screen or playback screen.
(Back) on the shooting screen or playback screen.
| Display | Battery level |
 | There is sufficient charge remaining. |
 | The remaining charge is half or less. Charging is recommended. |
 | There is not sufficient charge remaining. Please charge as soon as possible. |
- When the battery level is low, the
![]() icon displays at the bottom right of the LCD monitor.
icon displays at the bottom right of the LCD monitor. - When the battery runs out completely, the
![]() icon appears on the LCD monitor and the power is turned off.
icon appears on the LCD monitor and the power is turned off.
- If you do not use the camera for a certain period of time, it will turn off automatically. You are able to set the amount of time until the power is turned off.
- During shooting mode, press
![]() (Playback) to display the playback screen and enter playback mode.
(Playback) to display the playback screen and enter playback mode. - Press the shutter button fully during playback mode to display the shooting screen and select shooting mode.
Initial Settings
When turning the camera on for the first time after purchase, a screen will be displayed automatically to set the language, date and time, and also to pair a smartphone.
Please install the "INSTAX mini LiPlay" app on your smartphone before carrying out pairing registration.
- If you are using an Android OS smartphone, please search for "INSTAX mini LiPlay" in Google Play Store and install it. *Requirements for Android OS smartphones: Android Ver. 5.0 or higher with Google Play Store installed
- If you are using an iOS smartphone, please search for "INSTAX mini LiPlay" in the App Store and install it. *Requirements for iOS smartphones: iOS Ver. 10 or higher
Depending on your smartphone model, you may not be able to use "INSTAX mini LiPlay" even if you have installed it and your smartphone meets the above requirements.
This setting can also be configured later If you want to configure the settings later or reconfigure the settings, set the [LANG], [DATE/TIME] and [Bluetooth SETTINGS] in the SET-UP MENU
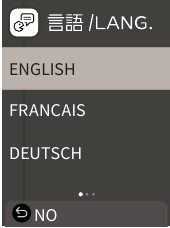
- Turn on the power
- When you turn on the power for the first time after purchase, the Language Setting (/LANG.) screen is displayed.
- Select the language you wish to use and press [MENU/OK]
![]()
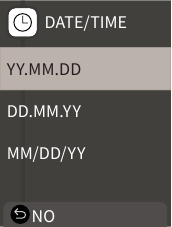
- Set the date order and press [MENU/OK] DATE/TIME
![]()
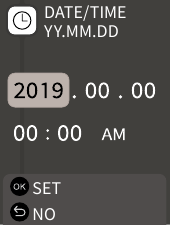
- Set the year, month, day, hour and minute then press [MENU/OK]
Move the cursor by using![]()
![]() , then change the number using
, then change the number using ![]()
![]() .
.
![]()
Next, configure the pairing settings. - Press [MENU/OK]
![]()
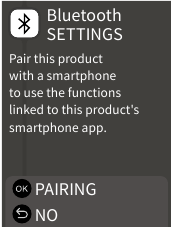
- If you do not wish to set pairing, press
![]() (Back) to finish the initial settings.
(Back) to finish the initial settings.
 (Back) to finish the initial settings.
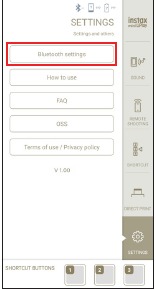
- Launch the smartphone app "INSTAX mini LiPlay" and press [SETTINGS]
![]()
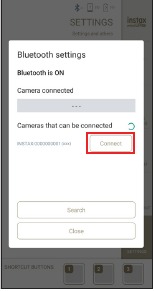
- Press [Bluetooth settings] on the smartphone app
![]()
- Press [Connect] on the smartphone app
![]()

- You can confirm camera's OWN NAME by accessing the Set-up Menu.
Next, select the menu items in the following order: [Bluetooth SETTINGS], [INFORMATION], [OWN NAME].
- Allow pairing
- Confirm that pairing registration is complete
![]()
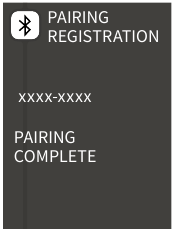
When pairing registration is complete, the screen changes to the shooting screen.
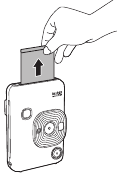
Loading/Unloading the Film Pack
Loading the Film Pack
- Slide the film door lock and open the film door
![]()
- Insert film pack by aligning the yellow marks
![]()
- Close the film door
![]()
- Remove the black film cover that is automatically rejected
![]()


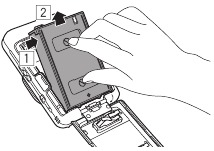
Unloading a Used Film Pack
- Slide the film door lock and open the film door
![]()
- Grasp the rectangular holes on the film pack, then pull film pack out from the camera
![]()

Basic Shooting and Playback
Shooting
The following steps describe the basic shooting procedure.
- Turn on the power
- Hold the camera
- Configure the frame and filter, etc as needed
- Decide the composition to shoot
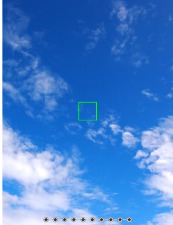
- Press the shutter button halfway to focus on the subject
A beep will sound and the green AF frame will display on LCD monitor.
![]()
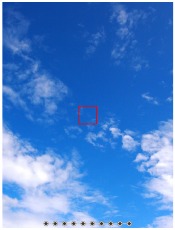
When the subject is in focus
A red AF frame will display on the LCD monitor. Either change the composition or use the AF/AE lock.
![]()
When the subject is not in focus - Press the shutter button down fully to take a photo
The photo is taken and the image is saved to the internal memory or memory card.
- For the steps on how to print an image you have taken, please refer to "Printing".
- When shooting, steady your arms against your body and hold the camera firmly with both hands.
- Be careful not to touch the camera lens when pressing the shutter button.
- Gently press the shutter button fully to take a picture, ensuring that the camera does not move or shake.
- Be careful not to cover the flash or lens with your fingers or the strap.
- The flash may fire when you fully press the shutter button to take a picture in low light or backlit conditions. You can change the flash settings so that the flash does not fire.
Notes on the internal memory
- When the internal memory is full, the shutter does not release and you cannot shoot photos. Please delete some images or use a memory card.
- If the camera experiences a malfunction, images in the internal memory may be corrupted or lost.
- It is recommended that you copy important images to another media format (Hard disk, CD-R, CD-RW, DVD-R, etc.) as a backup.
- If you submit your camera for repair, we cannot guarantee the integrity of the data in the internal memory.
- When repairing the camera, we may need to check the data in the internal memory.
Playing Back Images
You can play back images on the LCD monitor.
- Turn on the power
- Press
![]() (Playback)
(Playback)
The last image taken is displayed. - Press
![]() or
or ![]() to select the image you want to play back
to select the image you want to play back
 (Playback)
- Press the shutter button fully to return to the Shooting screen.
Changing the Playback Screen Display
You can zoom in on the image and change the number of images displayed on the LCD monitor.
Zooming images
- Select the image you want to zoom in on and press [MENU/OK]
The playback menu is displayed. - Press
![]() or
or ![]() to select [ZOOM]
to select [ZOOM] - Press [MENU/OK]
The zoom screen is displayed. - Zoom in or out of the image with
![]() and
and ![]()
![]()
- Press
![]() or
or ![]() on the zoom screen and move the screen position using
on the zoom screen and move the screen position using ![]()
![]()
![]()
![]() . To return to the zoom screen, press
. To return to the zoom screen, press ![]() (Back).
(Back). - If you press [MENU/OK] whilst in the zoom or move screen, the screen will return to the playback screen.
- You can also print with the image zoomed in or zoomed out.
Change the Number of Images Displayed
While displaying the playback screen, press  (Playback) to change the number of images displayed.

Printing
You can print the images using the following procedure.
- Turn on the power
- Press
![]() (Playback)
(Playback)
The last image taken is displayed. - Press
![]() or
or ![]() to select the image you want to print
to select the image you want to print - Select desired settings such as frame and zoom
- Press
![]() (Print)
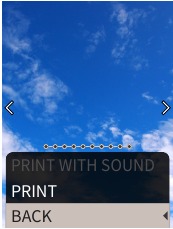
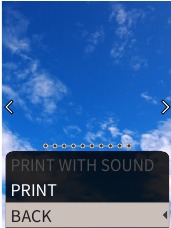
(Print) - Press
![]() or
or ![]() to select [PRINT] or [PRINT WITH SOUND]
to select [PRINT] or [PRINT WITH SOUND]
Note
To print with sound, it is necessary to link with the sound function of the smartphone app.
![]()
- Press [MENU/OK]
Printing starts.

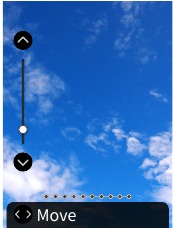
- To print with sound, use
![]()
![]()
![]()
![]() to change the print position of the QR Code as needed.
to change the print position of the QR Code as needed. - To cancel printing, select [BACK] or press
![]() (Back).
(Back).
- When the sound of film unloading stops, hold the top of the film and remove it
![]()
Note
Be careful not to obstruct the film ejection slot with your fingers or the strap.
Remaining Film Indicator
The remaining number of film is indicated by the dots at the bottom of the screen. Each time a film is printed, a dot changes to a small square. The dots will display in red when the number of film remaining is 2 or less.

- For handling of the film, please refer to the FUJIFILM Instant Film "INSTAX mini" instruction manual.
- Film development takes about 90 seconds (the time varies depending on the ambient temperature).
Selecting the Frame and Filter
Selecting the Frame
Follow the procedure below to select the frame type.
- On the shooting screen or playback screen, press
![]()
The following guide is displayed.
![]()
- Press or to select the frame type
- Press or [MENU/OK]
The frame is applied and the display returns to the previous screen.

- Press
![]() (Back) to return to the previous screen without applying the frame.
(Back) to return to the previous screen without applying the frame. - To cancel the frame you have applied, select "No Frame" under frame type.
You can also press a shortcut button to select the frame assigned to that button.
Selecting the Filter
Follow the procedure below to select the filter type.
- On the shooting screen, press
![]()
The following guide is displayed.
![]()
- Press
![]() or
or ![]() to select the filter type
to select the filter type - Press
![]() or [MENU/OK]
or [MENU/OK]
The filter is applied and the display returns to the previous screen.

- Press
![]() (Back) to return to the previous screen without applying the filter.
(Back) to return to the previous screen without applying the filter. - To cancel the filter you have applied, select "No Filter" under filter type.
Recording Sound in Images
This camera allows recorded sound to be recorded in images.
Recording Sound When Shooting
You can switch between two recording modes, [After shooting] and [Before & after], to suit to your preferences or purpose of use.
The recording mode can be switched in Rec Settings of the shooting menu.
Recording Sound Immediately after Shooting When After shooting Is Set
- Press
![]() (Sound) on the shooting screen
(Sound) on the shooting screen
An explanation on the recording mode is displayed. - Press [MENU/OK] or
![]() (Sound)
(Sound)
The recording mode starts, and a recording icon is displayed at the top right of the screen.
![]()
- Press the shutter button halfway to focus on the subject
- Press the shutter button down fully
Recording starts after shooting.

- The maximum recording time is approximately 10 seconds. After approximately 10 seconds elapse, recording ends and the screen changes automatically.
- If you press
![]() (Sound) again during recording, recording ends at that point in time.
(Sound) again during recording, recording ends at that point in time.
- Press [MENU/OK] to print with sound
Note
To print with sound, it is necessary to link with the sound function of the smartphone app.
- Use
![]()
![]()
![]()
![]() to change the print position of the QR Code as needed.
to change the print position of the QR Code as needed. - To cancel printing with sound, press
![]() (Back).
(Back).
Recording Sound before and after Shooting When Before & after Is Set
- Press
![]() (Sound) on the shooting screen
(Sound) on the shooting screen
The recording mode starts, and a recording animation is displayed at the bottom of the screen.
- When the
![]() (Sound) is pressed for the first time after turning on the power, an explanation on the recording mode is displayed for a short time and then the recording mode starts.
(Sound) is pressed for the first time after turning on the power, an explanation on the recording mode is displayed for a short time and then the recording mode starts.
![]()

- Press the shutter button halfway to focus on the subject
- Press the shutter button down fully
A photo is taken and sound is recorded for the 5 seconds before and 5 seconds after you pressed the shutter button fully.
- To exit the recording mode, press
![]() (Sound) again.
(Sound) again.
Recording Sound When Playing Back
- Press
![]() (Sound) on the single image playback screen
(Sound) on the single image playback screen
An explanation on the recording mode is displayed. - Press [MENU/OK] or
![]() (Sound)
(Sound)
The recording starts, and a recording icon is displayed at the center of the screen.
- The maximum recording time is approximately 10 seconds. After approximately 10 seconds elapse, recording ends automatically.
- If you press
![]() (Sound) again during recording, recording ends at that point in time.
(Sound) again during recording, recording ends at that point in time.
- Press
![]() to check the recording
to check the recording
The recording is played back.
![]()

- Press
![]() to pause the sound playing back, and
to pause the sound playing back, and ![]() to stop the sound playing back.
to stop the sound playing back. - Press [MENU/OK] during playback to display the playback volume adjustment screen. You can also adjust the volume by pressing
![]() or
or ![]() .
. - If you press
![]() (Sound) while an image with sound is displayed, the message "Are you sure you want to overwrite this recording?" is displayed. To overwrite, select [CONFIRM]. Otherwise, select [BACK].
(Sound) while an image with sound is displayed, the message "Are you sure you want to overwrite this recording?" is displayed. To overwrite, select [CONFIRM]. Otherwise, select [BACK].
Various Types of Shooting
Shoot Using the Self-timer
Use the self-timer for group photos or to prevent the camera from shaking.
- On the shooting screen, press
![]()
The following guide is displayed.
![]()
- Press
![]() or
or ![]() to select [2 SEC] or [10 SEC]
to select [2 SEC] or [10 SEC] - Press [MENU/OK] or
![]()
An icon showing the self-timer length that has been set will display in the upper right of the screen.

- Press
![]() (Back) to return to the previous screen without applying the setting.
(Back) to return to the previous screen without applying the setting.
- Fully press the shutter button
If you selected [2 SEC]:
When you press the shutter button, the self-timer lamp blinks.
If you selected [10 SEC]:
When you press the shutter button, the self-timer lamp lights up and blinks for 3 seconds before shooting.
Press  (Back) to cancel the self-timer.
Shooting Using the Flash
Use the flash to shoot at night or in dark environments. You can change the flash setting to prevent the flash from firing.
- On the shooting screen, press
![]()
The following guide is displayed.
![]()
- Press
![]() or
or ![]() to select the flash setting
to select the flash setting
- For details about the flash settings, please refer to "Types of Flash".
- Press [MENU/OK] or
![]()
- Fully press the shutter button
- If you press the shutter button whilst the flash is charging, the self-timer lamp will blink and the shutter will not release.
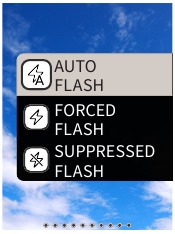
Types of Flash
 Auto flash
The flash fires automatically if the surroundings are dark. This setting is suitable for most situations.
 Forced Flash
The flash fires regardless of the surrounding brightness. Use when the subject is dark due to backlighting.
 Suppressed Flash
The flash does not fire even when the surroundings are dark.
This setting is suitable for shooting in places where flash photography is prohibited.
It is recommended to stabilize the camera on a table, etc. when using suppressed flash in dark surroundings.
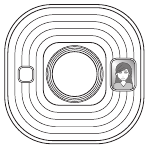
Taking a Photo of Yourself (Selfie)
You can take a photo of yourself using the selfie mirror.
- Hold the camera firmly with the lens 30cm to 50cm from your face
- Hold the camera firmly, as it is particularly prone to camera shake in dark environments.
![]()

- Check your composition in the selfie mirror and shoot
![]()
- Do not stare at the flash when shooting. Staring at the flash may temporarily effect vision.
Shooting Using the AF/AE Lock
When shooting, holding the shutter button halfway locks the focus, called "AF lock". The brightness or exposure will also be locked called "AE lock". This will be useful when you want to place the subject outside the center of the screen whilst shooting.
- Press the shutter button halfway to focus on the subject
When you press the shutter button halfway, AF and AE are locked. - Decide upon your composition while pressing the shutter button halfway
- Press the shutter button fully to shoot
It is recommended to use the AE/AF lock when shooting the following subjects, as they can be difficult to focus on.
- Shiny subjects such as a mirror or car body
- Subjects that are moving at high speed
- Subjects on the other side of a glass
- Dark subjects that absorb light without reflecting it such as hair or fur
- Non-solid subjects such as smoke or flames
- Subject with little contrast with the background (such as a person wearing clothes with the same color as the background)
- When there is a large contrast difference in the AF frame and the subject is close to it (such as a subject in front of a background with a strong contrast)
Printing from Print History
You can find images printed previously and retain the settings (such as image effects) for printing. You can print the images you have taken previously using the following procedure.
- Press [MENU/OK] on the playback screen
The playback menu is displayed. - Press
![]() or
or ![]() and select [PRINT HISTORY]
and select [PRINT HISTORY] - Press [MENU/OK]
- Press
![]() or
or ![]() to select the image you want to print
to select the image you want to print - Press
![]() (Print)
(Print) - Press
![]() or
or ![]() to select [PRINT] or [PRINT WITH SOUND]
to select [PRINT] or [PRINT WITH SOUND]
Note
To print with sound, it is necessary to link with the sound function of the smartphone app.
![]()
- Press [MENU/OK]
Printing starts.

- To print with sound, use to change the print position of the QR Code as needed.
- To cancel printing, select [BACK] or press (Back).
- When the sound of the film unloading stops, hold the top of the film and remove it
Note
Be careful not to obstruct the film ejection slot with your fingers or the strap.
Using a Memory Card
The camera can save approximately 45 images in the internal memory, but you can save more images by using a memory card.
Notes on memory card
- Micro SD and micro SDHC memory cards are compatible with this camera. Using a memory card other than the specified type may cause damage to the camera.
- Because memory cards are small, infants may accidentally swallow them. Keep out of reach of children. Please consult your doctor immediately if an infant swallows a memory card.
- Do not turn off the camera or remove the memory card while formatting the memory card or recording or erasing data
Doing so may damage the memory card - Do not use or store a memory card in an environment prone to strong static electricity or electrical noise.
- If you insert a memory card charged with static electricity into the camera, the camera may malfunction. If this happens, turn off the power and then turn it on again.
- Do not put a memory card in your trouser pocket. When you sit down, stress may be applied to the memory card causing it to break.
- When you remove a memory card after prolonged use, it may be warm, but this is normal.
- Do not attach labels, etc. onto memory cards. Labels may become unattached from the memory card whilst being inserted and removed from the camera which may cause the camera to malfunction.
Notes on using a memory card in a PC
- Be sure to use the camera to format unused memory cards and memory cards used on the PC and other devices before use.
- When you format a memory card with the camera, shoot and record images, a folder is automatically created. Do not use a computer to change or delete the memory card folder names or file names. The memory card may become unusable by the camera.
- Please do not use the PC to delete images from the memory card. Always use the camera to delete images from the memory card.
- When editing an image file, copy or move the image file to a hard disk, etc. for editing.
Inserting a Memory Card
- Open the card slot cover

- Insert the memory card all the way until a click is heard. Ensure the correct orientation is used as shown below

- Close the card slot cover


- When removing a memory card, push against the memory card with your finger and slowly release your finger from the card. The lock is released and the memory card can be removed.
Note
Take care when removing a memory card, it may be ejected forcefully if you release your finger suddenly. Please release the card gently.
Using the Shooting Menu
You can change various settings related to shooting from the shooting menu.
- Press [MENU/OK] on the shooting screen
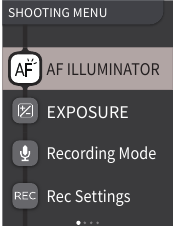
The shooting menu displays. SHOOTING MENU
![]()
- Press
![]() or
or ![]() to select the item to set
to select the item to set
- For a description of each item, please refer to "Shooting Menu Items".
- Change the settings
- Press [MENU/OK]
The settings are applied and the display returns to the shooting screen.
Shooting Menu Items
[AF ILLUMINATOR]
If you select ON, the AF Illuminator will be lit during the period from when you press the shutter button halfway until the subject is in focus, making it easier to focus on dark subjects.
- Depending on the scene, it may be difficult to focus even if the flash is used.
- When shooting close to the subject, the effect of the AF Illuminator may not be sufficient.
- Do not use the AF illuminator in close proximity to human eyes.
[EXPOSURE]
Adjust the brightness of the image. Exposure is used when the subject is too bright or too dark, or when the contrast between the subject and the background (difference in brightness) is large.
- The set exposure value is retained even after moving the image data to a PC, etc.
[Recording Mode]
Starts the recording mode set in [Rec Settings].
[Rec Settings]
Switches to [After shooting] or [Before & after].
For a description of the following items, please refer to "Using the Set-up Menu".
[PRINT SETTINGS] / [Bluetooth SETTINGS] / [CROSS KEY GUIDE] / [DATE/TIME] / [LANG.] / [SOUND SET-UP] / [PLAYBACK VOLUME] / [AUTO POWER OFF] / [RESET] / [FRAME DATA RESET] / [FORMAT] / [FIRMWARE UPGRADE]
Using the Playback Menu
You can change various settings related to playback from the playback menu.
- Press [MENU/OK] on the playback screen
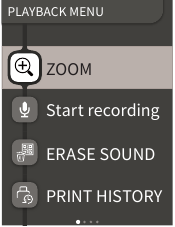
The playback menu is displayed.
![]()
- Press
![]() or
or ![]() to select the item
to select the item
- For a description of each item, please refer to "Playback Menu Items".
- Change the settings
- Press [MENU/OK]
The settings are applied and the display returns to the previous screen.
Playback Menu Items
[ZOOM]
Please refer to "Zooming images".
[Start recording]
Records sound in images. In the case of images with sound already recorded, the sound will be overwritten.
[ERASE SOUND]
Erases only the sound from images with sound.
[PRINT HISTORY]
- Display up to the last 50 images that were printed.
- Select an image and press
![]() (Print) to start printing.
(Print) to start printing. - You can clear the print history one image at a time by pressing [MENU/OK].
 (Print) to start printing.
[ERASE]
You can erase images one by one or erase them all at once.
[IMAGE ROTATE]
Display an image rotated by 90 degrees.
[COPY]
Copy images from the internal memory to a memory card or from a memory card to the internal memory.
Follow the procedure below.
- Select [COPY] from the playback menu
- Select the copy destination and press [MENU/OK]
- Select [FRAME] or [ALL FRAMES] and press [MENU/OK] If you selected [ALL FRAMES], copying starts. If you selected [FRAME], proceed to step 4.
- Press
![]() or
or ![]() to select the image to copy
to select the image to copy
- Press
![]() or
or ![]() to select [COPY]
to select [COPY] - Press [MENU/OK]
For a description of the following items, please refer to "Using the Set-up Menu".
[PRINT SETTINGS] / [Bluetooth SETTINGS] / [CROSS KEY GUIDE] / [DATE/TIME] / [LANG.] / [SOUND SET-UP] / [PLAYBACK VOLUME] / [AUTO POWER OFF] / [RESET] / [FRAME DATA RESET] / [FORMAT] / [FIRMWARE UPGRADE]
Using the Set-up Menu
Follow the procedure below to change settings with the set-up menu.
- On the shooting screen or playback screen, press [MENU/OK]
- Press
![]() or
or ![]() to select the item to set
to select the item to set
- For a description of each item, please refer to "Set-up Menu Items".
- Change the settings
- Press [MENU/OK]
The settings are applied and the display returns to the previous screen.
Set-up Menu Items
[PRINT SETTINGS]
Change the print position and print color of the QR Code printed on print with sound.
Note
To print with sound, it is necessary to link with the sound function of the smartphone app.
[Default QR Code Position]:
Change the default QR code position.
[QR Code Color]:
Change the QR Code printing color.
Bluetooth SETTINGS
Please install the smartphone app on your smartphone before pairing registration.
[PAIRING REGISTRATION]:
When you connect with your smartphone via Bluetooth for the first time, you will need to pair the devices. Please refer to the following procedure for pairing.
- Select [Bluetooth SETTINGS] from the playback menu
- Select [PAIRING REGISTRATION] and press [MENU/OK]
- Press [SETTINGS] on the smartphone app
- Press [Bluetooth settings] on the smartphone app
- Press [Connect]
- Allow pairing
[DELETE PAIRING REG]:
You can delete information of a smartphone registered for pairing.
[INFORMATION]:
Displays the Bluetooth address, name, and registered terminal name of the main unit.
[CROSS KEY GUIDE]
Sets whether to show or hide the cross key guide.
[DATE/TIME]
Set the date and time.
[DATE STAMP]
Writes the date to images. Select [OFF] if you want to remove the date written to images.
[LANG]
Set the language to be displayed on the LCD monitor.
[SOUND SET-UP]
Set the volume of the operation sound, shutter volume and start up sound. Select [OFF] if you want to turn off the sound.
[PLAYBACK VOLUME]
Set the playback volume of the recorded sounds.
[AUTO POWER OFF]
Sets the time until the power is automatically turned off when the camera is not in use.
[RESET]
Resets the settings to the default settings.
The date and time set in date/time are not reset.
[FRAME DATA RESET]
Resets the default frame settings used for the shortcut buttons.
[FORMAT]
Format the camera's internal memory or a memory card inserted in the card slot. All saved images will be deleted.
[FIRMWARE UPGRADE]
Upgrade the firmware version.
Insert the memory card containing the firmware into the card slot and follow the instructions on the screen.
Download the latest firmware from the FUJIFILM website.
Functions Available by Linking with the Smartphone App
The following functions can be used by linking with the smartphone app "INSTAX mini LiPlay".

Sound Function
You can convert the sound recorded by the camera into a QR Code and print it together with an image (Print with sound).
- The sound is played when the QR code printed with a sound image is read by a smartphone, etc.
- You can play or delete the sound on images with sound that you have previously printed using the smartphone app.
Note
If you delete an image with sound using the smartphone application, the sound will no longer be able to be played even if the QR Code is read.
Remote Shooting Function
You can set flash and self-timer options with the smartphone app and shoot remotely.
Shortcut Function
The three shortcut buttons on the side of the camera can be set in the smartphone app.
Direct Print Function
You can send an image from your smartphone to the camera and print it with the INSTAX printing function. Before sending, you can move, rotate and zoom the image with the smartphone app.
Specifications
Camera Function
| Image sensor | 1/5 type CMOS primary color filter |
| Number of recorded pixels | 2560 × 1920 pixels |
| Storage media | Internal memory, micro SD/micro SDHC memory card |
| Storage capacity | Approximately 45 images in internal memory, approximately 850 images per 1 GB in micro SD/micro SDHC memory card |
| Recording method | DCF compliant Exif Ver 2.3 |
| Focus distance | f = 28 mm (35 mm film equivalent) |
| Aperture | F2.0 |
| Auto focus | Single AF (with AF Illuminator) |
| Shooting distance | 10 cm to ∞ |
| Shutter speed | 1/4 second to 1/8000 second (automatic switching) |
| Shooting sensitivity | ISO100 to 1600 (automatic switching) |
| Exposure control | Program AE |
| Exposure | −2.0 EV to +2.0 EV (1/3 EV step) |
| Metering method | TTL 256 split metering, multi metering |
| White balance | Auto |
| Flash | Auto flash / Forced flash/Suppressed flash Shooting range with flash: Approximately 50 cm to 1.5 m |
| Self-timer | Approximately 2 seconds / approximately 10 seconds |
| Image effects | 6 filters, 10 frames (3 available with shortcuts) |
| Sound recording | Possible to record sound when shooting or playing back single image. Possible to overwrite. |
Print Function
| Film used | FUJIFILM instant film "INSTAX mini" (sold separately) |
| Number of films | 10 films/pack |
| Film size | 86 mm × 54 mm |
| Screen size | 62 mm × 46 mm |
| Print pixel count | 800 × 600 dots |
| Print resolution | 12.5 dots / mm (318 dpi, 80 μm dot pitch) |
| Print gradation | RGB gradation of 256 colors |
| Printable image format | JPEG images taken with this unit |
| Print output time | Approximately 12 seconds |
| Print function | Images in the internal memory and images in the memory card can be printed |
| Reprint | Reprint is possible for images stored in Print history (up to 50) |
Other
| Smartphone app linked functions | Sound playback function from printed images, smartphone image print function, remote shooting function, frame selection function |
| LCD monitor | 2.7-inch TFT color LCD monitor Pixel count: Approximately 230,000 dots |
| External interface | Micro USB Micro-B (for charging only) |
| Power supply | Lithium ion battery (internal type: not removable) |
| Charging function | Built-in battery |
| Possible number of printed images | Approximately 100 (from full charge) *The number of prints depends on the usage conditions. |
| Charging time | Approximately 2-3 hours *Charging time depends on the temperature. |
| Main unit dimensions | 82.5 mm × 122.9 mm × 36.7 mm (excluding projecting parts) |
| Main unit weight | Approximately 255 g |
| Operating environment | Temperaturee: +5 ºC to +40 ºC Humidity: 20% to 80% (no condensation) |
*The above specifications are subject to change for performance improvement.
Troubleshooting
Please check the following items before considering a problem to be a malfunction. If the problem persists even after taking action, please contact our service center for repair or visit the website below.
FUJIFILM website: http://www.fujifilm.com/
If the following problem occurs...
| Problem | Possible causes and solutions |
| I cannot turn on the camera. | The battery may be exhausted. Please charge the camera. |
| The battery is exhausted quickly. | If you use the camera in a very cold environment, the battery will drain quickly. Please keep the camera warm before shooting. |
| Camera shuts down during use. | The battery level may be low. Please charge the camera. |
| Charging does not start. |
|
| It takes too long to charge. | At low temperatures, charging may take some time. |
| The self-timer lamp flashes while charging. | Charge the battery in a temperature range of +5°C to +40°C. If you cannot charge the battery within this range, please contact our support center. |
| I cannot shoot when I press the shutter button. |
|
| I cannot focus the camera. | Use the AF/AE lock to shoot subjects that are difficult to focus on. |
| The flash does not fire. | Check that the suppressed flash setting has not been selected. Select a setting other than the suppressed flash setting. |
| Even though the flash fired, the image is dark. |
|
| The image is blurred. |
|
| The camera does not work properly. |
|
| The film pack does not load or does not load smoothly. |
|
| The film does not unload. |
|
| Some or all of the finished prints are white. | Do not open the film door until all film exposures have been used. Unexposed film will be prematurely exposed if the door is opened. Prematurely exposed film will be white with no images. |
| The print is uneven. |
|

Documents / Resources
References
Download manual
Here you can download full pdf version of manual, it may contain additional safety instructions, warranty information, FCC rules, etc.
Advertisement
Thank you! Your question has been received!


Need Assistance?
Do you have a question about the instax mini LiPlay that isn't answered in the manual? Leave your question here.