Sunbeam MultiProcessor LC6250 - Food Processor Range Manual
- Instruction booklet (44 pages)
Advertisement
- 1 Sunbeam's Safety Precautions
- 2 Features of your Sunbeam MultiProcessor
- 3 Features of your Sunbeam MultiProcessor Plus
- 4 Attachments for your Sunbeam MultiProcessor
- 5 Using your Sunbeam MultiProcessor
- 6 Fitting/using the tools on your MultiProcessor
- 7 Storing your Sunbeam MultiProcessor
- 8 Handy hints for In Bowl Processing
- 9 A guide to your food processor
- 10 Handy blending tips
- 11 A guide to your blender
- 12 Care and cleaning
- 13 Documents / Resources
Sunbeam's Safety Precautions
SAFETY PRECAUTIONS FOR YOUR SUNBEAM FOOD PROCESSOR.
- Always use extreme care when handling processing blades and cutting discs. These are extremely sharp and may cause injury if handled incorrectly. Always store processing blades and cutting discs in their respective covers or processing containers.
- Unplug from power outlet before cleaning.
- Switch off the appliance and disconnect from supply before changing accessories or approaching parts that move in use.
- Always fit the safety cover before using the food processor.
- Do not put hot liquids into the food processor bowl or blender. Warm liquids only.
- Avoid contacting moving parts at all times.
- Place the processor bowl onto the base of the processor before fitting any attachments.
- All blades and attachments should be removed with care before cleaning.
- Do not over fill the processor.
- Always remove the blade before emptying the processor bowl of its contents.
- When mixing a heavy load, ie. a '1.5kg dough' do not operate food processor for more than 45 seconds at a time. This does not apply for any of the recipes detailed in this booklet.
![]()
Potential injury from misuse.
Sunbeam is very safety conscious when designing and manufacturing consumer products, but it is essential that the product user also exercise care when using an electrical appliance. Listed below are precautions which are essential for the safe use of an electrical appliance:
- Read carefully and save all the instructions provided with an appliance.
- Always turn the power off at the power outlet before you insert or remove a plug. Remove by grasping the plug - do not pull on the cord.
- Turn the power off and remove the plug when the appliance is not in use and before cleaning.
- Do not use your appliance with an extension cord unless this cord has been checked and tested by a qualified technician or service person.
- Always use your appliance from a power outlet of the voltage (A.C. only) marked on the appliance.
- This appliance is not intended for use by persons (including children) with reduced physical, sensory or mental capabilities, or lack of experience and knowledge, unless they have been given supervision or instruction concerning use of the appliance by a person responsible for their safety.
- Children should be supervised to ensure that they do not play with the appliance.
- Never leave an appliance unattended while in use.
- Do not use an appliance for any purpose other than its intended use.
- Do not place an appliance on or near a hot gas flame, electric element or on a heated oven. Do not place on top of any other appliance.
- Do not let the power cord of an appliance hang over the edge of a table or bench top or touch any hot surface.
- Do not operate any electrical appliance with a damaged cord or after the appliance has been damaged in any manner. If damage is suspected, return the appliance to the nearest Sunbeam Appointed Service Centre for examination, repair or adjustment.
- For additional protection, Sunbeam recommend the use of a residual current device (RCD with a tripping current not exceeding 30mA in the electrical circuit supplying power to your appliances.
- Do not immerse the appliance in water or any other liquid unless recommended.
- Appliances are not intended to be operated by means of an external timer or separate remote control system.
- This appliance is intended to be used in household and similar applications such as: staff kitchen areas in shops, offices and other working environments; farm houses; by clients in hotels, motels and other residential type environments; bed and breakfast type environments.
If you have any concerns regarding the performance and use of your appliance, please visit www.sunbeam.com.au or contact the Sunbeam Consumer Service Line. Ensure the above safety precautions are understood.
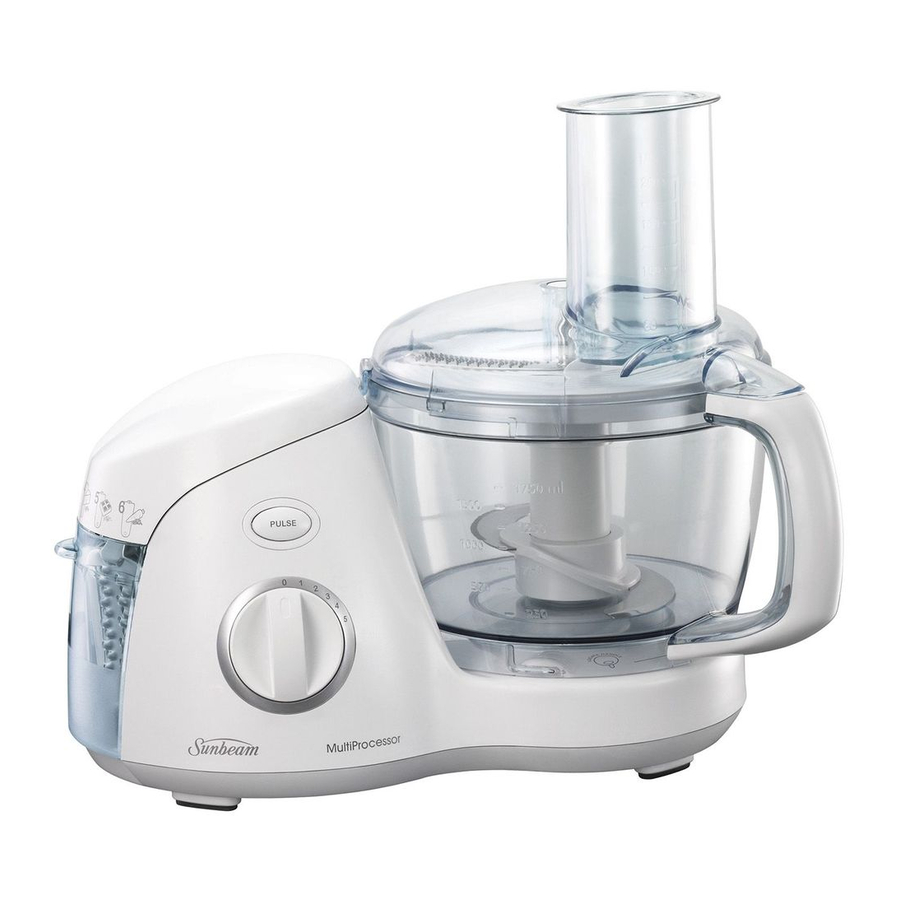
Features of your Sunbeam MultiProcessor

Processing bowl cover
The processing bowl cover activates the automatic safety system. The MultiProcessor will not operate unless the cover is correctly positioned on the processing bowl and locked into place.
355w motor base
The base houses a powerful 355 watt motor, which provides great processing results every time.
Pulse button
Increases the intensity of the standard processing action to assist in the most demanding tasks.
Variable speed control
The large speed control dial with 5 clearly marked speeds makes it easy to select the desired setting.
Blade storage compartment
Enables attachments to be stored conveniently when not in use.
Non-slip feet
Keeps the food processor secure on the bench top during use.
Food pusher
Guides food evenly down the feed tube and can also be used to close the chute while processing to prevent food from escaping through the feed tube.
Feed tube
The feed tube is used to guide ingredients down into the selected blades and allows you to add ingredients during other processing tasks.
Spindle
Drives all the food processing attachments. The spindle must be in place to operate the food processor.
Processing bowl
Capacity is 1.75 litres for liquids and 1.5 kilograms for solids. The bowl locks into place on the motor base and is designed to encourage even, efficient processing.
Cord storage facility
For tidy, convenient storage of the cord on the backside of the motor base.
Features of your Sunbeam MultiProcessor Plus

Blender cover with lid pouring hole
The blender lid securely seals the jug and features a lid pouring hole that allows you to add ingredients during blending.
1.5 litre shatter proof blender jug
The sizeable 1.5 litre jug features an easy grip handle and is marked in both cups and millilitres (ml) for ease of use. The blender jug locks onto the motor base of the food processor and will not operate unless the jug is in the locked position.
Serrated stainless steel blades
These durable, serrated stainless steel blades are strong enough to crush ice cubes and are ideal for pureeing, blending and mixing. The blade assembly is detachable for easy and thorough cleaning.
Pulse button
Increases the intensity of the standard processing action to assist in the most demanding tasks.
Blade storage compartment
Enables attachments to be stored conveniently when not in use.
Variable speed control
The large speed control dial with 10 clearly marked speeds makes it easy to select the desired setting.
Non-slip feet
Keeps the food processor secure on the bench top during use. 6
Ingredient measuring cap
Handy 70mL ingredient measuring cap.
Food pusher
Guides food evenly down the feed tube and can also be used to close the chute while processing to prevent food from escaping through the feed tube.
Feed tube
The feed tube is used to guide ingredients down into the selected blades and allows you to add ingredients during other processing tasks.
Bowl cover
The processing bowl cover activates the automatic safety system. The MultiProcessor
Plus will not operate unless the cover is correctly positioned on the processing bowl and locked into place.
Spindle
Drives all the food processing attachments.
The spindle must be in place to operate the food processor.
Processing bowl
Capacity is 1.75 litres for liquids and 1.5 kilograms for solids. The bowl locks into place on the motor base and is designed to encourage even, efficient processing.
Cord storage facility
For tidy, convenient storage of the cord on the backside of the motor base.
Attachments for your Sunbeam MultiProcessor
Processing blade
The stainless steel processing blade is contoured to fit the shape of the processing bowl to provide the most efficient chopping/ mixing action.

Please ensure that the processing blade protective cover is placed on the processing blade when not in use.
The processing blade can be used to chop raw meats to mince, chocolate to crumbs and nuts to paste.
Dough blade
The dough blade is contoured for fast, efficient processing. It is ideal for mixing doughs, heavy cake mixes and batters.

Blade holding disc
The blade holding disc houses the various processing attachments – slicing, chipping, grating and shredding.

Slicing blades - Thick and Thin
The thick slicing blade is ideal for slicing a variety of fruits and vegetables. The thin slicing blade is ideal for slicing of fruits, vegetables, raw meats, chicken and deli meats like salami.

Chipping blade
The chipping blade is ideal for making potato chips and vegetable strips.

Grating blade
The grating blade is ideal for grating hard cheeses, especially parmesan.

Shredding blades - Coarse and Fine

The coarse shredding blade is ideal for a variety of fruits and vegetables.
The fine shredding blade is ideal for chocolate, ginger and garlic and a variety of fruits and vegetables.
Whisk attachment
The whisk attachment is ideal for whisking egg whites, creams, light batters and packet cake mixtures.

Safety cover
This attachment is only available with the MultiProcessor Plus (LC6950).
When the blender is not in use, it is recommended that the blender is removed from the food processor body and the safety cover is locked in place. The MultiProcessor Plus will not operate unless the safety cover or blender jug is locked in place.

Citrus Juicer
This attachment is only available with the MultiProcessor Plus (LC6950).
The citrus juicer sits inside the processing bowl (without the spindle) to filter pips and pulp pieces during juicing.

The citrus juicer attachment enables you to juice all types of citrus fruits from limes and lemons to oranges and grapefruit.
Spatula

The spatula is ideal for assisting with all food processing tasks.
Using your Sunbeam MultiProcessor
Before using your MultiProcessor
- Wash the processing bowl, cover and all attachments in warm water using a mild detergent. Dry each part thoroughly before use.
- Before you assemble the food processor, ensure that the power cord is unplugged.
Before using the processing bowl
- The following steps are only necessary for the MultiProcessor Plus (LC6950).
- Place the motor base facing you on a dry, level surface.
- Fit the safety cover onto the food processor body and twist anti-clockwise, see Figure 1
LC6950 Pictured
![]()
Fig 1

 Note: The MultiProcessor Plus processing bowl will not operate if the safety cover or blender jug are not in place.
Positioning the processing bowl and cover
The following steps are for both models LC6250 and LC6950.
- Place the motor base facing you on a dry, level surface.
- Position the processing bowl over the drive shaft. The handle of the bowl needs to be facing you (marked "Locate handle") and the bowl should now be resting on the base of the food processor, see Figure 2.
LC6250 Pictured
![]()
Fig 2 - To lock the bowl into position for use, turn the handle to the right, as far as it will go, see Figure 3.
LC6250 Pictured
![]()
Fig 3 - Place the processor bowl cover onto the processing bowl, by aligning the icon
![]() marked on the handle with the icon
marked on the handle with the icon ![]() on the bowl cover. Then rotate lid to lock, see Figures 4 and 5.
on the bowl cover. Then rotate lid to lock, see Figures 4 and 5.


 marked on the handle with the icon
  on the bowl cover. Then rotate lid to lock, see Figures 4 and 5.
UNLOCKED

LC6250 Pictured
Fig 4
The holding lip should be flush with the top of the bowl handle.
LOCKED

LC6250 Pictured
Fig 5

If the processing bowl and cover are not correctly assembled, the MultiProcessor will not function.
Using your MultiProcessor
- Plug the power cord into a 230-240V AC power outlet and turn the power 'ON'.
- Using the control dial, select the desired processing speed. The Pulse function remains on as long as the Pulse button is pressed down. The variable speed settings will provide continuous processing until the control dial is returned to the '0' position. Further ingredients can also be added whilst processing by pouring through the feed tube once the food pusher has been removed.
- After you have completed processing, turn the control dial to the '0' position.
Note: For maximum control when using your food processor, load the feed tube before turning on your food processor. Always use the food pusher for more evenly processed foods and never use your fingers.
When mixing a heavy load, ie. '1.5kg Dough' do not operate food processor for more than 1 minute at a time.
Fitting/using the tools on your MultiProcessor
Note: All attachments must be firmly attached to the spindle. Always adjust the attachments until you are sure that they are correctly fitted.
Placing the spindle
- Fit the spindle onto the drive shaft, see Figure 6.
LC6250 Pictured

Fig 6

Processing Blade
- Fit the processor bowl and spindle as detailed previously in Figures 2, 3 & 6.
- Remove the protective cover from the stainless steel processing blade, see Figure 7.
![]()
Fig 7 - Fit the processing blade over the spindle and press firmly into place, see Figure 8.

Fig 8
![]()
Use extreme caution as blades are sharp. Always handle the chopping blade by its central plastic section. - Place food into the processing bowl.
- Fit the processing bowl cover to the processing bowl, see Figures 4 & 5 and place the food pusher in the feed tube.
- Plug the power cord into a 230-240V AC power outlet and turn the power 'ON'.
- Select the required speed.
- When processing is complete, remove the spindle and blade from the processing bowl before removing the processed food.


Note: After cleaning, always replace the protective cover on the stainless steel processing blade.
Dough Blade
- Fit the processor bowl and spindle as detailed previously, in Figures 2, 3 & 6.
- Fit the dough blade over the spindle and press firmly into place, see Figure 9.
LC6250 Pictured

Fig 9 - Place ingredients into the processing bowl.
- Fit the processing bowl cover to the processing bowl, see Figures 4 & 5 and place the food pusher in the feed tube.
- Plug the power cord into a 230-240V AC power outlet and turn the power 'ON'.
- Select required speed.
- When processing is complete, remove the spindle and blade from the processing bowl before removing the dough.

Note: For added safety we recommend that you always leave the food pusher in place whilst operating the processor.
Whisk Attachment
- Fit the processor bowl and spindle as detailed previously in Figures 2, 3 & 6.
- Fit the whisk attachment over the spindle and press firmly into place, see Figure 10.
LC6250 Pictured

Fig 10 - Add ingredients into the processing bowl.
- Fit the processing bowl cover to the processing bowl in Figures 4 & 5 and place the food pusher in the feed tube.
- Plug the power cord into a 230-240V AC power outlet and turn the power 'ON'.
- Select the required speed.
- When processing is complete, remove the spindle and whisk from the processing bowl before removing the processed food.

Slicing, Chipping, Grating and Shredding Blades
- Place the blade of your choice into the blade holding disc. Hold the blade by the holding clip and insert the other end into the blade holding disc. Press down on the end of the blade with the holding clip until the blade is sitting flat in the blade holding disc,
see Figures 11 & 12.

Fig 11
![]()
Fig 12 - Fit the processor bowl and spindle as detailed previously in Figures 2, 3 & 6.
- Fit the blade holding disc over the spindle and press firmly into place, see Figure 13.
LC6250 Pictured

Fig 13
![]()
Use extreme caution as the blades are sharp. - Fit the processing bowl cover to the processing bowl in Figures 4 & 5 and place the food pusher in the feed tube.
- Plug the power cord into a 230-240V AC power outlet and turn the power 'ON'.
- Select the required speed.
- When processing is complete, remove the blade holding disc and spindle from the processing bowl before removing the processed food.


Citrus Juicer
Note: This attachment is only available with the MultiProcessor Plus (LC6950).
- Fit the processor bowl as detailed previously in Figures 2 & 3.
- Fit the citrus juicer bowl into the food processing bowl, see Figure 14.
![]()
Fig 14 - Rotate anti-clockwise, ensuring that the citrus juicer bowl tab has locked into place, see Figure 15.
![]()
Fig 15 - Insert the juicing cone into the centre of the citrus juicer bowl; the drive shaft should be inside the central column of the bowl, see Figure 16.
![]()
Fig 16
- Plug the power cord into a 230-240V AC power outlet and turn the power 'ON'.
- Place fruit on citrus cone and hold with a cupped hand and turn speed control to speed 1.


Note: Always operate the juicer at minimum speed only.
Blender
Note: This feature is only available with the MultiProcessor Plus (LC6950).
- Remove the safety cover from the food processor body. Simply twist the safety cover clockwise and remove, see Figure 17.
LC6950 Pictured

Fig 17 - Position the blender onto the processor body above the speed control dial with the handle to the left where marked "Locate handle". see Figure 18.
![]()
Fig 18 - To lock the blender into place, simply hold the handle of the jug and turn it to the right as far as it will go. The assembly indicator light will be on if positioned correctly and locked in place, see Figure 19.

Fig 19
- Place ingredients into the jug.
![warning]() Note: Do not exceed the maximum indicated level – 1.5 litres.
Note: Do not exceed the maximum indicated level – 1.5 litres. - Position the lid onto the blender jug so that the long holding lip is facing towards you, see Figure 20.

Fig 20 - Turn the holding lip to the right, the holding lip should be flush with the top of the jug handle, see Figure 21.

Fig 21 - Fit the processor bowl and cover as detailed previously in Figures 2, 3, 4 & 5.
![warning]() Note: The blender will not operate if the processor lid is not correctly locked in place.
Note: The blender will not operate if the processor lid is not correctly locked in place. - Plug the power cord into a 230-240V AC power outlet and turn the power 'ON'.
- Select the required blending speed 1-10 or PULSE.


 Tip: Further ingredients can be added whilst blending by pouring through the lid hole once the measuring cup has been removed.
Storing your Sunbeam MultiProcessor
The Sunbeam MultiProcessor was designed so that all attachments can be stored within the unit itself, see Figure 22.
LC6250 Pictured

Fig 22
Blade storage compartment
- Your MultiProcessor is accessorised with 6 blades. Each of these blades are illustrated and numbered above the blade storage compartment, seeFigure 23.
![]()
Fig 23
- Pull down the blade storage door, see Figure 24.
![]()
Fig 24 - Each of the blades is numbered 1 through 6 and corresponds with the numbered illustrations on the unit, see Figure 25.

Fig 25
Blade 1 is the 'Thin Slicing' blade and its position in the blade storage compartment is the far left front position, see Figure 26.

Fig 26
- Blade 2 is the 'Thick Slicing' blade and is positioned directly behind the thin slicing blade.
- Blade 3 is the 'Chipping' blade and its position in the blade storage compartment is the middle front position, see Figure 27.
![]()
Fig 27
- Blade 4 is the 'Grating' blade and ispositioned directly behind the chipping blade.
- Blade 5 is the 'Fine Shredding' blade and its position in the blade storage compartment is the far right front position, see Figure 28.
![]()
Fig 28
- Blade 6 is the 'Coarse Shredding' blade and is positioned directly behind the fine shredding blade.


Processing bowl storage
See Figure 29:
LC6250 Pictured

Fig 29
- Place the processing bowl onto the base of the food processor.
- Fit the spindle over the drive shaft.
- Fit the whisk attachment over the spindle.
- Take the processing blade with cover and place over the spindle. The processing blade should be sitting with the blade cover resting on top of the whisk attachment.

Use extreme caution as blades are sharp. Always handle the chopping blade by its central plastic section.
- Fit the dough blade over the spindle. The dough blade has a narrow opening on one end and a larger opening on the other. Place the dough blade with the narrow end resting on the top of the chopping blade.
- Place the blade holding disc over the spindle and then fit the processing bowl cover to the processing bowl.
Cord storage
The power cord can be stored by wrapping it around the two clips on the back of the motor base, see Figure 30.

Fig 30
Handy hints for In Bowl Processing
Chopping
For the best, most consistent results, you should try to process pieces of food that are approximately equal in size. When you break, cut or tear food into uniform pieces before you begin processing, the finished results will be more uniform.
More consistent processing results are achieved if the container is not overloaded.
Mincing
Pre-cut meat into cubes approximately 2cm square.
Vegetables
When processing vegetables such as onions, peel and quarter or cut large vegetables into eighths.
Mixing
The quantities that can be processed within the processing bowl will vary with the density of the mixture.
Adding ingredients
When various recipes require dry ingredients such as flour, add them directly into the processing bowl before processing. There is no need to sift ingredients when using your MultiProcessor. Liquid ingredients may be added while the processor is operating by pouring through the feed tube in the processor cover.
Note: When processing sauces or semi-liquid ingredients, stop the food processor and scrape down the bowl sides with the spatula provided.
Using the Feed Tube
The most important factor for successful slicing and shredding is the way in which the food is packed into the feed tube.
Slicing, shredding and grating
Cut all ingredients to a size that fits comfortably into the feed tube. Pack the feed tube and, while holding food steady and upright with the food pusher, press down evenly until all ingredients are sliced or shredded. The more firmly you push, the thicker the slices or shreds. Do not use excessive force or you may damage the food processor.
Note: Never use fingers to push food down the feed tube. Always use the food pusher.
For best results when slicing
The feed tube should always be packed firmly to allow each piece of food to support the others. There will always be a small portion of food left unprocessed between the food pusher and the blade.
Preparing longer slices
Pack food items horizontally in the feed tube, see Figure 31.

Fig 31
Preparing shorter slices
Pack the food items vertically in the feed tube, see Figure 32.

Fig 32
For best results when shredding and grating
Remember that softer foods such as cheese (cheddar, mozzarella or swiss) should be well chilled before processing. Harder foods such as parmesan or Romano cheese should be at room temperature before processing.
Note: When grating parmesan cheese do not apply a lot of pressure to the food pusher.
Disassembly
When processing is completed, remove the cover from the processing bowl first and then remove the processing bowl with the processing blade still in place.
To remove the processing bowl firstly unlock the processing bowl cover by rotating it in a clockwise direction until the cover is unlocked.
Note: Always wait for the processing blade to stop moving completely before removing the bowl cover.
Use extreme caution, as blades are sharp. Always handle the chopping blade by its central plastic section.
A guide to your food processor
| Processing Task | Attachment | Food Product | Max. Qty. | Speed setting | Notes |
| Chopping |  | Vegetables – onions | 800g | 3 | Ensure onions are peeled |
| Fruits (fresh or dried) 800g | 800g | 3 | Pick fruit and vegetables that are fresh and firm | ||
| A selection of fresh herbs | 1 bunch | 2 | Wash herbs and dry thoroughly | ||
| Nuts - i.e. whole peanuts/cashews/almonds | 500g | 5 | Break into pieces before processing | ||
| Chocolate – whole or buds | 400g | 4 | |||
| Mincing | | Chicken fillets, fish fillets (boned), red meat & bacon rashes | 500g | 5 | Trim excess fat off meat and ensure all bones are removed |
| Crumbing | | Biscuits, bread and crackers | 125g | 3 or 4 | Break large biscuits into smaller pieces before processing. Process in batches |
| Pureeing | | Cooked vegetables | 2 cups | 1 | May need to add water during processing |
| Cooked fruits | up to 1.75L | 1 | |||
| Mixing | | Cake mixtures, batters, dips and flavoured butters | 800ml | 1-3 | Start on speed 1 to combine ingredients, then slowly increase the speed for thorough mixing |
| Emulsifying | | Mayonnaise, oil based dressings | 1ltr | PULSE or 3 | Keep processing while adding oil |
| Kneading |  | Bread, pasta, pizza doughs, shortcrust and scones | 1.5kg | 1-5 | Start on speed 1 to combine ingredients, then use speed 5 for mixing |
| Slicing (thick & thin) |  | Vegetables (cucumber, zucchini carrot, capsicum) | 800g | 1-2 | Trim all vegetables and wash before processing |
| Use speed 1 for soft fruit and vegetables | |||||
| Fruits (apples tomatoes, limes) | 800g | 1-2 | Pick fruits and vegetables that are the same size & thickness | ||
| Use speed 2 for hard fruit and vegetables. | |||||
| Chipping |  | Vegetables (carrot potato, parsnip sweet potato) | 1 kg | 1-2 | Wash and peel vegetables before processing |
| Grating |  | Parmesan cheese | 500g | 1-2 | Cut cheeses to fit into the feed tube. Do not apply too much pressure onto the food pusher |
| Shredding (coarse & fine) |  | Chocolate (use block) | 500g | 1-2 | Brake block of chocolate into 2 or 3 pieces to fit into the feed tube, one piece at a time |
| Fruits – i.e. apple | 1 kg | ||||
| Vegetables – i.e. carrot | 1 kg | ||||
| Whisking |  | Cake mixture, egg whites, cream and light batters | 1 kg | 4-5 | Be careful not to over beat egg whites |
Handy blending tips
Note: Only for the MultiProcessor Plus (LC6950).
- Nothing can beat a blender for making smooth purees and sauces or for whipping up frothy drinks - from healthy breakfast shakes to frozen daiquiris.
- Use your blender for chopping small amounts of food like nuts, bread crumbs and whole spices.
- Turn any oil-based salad dressing into a creamy style dressing by blending it until slightly thickened.
- A brief whirl in the blender will rescue a lumpy gravy, or an egg-based sauce that has separated.
- When crushing ice, add ¼ cup of water, as this will aid in the ice crushing process. Continue pulsing until the ice is completely crushed and it has a snow flake texture.
- Food items for blending should be cut into cubes (approximately 2-3cm), this will assist in an even result.
- Ensure the lid is firmly and securely placed on the jug. Do not operate the blender without the lid on, if you wish to add any additional ingredients remove the measuring cup and add as necessary.
- Never fill above the maximum level indicator.
- To ensure efficient mixing when blending dry mixtures, it may be necessary to stop the blender and push ingredients down the sides of the jug with a spatula.
- When pureeing fruits or vegetables, cooked or raw, cut into small pieces to facilitate blending.
- When making bread crumbs, use 2 to 3 day old bread, leaving crusts on to minimise the possibility of clumping. If only fresh bread is available, dry it out for a few minutes in a low oven.
- When blending a variety of ingredients together, blend the liquids first, then add dry ingredients.
- Always ensure stones are removed from fruits and bones from meat as these can harm the blades.
- Don't allow a used blender to sit for too long as the food will dry on the blades making it very difficult to clean. If you can't clean the blender straight away, pour some warm water in it and allow to soak.
- Do not process hot liquids in your blender. Allow to cool before processing.
- Always ventilate the blender jug when pureeing warm ingredients. This is achieved by lifting the measuring cup out of the lid.
A guide to your blender
| PROCESSING TASK | FOOD | SUGGESTED SETTING | SUGGESTED PROCEDURE |
| Aerating | Milkshakes, Smoothies | 2 | Use chilled milk. Blend until desired consistency is achieved. |
| Chopping | Nuts, Chocolate, Garlic or Herbs | PULSE | Process ½ cup at a time to ensure evenly sized pieces. |
| Crumbing | Bread Crumbs | PULSE & 2 | Tear bread roughly. Process until desired consistency. |
| Biscuit Crumbs | 2 | Break into pieces and process until crumbed. | |
| Crushing Ice | PULSE | Add ¼ cup of water. Use the button 3-4 times in succession for crushed ice. | |
| Emulsifying | Salad Dressing | 2 | Blend until well combined. Oil may be added to the mixture during processing through the pouring hole in the lid. |
| Mixing | Batters, Cakes | 1 | Process ingredients until just combined. DO NOT OVERPROCESS. |
| Pureeing | Soups Vegetables Fruits | 2 | Blend until smooth. |
Note: Times for processing will vary with the quantity in blender jug. These times are only a guide.
Care and cleaning
When you have finished processing, unplug your MultiProcessor from the power outlet. Wash all accessories, processor tools and all surfaces that have come into contact with food in hot soapy water except for the processor body. Clean the processor body by wiping with a damp cloth.
Care must be taken when handling the metal blades as these items are extremely sharp.
Note: Always unplug the MultiProcessor before cleaning.
Dishwasher use
All plastic components deteriorate through the prolonged use of a dishwasher for cleaning.
We recommend washing all parts of the MultiProcessor in hot soapy water except for the processor body
Cleaning your Blender
Note: Only for the MultiProcessor Plus (LC6950).
Quick cleaning method
Half fill the blender with warm water and a small amount of detergent. Press the PULSE button for a few seconds. Then remove the jug and rinse it under running water.
For thorough cleaning
Unscrew the blade system from the jug by turning anti-clockwise. Remove the silicone rubber seal from the blade assembly. Wash the lid, jug, silicone rubber seal and the blade assembly in warm soapy water.

Take care when cleaning the blades, as they are extremely sharp.

Documents / ResourcesDownload manual
Here you can download full pdf version of manual, it may contain additional safety instructions, warranty information, FCC rules, etc.
Download Sunbeam MultiProcessor LC6250 - Food Processor Range Manual
Advertisement
Thank you! Your question has been received!


Need Assistance?
Do you have a question about the MultiProcessor LC6250 that isn't answered in the manual? Leave your question here.