Oregon Scientific EB312E - Electronic Travel Barometer Manual
- Instruction manual (2 pages)
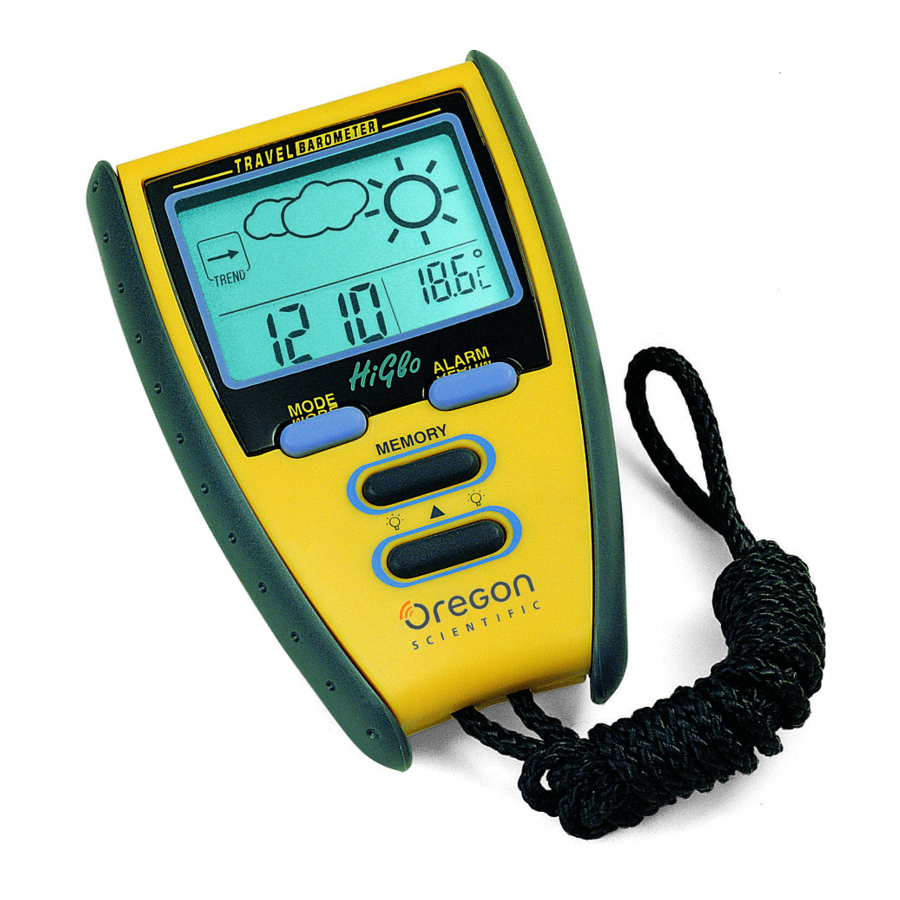
Advertisement
- 1 INTRODUCTION
- 2 FEATURES
- 3 DESCRIPTION OF PARTS
- 4 INSTALLING AND REPLACING BATTERIES
- 5 REPLACE EXHAUST BATTERIES
- 6 DISPLAY AND FUNCTIONS
- 7 GENERAL OPERATION
- 8 HOW TO VIEW THE TEMPERATURE MEMORY
- 9 HOW TO CLEAR THE TEMPERATURE MEMORY
- 10 HOW TO VIEW THE ALARM TIME AND THE CALENDAR
- 11 HOW TO SET THE CLOCK AND THE CALENDAR
- 12 HOW TO SET THE DAILY ALARM
- 13 HOW TO READ THE BAROMETIC PRESSURE TREND
- 14 HOW TO READ THE ILLUSTRATED WEATHER FORECAST SYMBOLS AND THE STORM ALARM
- 15 THE RESET BUTTON
- 16 LOW BATTERY SIGNAL INDICATION
- 17 MAINTENANCE
- 18 SPECIFICATIONS
- 19 Documents / Resources
INTRODUCTION
- Thank you for your purchase of this Travel Barometer.
- Your Travel Barometer is an example of superior design and craftsmanship.
- In order to optimize its function, be sure to read this manual carefully and keep it for future reference.
FEATURES
- LCD digital barometer with weather forecast icons show Sunny, Slightly Cloudy, Cloudy, Rainy or Stormy
- Barometric pressure trend display
- Built-in storm weather warning with audible and visual alarm
- Displays indoor temperature
- Maximum and minimum temperature memory
- Clock display shows the hour and minute: Alternating calendar display, shows the month and date
- Daily alarm
- User selectable 12/24 hour time format
- Strong back light
- Built-in low battery indicator
- Water resist case deisgn
DESCRIPTION OF PARTS

- LCD DISPLAY
- ALARM BUTTON
- MODE BUTTON
- MEMORY BUTTON
- LIGHT/UP BUTTON
- VENTILATION
- BATTERY DOOR
[SEE FIG.1]

- RESET BUTTON
- WALL MOUNT BRACKET
- HANGER HOLE

[SEE FIG.2]
INSTALLING AND REPLACING BATTERIES
The Travel Barometer uses two CR2032 Lithium batteries and it is shipped with these batteries installed. To activate the unit, you must first remove the protective battery tabs which keep the batteries fresh and ready for use after shipment. You have to use a screw driver to remove the 4 back screws to pull up the battery cover to expose the batteries. Remove the small plastic tab and the Travel Barometer begins to work.
REPLACE EXHAUST BATTERIES
If the ' BATT ' indicator appears, removes the exhausted batteries and follow below steps to replace the batteries:
- On the back of the unit, use a screw driver to remove the four back screwsand then lift up the battery cover.
- Insert the batteries as indicated by the polarity symbols ( + and - ) marked inside the battery compartment.
- Replace the battery cover and fasten the four screws.
[SEE FIG. 2]
Note:
After replacing the batteries, the whole display will be turned on for about 3 seconds and then show the following:
- Indoor temperature shows the current measurement
- Weather forecast shows slightly cloudy (a sun shows with the cloud indicator )
- Clock shows 12:00 (AM).
The Travel Barometer takes about 24 hours to store the barometric pressure data. Until that time has elapsed, the weather forecast symbols may not reflect actual weather forecast for your area.
DISPLAY AND FUNCTIONS

- CLOCK/ALARM OR CALENDAR DISPLAY
- WEATHER FORECAST INDICATOR
- INDOOR TEMPERATURE
[SEE FIG. 3]
GENERAL OPERATION
The display on your Travel Barometer has several functions, other than those first displayed when the unit is turned on. The temperature area of the screen has additional memory displays for the indoor temperatures. The clock display, in addition to displaying the current time, also acts as the alarm and calendar display. You can access the other functions by pressing the [ MODE ] or the [ MEMORY ] button.
Press the [  ] button once for light-up the display for 3 seconds, so for you to see the barometer in the dark.
HOW TO VIEW THE TEMPERATURE MEMORY
Press the [ MEMORY ] button once. The temperature display will show the maximum temperature.
( This reading indicates the maximum temperature recorded since it was last reset. ) Press [ MEMORY] button again and you'll see the minimum temperature. Pressing [ MEMORY ] button a third time returns you to the current temperature.
HOW TO CLEAR THE TEMPERATURE MEMORY
To clear temperature memory and begin recording new high and low temperatures, press and hold the [ MEMORY ] button for about 2 seconds until the unit beeps once.
Note:
If you are in MIN or MAX temperature display screens, and you do not press any other button, the screen will return to the current temperature readings after 20 seconds.
HOW TO VIEW THE ALARM TIME AND THE CALENDAR
To view your alarm time press the [ ALARM ] button once. The alarm indicator will appear with an alarm time. Press the [ ALARM ] button a second time to return to the normal clock display.
To view the current date, press the [ MODE ] button once, the month and the date will be displayed. Pressing [ MODE ] button again will return you to the normal clock display.
Note:
If you are in the calendar/alarm display, and you do not press any other button, the screen will return to the normal clock display after 20 seconds.
HOW TO SET THE CLOCK AND THE CALENDAR
When you first start up your Travel Barometer ( or after you replace the batteries or reset the unit ) use the following steps to set your clock and calendar:
- Press and hold the [ MODE ] button in the current Time Mode for about 2 seconds. The month digits will flash. Press the [
![]() ] button to increase the setting in 1 month increments until the desired month is displayed.
] button to increase the setting in 1 month increments until the desired month is displayed. - Once the month is correct, press [ MODE ] button again to display the date digits. The date digits will be flashing. Use the [
![]() ] button to increase the date in 1 day increments until the desired day is played.
] button to increase the date in 1 day increments until the desired day is played. - Once the day is correct, press [ MODE ] button. You'll see 12hr or 24hr flashing. Pressing the [
![]() ] button will toggle between the 12 and 24 hour settings.
] button will toggle between the 12 and 24 hour settings. - Once the clock format is correct, press [ MODE ] button. The hour digits will be flashing. Press the [
![]() ] button again to increase the clock in 1 hour increments until the desired hour is displayed.
] button again to increase the clock in 1 hour increments until the desired hour is displayed. - Once the hour is correct, press [ Mode ] button again to create the flashing minute digits. Pressing the [
![]() ] button will increase the minutes one at a time, until the correct time is displayed.
] button will increase the minutes one at a time, until the correct time is displayed. - Finally press the [ Mode ] button to confirm all the settings you just entered. The unit will return to the clock display.
 ] button to increase the setting in 1 month increments until the desired month is displayed.
HOW TO SET THE DAILY ALARM
- Press and hold the [ ALARM ] button in Alarm Time Mode for about 2 seconds. The indicator
![]() and the hour digits will be flashing. Press the [
and the hour digits will be flashing. Press the [ ![]() ] button to increase the alarm time in 1 hour increments, until the desired hour is displayed.
] button to increase the alarm time in 1 hour increments, until the desired hour is displayed. - Press [ ALARM ] button again and the indicator
![]() and the minute digits will flash. Press the [
and the minute digits will flash. Press the [ ![]() ] button to increase in 1 minute increments until the correct time is displayed.
] button to increase in 1 minute increments until the correct time is displayed. - Press [ ALARM ] button a third time and press the [
![]() ] button to toggle the alarm between ACTIVATED (
] button to toggle the alarm between ACTIVATED ( ![]() displayed) and deactivated (
displayed) and deactivated ( ![]() disappear ).
disappear ). - Press the [ ALARM ] button again. The daily alarm is now set, and your Travel Barometer will resume its normal time.
 and the hour digits will be flashing. Press the [
  displayed) and deactivated (
  disappear ).
Note:
If you get interrupted at any point in the alarm setting sequence, the clock will return to its normal time display, if no buttons are pressed for 20 seconds.
HOW TO READ THE BAROMETIC PRESSURE TREND
The Barometer gives you the pressure trend for the last hour, indicated by the arrow displayed in the upper left corner of your display, next to the weather icon. The weather will be improving if this trend (arrow) is rising, or getting worse if the trend (arrow) is falling. Here's what it can look like:

[SEE FIG. 4]
HOW TO READ THE ILLUSTRATED WEATHER FORECAST SYMBOLS AND THE STORM ALARM
Your Travel Barometer automatically detects the barometric pressure changes in your area. Based on this changing pressure, it displays an illustrated weather symbol indicating the weather forecast. The displayed weather marks are indicating a forecast 12 to 24 hours ahead, for a radius of approximately 30-50km (20 to 30 miles).
If the Travel Barometer detects stormy conditions, the storm indicator ( lightning bolts ) will flash and an alarm will beep. The alarm sound will stop automatically after 1 minute to conserve power. If you're not present when these alarms begin, the audible beep will sound every 3 minutes as a continued storm warning until the weather forecast improves.
To stop the sounding storm alarm, press any button. The storm icon will continue to flash until the weather forecast improves. [SEE FIG. 5]


- The accuracy of weather forecasting when using pressure trend alone isabout 70 to 75 percent and, therefore, we cannot held the responsible for any inconveniences caused by an inaccurate weather forecast.
- The weather forecast symbols may not reflect the current weather condition. The symbols are forecasting the future.
- A ' Sunny ' forecast covering the night-time reflects fine clear weather.
THE RESET BUTTON
If the unit does not operate properly, use a pointed object to push the [ RESET ] button once, which is located on the battery compartment.
LOW BATTERY SIGNAL INDICATION
If the voltage of the batteries becomes low, the ' BATT ' indicator will be displayed. Please replace the batteries when the ' BATT ' indicator is displayed.
MAINTENANCE
The following suggestions will help you care for the Travel Barometer so you can enjoy it for years.
- Avoid dropping the Travel Barometer into water as it is designed for weather proof.
- Use and store the Travel Barometer only in normal temperature environments. Temperature extremes can shorten the life of electronic devices, damage batteries, and distort or melt plastic parts.
- Handle the Travel Barometer gently and carefully. Dropping it can damage circuit boards and cause the Barometer to work improperly.
- Keep the Travel Barometer away from dust and dirt, which can cause premature wear of parts.
- Wipe the Travel Barometer with a damp cloth occasionally to keep it looking new. Do not use harsh chemicals, cleaning solvents, or strong detergents to clean the Barometer.
- Use only fresh batteries of the required size and type. Always remove oldor weak batteries. They can leak chemicals that can destroy electronic circuits.
- Modifying or tampering with the Travel Barometer internal components can cause a malfunction and might invalidate its warranty.
SPECIFICATIONS
| Operating temperature | 0°C to +50°C ( +32°F to + 122°F) | ||
| Temperature measuring range | 0°C to +50°C | ||
| ( unit: Internal sensor ) | ( +32°F to + 122°F ) | ||
| Temperature display resolution | 0.1°C ( 0.2°F ) | ||
| Temperature sampling cycle | 9 seconds | ||
| Pressure sampling cycle | 15 minutes | ||
| Clock accuracy | ± 0.5 secs per day | ||
| Power source | Two pieces CR2032 Lithium Battery | ||
| Battery life | Approx. 1 Year | ||
| Dimension | 98 x 65 x 21mm (H x W x D) | ||
| Weight | 100gms (with batteries) | ||

- The content of this manual is subjected to change without further notice.
- Due to printing limination, the displays shown in this manual may differ from the actual displays.
- The manufacturer and its suppliers held no responsibility to you or any other person for any damages, expenses, lost profits, or any other damages arise by using this Travel Barometer.
- The contents of this manual may not be reproduced without the permit of the manufacturer.

Documents / ResourcesDownload manual
Here you can download full pdf version of manual, it may contain additional safety instructions, warranty information, FCC rules, etc.
Download Oregon Scientific EB312E - Electronic Travel Barometer Manual
Advertisement
Thank you! Your question has been received!


Need Assistance?
Do you have a question about the EB312E that isn't answered in the manual? Leave your question here.