Table of Contents
Advertisement
Available languages
Available languages
Quick Links
SPLIT-SYSTEM HEAT PUMP
PLA-A . EA Series
OPERATION MANUAL
For safe and correct use, please read this operation manual thoroughly before operating the air-conditioner unit.
MANUEL D'UTILISATION
Pour une utilisation correcte sans risques, veuillez lire le manuel d'utilisation en entier avant de vous servir du
climatiseur.
MANUAL DE INSTRUCCIONES
Lea este manual de instrucciones hasta el final antes de poner en marcha la unidad de aire acondicionado para
garantizar un uso seguro y correcto.
FOR USER
POUR L'UTILISATEUR
PARA EL USUARIO
English
Français
Español
Advertisement
Chapters
Table of Contents

Related Manuals for Mitsubishi Electric PLA-A EA Series


Summary of Contents for Mitsubishi Electric PLA-A EA Series
- Page 1 SPLIT-SYSTEM HEAT PUMP PLA-A . EA Series OPERATION MANUAL FOR USER English For safe and correct use, please read this operation manual thoroughly before operating the air-conditioner unit. MANUEL D’UTILISATION POUR L’UTILISATEUR Français Pour une utilisation correcte sans risques, veuillez lire le manuel d’utilisation en entier avant de vous servir du climatiseur.
-
Page 2: Table Of Contents
Contents 1. Safety Precautions ....... . .1 5. Emergency Operation for Wireless Remote-controller ..13 2. -
Page 3: Parts Names
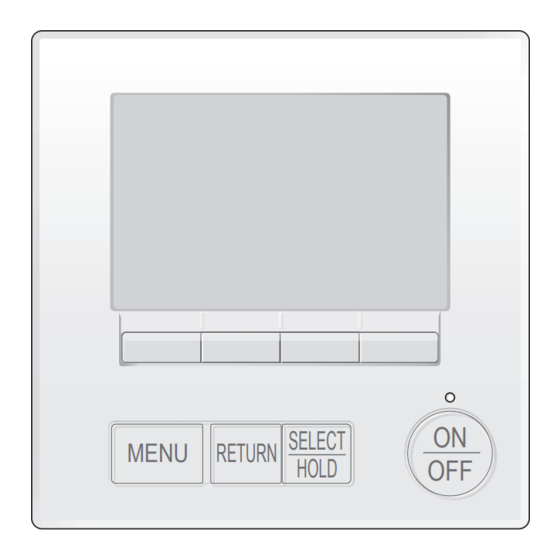
2. Parts Names ■ Indoor Unit Filter PLA-A▪EA8 Air outlet Fan steps 4 steps Vane Auto with swing Louver – Filter Long-life Filter cleaning indication 2,500 hr Vane Air intake Enter the model setting number for the indoor unit you want to operate. Remote controller (Optional parts) Wired remote controller Wireless remote controller... - Page 4 2. Parts Names ■ Wired Remote Controller Controller interface The functions of the function buttons change depending on the screen. Refer to the button function guide that appears at the bottom of the LCD for the functions they serve on a given screen. When the system is centrally controlled, the button function guide that corresponds to the locked button will not appear. Main display Main menu Main Main menu Room Cool Set temp. Auto Energy saving Mode Temp. 7 8 9 0 7 8 9 0 RETURN SELECT MENU Menu screen...
- Page 5 2. Parts Names Display The main display can be displayed in two different modes: “Full” and “Basic”. The factory setting is “Full”. To switch to the “Basic” mode, change the setting on the Main display setting. (Refer to operation manual included with remote controller.) <Full mode>...
- Page 6 2. Parts Names ■ Wireless Remote-Controller Note: In this operation manual, the term “Wireless remote controller” refers only to the PAR-SL101A-E. If you need any information for other remote controllers, refer to the operation manual that is included with the grille, which includes a remote controller, or the operation manual that is included with the optional remote controller. Transmission area Not available Remote controller display Battery replacement indicator Set Temperature buttons OFF/ON button Mode button (Changes operation mode) Fan Speed button (Changes fan speed) Airflow button (Changes up/down airflow direction) i-see button Timer ON button Menu button Timer OFF button...
- Page 7 2. Parts Names Notes (Only for wireless remote controller): Battery installation/replacement ■ When using the wireless remote controller, point it towards the receiver on the indoor unit. 1. Remove the top cover, insert two LR6 AA ■ If the remote controller is operated within approximately 3 minutes after power is supplied to the batteries, and then install the top cover.
-
Page 8: Operation
3. Operation ■ About the operation method, refer to the operation manual that comes with each remote controller. 3.1. Turning ON/OFF [ON] [OFF] Press the [ON/OFF] button. Press the [ON/OFF] button again. The ON/OFF lamp will light up in green, The ON/OFF lamp will come off, and and the operation will start. the operation will stop. When “LED lighting”... - Page 9 3. Operation 3.4. Fan speed setting <Exiting the Main menu screen> Press the [RETURN] button to exit the Main menu and return to the Main display. Room Room Cool Set temp. Auto Cool Set temp. Auto Mode Temp. Mode Temp. RETURN SELECT MENU RETURN SELECT HOLD MENU HOLD If no buttons are touched for 10 minutes, the screen will automatically Press the [F4] button to go through the fan speeds in the following order.
- Page 10 3. Operation Notes: <Vane setting> During swing operation, the directional indication on the screen ● Press the [F1] or [F2] button. does not change in sync with the directional vanes on the unit. Available directions depend on the type of unit connected. ● Press the button as indicated above In the following cases, the actual air direction will differ from the ● to go through the following setting direction indicated on the remote controller display. options. 1. While the display is in “STAND BY” or “DEFROST” states. 2. I mmediately after starting heat mode (while the system is wait- Vane Vent. Auto ing for the mode change to take effect). Auto Step 1 Step 2 3. I n heat mode, when room temperature is higher than the tem-...
- Page 11 3. Operation ■ Manual vane angle (Wired remote controller) 4 The current vane setting will ap- Manual vane angle pear. 1 Select “Comfort” from the Opera- Operation tion menu, and press the [SELECT/ Vane·Louver·Vent. (Lossnay) High power Select the desired outlets from HOLD] button. Comfort “1”,“2”, “3”, “4”, or “1, 2, 3, 4 (all Select: SELECT outlets)”...
- Page 12 3. Operation ■ Confirmation procedure (wired remote controller) 3 Select “3D i-See sensor” with the Comfort [F1] or [F2] button, and press the 1 First, confirm by setting “Ref. Manual vane angle Manual vane angle 3D i-See sensor [SELECT/HOLD] button. address” to 0 and “Unit No.” to 1. Ref.
- Page 13 3. Operation 3 When Direct/Indirect is selected, set 2 When No occupancy energy save Direct/Indirect setting Energy saving option each air outlet. or Room occupancy energy save No occupancy energy save Direct Select the air outlet with the [F1] or is selected.
-
Page 14: Timer
3. Operation Notes: 3.6.4 Seasonal airflow function Any person at the following places cannot be detected. 1 Select the setting with the [F4] ● Along the wall on which the air conditioner is installed Seasonal airflow Seasonal airflow button. Seasonal airflow Seasonal airflow ● Directly under the air conditioner OFF → Cooling only → Heating ● Where any obstacle, such as furniture, is between the person and Cooling/Heating Cooling/Heating only → Cooling/Heating → OFF… the air conditioner A person may not be detected in the following situations. -
Page 15: Care And Cleaning
6. Care and Cleaning ■ Filter information will appear on the Main display When the is displayed on the in the Full mode when it is time to Main display in the Full mode, the Room clean the filters. Room system is centrally controlled and Cool Set temp. -
Page 16: Trouble Shooting
7. Trouble Shooting Having trouble? Here is the solution. (Unit is operating normally.) Air conditioner does not heat or cool well. n Clean the filter. (Airflow is reduced when the filter is dirty or clogged.) n Check the temperature adjustment and adjust the set temperature. n Make sure that there is plenty of space around the outdoor unit. -
Page 17: Specifications
7. Trouble Shooting Having trouble? Here is the solution. (Unit is operating normally.) ■ Noise is louder than specifications. The indoor operation sound level is affected by the acoustics of the particular room as shown in the following table and will be higher than the noise specification, which was measured in anechoic room. - Page 18 Index 1. Consignes de sécurité ........1 5.
- Page 19 2. Nomenclature ■ Unité interne PLA-A·EA8 Modes du ventilateur 4 modes Filtre Ailette Auto avec variation Grille de refou- Louvre – lement d’air Filtre Longue durée Témoin de nettoyage du 2.500 heures fi ltre Entrez le numéro du Ailette réglage du modèle de Admission d’air l’appareil intérieur que vous souhaitez utiliser.
- Page 20 2. Nomenclature ■ Télécommande fi laire Interface de la télécommande Les fonctions réalisées par les touches varient en fonction de l’écran. Consultez le guide des touches en bas de l’écran LCD pour voir les fonctions correspondant à un écran donné. Lorsque le système est piloté à distance, le guide de fonction des touches n’apparaît pas pour les touches verrouillées. Ecran principal Menu général Main Main menu Room Energy saving Cool Set temp. Auto Mode Temp. 7 8 9 0 7 8 9 0 RETURN SELECT MENU...
- Page 21 2. Nomenclature Afficheur L’écran principal peut être affiché dans deux modes différents : “complet” et “basic”. Le réglage usine est “complet”. Pour passer au mode “basic”, changez-le dans l’écran principal. (Reportez-vous au manuel d’utilisation inclus avec la télécommande.) <Mode complet> <Mode basic> * Toutes les icônes sont affichées pour la compréhension.
- Page 22 2. Nomenclature Télécommande sans fil Remarque : Dans le présent manuel d’utilisation, l’expression “télécommande sans fil” fait référence au modèle PAR-SL101A-E. Pour toute information relative à un autre modèle de télécommande, reportez-vous au manuel d’utilisation fourni avec la grille, qui comprend une télécommande, ou au manuel d’utilisation fourni avec la télécommande en option. Zone de transmission Non disponible Écran d’affichage de la télécommande Témoin de remplacement de la pile Touches de réglage de température Touche OFF/ON Touche de mode (Modifie le mode Touche de vitesse du ventilateur de fonctionnement) (Modifie la vitesse du ventilateur) Touche “Airflow”...
- Page 23 2. Nomenclature Remarques (Pour télécommande sans fil uniquement) : Insertion/remplacement de la pile ■ Pour utiliser la télécommande sans fil, pointez-la vers le récepteur de l’appareil intérieur. ■ 1. Retirez le couvercle supérieur, insérez deux Si la télécommande est utilisée dans les 3 minutes qui suivent l’alimentation de l’appareil piles LR6 AA, puis reposez le couvercle. intérieur, l’appareil peut émettre deux bips successifs indiquant que le contrôle automatique initial est en cours.
- Page 24 3. Fonctionnement ■ Concernant le mode de fonctionnement, reportez-vous au manuel d’utilisation fourni avec chaque télécommande. 3.1. Marche/arrêt [ON] [OFF] Pressez la touche [ON/OFF]. Pressez à nouveau la touche [ON/OFF]. La lampe Marche / Arrêt s’allume en La lampe Marche / Arrêt s’éteint, et l’appa- vert, et l’appareil démarre. reil s’arrête. Lorsque “LED lighting” (Éclairage LED) est réglé...
- Page 25 3. Fonctionnement 3.4. Réglage de la vitesse du ventilateur <Fermer le Menu général> Pressez la touche [RETURN] pour sortir du Menu général, et retourner sur l’écran principal. Room Room Cool Set temp. Auto Cool Set temp. Auto Mode Temp. Mode Temp. RETURN SELECT RETURN SELECT MENU MENU HOLD HOLD Pressez [F4] pour changer la vitesse du ventilateur, dans l’ordre suivant. Si aucune touche n’est appuyée pendant 10 minutes, l’affi chage revient automatiquement à...
- Page 26 3. Fonctionnement <Réglage du déflecteur> Remarques : Pendant l’oscillation, l’indication directionnelle à l’écran ne ● Appuyez sur la touche [F1] ou [F2]. change pas en synchronisation avec les ailettes de l’unité. Les directions disponibles dépendent du type d’unités connec- ● Appuyez sur le bouton comme indiqué tées. ci-dessus pour passer en revue les Dans les cas suivants, la direction actuelle de l’air différera de la ●...
- Page 27 3. Fonctionnement ■ Angle de rotation des volets (Télécommande filaire) 4 Le réglage d’ailette actuel Manual vane angle 1 Dans le menu Operation (Fonc- s’affiche. Operation tionnement), sélectionnez “Com- Vane·Louver·Vent. (Lossnay) High power fort” (Confort) puis appuyez sur la Sélectionnez les sorties désirées Comfort touche [SELECT/HOLD]. de “1”, “2”, “3”, “4” ou “1, 2, 3, 4 Select: SELECT (toutes les sorties)”...
- Page 28 3. Fonctionnement ■ Procédure de confirmation (télécommande filaire) 3 Sélectionnez “3D i-See sensor” (Cap- Comfort teur 3D i-See) à l’aide de la touche Manual vane angle 1 Réglez d’abord “Ref. address” 3D i-See sensor [F1] ou [F2], puis appuyez sur la Manual vane angle (Adresse réf.) sur 0 et “Unit No.” Ref.
- Page 29 3. Fonctionnement 3 Quand Direct/Indirect est sélec- 2 Quand No occupancy energy save Direct/Indirect setting Energy saving option tionné, réglez chaque sortie d’air. (Économie d’énergie si la pièce No occupancy energy save Sélectionnez la sortie d’air à l’aide Direct n’est pas occupée) ou Room oc- : Indirect de la touche [F1] ou [F2], et chan- Cooling/Heating...
- Page 30 3. Fonctionnement Remarques : 3.6.4 Fonction Flux d'air saisonnier Les personnes qui se trouvent aux endroits suivants ne peuvent pas être détectées. 1 Sélectionnez le réglage à l’aide de Seasonal airflow Seasonal airflow ● Le long du mur sur lequel le climatiseur est installé la touche [F4]. Seasonal airflow Seasonal airflow ● Juste sous le climatiseur OFF (Arrêt) → Cooling only (Refroi- Cooling/Heating Cooling/Heating ● Lorsque la personne est séparée du climatiseur par un obstacle dissement uniquement) → Heating quelconque, un meuble par exemple only (Chauffage uniquement) →...
- Page 31 6. Entretien et nettoyage ■ Information filtre apparaît sur l’écran principal Lorsque le est affiché sur dans en mode complet quand les l’écran principal en mode complet, Room filtres doivent être nettoyés. Room Cool Set temp. Auto le système est piloté de façon cen- Cool Set temp.
- Page 32 7. Guide de dépannage En cas de problème : Voici la solution. (L’appareil fonctionne normalement.) ■ Le climatiseur ne chauffe ni ne refroidit correctement. Nettoyez le filtre. (Le débit d’air est réduit lorsque le filtre est sale ou colmaté.) ■ Contrôlez la température et ajustez la température définie en conséquence. ■...
- Page 33 7. Guide de dépannage En cas de problème : Voici la solution. (L’appareil fonctionne normalement.) ■ Le bruit perçu est supérieur aux caractéristiques sonores. Le niveau sonore du fonctionnement intérieur dépend de l’acoustique de la pièce dans laquelle l’appareil est installé (voir tableau suivant), et sera supérieur aux caractéristiques sonores (mesurées dans une pièce sans écho).
- Page 34 Contenido 1. Medidas de seguridad .......1 5. Funcionamiento de emergencia del controlador remoto inalámbrico . . .13 2.
-
Page 35: Nombres De Las Piezas
2. Nombres de las piezas ■ Unidad interior Filtro PLA-A·EA8 Salida de aire Pasos del ventilador 4 pasos Defl ector Automático oscilante Rejilla – Filtro Larga duración Defl ector Indicación de limpieza de fi ltro 2.500 horas Entrada de aire Introduzca el número de confi guración de modelo para la unidad interior que desea utilizar. - Page 36 2. Nombres de las piezas ■ Controlador remoto cableado Interfaz del controlador Las funciones de los botones de función cambian dependiendo de la pantalla. Consulte la guía de funciones de los botones que aparece en la parte inferior del LCD para ver las funciones que tienen en cada una de las pantallas. Cuando el sistema se controla a nivel central, la guía de función del botón que corresponde al botón bloqueado no aparecerá. Pantalla principal Menú principal Main Main menu Room Cool Set temp.
- Page 37 2. Nombres de las piezas Pantalla La pantalla principal se puede visualizar en dos modos diferentes: “Completo” y “Básico”. Por defecto, viene configurada a “Completo”. Para cambiar al modo “Básico”, cambie la configuración en la configuración de la pantalla principal. (Consulte el manual de instrucciones incluido con el controlador remoto.) <Modo completo>...
- Page 38 2. Nombres de las piezas ■ Controlador remoto inalámbrico Nota: En este manual de funcionamiento, el término “Controlador remoto inalámbrico” se refiere únicamente al modelo PAR-SL101A-E. Si necesita información acerca de otros controladores remotos, consulte el manual de funcionamiento que se incluye con la rejilla, que incluye un controlador remoto, o el manual de funcionamiento que se incluye con el controlador remoto opcional. Área de transmisión No disponible Pantalla del controlador remoto Indicador de sustitución de las pilas Botones Set Temperature Botón OFF/ON Botón Mode (cambia el modo de funcionamiento)
- Page 39 2. Nombres de las piezas Notas (solo para el controlador remoto inalámbrico): Instalación/sustitución de pilas ■ Cuando utilice el controlador remoto inalámbrico, apunte hacia el receptor de la unidad 1. Retire la cubierta superior, inserte dos pilas LR6 AA interior. ■ y vuelva a colocar la cubierta superior. Si el controlador remoto se utiliza unos 3 minutos después de encender la unidad interior, esta puede pitar dos veces, ya que estará...
-
Page 40: Manejo
3. Manejo ■ Para obtener información sobre el método de funcionamiento, consulte el manual de instrucciones suministrado con cada controlador remoto. 3.1. Encendido/Apagado del sistema [ON] [OFF] Presione el botón [ON/OFF]. Presione de nuevo el botón de La lámpara de ENCENDIDO/APAGADO se ilumi- [ON/OFF]. nará en verde y comenzará a funcionar la unidad. La lámpara de ENCENDIDO/ Cuando “LED lighting” (Iluminación LED) APAGADO se apagará... - Page 41 3. Manejo 3.4. Ajuste de la velocidad del ventilador <Salir de la pantalla del Menú principal> Presione el botón [RETURN] para salir del Menú principal y volver a la pantalla principal. Room Room Cool Set temp. Auto Cool Set temp. Auto Mode Temp. Mode Temp. RETURN SELECT RETURN SELECT MENU MENU HOLD HOLD Presione el botón [F4] para ver las velocidades del ventilador en el siguiente orden.
- Page 42 3. Manejo <Configuración del álabe> Notas: ● D urante la operación de oscilación, la indicación de dirección en Pulse el botón [F1] o [F2]. la pantalla no cambia al mismo tiempo que los deflectores direc- cionales de la unidad. Pulse el botón de la forma indicada ● L as direcciones disponibles dependen del tipo de unidad conectada. anteriormente para navegar por las ● E n los siguientes casos, la dirección real del aire diferirá de la di- siguientes opciones de configura- rección indicada en la pantalla del mando a distancia. ción. 1. C uando la pantalla está en los estados “STAND BY” (RESERVA) Vane Vent.
- Page 43 3. Manejo ■ Ángulo lama manual (Controlador remoto cableado) 4 Se mostrará el ajuste actual de los Manual vane angle deflectores. 1 Seleccione “Comfort” (Cómodo) Operation Vane·Louver·Vent. (Lossnay) desde el menú Funcionamiento y Seleccione las salidas que desee High power pulse el botón [SELECT/HOLD]. de “1”, “2”, “3”, “4”, o “1, 2, 3, 4 (to- Comfort Select: SELECT das las salidas)”...
- Page 44 3. Manejo ■ Procedimiento de confirmación (mando a distancia con cable) 3 Seleccione “3D i-See sensor” con Comfort el botón [F1] o [F2], y pulse el Manual vane angle 1 En primer lugar, confirme ajustan- 3D i-See sensor botón [SELECT/HOLD]. Manual vane angle do “Ref. address” (Codificación) a Ref.
- Page 45 3. Manejo 2 Si se ha seleccionado Ahorro de 3 Si selecciona Directo/Indirecto, Energy saving option Direct/Indirect setting energía cuando no hay nadie en la configure cada salida de aire. No occupancy energy save sala o Ahorro de energía cuando Seleccione la salida de aire con el Direct hay personas en la sala.
-
Page 46: Temporizador
3. Manejo Notas: 3.6.4 Función Flujo de aire estacional No se detectarán personas en los siguientes lugares. ● A lo largo de la pared en la que está instalado el acondicionador 1 Seleccione la configuración con el Seasonal airflow Seasonal airflow de aire Seasonal airflow botón [F4]. Seasonal airflow ● Directamente debajo del acondicionador de aire DESACTIVADO → Solo refri- Cooling/Heating Cooling/Heating ● Donde haya un obstáculo, por ejemplo muebles, entre la persona geración → Solo calefacción → y el acondicionador de aire Refrigeración/Calefacción →... -
Page 47: Mantenimiento Y Limpieza
6. Mantenimiento y limpieza ■ Información Filtros aparecerá en la pantalla princi- Cuando se muestra en la pan- pal en modo Completo cuando llegue talla principal en el modo Completa, el momento de limpiar los filtros. Room Room el sistema está controlado a nivel Cool Set temp. -
Page 48: Localización De Fallos
7. Localización de fallos ¿Problemas? Aquí tiene la solución. (La unidad funciona normalmente). ■ El acondicionador de aire no calienta o refrigera bien. Limpie el filtro (el flujo de aire se reduce cuando el filtro está sucio o atascado). ■ Compruebe el ajuste de temperatura y modifique la temperatura ajustada. ■... -
Page 49: Especificacione
7. Localización de fallos ¿Problemas? Aquí tiene la solución. (La unidad funciona normalmente). ■ El ruido es mayor de lo indicado en las especificaciones. El nivel de ruido del funcionamiento interior depende de la acústica de la sala en cuestión tal y como se indica en la siguiente tabla, por lo que puede ser superior a los valores de las especificaciones, que se midieron en salas sin eco. - Page 50 Software Information This product includes open source software (“OSS”) distributed under the terms of open source licenses. Apache License Version 2.0, January 2004 http://www.apache.org/licenses/ TERMS AND CONDITIONS FOR USE, REPRODUCTION, AND DISTRIBUTION 1. Definitions. “License” shall mean the terms and conditions for use, reproduction, and distribution as defined by Sections 1 through 9 of this document. “Licensor”...
- Page 51 APPENDIX: How to apply the Apache License to your work. To apply the Apache License to your work, attach the following boilerplate notice, with the fields enclosed by brackets “{}” replaced with your own identifying information. (Don’t include the brackets!) The text should be enclosed in the appropriate comment syntax for the file format. We also recommend that a file or class name and description of purpose be included on the same “printed page”...
- Page 52 For the residents of USA U.S. Product Warranty and Registration Information Congratulations on the purchase of your new Mitsubishi Electric Trane HVAC US Cooling & Heating system and thank you for trusting us with your personal comfort. Your installing contractor may have registered your products on your behalf. To check the registration status or to complete your product registration, please visit us at http://www.metahvac.com/.