Advertisement
Quick Links
Download this manual
See also:
Owner's Manual
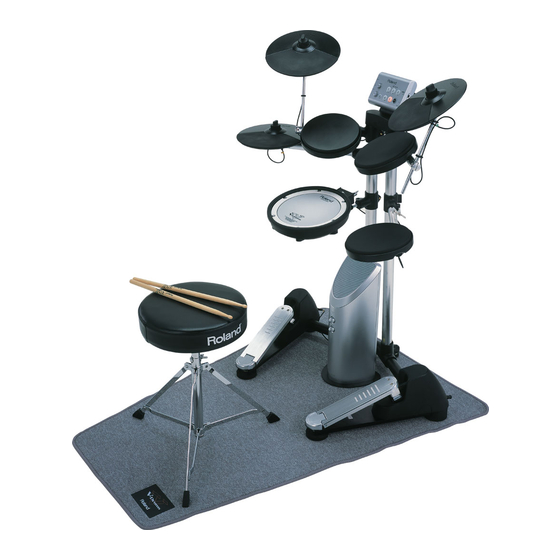
HD-1 V-Drums Lite
Set-up Guide
Checking the package contents
Immediately after you open the package, check to see whether you have everything.
If anything is missing, please contact your dealer.
Stand
Sound Module
AC Adaptor
Screw for Sound Module x 4
Arm pipe
Foot Pipes
Cymbal Pad x 3
Snare Pad
Screw for Foot Pipe x 4
Drum Key
Screwdriver
Manual Set
Set-up Guide
Video Manual
Owner's Manual
Roland Sticker
2
Open the
1. Open the arm pipes in the order shown
arms
in the illustration (1, 2, 3, 4).
Rear of the HD-1
4 1
3 2
2 4
Tighten
3
Loosen
3
Attach the
1. Attach the snare pad to the rod.
pads
Knob
Tighten
Loosen
Rod
Firmly tighten the knob of snare pad.
If it is not tightened sufficiently, the
pad may rotate or the rod may be
damaged.
Copyright © 2007 ROLAND CORPORATION All rights reserved. No part of this publication may be reproduced in any form without the written permission of ROLAND CORPORATION.
Assembling the HD-1
When assembling the stand, take care that it does not fall over.
1
Attach the foot pipes
When fitting the pipes together, be
careful not to pinch your hands!
1. Lay the stand on the floor, and attach one of the foot pipes.
Do not insert your fingers or hands underneath the pedals or in the spring.
2. Flip the stand over, and attach the other foot pipe.
Align with the screw
holes.
Tighten the
screws firmly
and evenly.
Align the flat portions.
Be careful that the left and right foot pipes are located correctly.
3. Use the clamp to fasten the pedal cable.
4. Set the stand upright.
Make sure the foot pipes are
securely fastened to the stand.
If not you risk to damage the
stand or have stability problems.
2. Use a drum key to loosen the
3. Adjust the rod height.
bolts.
Adjust this so that it does not
interfere with other pads, taking care
that the rod does not come out.
Be careful
As the cymbal rod sticks through the
not to pinch
pipe on the bottom side, be careful
yourself.
to not injure yourself.
4. Tighten the bolt to fasten securely.
2. Attach the cymbal pad.
Cymbal Knob
Cymbal Felt
Tighten to obtain an appropriate
amount of sway.
If this knob is too loose, you may
experience double triggering.
4
Attach the
sound module
5
Connect the
cables
6
Correct any
instability
7
Adjusting pads
and seat height
8
Connect the
AC adaptor
and amp
Attach in the
orientation shown
in the illustration.
1. Place the sound module on the holder,
and use the included screwdriver and
screws to fasten it.
When mounting the module,
be careful not to drop it.
1. Connect the cables to the pads and pedals.
The labels affixed to the
cables indicate the pad
to which they should be
connected. Make
connections as shown
in the illustration.
If the stand wobbles because the
1. For either the left pedal or right
floor is not perfectly flat, use the
pedal, turn the adjuster clockwise (as
adjusters (three locations indicated
seen from above) for the pedal that's
by
) to adjust the height.
not in firm contact with the floor.
In particular, when using the HD-1
on carpet, adjust these so that they
are in firm contact with the floor.
Be careful not to pinch your fingers
or hands when making these
adjustments.
1. Seat Height
2. Adjust the height of the pad.
Adjust the height of the seat so that when
Adjust the height
your feet are on the pedals, your legs are
of the snare to
parallel to the floor, as shown in the
the height of
diagram.
your waist when
seated.
Adjust the height and
position of the other
pads so you can play
comfortably.
Be careful not to pinch
the cable.
Headphones
Monitor Amplifier etc.
2. When attaching the cable connector to the
module, use your fingers ONLY to tighten the
screws. Do NOT use a screwdriver.
2. Use the clamp to fasten the cymbal cable.
Allow
some slack
Fasten the
cable with
the clamp
2. If the stand's vertical support is
still floating even after you've
adjusted the left and right height,
turn the rear adjuster.
Set tom 2 at the same height
as tom 1.
Tom 1
Tom 2
Be careful that the cable does
not protrude.
Tighten the knob firmly.
Place the AC adaptor so that its lamp light is
on the top side.
(it lights up when connected to an AC outlet)
Lamp
AC Adaptor
AC Outlet
Anchor the power cord using
the cord hook, as shown in the
illustration.
Advertisement

Related Manuals for Roland HD-1 V-Drums Lite


Summary of Contents for Roland HD-1 V-Drums Lite
- Page 1 If it is not tightened sufficiently, the pad may rotate or the rod may be damaged. Copyright © 2007 ROLAND CORPORATION All rights reserved. No part of this publication may be reproduced in any form without the written permission of ROLAND CORPORATION. Attach the sound module...
-
Page 2: Important Notes
• Sound module attachment screws not slip or move accidentally. • Foot pipe attachment screws • Cymbal knobs • If you will be using the HD-1 in the same • Cymbal felts location for an extended period, we • Cable ties recommend that you use an optional drum ❍...