Oregon Scientific RM913TCN - Radio Controlled Clock With Backlight Manual
- User manual (2 pages) ,
- User manual (2 pages)
Advertisement
- 1 FEATURES
- 2 DESCRIPTION OF PARTS (fig. A)
- 3 INSTALLING AND REPLACING BATTERIES
- 4 ABOUT THE RADIO RECEPTION
- 5 ABOUT CLOCK MODES
- 6 ABOUT THE ALARM TIME
- 7 SETTING AN ALARM TIME
- 8 SETTING THE MAIN TIME & ZONE TIME
- 9 TIME ZONE OFFSET TABLE (GMT) (fig. K)
- 10 RESETTING THE UNIT
- 11 SPECIFICATION
- 12 PRECAUTIONS
- 13 ABOUT OREGON SCIENTIFIC
- 14 Documents / Resources
FEATURES
- Radio controlled features:
- Automatic synchronization and setting of clock by Radio Signal
- 3 levels of Radio Signal reception (Strong, Weak, No reception)
- Alarm Clock & General features:
- Backlight for easy reading in the dark
- Displays time, date and day of the week in one of 4 languages (E/F/G/I)
- A second time-zone with time, date and day-of-the-week
- 2 alarm times with 8-minute snooze function
- 2 minute crescendo alarm that increases in volume
- Low battery indication.
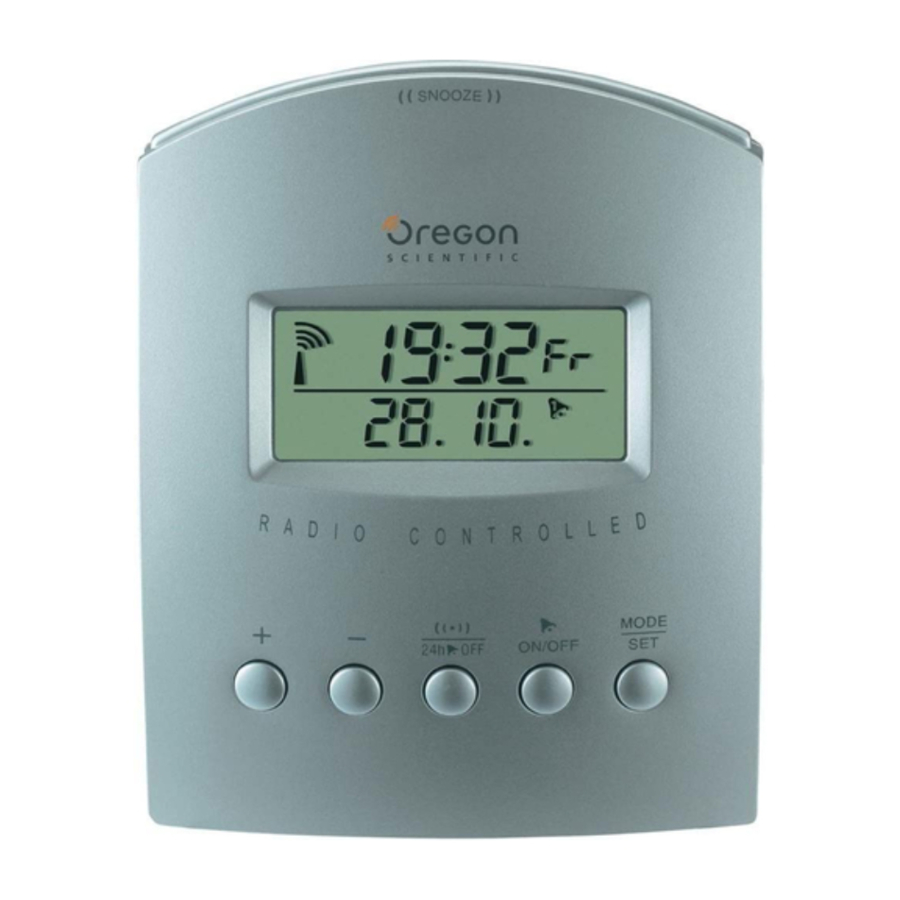
DESCRIPTION OF PARTS (fig. A)

- LCD DISPLAY
- BATTERY COMPARTMENT
- Accommodates two UM-4 or AAA size batteries
- SNOOZE
- Activates light for 8 sec.
- Activates the 8-minute snooze function by pressing it shortly.
- MODE/SET
- Selects display options.
- Long pressing (> 3sec) enters setting mode for time and display options.
- 24 OFF ALARM [
![]() ]
]
 ]
]- Repeat daily alarm. Display & set alarm time.
- Short pressing displays alarm time 1 and then alarm time 2.
- Long pressing (> 3sec) enters alarm time setting.
- ALARM [
![]() ] ON/OFF
] ON/OFF
 ] ON/OFF
- Direct activation or deactivation of alarms.
- UP [+]
- Incremental setting when in Main Time or Alarm Time setting: Single press: Increments by 1 If hold > 3 sec: Fast increments.
- In normal function and provided radio reception is disabled: Activate radio signal reception and start signal reception if hold > 3 sec.
-
DOWN [-]
- Decremental setting when in Main Time or Alarm Time setting: Single press: Decrements by 1. If held > 3 sec: Fast decrements.
- In normal function, disables radio signal reception if held > 3 sec.
INSTALLING AND REPLACING BATTERIES
When flashing " " appears on LCD, replace with 2 new UM-4 "AAA" batteries.
Steps for battery replacement:
- Pull the back cover as indicated on Fig B- 1

- Insert new batteries, follow the polarity symbols (+ and -) in the battery compartment (Fig. B- 2 ).

- Close the battery cover.


After replacing the batteries, the entire display will activate for about 1 second, then LCD will show as [Fig. C].

ABOUT THE RADIO RECEPTION
The RM913TCN is designed to automatically synchronize its calendar clock once it is brought within range of the MSF Rugby radio signal. When the RM913TCN is within range, its radiocontrol mechanism will override all manual settings. When the unit is receiving radio signal, the RADIO RECEPTION signal will start to blink. A complete reception generally takes about two to 10 minutes, depending on the strength of the radio signal. After that, scheduled scanning may only take a few seconds.
When the reception is complete, the RADIO RECEPTION signal will stop blinking. The strength of the reception will remain until the next scanning cycle takes place.
This clock receives Radio signals which are generated from MSF Rugby in UK with a radius of approximately 1500km.
Levels of radio reception are indicated by antenna symbols as shown in [Fig. D].
FIG. D
 | Strong, Forte, stark, Buona, Fuerte |
 | Weak, Faible, Schwach, Debole, Debil |
 | No Reception, Pas de réception, Kein Empfang, Ricezione nulla, No Hay Recepción |
| No indicator | Radio reception is disabled and no signal reception will be initiated until it is enabled again. |
 | Receiving, Recevant, Empfang, Ricezione, Recibiendo |
Activate reception
Your clock is factory set to start with a reception after inserting the batteries.
If you wish to deactivate the reception for reasons such as travelling outside the reception area (e.g. Asia, Africa or America), you may disable the reception. Subsequently, on return, you can enable it again.
Enter normal clock mode or alarm mode:
| Press key | Functions |
| [-] for > 3sec | Radio reception is deactivated. Antenna symbol disappears from display. |
| [+] for > 3sec | Radio reception is enabled. A full reception is instantly started. |

Keep your clock away from any metal parts and some electrical appliances to avoid interference.
ABOUT CLOCK MODES
The RM913TCN supports four time display modes in the sequence of:
[FIG. E-i] | MODE 1. | Hour-Minute-Second (of local time) Day-Month (of local time) |
[FIG. E-ii] | MODE 2. | Hour-Minute-Day of the Week (of local time) Day-Month (of local time) |
[FIG. E-iii] | MODE 3. | Hour-Minute-Day of the Week (of local time) Hour-Minute (of second time zone) |
[FIG. E-iv] | MODE 4. | Hour-Minute-Day of the Week (of second time zone) Day-Month (of second time zone) |
Each press on the MODE/SET button will toggle the display in the above order.
ABOUT THE ALARM TIME
- Two independent alarm times are available: Alarm 1 and Alarm 2.
- Press [
![]() ], Alarm Time 1 display indicates ((1)): [FIG. F]
], Alarm Time 1 display indicates ((1)): [FIG. F]
![]()
- Press [
![]() ] again, Alarm Time 2 is displayed indicated by indicator ((2)): [FIG. G]
] again, Alarm Time 2 is displayed indicated by indicator ((2)): [FIG. G]
![]()
 ], Alarm Time 1 display indicates ((1)): [FIG. F]

SETTING AN ALARM TIME
- Setting Alarm 1
- Press [
![]() ] to select Alarm 1. Press again and hold > 3 seconds. [FIG. H]
] to select Alarm 1. Press again and hold > 3 seconds. [FIG. H]
![]()
- Set the hours with [+] or [-] key to the desired time. The "
![]() " will appear and the alarm is activated after finishing the steps [FIG. I]
" will appear and the alarm is activated after finishing the steps [FIG. I]
![]()
- Press [+] or [-] buttons to enter the appropriate hour digit. Alarm set icon [
![]() ] will appear.
] will appear. - Press [
![]() ] to confirm and enter minute digits using the [+] or [-] buttons.
] to confirm and enter minute digits using the [+] or [-] buttons. - Press [
![]() ] to confirm and exit alarm set mode.
] to confirm and exit alarm set mode.
 ] to select Alarm 1. Press again and hold > 3 seconds. [FIG. H]
 " will appear and the alarm is activated after finishing the steps [FIG. I]
 ] to confirm and enter minute digits using the [+] or [-] buttons.
- Set Alarm 2
- Enter Alarm 2 setting mode and follow instructions as for Alarm 1.
- About Alarm Sound
The four-step crescendo function allows the alarm to start off gently and step up its intensity. Without interruption, the alarm will go off for a total of two minutes. If a second alarm goes off when the first alarm is sounding off, the first alarm will be disabled automatically. - How to stop an Alarm Sound
The total duration is 2 minutes. Press [![]() ] key within these 2 minutes, the Alarm will be repeated after approx. 8 minutes and so on, until either of the following actions takes place.
] key within these 2 minutes, the Alarm will be repeated after approx. 8 minutes and so on, until either of the following actions takes place.
To stop an alarm from ringing on the same day, press [24HR OFF ] or [AL ON/OFF ] once.
Note that the alarm is still armed and will go off at the set time the following day.
To deactivate the alarm function completely, press [AL ON/OFF ] a second time.
If no [![]() ] key is pressed in two subsequent 2 min alarm cycles, the alarm will sound each time for the full 2 minutes and then stop for 24 hours.
] key is pressed in two subsequent 2 min alarm cycles, the alarm will sound each time for the full 2 minutes and then stop for 24 hours.
 ] key within these 2 minutes, the Alarm will be repeated after approx. 8 minutes and so on, until either of the following actions takes place.
SETTING THE MAIN TIME & ZONE TIME
Setting sequence:
Press [  ] hold > than 3 sec
| Setting (blinks) | Action |
| Hour of Time |
|
| Minutes of Time |
|
| Year |
|
| Month of Date |
|
| Day of Date |
|
| Language of Day |
|
| Offset for other key time zones |
|
 ]
] ]
]

Adjusting your main time may conflict with the received radio signal. In this case, the received signal has always priority and will override the manual setting!!
TIME ZONE OFFSET TABLE (GMT) (fig. K)
")
RESETTING THE UNIT
In case of malfunction or abnormal display, take out and re-install the batteries again. All settings will be cleared and reset to their default values.
SPECIFICATION
- 12 h display with hh: mm ss
- Dual alarm times
- Power: 2 pc. UM4 (AAA) size batteries
- Size: 110 X 86 X 42 mm ( H x W x D )
- Weight: 160 g (without battery)
PRECAUTIONS
This product is engineered to give you years of satisfactory service if you handle it carefully. Here are a few precautions:
- Do not immerse the unit in water.
- Do not clean the unit with alcohol containing detergent, abrasive or corrosive materials. Abrasive cleaning agents may scratch the plastic parts and corrode the electronic circuit.
- Do not subject the unit to excessive force, shock, dust, temperature or humid-ity, which may result in malfunction, shorter electronic life span, damaged battery and distorted parts.
- Do not tamper with the unitís internal components. Doing so will invalidatethe warranty on the unit and may cause unnecessary damage. The unit con-tains no user-serviceable parts.
- Only use fresh batteries as specified in the userís manual. Do not mix new and old batteries as the old ones may leak.
- Always read the user's manual thoroughly before operating the unit.
ABOUT OREGON SCIENTIFIC
Visit our website (www.oregonscientific.com) to learn more about Oregon Scientific products such as digital cameras; MP3 players; children's electronic learning products and games; projection clocks; health and fitness gear; weather stations; and digital and conference phones. The website also includes contact information for our customer care department in case you need to reach us, as well as frequently asked questions and customer downloads.
We hope you will find all the information you need on our website, however if you'd like to contact the Oregon Scientific Customer Care department directly, please visit www2.oregonscientific.com/service/support or call 949-608-2848 in the US. For international enquiries, please visit www2.oregonscientific.com/about/international/default.asp

Documents / ResourcesDownload manual
Here you can download full pdf version of manual, it may contain additional safety instructions, warranty information, FCC rules, etc.
Download Oregon Scientific RM913TCN - Radio Controlled Clock With Backlight Manual
Advertisement
Thank you! Your question has been received!


Need Assistance?
Do you have a question about the RM913TCN that isn't answered in the manual? Leave your question here.