Oregon Scientific AW131 - BBQ/Oven Meat Thermometer Manual
- User manual (1 page) ,
- User manual (2 pages)
Advertisement
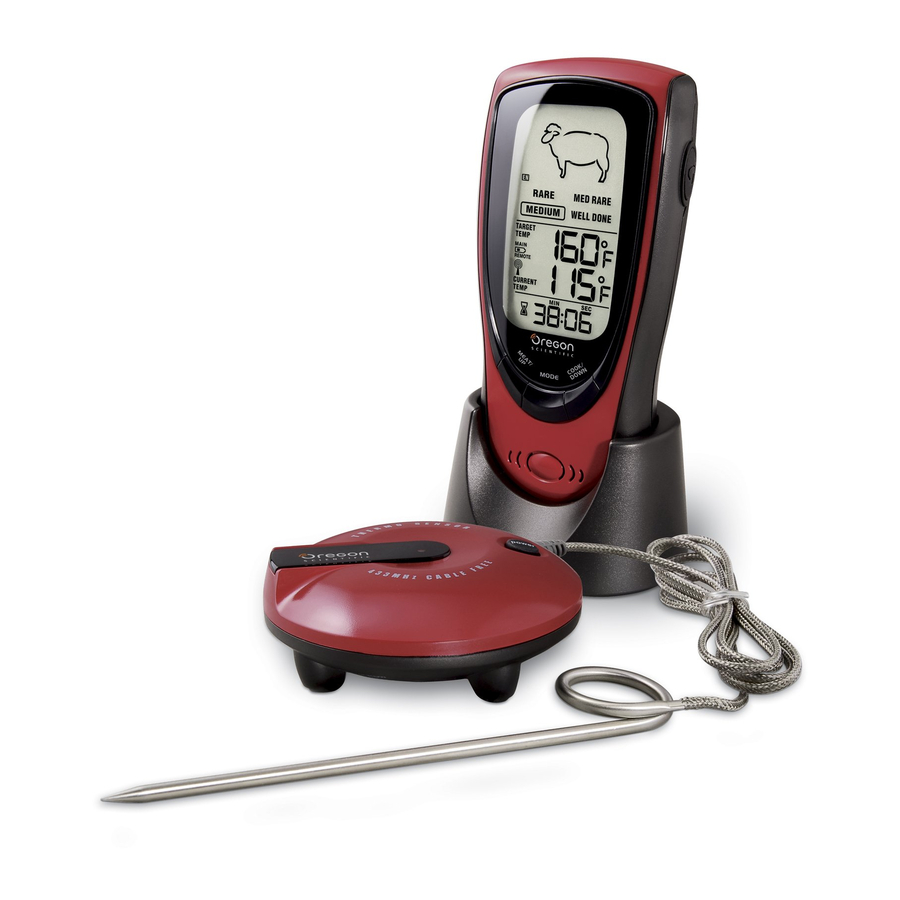
OVERVIEW
MAIN UNIT FRONT VIEW

- MEAT / UP: Select meat type / increase target temperature
- POWER: Activate / deactivate unit
- COOK / DOWN: Select doneness level / decrease target temperature
- MODE: Select between cooking options
- Speaker
MAIN UNIT BACK VIEW

- Belt Clip
- RESET
- °C / °F: Select temperature unit
- Battery compartment
- HI / LOW: Select volume level
- Battery compartment lever
- LANG: Press to select voice prompt language
- HR: Select hours for timer
- MIN: Select minutes for timer
- START / STOP: Start, pause and reset timer
LCD SCREEN

- Language icons
- Doneness level
- Low battery indicator
- Signal reception icon
- Timer icon
- Meat types
- Target temperature
- Current temperature
- Timer
TRANSMITTER AND PROBE

- LED indicator
- RESET
- POWER :
Activate / deactivate transmitter - Connector jack for probe
- Battery compartment

- Probe connector wire
- Probe tip
GETTING STARTED
BATTERIES
Insert the batteries (2 x UM-3 AA 1.5V batteries) as shown, taking care to match the polarities (+ / -).

 indicates when the batteries are low.
SET LANGUAGE
The talking language needs to be set when the unit is first activated, or after changing batteries.
- Press and hold POWER to activate the main unit. The language icons will flash.
- Press LANG to toggle to the language desired.
NOTE
The language options are: EN (English), DK (Danish), FR (French), ES (Spanish) and DE (German).
STAND
Place the unit into the stand provided and place on a table or work surface for easy viewing and access.

TRANSMITTER
- Remove the battery compartment cover and insert the transmitter batteries (2 x UM-4 AAA 1.5V batteries), taking care to match the polarities (+ / -).

- Press RESET and replace the battery compartment door. The LED indicator will flash to indicate the transmitter is activated.

 indicates the batteries are low.
TRANSMITTER DATA TRANSMISSION
Place the transmitter within 100 m (330 ft) of the main unit. The sensor reception icon shows the status.
| STRONG | WEAK | NO SIGNAL |
 |  |  |
NOTE
The LED indicator blinks during transmission. If the transmitter is moved out of range the unit will beep three times.
OPERATION

The probe is a sharp metal object, and will become hot during cooking. Take care when handling.
- Plug the probe connector to the transmitter jack.

- Insert tip of the probe into the center of the meat, taking care not to pierce through it. Do not expose any part of the probe to open flames.

- Press MEAT / UP to navigate and select the desired meat types. The voice announcement and LCD icon indicate the meat type.


| ICON | DESCRIPTION |
 | Beef |
 | Lamb |
 | Veal |
 | Hamburger |
 | Pork |
 | Turkey |
 | Chicken |
 | Fish |
- Press COOK / DOWN to select the doneness level (Rare, Medium Rare, Medium or Well Done). The LCD and talking announcement indicate selection.
- The target temperature appears on the LCD screen. Begin cooking.
- The cooking alerts will sound depending on the temperature:
- Nearly Done Alert: 2 beeps followed by "It's nearly done" when the meat is nearing the target temperature.
- Done Alert: 4 beeps followed by "It's done" when the meat has reached the target temperature.
- Overcook Alert: The LCD screen will flash and continue beeping until a button is pressed.
- Press any button to silence the alert.
NOTE
When the probe temperature exceeds the maximum display temperature (300°C / 572°F) the LCD will flash.
MANUALLY SET TARGET TEMPERATURE
- Insert the probe into the meat as shown above.
- Press and hold MODE to select manual target temperature mode. When in this mode, the meat icons will disappear.
- Press MEAT / UP and COOK / DOWN to select your desired temperature.
- Your target temperature will appear on the LCD screen. Begin cooking.
- The cooking alerts will sound as described above.
- Press any button to silence the alert.
NOTE
Press and hold MODE to return to automatic target temperature mode.
AFTER COOKING
- Once cooking is finished, remove the probe using an oven mitt.
- Clean the probe with water and a mild detergent. To clean the main unit and sensor, wipe with a damp cloth.
NOTE
Do not clean the probe in a dishwasher or immerse the main unit or sensor in water.
COUNT-UP / COUNTDOWN TIMER
The count-up and countdown timers operate independently of the temperature sensor.
To set a count-up timer:
If no countdown time is set the timer will act as a count up timer.
To set a countdown time:
Use HR and MIN to set the countdown time.
To start timer:
- Press START / STOP to begin.
- Press START / STOP again to pause,
- Once paused, press and hold START / STOP to reset to zero.
- Once a countdown has finished, the unit will beep, to silence the alert press any button.
NOTE
The countdown timer will count up to 23:59.59 sec.
TEMPERATURE UNIT
Slide °C / °F to select the temperature unit.
VOLUME
Slide HI / LO switch to select the speaker volume level.
AUTO KEYLOCK
If no button is pressed for 5 seconds auto keylock will engage. Press any button to unlock.
BACKLIGHT
Press any button to illuminate the screen for 5 seconds.
PRECAUTIONS
- Do not subject the unit to excessive force, shock, dust, temperature or humidity.
- Do not cover the ventilation holes with any items such as newspapers, curtains etc.
- Do not immerse the unit in water. If you spill liquid over it, dry it immediately with a soft, lint-free cloth.
- Do not clean the unit with abrasive or corrosive materials.
- Do not tamper with the unit's internal components. This invalidates the warranty.
- Only use fresh batteries. Do not mix new and old batteries.
- Images shown in this manual may differ from the actual display.
- When disposing of this product, ensure it is collected separately for special treatment.
- Placement of this product on certain types of wood may result in damage to its finish for which Oregon Scientific will not be responsible. Consult the furniture manufacturer's care instructions for information.
- The contents of this manual may not be reproduced without the permission of the manufacturer.
- Do not dispose old batteries as unsorted municipal waste. Collection of such waste separately for special treatment is necessary.
- Please note that some units are equipped with a battery safety strip. Remove the strip from the battery compartment before first use.
NOTE
The technical specifications for this product and the contents of the user manual are subject to change without notice.
SPECIFICATIONS
MAIN UNIT
| TYPE | DESCRIPTION |
| MAIN UNIT | |
| L x W x H | 142 x 70 x 39 mm (5.6 x 2.75 x 1.53 in) |
| Weight (without batteries) | 145 g (5.1 oz) |
| Temperature unit | °C / °F |
| Temperature Resolution | 1°C (2°F) |
| Display temperature range | 0°C - 300°C (32°F - 572°F) |
| Signal frequency | 433MHz |
| Power | 2 x UM-3 AA 1.5 V batteries |
| REMOTE UNIT | |
| L x W x H | 86 x 86 x 31 mm (3.4 x 3.4 x 1.2 in) |
| Weight (without batteries) | 55 g (1.9 oz) |
| Transmission range | 100 m (300 ft) unobstructed |
| Power | 2 x UM-4 AAA 1.5V batteries |

Documents / ResourcesDownload manual
Here you can download full pdf version of manual, it may contain additional safety instructions, warranty information, FCC rules, etc.
Download Oregon Scientific AW131 - BBQ/Oven Meat Thermometer Manual
Advertisement
Thank you! Your question has been received!


Need Assistance?
Do you have a question about the AW131 that isn't answered in the manual? Leave your question here.