
Related Manuals for THOMSON grass valley VIPER LDK 5490


Summary of Contents for THOMSON grass valley VIPER LDK 5490
- Page 1 All manuals and user guides at all-guides.com User’s Guide 3922 496 49801 PRINTED: January 2004 LDK 7500 + LDK 5490 VIPER - DIGITAL CINEMATOGRAPHIC CAMERA SYSTEM...
- Page 2 All manuals and user guides at all-guides.com Declaration of Conformity We, Thomson Broadcast Solutions B.V., Kapittelweg 10, 4827 HG Breda, The Netherlands, declare under our sole responsibility that this product is in compliance with the following standards: EN60065 : Safety...
- Page 3 All manuals and user guides at all-guides.com Viper Digital Cinematographic Camera Operator's Manual The Viper FilmStream Camera combines two different application concepts in a single camera. By selecting the operation mode, the camera operates either as a HD video camera or as a digital film camera. The digital film camera mode is known as the FilmStream mode.
-
Page 4: Table Of Contents
All manuals and user guides at all-guides.com Contents - Part 1 - FilmStream mode Important Precautions .................. iv Introduction ....................1-1 Selecting operational mode ................ 1-2 Streaming modes ..................1-3 Technology ....................1-4 Access and Security ................... 1-6 Assembling the Units ................2-1 Lens ...................... - Page 5 All manuals and user guides at all-guides.com Contents - Part 2 - HD Video mode Introduction ....................1-1 Selecting operational mode ................ 1-2 HD Video mode ..................1-3 Technology ....................1-4 Access and Security ................... 1-6 Assembling the Units ................2-1 Transport Case ...................
-
Page 6: Important Precautions
All manuals and user guides at all-guides.com Important Precautions To ensure continual high performance from the camcorder take the following precautions into consideration: Avoid very damp places. If the environment is wet or damp a rain cover must be used to protect the unit. - Page 7 All manuals and user guides at all-guides.com Warning If the camera is in a wet or damp environment, a rain cover must be used to protect it for personal safety reasons (EN60065). The optional rain cover protects the camera according to safety specification EN60529 up to level IPX2 (spraying water).
- Page 8 All manuals and user guides at all-guides.com Viper...
- Page 9 All manuals and user guides at all-guides.com Section 1 Introduction This section describes the FilmStream mode of operation and outlines the technology used in the Viper. The access and security features of the camera are also explained. Contents Selecting operational mode ............. 1-2 Streaming modes ................
-
Page 10: Selecting Operational Mode
All manuals and user guides at all-guides.com Selecting operational mode To operate in the FilmStream mode you must ensure that the camera is switched to this mode. The output signals and the control functions that are available depend on the mode you select. The factory default for the mode setting is the FilmStream mode, so normally you do not have to switch modes to operate the camera as a digital film camera. -
Page 11: Streaming Modes
All manuals and user guides at all-guides.com Streaming modes FilmStream mode The FilmStream mode differs from the HD video mode in that it captures all information in a scene and stores it digitally without altering any parameters. By avoiding video processing in the raw RGB data, the output signal is a true and faithful representation of the light from the scene. -
Page 12: Technology
All manuals and user guides at all-guides.com Technology CCD sensor technology The Viper FilmStream Camera uses three unique 9.2 Megapixel HD- DPM+ CCD sensors that allow the camera to work in several formats; 1080 lines at 24/25/30 frames per second or 720 lines at 24/25/30/50/ 60 frames per second. - Page 13 All manuals and user guides at all-guides.com • 1080i When eight vertical sub-pixels are combined, the total line count becomes 540 lines. The second field is shifted four pixels to give an interlaced picture. • 720P When six vertical sub-pixels are combined, then the total line count becomes 720 lines.
-
Page 14: Access And Security
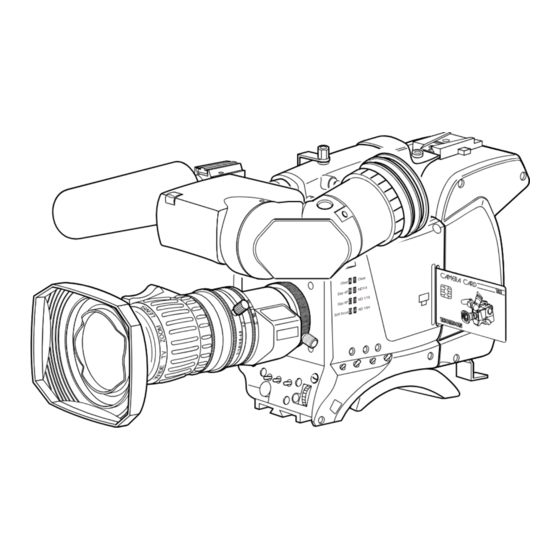
All manuals and user guides at all-guides.com Access and Security Camera cards Three camera cards are delivered with each camera; one owner’s card and two user cards. An owner’s card is linked to the serial number of the camera and is unique to that camera. It cannot be used as an owner’s card for another camera. - Page 15 All manuals and user guides at all-guides.com Access control The owner’s card or the PIN code is used to access special set-up and security features of the camera. Inserting the owner’s card into the camera gives direct access to the Security menu. If you select the Security menu without this card inserted, you must enter the correct PIN code to gain access to this menu.
- Page 16 All manuals and user guides at all-guides.com FilmStream mode Viper...
- Page 17 All manuals and user guides at all-guides.com Section 2 Assembling the Units This section provides information on the physical assembly of the camera and on the mounting of accessories. Contents Lens ....................2-2 2-inch Viewfinder ................2-4 Positioning the 2-inch viewfinder ............ 2-6 Tripod Adapter Plate (optional) ............
-
Page 18: Lens
All manuals and user guides at all-guides.com Lens FilmStream mode Viper... - Page 19 All manuals and user guides at all-guides.com Attach a lens to the camera head as follows: a. Ensure that the lens locking ring (1) is in the unlocked position - turned counterclockwise. b. Remove the dust protection cap (2). c. Slot the lens into the lens mount (3). Caution Do not attach a lens weighing more than 5 kg to the camera without a support.
-
Page 20: 2-Inch Viewfinder
All manuals and user guides at all-guides.com 2-inch Viewfinder FilmStream mode Viper... - Page 21 All manuals and user guides at all-guides.com Mounting the 2-inch viewfinder and microphone holder To mount the 2-inch viewfinder proceed as follows: a. Loosen locking ring (1) of viewfinder support bracket (2) at the front of the camera handle. (As seen from the rear of the camera, turning the locking ring counterclockwise moves it towards the handle.) b.
-
Page 22: Positioning The 2-Inch Viewfinder
All manuals and user guides at all-guides.com Positioning the 2-inch viewfinder FilmStream mode Viper... - Page 23 All manuals and user guides at all-guides.com The horizontal position of the viewfinder can be adjusted as follows to suit your requirements: a. Loosen the locking ring (1). (As seen from the rear of the camera, turning the locking ring counterclockwise moves it towards the handle.) b.
-
Page 24: Tripod Adapter Plate (Optional)
All manuals and user guides at all-guides.com Tripod Adapter Plate (optional) To mount the camera on a tripod, the tripod plate (LDK 5031 is available as an option) must first be attached to the tripod. Follow the tripod manufacturer’s instructions to mount the wedge plate supplied with the tripod and the tripod adapter plate firmly onto the tripod. - Page 25 All manuals and user guides at all-guides.com Attach the camera to the tripod adapter plate as follows: a. Slide the camera horizontally along the tripod adapter plate from back to front ensuring that the front of the camera engages the V- slot (1) at the front of the tripod adapter plate, and that the slot on the bottom of the camera engages the stud (2) at the rear of the tripod adapter plate.
-
Page 26: Shoulder Pad
All manuals and user guides at all-guides.com Shoulder Pad To change the position of the shoulder pad press and hold lever (1). The shoulder pad can now be moved backwards and forwards along the axis of the camera. Adjust the shoulder pad when all units have been mounted so that the best balanced position can be obtained. - Page 27 All manuals and user guides at all-guides.com Section 3 Configurations This section describes how the Viper can be connected to external equipment and how it can be configured with an external recorder. Contents Configurations ................... 3-2 Configurations FilmStream mode...
-
Page 28: Configurations
All manuals and user guides at all-guides.com Configurations FilmStream system diagram Break-out HD-SDI viewing CVBS FilmStream/RGB/YUV HD-SDI viewing, CVBS Rec. Start HD-SD Tally return converter Cam. Audio 1x Hard disk Hard disks capture off-line (Off-line copy from to post-production system recorder SDI or CVBS) More audio... - Page 29 All manuals and user guides at all-guides.com HDStream system diagram 12V power Break-out 2nd HD-SDI CVBS YUV (HD-SDI) (Rec . Start) HD-SD (Tally return) converter Cam. Audio 1x To post-production On-line tape Voodoo HD-D5 off-line HD-CAM recorder More audio Time code To off-line editing Off-line tape Configurations...
- Page 30 All manuals and user guides at all-guides.com FilmStream mode Viper...
- Page 31 All manuals and user guides at all-guides.com Section 4 Camera Controls This section shows the physical location of the controls and connectors on the camera. These are grouped according to their function so as to provide a quick reference guide to the operation of a particular aspect of the camera.
-
Page 32: Power Supply
All manuals and user guides at all-guides.com Power Supply DC out CVBS Power switch The power supply to the camera is switched on and off by the power at the front-left of the camera. The power switch has two positions: : Power to camera is switched on. - Page 33 All manuals and user guides at all-guides.com Power source switch Power can be supplied to the camera in either of two ways: • via the multicore cable and connector, or • directly, via the DC IN power socket on the rear of the camera. Set the power source switch at the rear of the camera to the position that corresponds to you chosen method: Ext.
-
Page 34: Filmstream Connectors
All manuals and user guides at all-guides.com FilmStream Connectors DC out CVBS Viewing channel output connector (HD-SDI) This BNC connector supplies a serial digital video output (Y/Cr/Cb 4:2:2) for monitoring purposes. FilmStream mode Viper... - Page 35 All manuals and user guides at all-guides.com Multicore connector This multicore connector provides the FilmStream output, viewing channel output signals, control signals and the camera microphone signal. DC power can also be supplied to the camera via this connector. The connector accepts a playback video signal for display in the viewfinder.
-
Page 36: Filmstream Camera Functions
All manuals and user guides at all-guides.com FilmStream Camera Functions Filter switch Rotate these switches to move the optical filter wheels: The outer (bigger) filter switch has four positions: Clear ND 1/4 filter ( 2 stops) ND 1/16 filter ( 4 stops) ND 1/64 filter ( 6 stops) The inner (smaller) filter switch has four positions: Clear... - Page 37 All manuals and user guides at all-guides.com Std Scene File button The standard scene file button is a momentary button which, when pressed for two seconds, recalls the standard scene file values. These values only take effect when the camera is not recording. Colour Bars switch (Bars) The Bars switch turns the colour bar test signal on and off.
- Page 38 All manuals and user guides at all-guides.com Monitoring Video Functions These buttons and switches only effect the monitoring signal and have no effect on the FilmStream output. Viewfinder Zoom button When this button is pressed and held, the centre of the viewfinder picture is magnified to assist with focusing.
- Page 39 All manuals and user guides at all-guides.com Gain selection switch This up/down scroll selection switch gives a choice between three gain settings. The indicators in the viewfinder light as follows: Gain is -6dB Gain is +6dB Gain is +12dB Controls FilmStream mode...
- Page 40 All manuals and user guides at all-guides.com Viewfinder Tally indicators (red) The red tally indicators at the front of the viewfinder and at the rear of the carrying handle light to indicate that the camera is recording. Tally switch The tally switch is used to control the tally indicators at the front of the viewfinder and at the rear of the carrying handle.
- Page 41 All manuals and user guides at all-guides.com Zebra switch This switch disables (OFF position) or enables the zebra pattern in the viewfinder which indicates high video levels. Values for the zebra function are selected in the VF menu. (The zebra pattern is switched off when the skin view is on.) Option switch This switch is included on the viewfinder to allow future features to be...
-
Page 42: Viewfinder Indicators
All manuals and user guides at all-guides.com Viewfinder Indicators TAPE FOC+ BATT ND/RE Gain indicators The gain indicators along the top of the viewfinder light as follows: Gain is - (-6dB) Gain is + (+6dB) Gain is ++ (+12dB) (Only applies to the monitoring signals.) 4-12 FilmStream mode Viper... - Page 43 All manuals and user guides at all-guides.com Top indicators lights (red) when the camera is recording. It flashes while the recording system is preparing to record. TAPE flashes when only about 5 minutes or less of tape is left. It lights continuously when the tape is at an end.
- Page 44 All manuals and user guides at all-guides.com TAPE FOC+ BATT ND/RE White Balance indicators The white balance indicators light as follows: - preset temperature of 3200K is selected - preset temperature of 4700K is selected - preset temperature of 5600K is selected - preset temperature of 7500K is selected - not used in FilmStream mode AW1 - not used in FilmStream mode...
- Page 45 All manuals and user guides at all-guides.com Message box The display time of this information message box is set by the Info time item of the VF menu. Centre marker This cross marks the centre of the picture. Cadre marker These dotted white lines show the limits of a 4:3 picture in the 16:9 mode.
- Page 46 All manuals and user guides at all-guides.com Audio Audio microphone connector Balanced input for high quality condensor microphone. A phantom power supply is provided for this microphone. The maximum input level is -12dBu = 0dBFS. Only connect condenser microphones to this audio connector.
-
Page 47: System Menu Control
All manuals and user guides at all-guides.com System Menu Control The system menus are displayed in the viewfinder. There are two controls at the front of the camera that allow you to navigate through these menus. The functions handled by the system menus are divided into eight different menus. -
Page 48: Auxilary Functions
All manuals and user guides at all-guides.com Auxilary Functions DC out CVBS Tally Indicators The red tally indicators light to indicate that the camera is recording. LCP connector The optional Local Control Panel (LCP) connects to this 12-pin connector. 4-18 FilmStream mode Viper... - Page 49 All manuals and user guides at all-guides.com Section 5 Set-up and operation This section contains information on the practical use of the camera. It tells you how to set up and use the camera in the FilmStream mode. Contents Setting up the camera ..............5-2 Operating the camera ...............
-
Page 50: Setting Up The Camera
All manuals and user guides at all-guides.com Setting up the camera Physical set-up The Viper can be tripod-mounted or operated from the shoulder. Attach all accessories to the camera as described in Section 2 or as described by the manufacturer. Connect the camera to the recording system or directly to the post-production facility. - Page 51 All manuals and user guides at all-guides.com When you fit a lens, check the lens documentation to determine how to adjust the back focus of the lens. In the menu system, select the lens type from two predefined settings; standard or wide angle. Choose and, if necessary, adjust the iris parameters to suit the lens and your personal preferences.
-
Page 52: Operating The Camera
All manuals and user guides at all-guides.com Operating the camera functions to be performed are: • Framing • Focussing • Shutter angle • Internal optical filters (if required) • Start recording Framing Because the picture displayed in the viewfinder (and on the monitors) is directly derived from the electronic signal from the sensors, it is a perfect representation of the captured shot regardless of the position of the viewfinder. - Page 53 All manuals and user guides at all-guides.com The shutter angle is set electronically with the exposure switch on the front of the camera. The following table gives the equivalent values of exposure time in mSec. for a particular shutter angle measured in degrees. This is shown for the various frame rates.
- Page 54 All manuals and user guides at all-guides.com Neutral density filters can be placed in the path of the optical signal to restrict the incoming light. The filter is selected via the filter switch at the top-front of the camera. These filters can be used, for example, to control depth of field.
- Page 55 All manuals and user guides at all-guides.com Section 6 Using the Menus This section describes the structure of the menu control system. It explains how to program the menu system for your personal preferences. The menu structure and the methods of function selection are also explained.
-
Page 56: Introduction
All manuals and user guides at all-guides.com Introduction Operationally, the camera is very easy to use. It may require some time for you to become familiar with all the functions available and the large number of set-up options. We recommend that you spend time using the various controls and displays in order to discover the wide range of possibilities. -
Page 57: Menu System
All manuals and user guides at all-guides.com Menu System The system functions of the camera are grouped into menus and sub- menus. The systems menu is viewed in the viewfinder and navigated by means of the Rotary control and the Select button which are both located at the front of the camera. - Page 58 All manuals and user guides at all-guides.com Select TOP to bring you back to the Main menu. Select PREVIOUS to go back to the menu that you were in before the current one. PREVIOUS Format 1080i Aspect ratio 16:9 Output mode FilmStr.
- Page 59 All manuals and user guides at all-guides.com Making changes To find out where you have to go to change a function, consult the appendix to discover under which menu group or sub-group the function you want to change is located. If the cursor points to an item (and there are no double arrows to indicate a sub-menu) then the item pointed to has a value.
-
Page 60: Menu Structure
All manuals and user guides at all-guides.com Menu Structure Access to the functions on these menus is determined by the user level that has been set. The menus are as follows: Main (top) menu The top menu gives access to the other main menus. VF menu This menu contains the functions which determine how items in the viewfinder are displayed... -
Page 61: Security Menu
All manuals and user guides at all-guides.com Security Menu The Security menu provides restricted access to special set-up and security features of the camera. Access to this menu requires the owner's unique camera card or the PIN code that has been set for the camera. -
Page 62: Files Menu
All manuals and user guides at all-guides.com Files Menu Files Menu Features A user of the LDK 7500 camera can have access to 15 different files. This number can be extended by using additional scene file smart cards. The Files menu is used to recall and store these files. There are two types of file;... - Page 63 All manuals and user guides at all-guides.com The default file names can be changed in the files menu. A STANDARD operator files (factory or customer defined) is stored in the camera. Note: The standard customer operator file is stored via the Security menu, not the Files menu.
- Page 64 All manuals and user guides at all-guides.com 6-10 FilmStream mode Viper...
- Page 65 All manuals and user guides at all-guides.com Main Menu Menu text User Values Default Blocked if File Comments >> Lens >> Video >> Install >> Files >> Security >> Appendix LDK 7500 Menu FilmStream v2_0.xls Page 1...
- Page 66 All manuals and user guides at all-guides.com VF Menu Menu text User Values Default Blocked if File Comments VF mon Y,R,G,B,-G VF Contour >> VF Contour On, Off Level 0..99 VF cont. Off Focus Assist On,Off Zebra >> Zebra On,Off 2"...
- Page 67 All manuals and user guides at all-guides.com Lens Menu Menu text User Values Default Blocked if File Comments Lens Type Std,WA Auto Iris On, Off SuperXPander Peak/Average 0..99 Auto Iris off Auto iris setp. 0..99 Mom. iris setp. 0..99 Manufacturer Fuj, Ang, Can, Other Extended iris >>...
- Page 68 All manuals and user guides at all-guides.com Video Monitoring Menu Menu text User Values Default Blocked if File Comments Contour >> Contour Off, On Contour level 00..99 Contour = Off Gain >> 0..99 Green 0..99 Blue 0..99 Black >> 0..99 Green 0..99 Blue...
- Page 69 All manuals and user guides at all-guides.com Install Menu Menu text User Values Default Blocked if File Comments 1080i50, 1080i59, 1080psf23, 1080psf24, 1080psf25, 1080psf29, Format 1080i59-23, 720p50, 720p59, 720p59-23, 720p59-25, 720p59-29 YCrCb, FilmStream, Output Mode YCrCb RGB, HD Stream Off, Full Field, 2L in Vid, Metadata 2L bfr Vid IR receiver...
- Page 70 All manuals and user guides at all-guides.com Security Menu Menu text User Values Default Blocked if File Comments Installed Level user0..user3 no owner card, no PIN Run Hours >> no owner card, no PIN Days ago 0 ... 30 Set Time >>...
- Page 71 All manuals and user guides at all-guides.com Files Menu Menu text User Values Default Blocked if File Comments Store scenefile >> File select SCAM1..4, SCARD 1..4 Store Exec Recall scenefile >> File select STANDARD, SCAM1..4, SCARD 1..4 Recall Exec Store oper. file >>...
- Page 72 All manuals and user guides at all-guides.com Diagnostic Menu Menu text User Values Default Blocked if File Comments Adaptor Type … Sensor Type … Sensor Voltage Ok, NotOk Shutter Run Run, Stop Front Power Ok, NotOk Cam. 12nc Cam. Version Cam.
- Page 73 All manuals and user guides at all-guides.com Service Menu Menu text User Values Default Blocked if File Comments Sawtooth Off, On Sawt Select PrPr, Asic PrPr ViPr Test Int, Ext Off, On Off, On Chroma Off, On Shutter phase -30..+30 Scaler >>...
- Page 74 All manuals and user guides at all-guides.com Main Menu Menu text User Values Default Blocked if File Comments >> Lens >> Video >> Install >> Files >> Security >> Diagnostics >> Service >> Appendix LDK7500 Menu HDV v2.0.xls Page 1...
- Page 75 All manuals and user guides at all-guides.com VF Menu Menu text User Values Default Blocked if File Comments VF mon Y,R,G,B,-G VF Contour >> VF Contour On, Off Level 0..99 VF cont. Off Focus Assist On,Off Zebra >> Zebra On,Off 2"...
- Page 76 All manuals and user guides at all-guides.com Lens Menu Menu text User Values Default Blocked if File Comments Lens Type Std,WA Auto Iris On, Off SuperXPander Peak/Average 0..99 Auto Iris off scene AutoIris Setpoint 0..99 scene Mom. Iris Setpoint 0..99 scene Manufacturer Fuj, Ang, Can, Other...
- Page 77 All manuals and user guides at all-guides.com Video Menu Menu text User Values Default Blocked if File Comments Colour filter 00 .. 99 3k2, 5K6, 7K5, AWC Contour >> Contour Off, On Level 00..99 Contour = Off Source Select >> Y,R,G,RG <more>...
- Page 78 All manuals and user guides at all-guides.com Video Menu (continued) Menu text User Values Default Blocked if File Comments Black >> Dyn. Black Off, On Black strech 0…99 Blk str = Off Master 0..99 <more> >> 0..99 Green 0..99 Blue 0..99 Master 0..99...
- Page 79 All manuals and user guides at all-guides.com Video Menu (continued) Menu text User Values Default Blocked if File Comments Matrix >> EBU, RAI, BBC ,B/W, Matrix SKIN, 1:1,CFL,VAR1, Skin VAR2 R..G 0..99 Matrix <> Var G..R 0..99 Matrix <> Var R..B 0..99 Matrix <>...
- Page 80 All manuals and user guides at all-guides.com Install Menu Menu text User Values Default Blocked if File Comments 1080i50, 1080i59, 1080psf23, 1080psf24, 1080psf25, 1080psf29, Format 1080i59-23, 720p50, 720p59, 720p59-23, 720p59-25, 720p59-29 AspectRatio 16:9, Wide 16:9 YCrCb, FilmStream, Output Mode YCrCb RGB, HD Stream IR receiver Off, On...
- Page 81 All manuals and user guides at all-guides.com Files Menu Menu text User Values Default Blocked if File Comments Store scenefile >> File select SCAM1..4, SCARD 1..4 Store Exec Recall scenefile >> File select STANDARD, SCAM1..4, SCARD 1..4 Recall Exec Store oper. file >>...
- Page 82 All manuals and user guides at all-guides.com Security Menu Menu text User Values Default Blocked if File Comments Installed Level user0..user3 no owner card, no PIN Run Hours >> no owner card, no PIN Days ago 0 ... 30 Set Time >>...
- Page 83 All manuals and user guides at all-guides.com Diagnostic Menu Menu text User Values Default Blocked if File Comments Adaptor Type … Sensor Type … Sensor Voltage Ok, NotOk Shutter Run Run, Stop Front Power Ok, NotOk Green carrier Ok, NotOk Cam.
- Page 84 All manuals and user guides at all-guides.com Service Menu Menu text User Values Default Blocked if File Comments Sawtooth Off, On Sawt Select PrPr, Asic PrPr ViPr Test Int, Ext Off, On Off, On Shutter phase -30..+30 Scaler >> EPLD Test Off,Sawt,Bars Chroma Off, On...
- Page 85 All manuals and user guides at all-guides.com 812-4 LDK 200 Series Block Diagrams Triax Operation S m ar C ar d k e r T ra c A u x TRAD page 1 Training Center Breda date 26-06-02...
- Page 86 All manuals and user guides at all-guides.com Head page 2 Training Center Breda...
- Page 87 All manuals and user guides at all-guides.com Overview VIPER page 3 Training Center Breda...
- Page 88 All manuals and user guides at all-guides.com Head page 4 Training Center Breda...
- Page 89 All manuals and user guides at all-guides.com VIPER adaptor VIPER adaptor VIPER adaptor VIPER adaptor VIPER adaptor page 5 Training Center Breda...
- Page 90 All manuals and user guides at all-guides.com VIPER Modes LVDS Video Proc HD SDI Output HD SDI Out 4:2:2 EPLD AsicA AsicB VIPER 12bit HD SDI Out LDK 6000 4:2:2 Gamma mode K n e e 12bit 1 2 3 4 5 6 Contour 1 2 3 4 5 6 1 2 3 4 5 6...