Advertisement
Caution
- To avoid short circuit, electric shock or malfunction:
Do not disassemble for repair.
Do not place in high temperature and humid space such as electric heater, direct sunlight, bathroom, wet floor etc.
Do not place in excessive vibration.
Do not place in dusty or dirty space.
Do not operate the tuner with wet hands. - To avoid breakdown
Do not handle all controls with excessive power. Do not drop the tuner. - Cleaning
Do not use thinner or alcohol for cleaning.
Use only dry and clean cloth. - To prevent battery loss
Remove the battery when the tuner is not in use for a long time.
Turn the power button off when the tuner is not in use. - Battery
Use only 3V battery: AAA Size (R03, LR03, L30) × 2
Features & Functions

- POWER button for ON/OFF
The power will be turned ON & OFF by each press of POWER button. This tuner will be turned OFF after 20 minutes automatically. - MODE button for AUTO/MAN & GUITAR/BASS selection
Following modes will be indicated on LCD in order by each press of MODE button.
AUTO GUITAR - MAN GUITAR - AUTO BASS - MAN BASS - AUTO GUITAR - FUNCTION button for Function selection
Following modes will be indicated on LCD in order by each press of FUNCTION button.
PITCH - FLAT - PITCH - FLAT
NOTE Function will be indicated on LCD when you select MAN Mode. - ADJUST button for FUNCTION modes
- Pitch Adjust: Reference Pitch Setting (Calibration) You can set the calibration by each press of ADJUST button. Calibration Range: 435Hz - 445Hz (1Hz step)
- Note Adjust: Tuning Note Selection When you wish to tune in MAN mode, you can select the note you wish to tune by each press of ADJUST button.
Note : 5A, 4D, 3G, 2B, 1E, 7B, 6E (Electric Guitar & Acoustic Guitar) 3A, 2D, 1G, HC, LB, 4E (Bass Guitar) - Flat Adjust: Flat Selection You can use the Flat mode to tune to a pitch that is lowered by 1~2 semitones (
![]() ) for the specified note. Press the ADJUST button to select the semitones (
) for the specified note. Press the ADJUST button to select the semitones (![]() ) that you wish to lower and Flat modes will be indicated on LCD one by one.
) that you wish to lower and Flat modes will be indicated on LCD one by one.
- SOUND button for Sound Output
Connect the OUTPUT jack of tuner to a input jack of amplification and you can tune your instruments by hearing the standard sound from amplifier. When you press SOUND button, SOUND mode will be indicated on LCD and tuning needles will not shown on LCD. Sound Note will circulate according to the order 5A-4D-3G-2B-1E-7B- 6E, whenever you press the ADJUST button. You can hear the sound flatten by 1~2 semitones (![]() ) you wish by each press of ADJUST button after you select the Flat Function with FUNCTION button in Sound Mode. If you press SOUND button once more, it will go back to Tuning Mode.
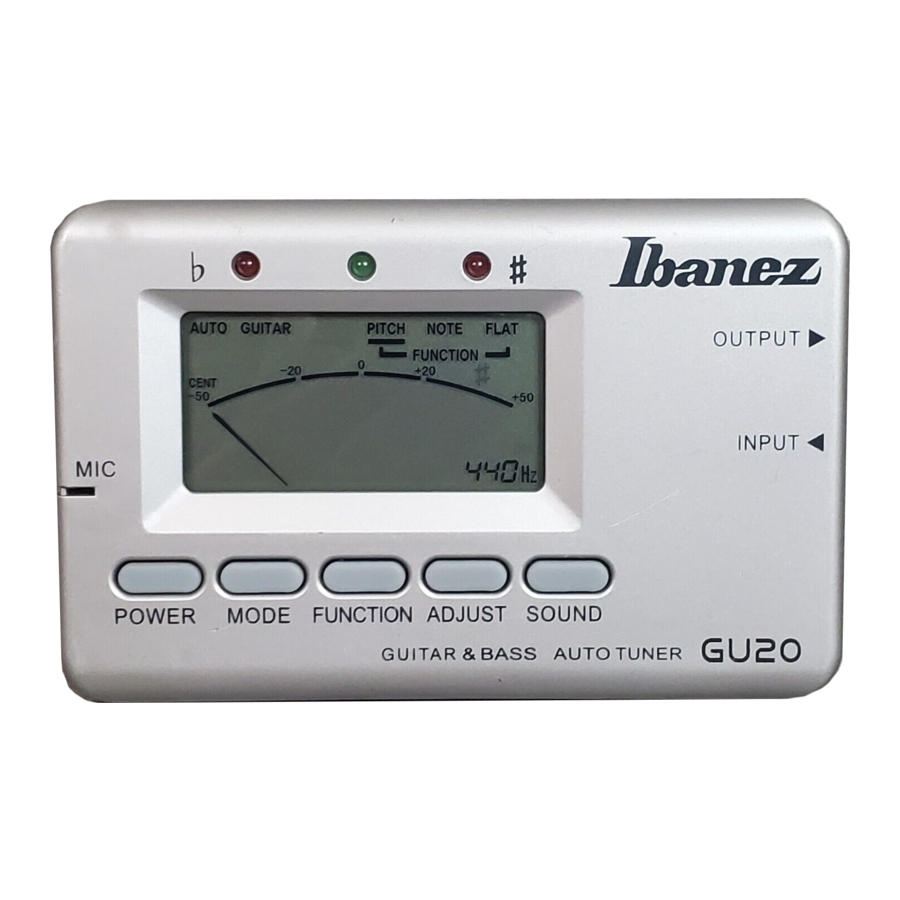
) you wish by each press of ADJUST button after you select the Flat Function with FUNCTION button in Sound Mode. If you press SOUND button once more, it will go back to Tuning Mode. - Liquid Crystal Display (LCD)
")
* Initial setting on LCD:MODE=AUTO GUITAR, FUNCTION=PITCH,
Calibration=440Hz
These settings will be initialized when the power is turned on.
")
- Mode: AUTO GUITAR / MAN GUITAR / AUTO BASS / MAN BASS
- Note of Electric / Acoustic / Bass Guitars & Violin etc.
- Function Indicator
![]() /#: When the string is in tune, tuning needle stop in the center "0" then
/#: When the string is in tune, tuning needle stop in the center "0" then ![]() /# will be indicated on LCD. If the pitch of string is flat, will be indicated on LCD. If the pitch of string is sharp, # will be indicated on LCD.
/# will be indicated on LCD. If the pitch of string is flat, will be indicated on LCD. If the pitch of string is sharp, # will be indicated on LCD.- Flat indicator
- Reference pitch (Calibration): Indicates the current calibration value.
- Tuning meter When the string is in tune, Tuning needle stops in the center "0".
When the string is in tune, Tuning needle stops in the center "0".
 /#: When the string is in tune, tuning needle stop in the center "0" then
 - INPUT Jack For Electric Stringed Instruments
When you wish to tune electric stringed instruments, connect the output cord or pickup of the instrument to the INPUT jack of tuner. The MICROPHONE do not operate when the INPUT jack is connected with instrument. - OUTPUT jack for connection amplifier
If you to monitor the sound of instrument, connect the OUTPUT jack of tuner to the Input jack of Amplifier. You can monitor the sound of instrument regardless of tuner ON/OFF. When you play the instrument, be sure to turn OFF the power of tuner to prevent the hum noise from tuner. - MICROPHONE
For Acoustic Stringed Instruments When you wish to tune acoustic stringed instruments, locate this tuner near the instrument for more accurate tuning. This MICROPHONE do not operate when the INPUT jack is connected with instrument. - Tuning Guide LEDs
These LEDs will help the discrimination of tuning process. When the string is in tune, Tuning needle stops in the center "0". Then, the Green LED in the middle will light up. If the pitch of string is flat, the Red LED in the left will light up. If the pitch of string is sharp, the Red LED in the right will light up.
Tuning Procedure
For accurate Tuning
- Do not operate the tuner nearby sound equipment such as Radios or Televisions, if possible. These units can be impediment in reception of exact sound by internal Microcomputer.
- Locate the volume level of electric stringed instruments at center position for reasonable sound input.
- Do not pluck loudly and heavily.
- If you want quick tuning of next string, press all strings with finger lightly after current tuning to cut sound input of current tuning string.
Accord automatique en mode Auto
- Electric stringed instruments: Connect output cord of the instrument to the INPUT jack of tuner and if possible, adjust the volume level of the instrument to center position. If you wish to monitor the sound of the instrument, connect the OUTPUT jack of tuner to the INPUT jack of amplification. Acoustic stringed instruments: Locate the instrument near the MIC in tuner.
- Press the POWER button to turn the tuner ON. The LCD lights up and LCD is automatically set to the AUTO GUITAR mode and standard reference pitch 440Hz.
- Adjust the reference pitch by PITCH button, if necessary.
- If you wish to tune Electric Guitar, Acoustic Guitar, Violin etc., try totune from the low frequency string. If you wish to tune Bass Guitar, press the Mode button twice, AUTO-BASS will be indicated on LCD. Then, try the tuning from the low frequency string.
- If the pitch of tuning string is greater than -50 or +50 cents from theexact pitch, tighten or loosen the string until one of the LEDs lights up and the tuning note you wish to tune is indicated on LCD. If pitch of the tuning string is within -50 or +50 cents, tighten or loosen the string slowly to approach the needle of meter to the center "0".
- When the needle of LCD meter stops in the center "0", the Green LED in the middle will light up and
![]() /# will be indicated simultaneously on LCD. This point is exact sound of the string.
/# will be indicated simultaneously on LCD. This point is exact sound of the string.
Manual Tuning in Man Mode
- Electric stringed instruments: Connect output cord of the instrument to the INPUT jack of tuner and if possible, adjust the volume level of the instrument to center position. If you wish to monitor the sound of the instrument, connect the OUTPUT jack of tuner to the INPUT jack of amplification.
- Press the POWER button to turn the tuner ON. The LCD lights upand LCD is automatically set to the AUTO GUITAR mode and standard reference pitch 440Hz.
- Adjust the reference pitch by PITCH button, if necessary.
- If you wish to tune Electric Guitar, Acoustic Guitar, Violin etc., press Mode button once, MAN GUITAR & 5A (Note) will be indicated on LCD then, select note you wish to tune by each press of Adjust button. If the note you wish to tune is indicated on LCD, try the tuning. If you wish to tune BASS Guitar, press the Mode button three times, MAN-BASS & 3A will be indicated on LCD. Then, select the note you wish to tune by each press of Adjust button. If the note you wish to tune is indicated on LCD, try the tuning from the low frequency string.
- If the pitch of tuning string is greater than -50 or +50 cents from the exact pitch, tighten or loosen the string until one of the LEDs lights up and the tuning note you wish to tune is indicated on LCD. If pitch of the tuning string is within -50 or +50 cents, tighten or loosen the tuning string slowly to approach the needle of meter to the center "0".
- When the needle of LCD meter stops in the center "0", the Green LED in the middle will light up and
![]() & # will be indicated simultaneously on LCD. This point is exact sound of the string.
& # will be indicated simultaneously on LCD. This point is exact sound of the string.
Tuning by Sound
- Press the SOUND button, the mode will switch to MAN GUITAR,and the FUNCTION will switch to NOTE.
A5 will be displayed for NOTE and the corresponding sound will be generated. - You can compare and tune while listening to sound generated from the amplifier connected to the OUTPUT jack with the pitch of your instrument.
- If necessary, adjust NOTE or FLAT to perform tuning.
Notice: The sound level can be subjected to decrease depending on the instrument output impedance.
When either Volume or Tone control turns aniti-clockwise fully, no sound comes out.
Installation & Replacement of Battery

- Slide the battery cover on bottomside in the direction of the tuner arrow while pressing the cover.
- Fix AAA Size (R03, LR03, L30) × 2 - 3V battery into correct polarity of battery terminal and insert it in the battery space.
- Slide the battery cover on the contrary.
* This tuner is very convenient for users to monitor its display on LCD, because it is a little inclined to be more stable.
Specifications
Mode: Auto & Manual Tuning Modes
Tuning Range: A0 (27.50Hz)~C8 (4,186.00Hz)
Tuning Note: 5A, 4D, 3G, 2B, 1E, 7B, 6E (Electic Guitar & Acoustic Guitar)
3A, 2D, 1G, HC, LB, 4E (Bass Guitar) Flat Function: 1~2 semitones ( )
)
Accuracy: +/- 1 Cent
Calibration: 435 ~ 445Hz (1Hz step)
Indicator: LCD & 3LEDs
Input: Condenser Microphone for Acoustic, Input Jack for Electric
Output: Output Jack for connection with Amplifier
Power: 3V Battery - AAA size (R03, LR03, L30) × 2
Dimensions: 105 (W) × 68 (D) × 25 (H) mm
Weight: 120g (Including Battery)
* The design and specifications are subject to change without prior notice for product improvement.

This is to certify that Guitar & Bass Tuner GU20 is in conformity with: Council Directive 89/336/EEC (EMC Directive) Applicable Standards: EN50081-1: .92 Electromagnetic Compatibility-Generic emission standard. Part 1: Residential, commercial and light industry. EN50082-1: 01.97 Electromagnetic Compatibility-Generic immunity standard. Part 1: Residential, commercial and light industry.
Documents / ResourcesDownload manual
Here you can download full pdf version of manual, it may contain additional safety instructions, warranty information, FCC rules, etc.
Advertisement
Thank you! Your question has been received!


Need Assistance?
Do you have a question about the GU20 that isn't answered in the manual? Leave your question here.