Advertisement
Caution
- To avoid short circuit, electric shock or malfunction:
- Do not disassemble for repair.
- Do not place in high temperature and humid space such as electric heater, direct sunlight, bathroom, wet floor etc.
- Do not place in excessive vibration.
- Do not place in dusty or dirty space.
- Do not operate the tuner with wet hands.
- To avoid breakdown
- Do not handle all controls with excessive power.
- Do not drop the tuner.
- Cleaning
- Do not use thinner or alcohol for cleaning.
- Use only dry and clean cloth.
- To prevent battery loss
- Remove the battery when the tuner is not in use for a long time.
- Turn the power button off when the tuner is not in use.
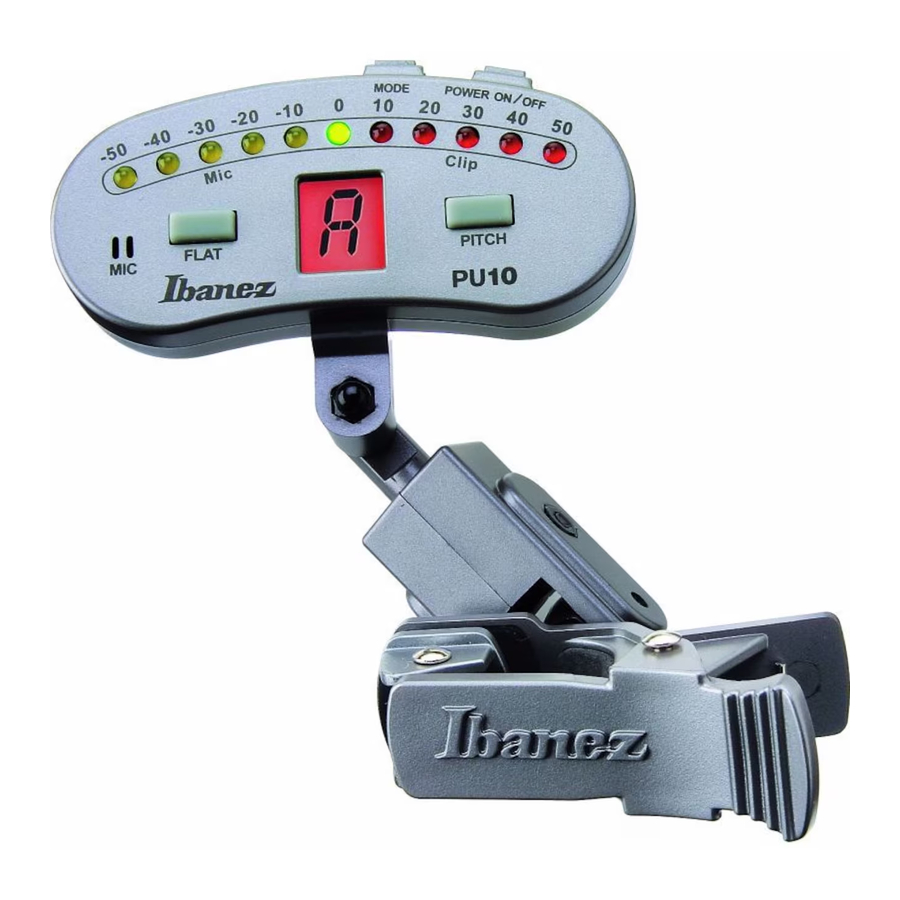
Functions and Features

- POWER ON/OFF button
This button turns the power ON/OFF. When the power is ON, the LED indicator will be lit. When the power is turned OFF, the LED indicator will be lit in the opposite direction from when the power is turned ON. The power will automatically goes OFF if PU10 is not used for more than 20 minutes. - MODE button
With this button you can select whether to pick up the sound from the built-in microphone or to pick up the vibrations of the headstock of your guitar from the CLIP.
CLIP input: In CLIP input mode, the middle red LED (+30 cent) on the display blinks.
MIC input: In MIC input mode, the middle yellow LED (-30 cent) on the display blinks.
PU10 functions as a chromatic tuner. - FLAT button
If you press the FLAT button, flat tuning is possible from one semitone to one and a half tone.
Each time you press the FLAT button, the indication of the segment changes as in this figure.
![]()
You can tune the reference NOTE (A, A#, B, C, C#, D, D#, E, F, F#, G, G#) with flatted from one semitone to one and a half tone. - PITCH button
If you press the PITCH button, you can set the reference pitch (frequency of A). Each time you press the PITCH button, you can change the reference pitch in the range of 436Hz~445Hz.
![]()
- LCD
- MICROPHONE
If you select MIC mode with the MODE button, the tuner picks up sound directly from the microphone. CLIP mode does not function when MIC mode is selected. - CLIP
If you select CLIP mode with the MODE button, the tuner picks up the vibrations of the instrument. MIC mode does not function when CLIP mode is selected.

- Tuning Guide LED
When the tuning is correct, the center green LED will be lit. The yellow LED on the left side indicates that the pitch is low and the red LED on the right side indicates that the pitch is high.


Operation
Tuning
In order to tune your instrument accurately,
- Do not use PU10 near audio equipment, such as aradio or television.
- For faster tuning, press down the strings lightly andmute each time after tuning one string is finished.
In CLIP input mode
First, install the CLIP in a visible place where the vibrations of the guitar will be detected easily.
As PU10 has four rotating shafts between the CLIP and the TUNER, the display is visible regardless of where on the guitar's headstock the CLIP is installed. However, carefully choose the area where to install PU10 so that your tuning is not interrupted by turning machine head or vice versa.
Turn the power ON when the installation is completed. When the power is ON, the LED indicator will be lit.
Next, use MODE button to select CLIP and begin tuning.
Play a single note and try to match the note which is displayed on the LCD indicator with the target tone.
Then, tune more precisely until the green LED is lit up.
The yellow LED indicates that the pitch is lower than the displayed note.
The red LED indicates that the pitch is higher than the displayed note.
In MIC input mode
When you use the built-in microphone, it may catch background noise and cause an error in tuning. We recommend you tune in a quiet place with little or no background noise and play the instrument as close to the microphone as possible. Then, follow the same process as the CLIP input mode to tune the instrument.
Installing or replacing the battery

- Slide off the batterycover on the upper part of the back.
- Insert the battery (CR2032) in the correct polarity and put the battery cover back.
- Check if PU10 operates correctly by turning on the Power SW after replacing the battery.
Specifications
Mode: MIC input tuning/CLIP input tuning
Tuning range: A0 (27.50Hz)~C8 (4,186.00Hz)
Tuning notes: A,A#,B,C,C#,D,D#,E,F,F#,G,G#
Flat tuning: 1~3 semitones Accuracy: +/-1 cent
Calibration: 436Hz~445Hz
Display: LCD, LED
Input: Built-in MIC, CLIP (PIEZO)
- Power supply: Lithium battery (CR2032) x 1, 3V
- Dimensions: 110 (W) x 56 (D) x 39.5(H)mm
- Weight: 52 g (including batteries)
* Design and specifications are subject to change without notice for improvement of the product.

The PU10 fully conforms to the protection requirements of the following EC Council Directives.
2004/108/EC: ELECTROMAGNETIC COMPATIBILITY

Documents / ResourcesDownload manual
Here you can download full pdf version of manual, it may contain additional safety instructions, warranty information, FCC rules, etc.
Advertisement
Thank you! Your question has been received!


Need Assistance?
Do you have a question about the PU10 that isn't answered in the manual? Leave your question here.