Bissell Vac & Steam 1977N - Multi-Surface Cleaner Manual
- Manual (188 pages)
Advertisement
IMPORTANT SAFETY INSTRUCTIONS
READ ALL INSTRUCTIONS BEFORE USING YOUR APPLIANCE.
When using an electrical appliance, basic precautions should be observed, including the following:

TO REDUCE THE RISK OF FIRE, ELECTRIC SHOCK, OR INJURY:
- This appliance can be used by children aged from 8 years and above and persons with reduced physical, sensory or mental capabilities or lack of experience and knowledge if they have been given supervision or instruction concerning use of the appliance in a safe way and understand the hazards involved. Cleaning and user maintenance shall not be made by children without supervision.
- Children should be supervised to ensure that they do not play with the appliance.
- If the supply cable is damaged, it must be replaced by the manufacturer, its service agent, or similarly qualified person in order to avoid a hazard.
- Keep hair, loose clothing, fingers, and all parts of body away from openings and moving parts of the appliance and its accessories.
- Do not leave appliance when plugged in.
- Unplug from electrical socket when not in use and before servicing.
- Do not allow to be used as a toy.
- Use only as described in this user guide.
- Use only manufacturer's recommended attachments.
- Do not use with damaged cable or plug.
- Do not immerse in water or liquid.
- If appliance is not working as it should, has been dropped, damaged, left outdoors, or dropped into water; do not attempt to operate it and return it to a service center.
- Do not pull or carry by cable, use cable as a handle, close door on cable, or pull cable around sharp edges or corners.
- Do not run appliance over cable.
- Keep cable away from heated surfaces.
- Do not unplug by pulling on cable.
- To unplug, grasp the plug, not the cable.
- Do not handle plug or appliance with wet hands.
- Do not put any object into openings.
- Do not use with any opening blocked; keep free of dust, lint, hair, and anything that may reduce air flow.
- Turn off all controls before unplugging.
- Use extra care when cleaning on stairs.
- Do not use to pick up flammable or combustible liquids, such as petroleum, or use in areas where they may be present.
- Do not pick up toxic material (chlorine bleach, ammonia, drain cleaner, etc.)
- Do not use appliance in an enclosed space filled with vapours given off by oil base paint, paint thinner, some mothproofing substances, flammable dust, or other explosive or toxic vapours.
- Do not pick up hard or sharp objects such as glass, nails, screws, coins, etc.
- Use only on dry, indoor surfaces.
- Keep appliance on a level surface.
- Do not pick up anything that is burning or smoking, such as cigarettes, matches, or hot ashes.
- Do not use without dust bag and/or filters in place.
- Do not use outdoors or on wet surfaces.
- This appliance is provided with double insulation. Use only identical replacement parts.
- Do not leave machine running in the same spot without handle fully upright.
- The appliance is not to be used if it has been dropped, if there are visible signs of damage or if it is leaking.
- Keep the appliance out of reach of children when it is energized or cooling down.
- The foot surfaces are liable to get hot during use.
- Do not direct steam at people, animals, or equipment containing electrical components.
- Do not use on leather, wax polished furniture or floors, synthetic fabrics, velvet or other delicate, steam-sensitive materials.
ALWAYS CONNECT TO A PROPERLY EARTHED ELECTRICAL SOCKET.
LIQUID OR STEAM MUST NOT BE DIRECTED TOWARDS EQUIPMENT CONTAINING ELECTRICAL COMPONENTS.
SURFACE MAY BE HOT. AVOID CONTACT.

THIS SYMBOL MEANS
WARNING: DANGER OF SCALDING
SAVE THESE INSTRUCTIONS
FOR OPERATION ON A 220-240 VOLT A.C. 50-60 HZ POWER SUPPLY ONLY.
This model is for household use only.
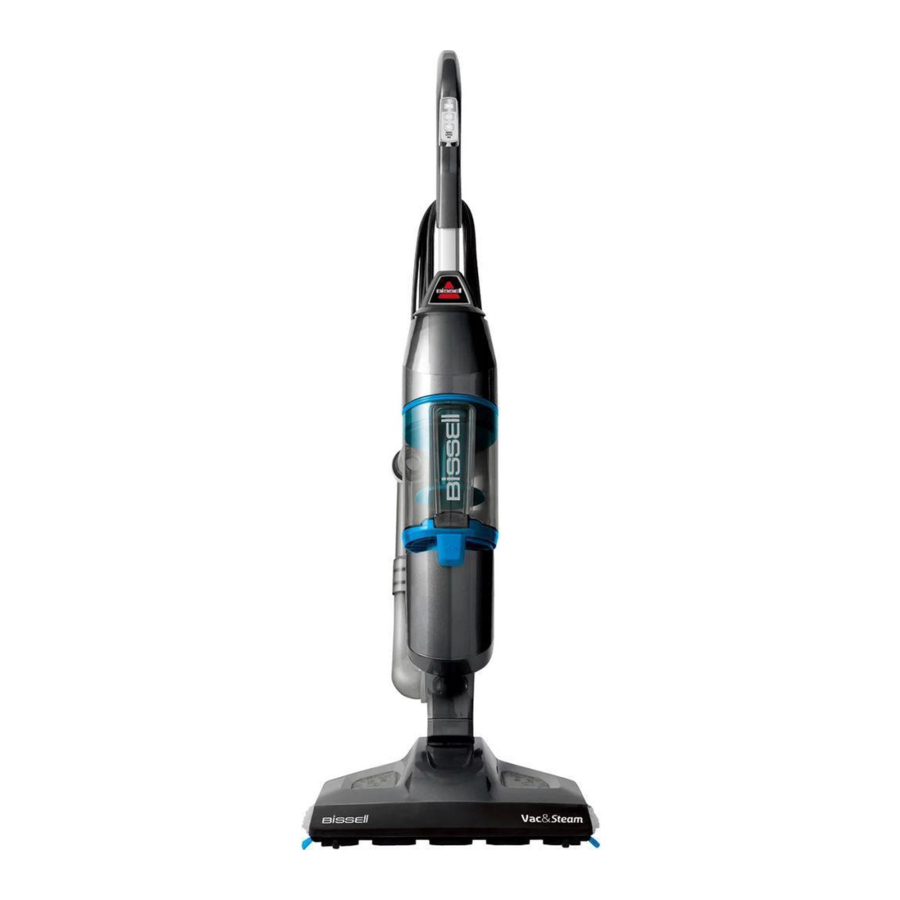
Product View

- Steam Trigger
- Easy Touch Digital Controls – LO/HI Steam & Vac On/Off
- Cord Clip
- Handle
- Water Cup
- 25' Power Cord
- Water Tank with Easy Fill Opening
- Vacuum Filter
- Drop-IT System
- Bottom Empty Dirt Bin
- Microfibre Mop Pads
- Quick Release Pad Tray
- Water Filter
- Scent Disk
- Vacuum Nozzle
Plastic film can be dangerous. To avoid danger of suffocation, keep away from babies and children.
Do not plug in your hard floor cleaner until you are familiar with all instructions and operating procedures.
To reduce the risk of electric shock, turn power switch off and disconnect polarized plug from electrical outlet before performing maintenance.
Assembly
Your hard floor cleaner assembles quickly and easily, no tools required.
Do not plug in your hard floor cleaner until you are familiar with all instructions and operating procedures.
Assemble Your Vac & Steam™
Insert the body into the foot until you hear the locking tab click. Insert the handle into the body of the unit until you hear a locking tab click.

Exercise extreme care when using the Vac & Steam™ on hardwood floors. Prolonged application of steam in one area increases the risk of damage to the surface treatment on timber floors. Test steam mop in an inconspicuous area before mopping a large area. The steam mop generates hot steam, so move the unit continuously when depressing the trigger. The trigger does not need to be depressed at all times. Regular foot traffic and direct sunlight will wear down timber floor surface treatment, making it more susceptible to steam damage. Check with your timber floor treatment and application specialist prior to steam mop operation.
Special Features
Easy Touch Digital Controls
The fingertip power controls are located on the front of the handle. Settings include:
(HI) – High Steam Use for durable floors or on sticky messes. To turn steam on, press once. Click again to turn steam off. Can be used simultaneously with the vacuum function or separately as a steam mop only.
(LO) – Low Steam Use on delicate floors or for light, everyday cleaning. To turn steam on, click once. Click again to turn steam off. Can be used simultaneously with the vacuum function or separately as a steam mop only.
NOTE: You must select a steam setting first and then hold down the hand trigger to produce steam.
(VAC) – Vacuum On/off switch. Can be used simultaneously with either steam function or separately as a stick vacuum only.
NOTE: All settings can be used alone or either steam setting can be used simultaneously with the vacuum setting.
Microfibre Mop Pads
Reusable microfibre mop pads are machine washable and safe for virtually all hard floor surfaces. The white microfibre pad is best for everyday use on delicate flooring like sealed hardwoods and laminate. The gray and white striped pad can be used for scrubbing heavily soiled floors and cleaning tougher messes.
Appliance will not pick up crayons, marbles and other large objects.
Tip
- Do not attempt to use your hard floor cleaner on the steam setting without water in the tank. You may hear a knocking sound indicating there is no water.
Be sure to turn off vacuum mode if you encounter liquid on the floor.
Operations
Getting Ready
Tip
- Use of distilled water is recommended to prolong the life of your hard floor cleaner.
The mop pad may have already come attached to the mop pad tray on the foot of the unit. If not, please follow step 1 below.
For Microfibre Mop pads, please follow these steps:
- Attach mop pad.
- Step on foot release for mop pad tray and lift unit off tray.
![]()
- Some units may come with freshening discs. Add Freshening Disc in the mesh pocket in the mop pad. Use the whole disc for a refreshing scent or cut in half for a lighter scent.
![]()
- Wrap mop pad around the bottom of the tray, making sure the gray stitching is in the front and the quick release tab is in the back.
![]()
- Put the mop pad tray back down on the floor and set the unit back on top. It will click into place.
- Step on foot release for mop pad tray and lift unit off tray.
- Fill the water tank.
![]()
- On the back of the unit, open the Easy Fill opening of the water tank and use the included water cup to fill the water tank with water. Don't overfill or water may spill from the tank. For best results, water should be at room temperature.
- Close the Easy Fill opening.
- The water tank holds 384 mL and will last approximately 15 minutes depending on the amount of the steam used during cleaning.
- Pull and twist the Quick Release cord wrap clockwise to unwrap the power cord completely and plug into an outlet as described on the Important Safety Instructions.
NOTE: Upon the first use of the Vac & Steam™ or first use after refilling the water tank, the pump may make a 'knocking' sound. This is normal and could last up to 30 seconds.


Do not operate appliance with damp or wet filters or without all filters in place.
Tinted plates on foot may get hot while steam mop is in use. Do not touch while hot.
Never put descaling, alcoholic, or detergent products into the steam cleaner, as this may damage it or make it unsafe for use.
Using Your Hard Floor Vacuum and Steam Mop
To reduce the risk of electric shock, turn power switch off and disconnect polarized plug from electrical outlet before performing maintenance or troubleshooting checks.
The hard floor cleaner can be used as a stick vacuum and a steam mop at the same time or separately. For best results and time savings, use the powerful vacuum to clear floor of dust and small debris as you steam mop.
Your hard floor cleaner is designed to clean hard flooring, such as ceramic tile, vinyl, marble, stone and sealed hard wood floors. Use on waxed or some unwaxed floors may result in a diminished glossiness. The hard floor cleaner is not for use on unsealed wood floors. For best results, test in an inconspicuous area and check the care instructions from your flooring manufacturer.
- Fill the unit with water and then plug the unit in and wait 30 seconds for it to heat up. Choose the level of steam to clean your floor:
HI (for durable floors or sticky messes) or
LO (for delicate floors or every day cleaning).
![]()
- Press steam trigger on the underside of the handle to actuate steam.
![]()
- Push the VAC switch down to turn on the cyclonic vacuum.
- Begin cleaning by slowly moving the unit over the floor surface while pressing the steam trigger on the underside of the handle. Moisture on the floor is normal when using in steam mode.
- When the hard floor cleaner stops emitting steam, turn the unit off (both steam mop and vacuum functions) and unplug. Open the Easy Fill opening of the water tank and use the water cup to add more water to the tank. For best results, water should be at room temperature. Then close the Easy Fill opening, turn the unit back on and continue cleaning.
NOTE: To be sure to sanitize an area of your floor, use the microfibre cloth pads and slowly and evenly stroke your steam mop back and forth at least three times over the area using continuous steam. For best results, remove the pad and wash after use.


Maintenance & Care
Removing All Mop Pads
To reduce the risk of electric shock, turn power switch off and disconnect polarized plug from electrical outlet before performing maintenance or troubleshooting checks.

Upright storage of the cleaner with a wet mop pad may result in the formation of white marks on your floor. To remove the white marks, clean area with vinegar.
- Unplug hard floor cleaner from electrical outlet.
- Step on foot release for mop pad tray and lift unit off tray.
![]()
- Carefully remove mop pad from the mop pad tray using the Quick Release Tab. The mop pad and tray may be hot.
- Put the mop pad tray back down on the floor and set the unit back on top. It will click into place.
- The microfibre mop pad can be machine washed in warm water. Use only liquid detergents. Do not use fabric softeners or bleach. For best results, air dry.

Empty Dirt Tank
The dirt tank needs to be emptied when the dirt reaches the 'Full' line on the side of the tank.
- Unplug hard floor cleaner from electrical outlet.
- Remove the Easy Empty dirt tank from the unit by moving the lock button on the front of the unit to the left.
![]()
- Press the bottom lid release button on the back of the dirt tank to empty dirt.
![]()
- The dirt tank also has a built in Drop-IT system for easy debris emptying.
- In the middle of the vacuum filter attached to the top of the dirt tank locate the color rod
- Pull the rod up and lock the rod in place by turning it clockwise
![]()
- Push down on the lever to force out stuck debris
![]()
- When done, rotate the color rod counter-clock wise and push it down to return it to its original position
- Close the bottom lid and mount the Easy Empty dirt tank back on the vacuum base and push the lock button to the right until it is centered on the front of the unit.
NOTE: The dirt tank may be washed in warm water with a mild detergent. Make sure it is completely dry before replacing.


Cleaning or Replacing the Vacuum Filter
To reduce the risk of electric shock, turn off machine and disconnect polarized plug from electrical outlet before performing maintenance or troubleshooting checks.
The key to maximum performance is having a clean filter. Cleaning the filter after each use will help your vacuum operate at peak efficiency.
To clean filter:
- Turn power off and unplug unit.
- Remove the dirt container from the unit, as directed above.
![]()
- Remove filter and tap firmly against the inside of a waste container, removing any visible dirt.
- Replace filter back into the dirt container and attach dirt container to the base of the unit. Slide the lever to your right to lock.

NOTE:
After heavy usage, you may clean the pleated filter by washing it gently by hand.
Thermal Protector
An internal thermal protector has been designed into your vacuum to protect it from overheating. When the thermal protector activates, the vacuum motor will stop operating. If this happens:
- Turn the cleaner OFF and unplug from electrical outlet.
- Empty dirt container, check filters and air passages for dirt accumulation.
- The thermal protector automatically resets after approximately 2 hours. If the thermal protector does not reset.
Replacing the Water Filter
To reduce the risk of electric shock, turn off machine and disconnect polarized plug from electrical outlet before performing maintenance or troubleshooting checks.
It is recommended to fill your unit with distilled water only. Periodically check your water filter. When the green grains turn blue, change your water filter.
If the filter is not changed at the appropriate time, calcium deposits may accumulate on the heater, causing damage or reduced performance.
To replace the filter:
- Using the grips on the side of the filter, pull filter out of the unit.

- Push filter firmly into the machine until it's flush.

Cleaning Hose Tube
To reduce the risk of electric shock, turn power switch off and disconnect polarized plug from electrical outlet before performing maintenance or troubleshooting checks.
- Grab bottom end of the hose and pull lower portion away from the body.
![]()
- Separate the hose into two pieces.
- Wash hose and wait for it to dry.
![]()
- Align the top of the hose to the groves on the hose opening of the unit.
- Twist hose down to insert lower portion of hose to the unit.
![]()
- Make sure hose fits tightly into the unit.
![]()


Cleaning Foot of Unit
- To clean the foot and bristles, push the release button on the back of the pivot joint and pull the foot to release it from the appliance.
- Wash bottom of foot and bristles with cold water.

- Look for any clogging in the steam nozzle. To clean, run water over steam nozzle.
NOTE: Make sure foot and bristles are dry before attaching the foot to the appliance. - To re-attach the foot to the appliance: place the foot on the floor, push the appliance down into the foot and then listen for the click that sounds when properly attached.

www.BISSELL.com

Documents / ResourcesDownload manual
Here you can download full pdf version of manual, it may contain additional safety instructions, warranty information, FCC rules, etc.
Download Bissell Vac & Steam 1977N - Multi-Surface Cleaner Manual
Advertisement
Thank you! Your question has been received!


Need Assistance?
Do you have a question about the Vac & Steam 1977N that isn't answered in the manual? Leave your question here.