Advertisement
- 1 Product Overview
- 2 IMPORTANT SAFETY INSTRUCTIONS
- 3 GROUNDING INSTRUCTIONS
- 4 What's in the Box?
- 5 Assembly
- 6 Cleaning Formulas
- 7 Filling the 2-in-1 Water Tank
- 8 Cleaning Your Carpet
- 9 Using the Ready Tools
- 10 Emptying the 2-in-1 Water Tank
- 11 After-Cleaning Care
- 12 Storing Your Machine
- 13 Troubleshooting
- 14 Warranty
- 15 Documents / Resources
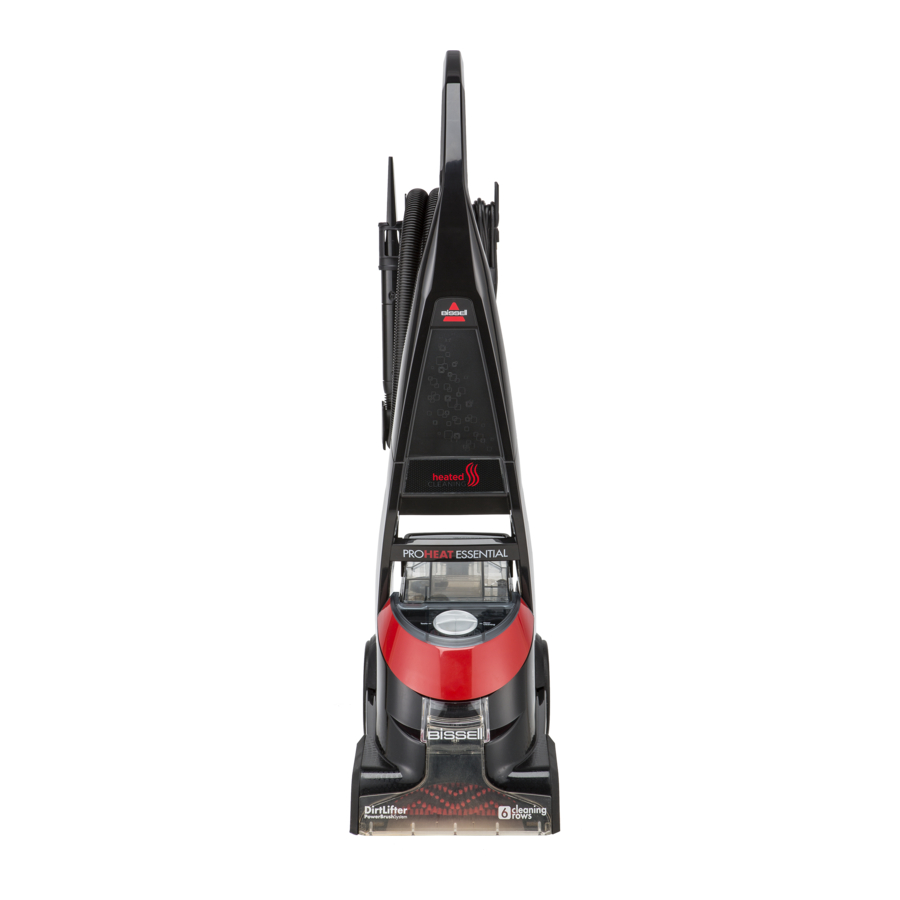
Product Overview

- Spray Trigger
- Quick Release™ Cord Wrap
- Upper Handle
- Tool Storage (select models)
- Carry Handle
- Tank Carry Handle
- 2-in-1 Water Tank
- ReadyTools™ Dial
- Removable Nozzle
- DirtLifter® PowerBrush
- Belt Access Door (underside of machine)
- EdgeSweep® Brushes
Go online for a comprehensive walkthrough of your new purchase!

This guide has everything you need to get ready for first use, including setting up, using and maintaining your machine, but online you'll find additional resources like tips and troubleshooting, videos, product registration, parts, and more.
Go to support. BISSELL.com.
IMPORTANT SAFETY INSTRUCTIONS
READ ALL INSTRUCTIONS BEFORE USING YOUR APPLIANCE.
When using an electrical appliance, basic precautions should be observed, including the following:


TO REDUCE THE RISK OF FIRE, ELECTRIC SHOCK OR INJURY:
- Connect to a properly grounded outlet only. See grounding instructions. Do not modify the 3-prong grounded plug.
- Do not leave appliance when it is plugged in. Unplug from outlet when not in use and before servicing.
- Use indoors only.
- Do not allow to be used as a toy. Close attention is necessary when used by or near children.
- Do not use for any purpose other than described in this user guide. Use only manufacturer's recommended attachments.
- Do not use with damaged cord or plug. If appliance is not working as it should, or has been dropped, damaged, left outdoors, or dropped into water, have it repaired at an authorized service center.
- Do not pull or carry by cord, use cord as a handle, close a door on cord, or pull cord around sharp edges or corners.
- Do not run appliance over cord. Keep cord away from heated surfaces.
- Do not unplug by pulling on cord. To unplug, grasp the plug, not the cord.
- Do not handle plug or appliance with wet hands.
- Do not put any object into openings. Do not use with any opening blocked; keep openings free of dust, lint, hair, and anything that may reduce air flow.
- Keep hair, loose clothing, fingers, and all parts of body away from openings and moving parts.
- Turn OFF all controls before plugging or unplugging appliance.
- Use extra care when cleaning on stairs.
- Do not use to pick up flammable or combustible materials (lighter fluid, gasoline, kerosene, etc.) or use in areas where they may be present.
- Do not use appliance in an enclosed space filled with vapors given off by oil-based paint, paint thinner, some moth-proofing substances, flammable dust, or other explosive or toxic vapors.
- Do not use to pick up toxic material (chlorine bleach, ammonia, drain cleaner, etc.).
- Do not pick up anything that is burning or smoking, such as cigarettes, matches or hot ashes.
- Do not pick up hard or sharp objects such as glass, nails, screws, coins, etc.
- Do not use without filters in place.
- Use only BISSELL® cleaning products intended for use with this appliance to prevent internal component damage. See the Cleaning Formula section of this guide.
- Do not immerse. Use only on surfaces moistened by the cleaning process.
- Keep appliance on a level surface.
- Do not carry the appliance while in use.
- Always install float before any wet pick-up operation.
- Unplug before connecting TurboBrush® Tool.
- Plastic film can be dangerous. To avoid danger of suffocation, keep away from children.
SAVE THESE INSTRUCTIONS
THIS MODEL IS FOR HOUSEHOLD USE ONLY.
COMMERCIAL USE OF THIS UNIT VOIDS THE MANUFACTURER'S WARRANTY.
Improper connection of the equipment-grounding conductor can result in a risk of electrical shock. Check with a qualified electrician or service person if you aren't sure if the outlet is properly grounded. DO NOT MODIFY THE PLUG. If it will not fit the outlet, have a proper outlet installed by a qualified electrician. This appliance is designed for use on a nominal 120-volt circuit, and has a grounding attachment plug that looks like the plug in the illustration. Make certain that the appliance is connected to an outlet having the same configuration as the plug. No plug adapter should be used with this appliance.
GROUNDING INSTRUCTIONS
This appliance must be connected to a grounded wiring system. If it should malfunction or break down, grounding provides a safe path of least resistance for electrical current, reducing the risk of electrical shock. The cord for this appliance has an equipment-grounding conductor and a grounding plug. It must only be plugged into an outlet that is properly installed and grounded in accordance with all local codes and ordinances.

What's in the Box?
Standard accessories may vary by model. To identify what should be included with your purchase, please refer to the "Carton Contents" list located on the carton top flap.

Assembly
 Go to support. BISSELL.com for assembly videos.
Required for Assembly

Phillips-head Screwdriver
- Slide Upper Handle onto lower base and secure with two long screws (taped to Upper Handle) into marked holes.
![]()
- Attach upper hose/cord wrap to the back of the handle by inserting hook into the slot and pressing up until it's seated flush with the back of the machine. Use 1 short screw to secure the bottom of the wrap to the machine.
![]()
- Attach lower hose/cord wrap by inserting the hook into the slot and pressing up until it's seated flush with the back of the machine. Use 2 short screws to secure the bottom hose/cord wrap.
![]()
- Wrap hose around both hose/cord wraps. Secure it by inserting the trigger hose grip into opening on the grip holder on the upper hose/cord wrap.
![]()
- Wrap cord around lower and upper hose/cord wraps. Secure plug to cord with clip on plug.
![]()
- Attach included tools to the appropriate storage locations on the machine (varies by model).
![]()


Cleaning Formulas
 Find more formulas at BISSELL.com.
Keep plenty of BISSELL® formulas on hand so you can clean whenever it fits your schedule. Always use genuine BISSELL formulas in your machine. Other formulas may harm the machine and void the warranty. Do not use Hard Floor Formula on area rugs or carpet.
 |  |  |  |
| Clean + Refresh Powerful cleaning and odor elimination with Febreze freshness | PET Stain & Odor Removes tough pet stains Includes StainProtect™ to protect against future stains | PRO MAX Clean + Protect Our most powerful formula for tough, ground-in dirt & stains Includes StainProtect to protect against future stains | PET PRO OXY Urine Eliminator Our best formula for pet urine stains & odors Includes StainProtect to protect against future stains |
Certain trademarks used under license from The Procter & Gamble Company or its affiliates.
Pretreat
Pretreat spots and stains to improve carpet cleaning performance.
 |  |
| PET Stain Pretreat Removes tough pet stains & odors with Enzyme Action | PET PRO OXY Stain Destroyer Removes tough pet stains & odors with OXY |
Boost
Add Boost carpet cleaning formula enhancers to any formula to increase its effectiveness.
 |  |  |
| OXY Boost Removes old, set-in stains | PRO MAX Boost Add to formula for 2X deep cleaning power | PET OXY Boost Removes pet stains and odors |
- To reduce the risk of fire and electric shock due to internal component damage, use only BISSELL cleaning formula intended for use with this machine.
- To reduce the risk of fire and electric shock when cleaning a hard floor, the BISSELL bare floor tool must be used and is only to be used with BISSELL Hard Floor Solutions formula intended for use with this appliance.
Filling the 2-in-1 Water Tank
More of a visual person? We've got video instructions for this step at support. BISSELL.com.
Note: Fill with warm (140°F/60°C MAX) tap water and add the appropriate BISSELL® formula. Do not use boiling water. Do not heat water or tank in microwave.
- Use Tank Carry Handle to remove tank from the machine and bring it to the sink.
![]()
- Pull up on the bottom edge of the latch on the tank to remove the lid.
![]()
- Pull up on bladder fill cover that says "Fill Here".
![]()
- Fill tank with warm (60°C/140°F MAX) tap water to the water fill line. Do not boil or microwave water as it can destroy the tank.
![]()
- Fill the provided measuring cup with formula to the fill line and pour into the bladder.
![]()
- Push down on bladder fill cover to close.
![]()
- Replace the tank lid and latch.
![]()
- Place tank into machine base and seat firmly into place.
![]()


Cleaning Your Carpet
Visit support. BISSELL.com for more carpet cleaning tips.
- Plug into a proper outlet.
![]()
- Set ReadyTools™ Dial to FLOOR CLEANING setting.
![]()
- Use the red power pedal on the back of the machine to turn it ON.
![]()
- Push the gray pedal to recline the machine.
![]()
- Press the Spray Trigger while making one slow forward and one slow backward pass. Do not overwet.
![]()
- Release trigger and make one slow forward and backward pass over same area.
![]()
- Repeat cleaning passes until solution being suctioned up appears clean. Continue passes without pressing Spray Trigger until you can't see any more water being suctioned up. Repeated passes will help speed up dry time.
![]()


ATTENTION
- Take care not to run over loose objects or edges of area rugs. Stalling the brush may result in premature belt failure.
- Some Berber carpets have a tendency to fuzz with wear. Repeated strokes in the same area with an ordinary vacuum or deep cleaner may aggravate this condition.
Using the Ready Tools
Your carpet cleaner comes equipped with a hose and at least one cleaning tool for cleaning stairs, upholstery and more. Find more tools at BISSELL.com.
- Set ReadyTools™ Dial to TOOLS setting. This will allow spray and suction from hose.
![]()
- Attach cleaning tool of your choice to end of hose.
![]()
- Hold tool about 1-2 inches above soiled surface. Press Spray Trigger to apply cleaning solution. Release trigger, apply downward pressure, and pull toward you to suction up dirt and cleaning solution. Do not overwet.
![]()
- When finished cleaning, remove and rinse tool(s) and hose in clean, running water.
![]()
- Before wrapping the hose, lift and stretch the hose to make sure water is cleared. Wrap hose around rack.
![]()


Emptying the 2-in-1 Water Tank
More of a video person? We've got you covered. Find these steps, and other how-to videos, at support. BISSELL.com.
- Turn machine OFF and remove the 2-in-1 Water Tank from the machine. Carry tank to a sink or outside to dispose of dirty water.
![]()
- Pull up on the bottom edge of the latch on the tank to remove the lid.
![]()
- Empty dirty water from back corner of tank.
![]()
- Rinse the tank with running, warm (60°C/140°F MAX) tap water, taking care to clean underneath and around heavy-duty bladder.
![]()
- After each use, remove any debris trapped in red lint screen on base of machine while tank is still removed.
![]()
- Return 2-in-1 Water Tank to machine.
![]()


To reduce the risk of electric shock, push power pedal OFF and disconnect plug from electrical outlet before performing maintenance or troubleshooting checks.
After-Cleaning Care
For a full list of machine maintenance tips and tricks, visit support. BISSELL.com.
Cleaning the Removable Nozzle
- Grab the sides of the top of the nozzle and pull forward.
![]()
- Rinse nozzle under running water.
![]()
- When finished, replace nozzle by slightly raising front of machine to line up slots on each side of the base with hooks the nozzle. Push forward to click nozzle into place.
![]()


Cleaning the ReadyTools™ Dial
If ReadyTools Dial is hard to turn, the diverter assembly that holds it may need to be cleaned.
- Remove the front nozzle.
![]()
- Use a Phillips-head screwdriver to remove the screws that hold the assembly in place. Set them aside.
![]()
- Remove assembly.
![]()
- Hold assembly under running water. Make sure water flows through and around the dial. Turn the dial about 10 times each way to clear debris.
![]()
- Replace assembly and screw.
![]()
- Replace the front nozzle.
![]()


To reduce the risk of electric shock, push power pedal OFF and disconnect plug from electrical outlet before performing maintenance or troubleshooting checks.
Storing Your Machine
We have additional machine maintenance tips for you at support. BISSELL.com.
Keep machine in a protected, dry area, like a closet or basement. Because it uses water, this machine should not be kept where there's a danger of freezing. Freezing will damage internal components and void the warranty.
Troubleshooting
 Below are some of the issues you may run into. If you don't see the issue you're experiencing below, visit support. BISSELL.com.
| Problem | Possible Cause | Remedies | |
Reduced spray OR no spray | Bladder may be empty. | Push power pedal OFF; refill bladder with clean, warm (60°F/140°C MAX) tap water and formula. | |
| 2-in-1 Water Tank may not be seated properly. | Push power pedal OFF; remove and reseat tank. | ||
| Pump may have lost prime. | Push power pedal OFF; after 1 minute turn ON and press Spray Trigger. | ||
| Pump belt may be broken. | Push power pedal OFF and unplug from outlet. Visit support.BISSELL.com for belt replacement instructions. | ||
DirtLifter® PowerBrush does not turn | Brush belt or pump belt is off or broken. | Push power pedal off and unplug from outlet. Visit support.BISSELL.com for belt replacement instructions. | |
Machine not picking up solution | ReadyTools Dial may be on wrong setting for cleaning job. | Set dial to either FLOOR CLEANING or TOOLS setting. | |
| Poor tool position (handheld attachments only). | Adjust angle; apply more downward pressure. | ||
| Removable Nozzle may not be properly attached. | Make sure nozzle is on correctly by slightly raising front of machine to line up slots on each side of base of machine with hooks on each side of nozzle. Attach at base first and then click nozzle into place. | ||
| 2-in-1 Water Tank lid is not properly installed. | Reinstall lid. | ||
| 2-in-1 Water Tank is not properly seated. | Tank must be firmly seated to function; remove and reseat. | ||
| 2-in-1 Water Tank has picked up maximum dirty water. | Empty 2-in-1 Water Tank and refill. | ||
| The lint screen may be clogged. | Clean out lint screen. | ||
NOTICE
To reduce the risk of a leaking condition, do not store unit where freezing may occur. Damage to internal components may result.
To reduce the risk of electric shock, turn power OFF and disconnect plug from electrical outlet before performing maintenance or troubleshooting checks.
Warranty
2-Year limited warranty, may vary by state. Visit support. BISSELL.com or call 1-800-237-7691 for complete warranty information.

We're Waggin' Our Tails!
BISSELL® proudly supports BISSELL Pet Foundation® and its mission to help save homeless pets. When you buy a BISSELL product, you help save pets, too. We're proud to design products that help make pet messes, odors and pet homelessness disappear.
Visit BISSELLsavespets.com to learn more.
But wait, there's more!
Join us online for a complete guide to your new product, including troubleshooting, product registration, parts, and more.
Go to support.BISSELL.com.

©2020 BISSELL Inc. All rights reserved.
Part Number 1624717 04/20 RevA

Documents / Resources
References
Download manual
Here you can download full pdf version of manual, it may contain additional safety instructions, warranty information, FCC rules, etc.
Advertisement
Thank you! Your question has been received!


Need Assistance?
Do you have a question about the Proheat Essential 1887 that isn't answered in the manual? Leave your question here.