Table of Contents
Advertisement
Quick Links
Advertisement
Table of Contents

Related Manuals for Ryobi R36XSHR10


Summary of Contents for Ryobi R36XSHR10
- Page 1 FRONT PAGE R36XSHR10...
- Page 2 ■ The operator or user of the product is IMPORTANT! responsible accidents hazards It is essential that you read the instructions occurring to other people or their property. in this manual before assembling, operating, PREPARATION and maintaining the product. ■ Never operate the product in the vicinity of Subject to technical modification.
-
Page 3: Operation
Do not use a battery pack or product to fire ● Replace or repair any damaged parts or excessive temperature. Exposure to fire with genuine RYOBI spare parts. or temperature above 130°C may cause ■ Do not allow processed material to build up explosion. -
Page 4: Transportation And Storage
prolonged use of a product. When using ■ When feeding long woody branches or any product for prolonged periods, ensure stems into the product, be careful of whip to take regular breaks. and vibrations as they get caught by the cutter. The operator must wear eye protection whenever using the product. -
Page 5: Maintenance
OVERLOAD PROTECTION DEVICE MAINTENANCE The product has an overload protection Before cleaning, inspecting, or servicing device. When overloading is detected, the the product, turn it off, allow the cutters to overload light will turn green, and the product completely stop, and remove the battery will automatically turn off. -
Page 6: Symbols In This Manual
Do not use as a step. Remove wheel axle, bin and plunger. Wait until all product components have completely stopped before touching them. STOP Press leg release buttons and fold legs up Lay shredder on the ground with the handles down. until they lock into place. - Page 7 Lock Unlock Stop the product Original Instructions...
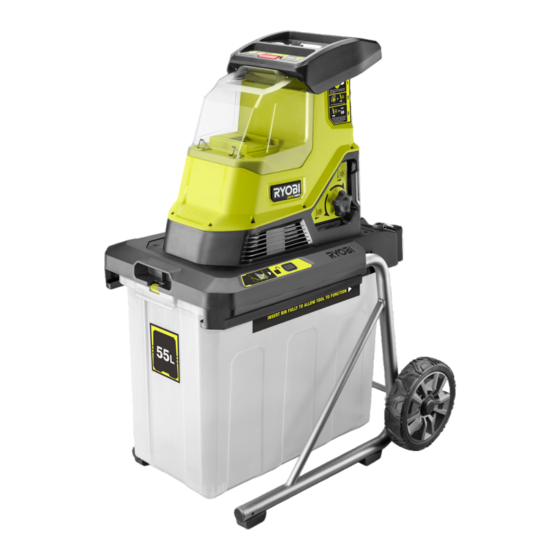
- Page 9 R36XSHR10 Battery slot Reverse button Calibration mode button Stop button Feeding chute Start button Battery door Crushing plate adjustment knob Metal frame release button Metal frame Latch Axle Right bracket Left bracket Material plunger Wheel R-clip Washer Hub cap Knob Operator’s manual...
- Page 10 Wear full eye and ear protection, non- Press the metal frame release button and unfold the metal frame. slip and heavy-duty protective gloves, substantial footwear, and long trousers at all times while operating the product. Install the wheel axle onto the metal Install the left bracket on the left frame.
- Page 11 Install the wheels on each end of the axle. Attach the washers on both ends and Install the hub cap on each end of the secure the wheels using R-clips. axle. Install both brackets onto the wheel axle. Attach the knob on both brackets and Push down the latch on each side of turn it clockwise to secure both brackets in place.
- Page 12 Clearing a Sharpening the Tensioning the p.16 p.13 p.15 p.17 Using the product blockage blade crushing plate p.18 Clearing debris Cleaning the Emptying the p.20 p.22 p.23 p.24 Moving the product Storing the product product collection bin...
-
Page 13: Using The Product
USING THE PRODUCT 1. Open the battery door and slide the battery pack into the battery slot. 2. Close the battery cover. NOTE: To feed material into the product, press the start button. To move material out of the product, press the reverse button. NOTE: To feed material into the product, insert the branch first, not the leaves. - Page 14 3. Press the start button to begin operating the product. 4. Feed material into the feeding chute. WARNING: Do not put your hands inside the feeding chute to clear away shredded material while the product is turned on. 5. Push shredded material into the feeding chute using the material plunger.
-
Page 15: Clearing A Blockage
CLEARING A BLOCKAGE 1. Press the stop button. 2. Hold the reverse button until the blades are clear of material. 3. Press the start button to refeed material into the product. Operation... -
Page 16: Sharpening The Blade
SHARPENING THE BLADE (NON-CALIBRATION MODE) 1. Press the start button. 2. Turn the crushing plate adjustment knob clockwise until you hear metal on metal contact or you see fine aluminum shavings in the bottom of the collection bin. NOTE: Contact between the crushing plate and the blades sharpens the blades. - Page 17 TENSIONING THE CRUSHING PLATE (CALIBRATION MODE) NOTE: Make sure that the product is turned off. 1. When the product is turned off, hold the calibration mode button and press the start button to begin calibration. 2. Turn the crushing plate adjustment knob clockwise slowly until the product turns off.
- Page 18 CLEARING DEBRIS 1. Press the stop button and open the battery door. 2. Remove the battery pack. 3. Close the battery door. 4. Using the torx key, remove the blade cover of the product. NOTE: When removing the blade cover, do not separate the screws from the cover to avoid misplacement or mix-up with other screws.
- Page 19 6. Turn the crushing plate adjustment knob counterclockwise until it moves as far away from the product as possible. 7. Install the shaving plate. Make sure that the shaving edge is facing into the product. 8. While wearing non-slip, heavy-duty gloves, install the cutter blades.
-
Page 20: Cleaning The Product
CLEANING THE PRODUCT 1. Press the stop button and open the battery door. 2. Remove the battery pack. 3. Close the battery door. 4. Clean the feeding chute using a brush. 5. Push down the release switch and pull out the collection bin. Empty the contents of the bin into a waste container. - Page 21 6. Clean the rest of the product using a dry cloth. WARNING: Avoid using solvents when cleaning plastic parts. Most plastics are susceptible to damage from the various types of commercial solvents and may be damaged by their use. Use a clean brush to remove dirt, dust, lubricant, grease, etc.
-
Page 22: Emptying The Collection Bin
EMPTYING THE COLLECTION BIN 1. Press the stop button. 2. Push down the release switch and pull out the collection bin. 3. Empty the contents of the collection bin into a waste container. Maintenance... -
Page 23: Moving The Product
MOVING THE PRODUCT 1. Press the stop button and open the battery door. 2. Remove the battery pack. 3. Close the battery door. 4. Tilt the product until it rests only on its wheels. 5. Move the product to the preferred location. -
Page 24: Storing The Product
STORING THE PRODUCT 1. Press the stop button and open the battery door. 2. Remove the battery pack. Close the battery door. 3. Push down the release switch and pull out the collection bin. 4. Clean the feeding chute using a brush and the rest of the product using a dry cloth. - Page 25 6. Turn the knobs that secure the left and right brackets to the metal frame counterclockwise and remove them. Remove the left and right brackets. 7. Flip up the latches on each side of the metal frame to remove the wheels. 8.
-
Page 26: Troubleshooting
TROUBLESHOOTING PROBLEM CAUSE ACTION Allow the product to cool down for 15 minutes. This can occur when the Temperature overload ambient temperature is high and the product has been used consistently without a break. The battery over current protection may have triggered. -
Page 27: Product Specifications
Cordless shredder given in this instruction manual have been measured in accordance with a standardised Model R36XSHR10 test and may be used to compare one tool with Rated power 1440 W another. They may be used for a preliminary Rated voltage 36 V d.c. - Page 28 Techtronic Industries Australia Pty Ltd 31 Gilby Road, Mount Waverley, VIC 3149 Melbourne, Australia Techtronic Industries N.Z. Limited Unit C, 70 Business Parade South, Highbrook, Auckland 2013, New Zealand RYOBI is a trade mark of Ryobi Limited, and is used under license. 961478305-03...