Oregon Scientific PE316PM - Pedometer With Pulsemeter Manual
- Instruction manual (1 page)
Advertisement
- 1 INTRODUCTION
- 2 FEATURES
- 3 NAMES AND FUNCTIONS
- 4 OPENING THE COVER
- 5 BATTERY INSTALLATION: MAIN UNIT
- 6 HOW TO WEAR THE PEDOMETER
- 7 HOW TO SET THE TIME
- 8 HOW TO ENTER PERSONAL DATA
- 9 HOW TO USE THE PEDOMETER
- 10 HOW TO USE THE DISTANCE AND CALORIE FUNCTION
- 11 HOW TO SET THE TIMER FUNCTION
- 12 HOW TO TAKE A PULSE
- 13 SPECIFICATIONS
- 14 MAINTENANCE
- 15 Documents / Resources
INTRODUCTION
Congratulations on your purchase of the easy-to-use multifunction lightweight Pedometer with Pulsemeter.
This product has several unique features that are useful to an individual who is active or frequently walks or runs. A pulsemeter, pedometer, calorie counter, and count-up timer, this unit can monitor and display important information for a variety of exercise routines or walking activities.
Designed for ease-of-use, this product has a clip that snugly attaches to clothing. Its lightweight and small size gives this product a trouble free quality.
FEATURES
- Pulse monitor
- Step counter
- 12 /24 hr. real time clock
- Total distance monitor
- Total calorie counter
- Stride length adjustment
- Count-up timer (99 hour, 59 minute, 59 seconds)
- Low battery indicator [
![]() ]
] - EL backlight
- Motion sensitivity adjustment
 ]
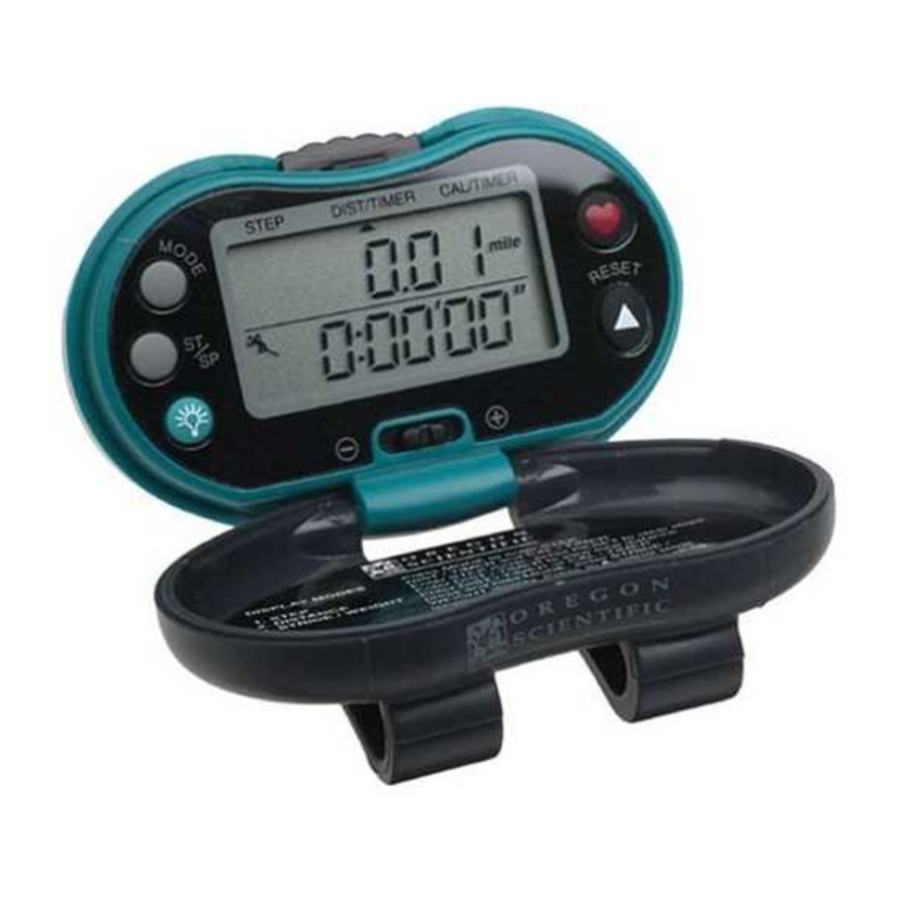
] NAMES AND FUNCTIONS

- LCD
Two line display with three different modes and pulse display - MODE Button
Alternates display between different modes - Start /Stop [ST/SP] Button
To start or stop the count-up timer - BackLight (
![]() ) Button
) Button
Turns backlight on - Pulse [
![]() ] Button
] Button
Sets the unit to the pulse display for taking and monitoring a persons heart rate - [RESET] / Advance (
![]() ) Button
) Button
Resets display modes to zero
Increases the value of settings when entering or changing data - Motion Sensitivity Slide Switch
Increases or decreases the unit's response to motion - Battery Compartment
Insert two (2 pieces) LR44 size batteries - Finger Insertion Slot
- Cover Release Button
Press to open protective cover - Cover
Protects LCD panel - Belt Clip
Clips to belt or clothing
 ) Button
 ] Button
 ) Button
OPENING THE COVER
Holding the pedometer upright, grasp the clip with one hand and press the COVER RELEASE button with the other.
BATTERY INSTALLATION: MAIN UNIT
- Gently press and pull the battery compartment door.
- Insert two (2 pieces) LR44 size 1.5V batteries or equivalent.
- Replace the battery compartment door.


 Note: Battery low icon [
  ] will go on when the batteries are low and need to be changed.
 | Note: If not disposed of properly, batteries can be harmful. Protect the environment by taking exhausted batteries to authorized disposal stations. |
HOW TO WEAR THE PEDOMETER
Attach at waist level to your belt, slacks, or training attire. Maintaining a horizontal position, attach securely. [FIG. C]

Note: Improper positioning of the pedometer may result in incorrect measurements.
HOW TO SET THE TIME
- Press MODE to toggle between STEP and DIST/TIMER, and CAL/ TIMER display modes.
- In STEP mode, press and hold MODE for two seconds. The 12 hour value will flash. Use the (
![]() ) button to make a selection between 12 hour and 24 hour format.
) button to make a selection between 12 hour and 24 hour format. - Press MODE again, the "hour digits" will flash. Use the (
![]() ) button to enter the hours. Holding down the button will increase the value rapidly.
) button to enter the hours. Holding down the button will increase the value rapidly. - Press MODE again, the "minute digits" will flash. Again, use the (
![]() ) button to change the minutes.
) button to change the minutes. - Press MODE again, the "second digits" will flash. Use the (
![]() ) button to set the "second digits" to zero. Alternatively, wait until the second digits correspond to the correct time and then press MODE to confirm and exit.
) button to set the "second digits" to zero. Alternatively, wait until the second digits correspond to the correct time and then press MODE to confirm and exit.
 ) button to make a selection between 12 hour and 24 hour format.
HOW TO ENTER PERSONAL DATA
For the unit to operate properly, personal data such as body weight and stride distance needs to be entered correctly.
Measuring distance correctly depends on setting the correct average length of an individual stride. The stride can be set between 30 to 150 cm (or 11 to 60 inches for imperial version).
Current body weight can be entered between 30kg and 150kg (or 60 to 340 pounds for imperial version). Body weight is used to determine the amount of calories that are lost during an exercise routine.
Entering stride length and body weight:
- Press MODE to toggle between STEP, DIST/TIMER [FIG. D], and CAL/TIMER [FIG. E] display modes.

- Enter DIST/TIMER or CAL/TIMER mode.
- Press and hold MODE for two seconds. The unit will enter the two-lineSTRIDE/WEIGHT display. The stride numbers will flash. [FIG. F]

- Press (
![]() ) until the desired stride length is entered. Holding down the button will increase the value rapidly.
) until the desired stride length is entered. Holding down the button will increase the value rapidly. - Press MODE, the weight numbers will flash.
- Press (
![]() ) until the desired weight is entered, again holding down the button will increase the value rapidly.
) until the desired weight is entered, again holding down the button will increase the value rapidly. - Press MODE to exit.


 ) until the desired stride length is entered. Holding down the button will increase the value rapidly.
 Note: if no changes are made to the Stride / weight display, the unit will automatically return to the DIST/TIMER display mode after about seven seconds.
An individuals stride may vary in length. Input the appropriate length for an individual's average walking length. To determine your average stride length, walk 10 steps and divide by 10 the total distance covered. Set the unit to this number.

HOW TO USE THE PEDOMETER
A pedometer function will count the number of steps a person takes over a specified distance.
- Press MODE to toggle between STEP, DIST/TIMER, and CAL/ TIMER display modes.
- Set the unit in STEP mode.
- Press RESET, the pedometer display will return to zero.[FIG.G]


Note on motion sensitivity: To make the unit more or less sensitive to motion, reposition the motion sensitivity slide switch. To determine the proper amount of motion sensitivity for an individual walking pattern, experiment with different settings.
HOW TO USE THE DISTANCE AND CALORIE FUNCTION
This unit can measure the total distance walked or ran and calculate the total number of calories consumed.
- Press MODE to toggle between STEP, DIST/TIMER, and CAL/ TIMER display modes.
- Set the unit in DIST/TIMER mode.
- The top line of the display shows the total distance a person has walkedor ran.
- Again, press MODE to toggle between STEP, DIST/TIMER, and CAL/ TIMER display modes.
- Set the unit in CAL/TIMER mode.
- The top line of the display shows the total number of consumed calories.
![warning]() Note on clearing the total distance and the number of consumed calories: The number of steps taken, the total distance traveled, and the number of calories consumed are inter-related. Clearing the STEP data will clear the total distance and the total number of calories consumed.
Note on clearing the total distance and the number of consumed calories: The number of steps taken, the total distance traveled, and the number of calories consumed are inter-related. Clearing the STEP data will clear the total distance and the total number of calories consumed.
- To clear STEP data, refer to How To Use The Pedometer section.
Note on calorie consumption: In order to keep fit, it is necessary for a person weighing 60 kg to walk 10,000 steps to consume 300 calories per day. The following graph shows the suggested consumption of calories with reference to people of different weight. [FIG. H]

HOW TO SET THE TIMER FUNCTION
The count-up timer will start from zero and count to a maximum time of 99 hours, 59 minutes, and 59 seconds (99:59'59).
- Press MODE to toggle between STEP, DIST/TIMER, and CAL/ TIMER display modes.
- Set the unit in DIST/TIMER, or CAL/TIMER mode.
- To start the timer, press ST/SP.
- To stop the timer, press ST/SP again.
- To reset the timer to zero, press RESET.
HOW TO TAKE A PULSE
A person's pulse rate indicates the number of times that the heart beats within a given amount of time. This unit attempts to calculate approximately how many times a heart will beat in one minute. Many factors such as smoking eating, breathing and stress can affect the rate at which a person's heart will beat. Monitoring pulse rate can be useful for determining how hard the heart is working at a given level of activity and this information can be used to plan an effective exercise routine. Individuals with an irregular heart beat or cardiovascular deficits may experience difficulty obtaining a pulse reading.
To take a pulse:
- Press PULSE [
![]() ] button, the display will show a heart icon and the word PULSE on the upper line. [FIG. I]
] button, the display will show a heart icon and the word PULSE on the upper line. [FIG. I]

- Insert your right index finger into the finger slot and position your fingerso that the padded portion is on the pulse sensor.

- Maintain a steady position, holding too forcefully or too lightly may result in an incorrect reading.


Note: When your finger is inserted properly, the heart icon on the display will flash. This indicates that the unit is reading a pulse. The unit will display the number of beats per minute that your heart is currently making.
If, for some reason, the unit cannot read a pulse within a given time it will automatically return to the previous display mode.
Press pulse [  ] button and try taking your pulse again.
SPECIFICATIONS
| Operating Modes | STEP, DIST/TIMER, CAL/TIMER |
| Real time clock | 12 hour / 24 hour option with hour/minute second display |
| Step counter | 0 to 99,999 steps |
| Distance traveled | 0 to 999.99 km (or 0 to 999.99 miles for imperial version) |
| Count up timer | 99 hours, 59 minutes, 59 seconds |
| Stride distance | 30 to 150 cm (or 11 to 60 inches for imperial version) |
| Weight range | 30 to 150 kg (60 to 340 lbs.) |
| Pulse range | 40 to 206 bpm |
| Operation temperature | -10°C to 40°C |
| Storage temperature | -20°C to 60°C |
| Power source | 2 x LR44 1.5V batteries or equivalent |
| Product size | 32 (D) x 41 (w) x 63 (L) mm |
| Weight | 32.2 g (without batteries) |
MAINTENANCE
- Do not immerse the unit in water. If the unit comes in contact withwater, dry it immediately with a soft lint-free cloth.
- Do not clean the unit with abrasive or corrosive materials. Abrasivecleaning agents may scratch the plastic parts and corrode the electronic circuit.
- Do not subject the unit to excessive: force, shock, dust, temperature, orhumidity. Such treatment may result in malfunction, a shorter electronic life span, damaged batteries, or distorted parts.
- Do not tamper with the unit's internal components. Doing so willterminate the unit's warranty and may cause damage. The unit contains no user-serviceable parts.
- Only use new batteries as specified in this instruction manual. Do not mixnew and old batteries as the old batteries may leak.
Read this instruction manual thoroughly before operating the unit.

- The content of this manual is subject to change without further notice.
- Due to printing limitation, the displays shown in this manual may differ from the actual display.
- The manufacturer and its suppliers held no responsibility to you or any other person for any damage expenses, lost profits, or any other claim arise by using this product.
- The contents of this manual may not be reproduced without the permission of the manufacturer.

Documents / ResourcesDownload manual
Here you can download full pdf version of manual, it may contain additional safety instructions, warranty information, FCC rules, etc.
Download Oregon Scientific PE316PM - Pedometer With Pulsemeter Manual
Advertisement
Thank you! Your question has been received!


Need Assistance?
Do you have a question about the PE316PM that isn't answered in the manual? Leave your question here.