Handicare Xclusive Manual
Hide thumbs
Also See for Xclusive:
- Quick reference manual (19 pages) ,
- User manual (32 pages) ,
- Sales manual (36 pages)
Advertisement
Available languages
Available languages
Quick Links
Advertisement
Chapters

Related Manuals for Handicare Xclusive


Summary of Contents for Handicare Xclusive
- Page 1 User Manual...
-
Page 3: Table Of Contents
FOREWORD CONTENT USER MANUAL Thank you for choosing a Handicare stairlift. This manual is for the XCLUSIVE lift type, OPTIONS and includes instructions for the standard features and optional upgrades. IMPORTANT INFORMATION FAULT FINDING ATTACHMENTS A. Reminders B. Emergency operation C. -
Page 4: Options
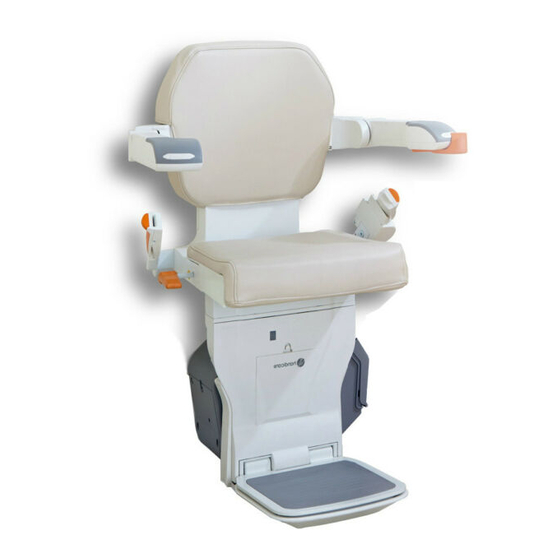
Continuous Charge kit [1]Diagnostic Display The illustration above shows the features used to operate [2]Joystick the XCLUSIVE lift. The XCLUSIVE lift can be upgraded with [3]Emergency stop the Automatic Swivel seat, Powered Footrest and the [4]Seat belt Continuous Charge kit, options to create even more seat comfort and user-friendliness. - Page 5 FOLD DOWN Ensure that the on/off switch is set in the 'ON' position. The diagnosic display will be illuminated when switched on. Fold down the footplate, the armrests and seat. page 10 > OPTIONAL POWERED FOOTREST PLACE FEET Place your feet on the footplate. Ensure that both feet are completely on the plate.
- Page 6 SAFETY FIRST CLICK! Fasten the seat belt securely, ensuring that it clicks into the holder. Put the key in the switch and turn it ninety degrees clockwise. Check that the chair is in the locked position. RIDE Move the joystick in the desired direction of travel. The display shows a “8/9”, the lift gradually starts to move.
- Page 7 EMERGENCY STOP In an emergency, press the emergency stop once. The lift stops straight away. To release the lift, press the emergency stop again. SWIVEL CLICK! The lift stops automatically at the end of the rail. You should now swivel the seat manually, making it easier to get on and off.
- Page 8 LOOSEN BELT Unfasten the seat belt. STAND UP Stand up from the seat. USER MANUAL...
- Page 9 FOLD UP CLICK! Fold up the armrests and seat {A}. Push the handle, located to the left or right under the seat, downwards {B}. Swivel the seat until you hear a 'click'. The seat is now in the locked position. PARK Press and hold the button on the remote control until the lift reaches a charge point.
- Page 10 CHARGE 15 sec. There are charge points for recharging the lift's batteries at the top and bottom of the rail (there may be additional charge points). If the lift is not in the correct position at the charge point, the lift beeps for 15 seconds and the display shows a “2”.
- Page 11 OPTIONS AUTOSWIVEL page 9 POWERED FOOTREST page 10 CONTINUOUS CHARGE KIT page 10 AUTOSWIVEL CLICK! The AUTOMATIC SWIVEL SEAT option let you swivel the seat automatically to face the direction you are going to walk in. To do this, push and hold the joystick in the direction of travel.
- Page 12 OPTION POWERED FOOTREST To operate a POWERED FOOTREST move the switch under the armrest.The stairlift should beep whilst folding the footrest. Always ensure the footplate is in the down position during travel. CONTINUOUS CHARGE KIT When the CONTINUOUS CHARGE strip is installed, the batteries will charge on every position of the rail.
- Page 13 USER MANUAL...
- Page 14 FOREWORD Your Xclusive stairlift is a sophisticated product that has been specifically developed to carry one person (max 130 kg/20½ stone/286 lbs) sitting on the seat. Before using your Xclusive stairlift please read this manual thoroughly to familiarise yourself with how to operate your stairlift.
- Page 15 Neither Handicare nor its authorised dealers may be held responsible for the suitability of the structures which surround and support the installation.
- Page 16 Installation and servicing should only be carried out by dealers or installers/service engineers authorised by the manufacturer in accordance with local regulations. The wall mounted remote controls operate on a infra-red frequency; Handicare is unable to accept responsibility for system inoperability in the unlikely event of interference from signals external to this stairlift.
-
Page 17: Faultfinding
FAULTFINDING DIAGNOSTIC DISPLAY page 15 CHAIRPOSITION page 16 EMERGENCY STOP page 16 ARMREST page 17 page 17 BATTERIES RC page 18 POWER page 18 OBSTACLE page 19 SWITCH page 19 DIAGNOSTIC DISPLAY The stairlift is fitted with a diagnostic display that displays a code to help diagnose faults. - Page 18 CHAIR POSITION CLICK! C A U S E S O L U T I O N Problem: the lift does not travel in either direction and the display shows a “0”. Cause: the seat is not locked and is in a swivelled position. Solution: swivel the seat using the handle located to the left or right under the seat, until it “clicks”...
- Page 19 ARMREST C A U S E S O L U T I O N Problem: the lift does not travel in either direction and the display shows a “-”. Cause: an armrest has not been folded down. Solution: fold down the armrest fully. C A U S E S O L U T I O N Problem: the lift does not travel in either direction and the display shows a “0”.
- Page 20 FAULTFINDING BATTERIES RC RED light C A U S E S O L U T I O N Problem: the lift does not travel in either direction and the light on the remote control shines red when the remote control is operated. Cause: the batteries in the remote control are flat.
- Page 21 OBSTACLE C A U S E S O L U T I O N Problem: the lift travels in one direction only and the display shows a “4/6”. Cause: there is an obstacle between the lift and the stairs. Solution: move the lift in the opposite direction {A} and remove the obstacle {B}. SWITCH C A U S E S O L U T I O N...
-
Page 22: Attachments
ATTACHMENTS REMINDERS page 20 EMERGENCY OPERATION page 21 DIAGNOSTIC CODES page 23 REMINDERS [A]Remove the key from the switch whenever you leave the lift. [B]Never remove the lift plug from the wall socket. USER MANUAL... -
Page 23: Emergency Operation
EMERGENCY OPERATION STOP [B.1]When the stairlift stops unexpectedly and no longer moves any further, the hand winder can be used to move the lift to a charging point. [B.2]Turn off the lift. [B.3]Open the cover in the front plate of the chassis, by pressing the tab at the top of the cover{A}. - Page 24 [B.5]Turn the hand winder as indicated on the winder access point. Then wind the lift in the required direction. [B.6]Replace the cap. [B.7]Replace the winder{A} and the cover{B}. [B.8]Turn on the lift. USER MANUAL...
-
Page 25: Diagnostic Codes
DIAGNOSTIC If the mentioned action does not help, call Handicare. CODES Write down the diagnostic Display Action Display Action code when you call Handicare for help. No display Charging, but the lift does not drive. Possibly the armrest is folded. - Page 26 Display Action Display Action Display Action Low battery voltage Joystick activated Joystick activated F A U L T Display Action Display Action Display Action IR address fail The main power relay not The main power not closed open F A U L T F A U L T F A U L T Display...
- Page 27 Display Action Display Action Display Action Power supply fault during Power supply fault during Power supply fault when charging charging battery on float F A U L T F A U L T F A U L T Display Action Display Action Display...
-
Page 28: User Manual
USER MANUAL... -
Page 29: Gebruikershandleiding
VOORWOORD INHOUD GEBRUIKERSHANDLEIDING Bedankt dat u heeft gekozen voor een Handicare traplift. In deze handleiding voor OPTIES lifttype XCLUSIVE, vindt u de gebruiksaan- wijzing voor de standaard uitvoeringen en de BELANGRIJKE INFORMATIE optionele uitbreidingen. FOUTDIAGNOSE BIJLAGEN A. Aandachtspunten B. Noodbediening C. -
Page 30: Opties
Continu oplaadset De illustratie hiernaast toont de onderdelen waarmee u de [1]Display XCLUSIVE lift bedient. Om het zitcomfort en gebruiksgemak [2]Joystick te vergroten, kunt u de XCLUSIVE uitbreiden met de opties: [3]Noodstop automatische draaistoel, automatische voetenplank en de [4]Veiligheidsgordel continu-oplaadset. - Page 31 NEERKLAPPEN Zorg ervoor dat de aan-/uit-schakelaar in de stand ‘AAN’ staat, als u de traplift wilt gebruiken. Als de diagnostische display is verlicht, is de traplift ingeschakeld. Klap de voetenplank, de armleuningen en de stoelzitting naar beneden. pagina 36 > OPTIONELE AUTOMATISCHE VOETENPLANK VOETEN PLAATSEN Plaats uw voeten op de voetenplank.
- Page 32 VEILIGHEID VOOROP CLICK! Doe de veiligheidsgordel om en klik deze stevig vast in de houder. Steek de sleutel in het contact en draai deze een kwart rechtsom. Controleer of de zitting is vergrendeld en niet kan draaien. RIJDEN Beweeg de joystick in de gewenste rijrichting. De display laat een “8/9” zien, de lift zet zich geleidelijk in beweging.
- Page 33 NOODSTOP STOP In geval van nood drukt u de noodstop eenmaal in. De lift stopt dan onmiddellijk. Om de lift weer vrij te geven, drukt u nogmaals op de noodstop. DRAAIEN CLICK! De lift stopt automatisch aan het einde van de rail. U kunt de stoel nu handmatig draaien zodat u gemakkelijker op- en afstapt.
- Page 34 RIEM LOSMAKEN Maak de veiligheidsgordel los. OPSTAAN Sta op van de stoel. GEBRUIKERSHANDLEIDING...
- Page 35 OPKLAPPEN CLICK! Klap de armleuningen en de stoelzitting op {A}. Druk de hendel links of rechts onder de zitting, naar beneden {B}. Draai de stoel totdat u een klikgeluid hoort. De stoel staat nu in de vergrendelde positie. PARKEREN Houd de knop op de afstandsbediening ingedrukt totdat de lift een oplaad- station bereikt.
- Page 36 OPLADEN 15 sec. Boven- en onder aan de rail bevindt zich een oplaadstation waar de accu’ s van de lift zich opladen (extra oplaadstations mogelijk). Wanneer de lift niet (juist) op het oplaadstation staat, piept de lift gedurende 15 seconden en display geeft een “2”...
- Page 37 OPTIES AUTOMATISCHE DRAAIFUNCTIE pagina 35 AUTOMATISCHE VOETENPLANK pagina 36 CONTINU OPLAADSET pagina 36 AUTOMATISCHE DRAAIFUNCTIE CLICK! Met de AUTOMATISCHE DRAAISTOEL-optie kunt u de stoel aan het einde van de rail automatisch in de looprichting laten draaien. Hiervoor houdt u de joystick in opwaartse richting vast.
- Page 38 AUTOMATISCHE VOETENPLANK Gebruik de schakelaar onder de armleuning om de AUTOMATISCHE VOETEN- PLANK in te klappen. U hoort een geluidssignaal terwijl de voetenplank inklapt. Zorg ervoor dat tijdens het rijden van de lift de voetenplank altijd uitgeklapt is. CONTINU OPLAADSET Wanneer de CONTINUE OPLAAD-strip is geïnstalleerd, zullen de accu’s op iedere positie op de rail worden opgeladen.
- Page 39 GEBRUIKERSHANDLEIDING...
- Page 40 Uw Xclusive-traplift is een geavanceerd product bedoeld om één persoon (max. 130 kg) in een zittende houding te vervoeren. Lees deze handleiding aandachtig door, zodat u weet hoe de Xclusive-traplift werkt voordat u ervan gebruikmaakt. De traplift is uitgerust met de nieuwste technologie en gemaakt in overeenstemming met erkende veiligheidsvoorschriften.
- Page 41 De klant is dan ook verantwoordelijk voor de kwaliteit ervan. Handicare noch de geautoriseerde dealers van Handicare kunnen aansprakelijk worden gesteld voor de geschiktheid van de constructie die de installatie moet dragen of die zich rond de installatie bevindt.
- Page 42 De wandschakelaars werken via een infraroodfrequentie. Handicare aanvaardt geen aansprakelijkheid voor de onbruikbaarheid van het systeem in het onwaarschijnlijke geval dat de traplift wordt verstoord door externe signalen.
-
Page 43: Foutdiagnose
FOUTDIAGNOSE DIAGNOSTISCHE DISPLAY pagina 41 STOELPOSITIE pagina 42 NOODSTOP pagina 42 ARMLEUNING pagina 43 SLEUTEL pagina 43 BATTERIJEN AB pagina 44 OPLADEN pagina 44 OBSTAKEL pagina 45 SCHAKELAAR pagina 45 DIAGNOSTISCHE DISPLAY Als sprake is van een storing, wordt deze door middel van een code weerge- geven op de diagnostische display van de traplift. - Page 44 STOELPOSITIE CLICK! O O R Z A A K O P L O S S I N G Probleem: de lift beweegt niet in beide richtingen en de display geeft een “0” aan. Oorzaak: de stoel is niet vergrendeld en staat in een gedraaide positie. Oplossing: draai de stoel met behulp van de hendel links of rechts onder de zitting.
- Page 45 ARMLEUNING O O R Z A A K O P L O S S I N G Probleem: de lift beweegt niet in beide richtingen en de display geeft een “-” aan. Oorzaak: een armleuning is niet neergeklapt. Oplossing: klap de armleuning volledig naar beneden. SLEUTEL O O R Z A A K O P L O S S I N G...
- Page 46 BATTERIJEN AB RED light O O R Z A A K O P L O S S I N G Probleem: de lift beweegt niet in beide richtingen en de LED op de afstandsbediening brandt rood bij bediening. Oorzaak: de batterijen in de afstandsbediening zijn leeg. Oplossing: vervang de batterijen van de afstandsbediening.
- Page 47 OBSTAKEL O O R Z A A K O P L O S S I N G Probleem: de lift beweegt slecht in één richting en de display geeft een “4/6” aan. Oorzaak: er bevindt zich een obstakel tussen de lift en de trap. Oplossing: beweeg de lift in tegenovergestelde richting{A} en neem het obstakel weg{B}.
-
Page 48: Bijlagen
BIJLAGEN AANDACHTSPUNTEN pagina 46 NOODBEDIENING pagina 47 DIAGNOSTISCHE CODES pagina 49 AANDACHTSPUNTEN [A]Neem de sleutel uit het contact als u de lift verlaat. [B]Neem nooit de stekker van de lift uit het wandcontact. GEBRUIKERSHANDLEIDING... - Page 49 NOODBEDIENING STOP [B.1]Als de lift onverwacht stopt en niet meer verder wil, kan de handwinder gebruikt worden om de stoel naar een oplaadpunt te laten zakken. [B.2]Schakel de lift uit. [B.3]Open het kapje in de frontplaat van het chassis. Druk hiervoor op het lipje aan de bovenzijde van de kap{A}.
- Page 50 [B.5]Draai de winder: op de bovenzijde van unit staat vermeld welke kant de winder op te draaien om de lift naar beneden te laten rijden. [B.6]Plaats de dop terug. [B.7]Plaats de winder{A} en de kap terug{B}. [B.8]Schakel de lift aan. GEBRUIKERSHANDLEIDING...
- Page 51 DIAGNOSTISCHE Indien de genoemde actie niet helpt, bel Handicare. CODES Noteer de foutmelding Display Actie Display Actie en geef deze door wanneer u Handicare belt. Geen display De lift laadt op, maar komt niet in beweging. Mogelijk staat de leuning omhoog.
- Page 52 Display Actie Display Actie Display Actie Lage accuspanning Joystick activeerd. Joystick activeerd. F O U T Display Actie Display Actie Display Actie Fout in IR-adres Het hoofdvoedingsrelais is Het hoofdvoedingsrelais is niet geopend niet gesloten F O U T F O U T F O U T Display Actie...
- Page 53 Display Actie Display Actie Display Actie Fout stroomvoorziening Fout stroomvoorziening Fout stroomvoorziening bij tijdens opladen tijdens opladen accu met constante lading F O U T F O U T F O U T Display Actie Display Actie Display Actie Hardware hoofdprintplaat Overstroom Slaap modus defect...
-
Page 54: Gebruikershandleiding
GEBRUIKERSHANDLEIDING... - Page 55 VORWORT INHALT BENUTZERHANDBUCH Wir freuen uns, dass Sie sich für einen Handicare Treppenlift entschieden haben. OPTIONS In diesem Handbuch für die Lifttype XCLUSIVE finden Sie eine Bedienungs- WICHTIGE INFORMATIONEN anleitung für die Standardausführungen und optionale Erweiterungen. FEHLERSUCHE ANHÄNGE A. Erinnerungen B.
- Page 56 Kontinuierliche Ladung- Kit Turn & Go Die nebenstehende Illustration zeigt die Elemente, mit denen [1]Anzeige Sie den XCLUSIVE lift bedienen. Um den Sitzkomfort und die [2]Joystick Bedienungsfreundlichkeit zu erhöhen, können Sie den [3]Not-Halt XCLUSIVE um folgende Optionen erweitern: automatischer [4]Sicherheitsgurt Drehsitz, automatische Fußstütze und der 'Kontinuierliche...
- Page 57 HERUNTERKLAPPEN Stellen Sie sicher, dass der EIN/AUS-Schalter auf ‘EIN’ steht. Die Diagnose- Anzeige leuchtet auf, um den betriebsbereiten Zustand anzuzeigen. Klappen Sie die Fußstütze, die Armlehnen und die Sitzfläche nach unten. Seite 62 > OPTION AUTOMATISCHE FUSSSTÜTZE FÜßE DARAUF STELLEN Stellen Sie Ihre Füße auf die Fußstütze.
- Page 58 SICHERHEIT AN ERSTER STELLE CLICK! Legen Sie den Sicherheitsgurt an und klicken Sie diesen gut in der Halterung fest. Stecken Sie den Schlüssel in den Kontakt und drehen Sie diesen eine Vierteldrehung nach rechts. Prüfen Sie, ob der Sitz verriegelt ist. FAHRT Bewegen Sie den Joystick in die gewünschte Richtung.
- Page 59 STOPP Im Notfall drücken Sie ein Mal die Not-Halt-Taste. Der Lift stoppt dann sofort. Um den Lift wieder in Gang zu setzen, drücken Sie die Not-Halt-Taste erneut. DREHFUNKTION CLICK! Der Lift stoppt automatisch am Schienenende. Sie können den Sitz nun von Hand drehen, damit Sie bequemer aufstehen und wieder Platz nehmen können.
- Page 60 SICHERHEITSGURT LÖSEN Lösen Sie den Sicherheitsgurt. AUFSTEHEN Stehen Sie vom Sitz auf. BENUTZERHANDBUCH...
- Page 61 HOCHKLAPPEN CLICK! Klappen Sie die Armlehnen und die Sitzfläche nach oben {A}. Drücken Sie den He- bel links oder rechts unter der Sitzfläche nach unten {B}. Drehen Sie den Sitz, bis Sie ein Klickgeräusch hören. Der Sitz befindet sich jetzt in der verriegelten Position. PARKEN Halten Sie die Taste auf der Fernbedienung gedrückt, bis der Lift eine Lade- station erreicht hat.
- Page 62 LADEN 15 sec. Am oberen und unteren Schienenende befindet sich eine Ladestation, auf der die Akkus des Lifts aufgeladen werden (zusätzliche Ladestationen sind möglich). Falls sich der Lift nicht oder nicht exakt auf der Ladestation befindet, ertönen 15 Sekunden lang akustische Signale und auf dem Display erscheint eine “2”. Sind die Akkus leer, funktioniert der Lift nicht.
-
Page 63: Benutzerhandbuch
OPTIONS AUTOMATISCHE DREHFUNKTION seite 61 AUTOMATISCHE FUßSTÜTZE seite 62 KONTINUIERLICHE LADUNG KIT seite 62 AUTOMATISCHE DREHFUNKTION CLICK! Mit der Option AUTOMATISCHER DREHSITZ dreht sich der Sitz am Schienenende automatisch in Laufrichtung. Dazu halten Sie den Joystick nach oben gedrückt. BENUTZERHANDBUCH... - Page 64 AUTOMATISCHE FUßSTÜTZE Bedienen Sie den Schalter unter der Armlehne, um die AUTOMATISCHE FUßSTÜTZE hochzuklappen. Während die Fußstütze automatisch hochgeklappt wird ertönt ein akustisches Signal. KONTINUIERLICHE LADUNG KIT Wenn die Streifen der KONTINUIERLICHEN LADUNG installiert ist, werden die Batterien an jeder Position an der Schiene aufgeladen. BENUTZERHANDBUCH...
- Page 65 BENUTZERHANDBUCH...
- Page 66 Ihr Xclusive Treppenlift ist ein hochentwickeltes Produkt, das speziell entwickelt wurde, um eine Person (max. 130 kg) auf dem Sitz sitzend zu befördern. Ehe Sie Ihren Xclusive Treppenlift in Betrieb nehmen, lesen Sie bitte diese Anleitung sorgfältig durch, um sich mit der Bedienung Ihres Treppenlifts vertraut zu machen.
- Page 67 Etagenböden, Geländern, Sockeln usw., welche die Anlage tragen oder umgeben sollen, wurden durch den Kunden geprüft und zugesichert, der damit auch die diesbezügliche volle Verantwortung übernimmt. Weder Handicare noch seine autorisierten Vertragshändler sind für die Eignung der Gebäudeteile zur Verantwortung zu ziehen, welche die Anlage umgeben und tragen.
- Page 68 örtlichen Bestimmungen autorisierten Vertragshändlern oder Monteuren/ Servicetechnikern durchgeführt werden. Die an der Wand montierten Fernbedienungen arbeiten auf Basis von Infrarot-Frequenzen. Handicare übernimmt keine Haftung für Systemausfälle im unwahrscheinlichen Fall von Störungen durch Signale von außerhalb dieses Treppenlifts. TECHNISCHE SPEZIFIKATIONEN...
-
Page 69: Fehlersuche
FEHLERSUCHE DIAGNOSEANZEIGE seite 67 SITZ VERRIEGELUNG seite 68 NOT HALT seite 68 ARMLEHNE seite 69 SCHL SSEL Ü seite 69 BATTERIEN FB seite 70 STROMVERSORGUNG seite 70 HINDERNIS seite 71 SCHALTER seite 71 DIAGNOSEANZEIGE Der Treppenlift ist mit einer Diagnoseanzeige ausgestattet, auf der ein Code zur Fehler-diagnose angezeigt wird. - Page 70 SITZ VERRIEGELUNG CLICK! U R S A C H E S U N G Ö Problem: Der Lift bewegt sich in keiner Richtung und auf dem Display erscheint eine “0”. Ursache: Der Sitz ist nicht verriegelt und in gedrehter Position. Lösung: Drehen Sie den Sitz mithilfe des Hebels links oder rechts unter der Sitzfläche.
- Page 71 ARMLEHNE U R S A C H E S U N G Ö Problem: Der Lift bewegt sich in keiner Richtung und auf dem Display erscheint eine “-”. Ursache: Eine Armlehne ist nicht nach unten geklappt. Lösung: Klappen Sie beide Armlehnen vollständig nach unten. SCHL SSEL Ü...
- Page 72 BATTERIEN FB RED light U R S A C H E S U N G Ö Problem: Der Lift bewegt sich in keiner Richtung, und die LED-Anzeige auf der Fernbedienung blinkt rot bei Bedienung. Ursache: Die Batterien der Fernbedienung sind leer. Lösung: Tauschen Sie die Batterien der Fernbedienung aus.
- Page 73 HINDERNIS U R S A C H E S U N G Ö Problem: Der Lift bewegt sich nur in einer Richtung und auf dem Display erscheint eine “4/6”. Ursache: Es befindet sich ein Hindernis zwischen dem Lift und der Treppe. Lösung: Bewegen Sie den Lift in anderer Richtung{A}, und entfernen Sie das Hindernis{B}.
-
Page 74: Erinnerungen
ANHANG ERINNERUNGEN seite 72 NOTBEDIENUNG seite 73 DIAGNOSECODES seite 75 ERINNERUNGEN [A]Nehmen Sie den Schlüssel aus dem Kontakt, wenn Sie den Lift verlassen. [B]Ziehen Sie niemals den Stecker des Lifts aus der Wandsteckdose. BENUTZERHANDBUCH... -
Page 75: Notbedienung
NOTBEDIENUNG STOPP [B.1]Wenn der Treppenlift unerwartet stoppt und sich die Fahrt nicht fortsetzten lässt, kann das Handrad benutzt werden, um den Lift auf seine Ladeposition zu bewegen. [B.2]Schalten Sie den Lift aus. [B.3]Öffnen Sie die Klappe an der Vorderseitenabdeckung durch Drücken der oberen Lasche {A}. Entnehmen Sie das Handrad aus der Klappe{B}. - Page 76 [B.5]Stecken Sie das Handrad in die dafür vorgesehende Öffnung. Anschließend drehen Sie den Lift in die gewünschte Richtung.[B.6]Setzten Sie die Kappe wieder ein. [B.7] Verstauen Sie das Handrad wieder in der Klappe {A} and setzen Sie die Klappe wieder ein {B}. [B.8]Schalten Sie den Lift wieder ein. BENUTZERHANDBUCH...
-
Page 77: Diagnosecodes
DIAGNOSECODES Wenn die erwähnte Aktion nicht hilft, rufen Sie Handicare. Schreiben Sie den Anzeige Aktion Anzeige Aktion Diagnosecode ab, wenn Sie Handicare um Hilfe rufen. Keine Anzeige Lädt, aber der Lift bewegt sich nicht. S T Ö R U N G S T Ö... - Page 78 Anzeige Aktion Anzeige Aktion Anzeige Aktion Niedrige Batteriespannung Joystick aktiviert Joystick aktiviert S T Ö R U N G Anzeige Aktion Anzeige Aktion Anzeige Aktion IR-Adresse-Fehler Das Netzstrom-Relais hat Netzstrom-Relais nicht sich nicht geöffnet geschlossen S T Ö R U N G S T Ö...
- Page 79 Anzeige Aktion Anzeige Aktion Anzeige Aktion Stromversorgung beim Stromversorgung beim Fehler in der Stromversorgung während sich die Batterie im Laden ausgefallen Laden ausgefallen Gleitmodus befand S T Ö R U N G S T Ö R U N G S T Ö R U N G Anzeige Aktion Anzeige...
- Page 80 BENUTZERHANDBUCH...
- Page 81 AVANT PROPOS CONTENU MANUEL D'UTILISATION Merci d'avoir choisi un monte-escalier Handicare. OPTIONS Dans ce manuel concernant le monte-escalier XCLUSIVE, vous trouverez le mode d'emploi INFORMATIONS IMPORTANTES des caractéristiques standard et des fonctionnalités en option. LOCALISATION DE PANNES ANNEXES A. Attention B.
- Page 82 Kit de charge continue L'illustration ci-dessus montre les éléments à l'aide desquels L'indicateur [2]Manette vous pouvez commander le monte-escalier XCLUSIVE. Afin [3]Arrêt d’urgence d'améliorer le confort d'assise et la facilité d'utilisation, vous Ceinture de sécurité pouvez équiper le monte-escalier XCLUSIVE des options [5]Interrupteur à...
- Page 83 RABATTRE L'indicateur de diagnostic s'allumera pour indiquer si c'est bien le cas. Rabattez les accoudoirs, le repose-pieds et l'assise vers le bas. page 88 > REPOSE-PIEDS AUTOMATIQUE EN OPTION POSITIONNER LES PIEDS Placez vos pieds sur le repose-pieds. Vérifiez que vos deux pieds ne dépassent pas des limites du repose-pieds.
- Page 84 SÉCURITÉ MARCHE ARRÊT CLICK! Mettez la ceinture de sécurité et bouclez-la solidement. Glissez la clé dans le contact et tournez-la d'un quart de tour vers la droite. Vérifiez si le siège est en position verrouillé. TRAJET Bougez la manette dans la direction souhaitée tout en la maintenant actionnée. L'écran affiche un “8/9”, le monte-escalier se met progressivement en mouvement.
- Page 85 BOUTON D’ARRÊT D’URGENCE ARRÊT En cas d'urgence, appuyez une fois sur le bouton d'arrêt d'urgence. Le monte-escalier s'arrête alors immédiatement. Afin de libérer de nouveau le monte-escalier, réappuyez sur le bouton d'arrêt d'urgence. TOURNER LE SIEGE CLICK! Le monte-escalier s'arrête automatiquement au bout du rail. Vous pouvez à présent faire pivoter le siège manuellement de manière à...
- Page 86 DÉTACHER LA CEINTURE Détachez la ceinture de sécurité. SE LEVER Levez-vous du siège. MANUEL D”UTILISATION...
- Page 87 RELEVER CLICK! Relevez les accoudoirs, l'assise et le repose-pied, vers le haut {A}. Poussez vers le bas la poignée se trouvant à gauche ou à droite sous le siège {B}. Faites tourner le siège jusqu'à entendre un clic. Le siège se trouve à présent dans la position verrouillée. STATIONNER Maintenez le bouton de la télécommande enfoncé...
- Page 88 CHARGER 15 sec. Un point de charge se trouve à chaque extrémité du rail et permet de recharger les batteries (il est possible d'ajouter des points de charge supplémentaires). Lorsque le monte-escalier ne se trouve pas (précisément) sur le point de charge, le monte-escalier émet un bip durant 15 secondes et l'écran affiche un “...
- Page 89 OPTIONS SIÈGE PIVOTANT AUTOMATIQUE page 87 REPOSE PIEDS AUTOMATIQUE page 88 KIT DE CHARGE CONTINUE page 88 SIÈGE PIVOTANT AUTOMATIQUE CLICK! Avec l'option de SIÈGE PIVOTANT AUTOMATIQUE, vous pouvez laisser le siège pivoter automatiquement à l'extrémité du rail. Pour ce faire, maintenez la manette actionnée dans le sens de la montée.
- Page 90 REPOSE PIEDS AUTOMATIQUE Pour lever le REPOSE-PIEDS AUTOMATIQUE, actionnez la manette sous l'accoudoir. Le monte-escalier devrait émettre un signal sonore pendant cette action. Toujours vous assurer que le repose-pieds soit baissé avant tout déplacement. KIT DE CHARGE CONTINUE Lorsque la bande de CHARGE CONTINUE est installé, les batteries seront rechargées en toute position sur le rail.
- Page 91 MANUEL D”UTILISATION...
- Page 92 Votre monte-escalier Xclusive est un produit sophistiqué qui a été spécialement conçu pour déplacer une personne assise de maximum 130 kg. Avant d'utiliser votre monte- escalier Xclusive, veuillez lire le présent manuel de manière approfondie afin de vous familiariser avec le fonctionnement de l'appareil.
- Page 93 été vérifiés et approuvés par l'utilisateur, qui, en conséquence, accepte toute responsabilité qui en découle. Ni Handicare, ni ses distributeurs contractuels ne seront tenus responsables du caractère convenable des structures qui entourent et soutiennent l'installation.
- Page 94 La télécommande murale fonctionne en émettant une fréquence infrarouge ; Handicare décline toute responsabilité quant au dysfonctionnement du système, dans le cas peu probable où des interférences seraient générées par des signaux extérieurs au monte- escalier.
-
Page 95: Manuel D'utilisation
LOCALISATION DE PANNES AFFICHAGE DE DIAGNOSTIC page 93 VEROUILLAGE DE LA CHAISE page 94 BOUTON D’URGENCE page 94 ACCOUDOIR page 95 CLÉ page 95 PILES page 96 ALIMENTATION page 96 OBSTACLE page 97 INTERRUPTEUR page 97 AFFICHAGE DE DIAGNOSTIC Le monte-escalier est équipé d'un écran d'affichage de diagnostic affichant un code pour résoudre les pannes diagnostiquées. - Page 96 VEROUILLAGE DE LA CHAISE CLICK! C A U S E S O L U T I O N Problème: le monte-escalier ne bouge pas dans les deux directions et l'écran affiche un “0”. Cause: le siège n’est pas verrouillé et se trouve dans la position pivotée. Solution: faites pivoter le siège à...
- Page 97 ACCOUDOIR C A U S E S O L U T I O N Problème: le monte-escalier ne bouge pas dans les deux directions et l'écran affiche un “-”. Cause: un accoudoir n'est pas rabattu. Solution: rabattez l'accoudoir totalement vers le bas. CLÉ...
- Page 98 PILES Lumière rouge RED light C A U S E S O L U T I O N Problème: le monte-escalier ne bouge pas dans les deux directions et la Led lumineuse de la télécommande s'allume rouge lorsqu'elle est actionnée. Cause: les piles de la télécommande ne fonctionnent plus.
- Page 99 OBSTACLE C A U S E S O L U T I O N Problème: le monte-escalier ne bouge que dans une seule direction et l'écran affiche un “4/6”. Cause: il y a un obstacle entre le monte-escalier et l'escalier. Solution: bougez le monte-escalier dans le sens opposé{A} et ôtez l'obstacle{B}.
-
Page 100: Annexes
ANNEXES ATTENTION page 98 FONCTIONNEMENT D'URGENCE page 99 CODES DE DIAGNOSTIC page 101 ATTENTION MARCHE ARRÊT [A]Ôtez la clé du contact en quittant le monte-escalier. [B]Ne débranchez jamais la fiche d’alimentation du monte-escalier de la prise murale. MANUEL D”UTILISATION... -
Page 101: Fonctionnement D'urgence
FONCTIONNEMENT D'URGENCE ARRÊT [B.1]Lorsque le monte-escalier s'arrête inopinément et ne se déplace plus dans aucun sens, la manivelle de secours manuel peut être utilisé pour déplacer le siège vers un point de charge. [B.2]Mettre le monte-escalier en position 'ARRÊT'. [B.3]Retirer le couvercle de protection avant du bloc moteur en appuyant sur la languette au dessus du couvercle{A}. - Page 102 [B.5]Placer la manivelle de secours sur le point d'accés comme indiqué. Puis déplacer le siège dans le sens souhaité. [B.6]Remettre le capuchon. [B.7]Remettre la manivelle de secours manuelle{A} et le couvercle{B}. [B.8]Mettre le monte-escalier en marche. MANUEL D”UTILISATION...
-
Page 103: Codes De Diagnostic
Handicare. Notez le code de Afficheur Action Afficheur Action diagnostic lorsque vous appelez Handicare. Rien sur l’afficheur Charge en cours mais le monte-escalier ne se déplace D É F A U T D É F A U T Afficheur Action... - Page 104 Afficheur Action Afficheur Action Afficheur Action Tension des batteries Le joystick activé Le joystick activé basse D É F A U T Afficheur Action Afficheur Action Afficheur Action Échec adresse IR Le relais de puissance prin- Le relais de puissance cipal ne s'est pas ouvert principal ne s'est pas fermé...
- Page 105 Afficheur Action Afficheur Action Afficheur Action Défaillance du bloc d'alimen- Défaillance du bloc d'alimen- Défaillance du bloc d'alimen- tation lorsque la pile est en tation pendant la charge tation pendant la charge mode de flottement D É F A U T D É...
- Page 106 MANUEL D”UTILISATION...
- Page 107 Í MANUAL DE USUARIO Gracias por haber elegido un salvaescaleras de Handicare. OPCIONES En este manual para los tipos de salvaescaleras XCLUSIVE, encontrará las INFORMACIÓN IMPORTANTE instrucciones para los modelos estándar y las ampliaciones opcionales. LOCALIZACIÓN DE DEFECTOS ANEXO A. Avisos B.
- Page 108 Kit de carga continua En el dibujo al lado se muestran los componentes de control [1]Pantalla de la salvaescaleras XCLUSIVE . Para aumentar el confort y [2]Palanca la facilidad de uso, puede ampliar la XCLUSIVE con las [3]Parada de emergencia siguientes opciones: silla de giro automático, reposapiés...
- Page 109 BAJAR Asegúrese de que el interruptor de encendido y apagado esté en la posición 'ENCENDIDO' . La pantalla de diagnóstico se iluminará para indicarlo. Baje los apoyabrazos, el reposapiés el asiento de la silla. página 114 > REPOSAPIÉS AUTOMÁTICO OPCIONAL COLOCAR LOS PIES Ponga los pies en el reposapiés.
- Page 110 SEGURIDAD ANTE TODO ENCENDIDO APAGADO CLICK! Póngase el cinturón de seguridad y abróchelo firmemente en la hebilla. Introduzca la llave en el contacto y gírela una cuarta vuelta hacia la derecha. Compruebe si la silla está en la posición bloqueada. RECORRIDO Mueva la palanca en la dirección que desea desplazarse.
- Page 111 PARADA DE EMERGENCIA PARAR En caso de emergencia, pulse una vez la parada de emergencia. El salvaesca- leras se detendrá inmediatamente. Para desbloquear el salvaescaleras, vuelva a pulsar la parada de emergencia. GIRAR CLICK! El salvaescaleras se parará automáticamente al final del riel. Ahora puede girar la silla manualmente para levantarse y bajar del salvaescaleras con mayor facilidad.
- Page 112 ABRIR EL CINTURÓN Desabroche el cinturón de seguridad. LEVANTARSE Levántese de la silla. MANUEL DE USUARIO...
- Page 113 LEVANTAR CLICK! Suba los apoyabrazos y el asiento de la silla {A}. Empuje la palanca a la izquierda o derecha de la silla hacia abajo {B}. Gire la silla hasta que oiga un clic. La silla está ahora en la posición bloqueada. APARCAMIENTO Mantenga el botón en el control remoto apretado hasta que el salvaescaleras llegue a una estación de carga.
- Page 114 CARGAR 15 sec. En la parte superior e inferior del riel hay una estación de carga donde se cargan las baterías del salvaescaleras (es posible instalar estaciones de carga adicionales). Si el salvaescaleras no está (correctamente) situado en la estación de carga, el salvaescaleras dará...
- Page 115 OPCIONES GIRO AUTOMÁTICO página 113 REPOSAPIÉS AUTOMÁTICO página 114 KIT DE CARGA CONTINUA página 114 GIRO AUTOMÁTICO CLICK! Con la opción SILLA DE GIRO AUTOMÁTICO, la silla girará automáticamente al final del riel en la dirección que usted quiera bajar de la silla. Para ello debe mantener la palanca hacia arriba.
- Page 116 REPOSAPIÉS AUTOMÁTICO Para levantar el REPOSAPIÉS AUTOMÁTICO, gire la manivela debajo del apoyabrazos. El salvaescaleras emitirá un pitido mientras se levanta el reposapiés. KIT DE CARGA CONTINUA Cuando la tira de la CARGA CONTINUA está instalado, la batería se recarga en cualquier posición en el riel.
- Page 117 MANUEL DE USUARIO...
- Page 118 INTRODUCCIÓN Su salvaescaleras Xclusive es un producto sofisticado que ha sido desarrollado especial- mente para desplazar a una persona (máx. 130 kg) sentada en la silla. Antes de utilizar su salvaescaleras Xclusive, lea este manual detenidamente para familiarizarse con el ma- nejo del mismo.
- Page 119 Ni Handicare ni sus distribuidores autorizados asumen ninguna respon- sabilidad de la estabilidad de las estructuras que rodean y apoyan la instalación.
- Page 120 Los telemandos montados en la pared funcionan con frecuencia infrarroja; Handicare no asume ninguna responsabilidad por cualquier disfunción en el caso improbable de que se produzca una interferencia de señales externos a este salvaescaleras.
- Page 121 LOCALIZACIÓN DE DEFECTOS PANTALLA DE DIAGNÓSTICO página 119 BLOQUEO DE SILLA página 120 PARADA DE EMERGENCIA página 120 APOYABRAZOS página 121 LLAVE página 121 BATERÍAS DEL TM página 122 ALIMENTACI Ó página 122 OBST CULO Á página 123 INTERRUPTOR página 123 PANTALLA DE DIAGNÓSTICO El salvaescaleras está...
- Page 122 BLOQUEO DE SILLA CLICK! C A U S A S O L U C I Ó N Problema: El salvaescaleras no se mueve en ambas direcciones y la pantalla muestra un “0”. Causa: La silla no está bloqueada y está en una posición girada. Solución: Gire la silla por medio de la palanca a la izquierda o derecha del asiento.
- Page 123 APOYABRAZOS C A U S A S O L U C I Ó N Problema: El salvaescaleras no se mueve en ambas direcciones y la pantalla muestra un “-”. Causa: Un apoyabrazos no se ha bajado. Solución: Baje el apoyabrazos completamente hacia abajo. LLAVE ENCENDIDO C A U S A...
- Page 124 BATERÍAS DEL TM RED light C A U S A S O L U C I Ó N Problema: El salvaescaleras no se mueve en ambas direcciones y el LED en el control remoto se enciende roja al accionarlo. Causa: Las pilas en el control remoto están vacías. Solución: Cambie las pilas del control remoto.
- Page 125 OBST CULO Á C A U S A S O L U C I Ó N Problema: El salvaescaleras solo se mueve en una direccióny la pantalla muestra un “4/6”. Causa: Hay un obstáculo entre el salvaescaleras y la escalera. Solución: Mueva el salvaescaleras en dirección contraria{A} y saque el obstáculo{B}.
- Page 126 ANNEXO AVISOS página 124 OPERACIÓN DE EMERGENCIA página 125 CÓDIGOS DE DIAGNÓSTICO página 127 AVISOS ENCENDIDO APAGADO [A]Saque la llave del contacto cuando salga del salvaescaleras. [B]No saque nunca el enchufe del salvaescaleras de la toma de corriente. MANUEL DE USUARIO...
- Page 127 OPERACIÓN DE EMERGENCIA PARAR [B.1]Cuando el salvaescalera ha sido parado inesperadamente y ya no se mueve nada más, el enrollador por la maniobra de emergencia puede ser utilizado para mover el salvaescalera a un punto de carga recarga. [B.2]Apague el salvaescalera. [B.3]Abrir la tapa delante del chasis, pulsar la lengüeta puesta en el lado superior de la tapa {A}.
- Page 128 [B.5]Girar el volante de la operación manual descrita en el punto de acceso. A continuación, mover el salvaescalera en la dirección deseada. [B.6]Coloque de nuevo la tapa. [B.7]Colocar de nuevo el volante de la operación manual{A} y la tapa{B}. [B.8]Encender el salvaescalera. MANUEL DE USUARIO...
- Page 129 CÓDIGOS DE Si la acción mencionada no ayuda, llame Handicare. DIAGNÓSTICO Anote el código de Pantalla Acción Pantalla Acción diagnóstico cuando se llama a Handicare en busca de ayuda. Pantalla apagada Cargando pero el salvaescaleras no funciona F A L L A...
- Page 130 Pantalla Acción Pantalla Acción Pantalla Acción Baja tensión de batería Palanca activado Palanca activado F A L L A Pantalla Acción Pantalla Acción Pantalla Acción Fallo de dirección IR El relé de energía principal El relé de energía principal no está abierto no está...
- Page 131 Pantalla Acción Pantalla Acción Pantalla Acción Error en el suministro Error en el suministro Error en el suministro eléctrico cuando la batería eléctrico durante la carga eléctrico durante la carga está en carga de flotación F A L L A F A L L A F A L L A Pantalla...
- Page 132 MANUEL DE USUARIO...
- Page 133 PREFAZIONE CONTENUTO MANUALE PER L’USO Grazie per avere scelto un montascale Handicare. OPZIONI Questo manuale dedicato ai montascale modelli XCLUSIVE contiene indicazioni INFORMAZIONI IMPORTANTI relative alle caratteristiche standard e alle estensioni opzionali. RILEVAZIONE DEI GUASTI APPENDICES A. Promemoria B. Funzionamento di emergenza C.
-
Page 134: Manuale Per L'uso
Kit di ricarica continua Turn & Go L'illustrazione qui riportata mostra i componenti attraverso i [1]Display quali l'utente può controllare il montascale XCLUSIVE. Per [2]Joystick aumentare la comodità e la facilità di utilizzo, è possibile [3]Arresto di emergenza dotare il modello XCLUSIVE dei seguenti optional: sedile... - Page 135 ABBASSARE Verificare che l'interruttore on/o sia posizionato su "ACCESO". Il display di diagnostica si illuminerà per indicare l'accensione del servoscala. Abbassare i braccioli, la pedana poggiapiedi e la seduta. Pagina 140 > PEDANA POGGIAPIEDI AUTOMATICA OPZIONALE POSIZIONARE I PIEDI Posizionare i piedi sulla pedana poggiapiedi. Assicurarsi che i piedi non fuoriescano dai bordi della pedana.
- Page 136 MASSIMA SICUREZZA ACCESO SPENTO CLICK! Allacciare la cintura di sicurezza e collegando i due elementi con un gesto deciso. Inserire la chiave nel contatto e ruotarla effettuando un quarto di giro verso destra. Verificare che la sedia si trovi in posizione di blocco. CORSA Spostare il joystick nella direzione desiderata.
- Page 137 ARRESTO DI EMERGENZA ARRESTO Se necessario, premere l'arresto di emergenza una sola volta. Il montascale si fermerà immediatamente. Per fare ripartire il montascale, premere nuovamente l'arresto di emergenza. RUOTARE IL SEDILE CLICK! Il montascale si ferma automaticamente alla fine della guida. Ora è possibile girare manualmente il sedile per salire e scendere più...
- Page 138 APRIRE LA CINTURA Slacciare la cintura di sicurezza. ALZARSI Alzarsi dal sedile. MANUALE PER L’USO...
- Page 139 RIPIEGARE CLICK! Sollevare i braccioli e la seduta {A}. Abbassare la maniglia presente sotto il sedile (sul lato destro o sinistro) {B}. Ruotare il sedile fino a quando non si sente uno scatto indicante che il sedile si trova nella posiziona di blocco. PARCHEGGIARE Tenere premuto il pulsante sul telecomando finché...
- Page 140 CARICARE 15 sec. Nei punti superiore e inferiore della guida è presente una postazione in cui l'accu- mulatore del montascale può ricaricarsi (è possibile installare punti di ricarica aggiuntivi). Se non si trova (esattamente) sul punto di ricarica, il montascale emetterà...
- Page 141 OPZIONI ROTAZIONE AUTOMATICA pagina 139 PEDANA POGGIAPIEDI MOTORIZZATA pagina 140 KIT DI RICARICA CONTINUA pagina 140 ROTAZIONE AUTOMATICA CLICK! Con il SEDILE GIREVOLE AUTOMATICO opzionale, è possibile ruotare automaticamente il sedile alla fine della guida nella direzione di marcia. Per farlo, è...
- Page 142 PEDANA POGGIAPIEDI MOTORIZZATA Per sollevare il PEDANA POGGIAPIEDI MOTORIZZATA, spostare l'interruttore presente sotto il bracciolo. Il servoscala emetterà un segnale acustico durante lo spostamento del poggiapiedi. KIT DI RICARICA CONTINUA Quando la striscia di RICARICA CONTINUA installato, le batterie saranno essere ricaricate in ogni posizione sulla guida.
- Page 143 MANUALE PER L’USO...
- Page 144 PREFAZIONE Il servoscala Xclusive è un sofisticato prodotto progettato appositamente per il trasporto di una persona (max. 130 kg) seduta sul sedile. Prima di utilizzare il servoscala Xclusive, si prega di leggere attentamente il presente manuale per familiarizzare con l'utilizzo del servoscala.
- Page 145 Handicare e i suoi rivenditori autorizzati non saranno da ritenersi responsabili per quanto riguarda l'idoneità delle strutture che circondano e sostengono l'installazione. MANUTENZIONE Pulizia Pulire regolarmente il servoscala.
- Page 146 I telecomandi installati sulla parete funzionano mediante frequenze a infrarossi; Handicare non può essere ritenuta responsabile per il mancato funzionamento del sistema nella remote ipotesi di un'interferenza con il servoscala causata da segnali esterni. SPECIFICHE TECNICHE...
-
Page 147: Rilevazione Dei Guasti
RILEVAZIONE DEI GUASTI DISPLAY DI DIAGNOSTICA pagina 145 BLOCCO DEL SEDILE pagina 146 ARRESTO DI EMERGENZA pagina 146 BRACCIOLO pagina147 CHIAVE pagina 147 BATTERIE TC pagina 148 BLOCCO pagina 148 OBSTACOLO pagina 149 INTERRUTTORE pagina 149 DISPLAY DI DIAGNOSTICA Il servoscala dispone di un display di diagnostica sul quale vengono visualizzati codici utili per riconoscere i guasti. - Page 148 BLOCCO DEL SEDILE CLICK! C A U S A S O L U Z I O N E Problema: il montascale non si muove in nessuna direzione e il display mostra un “0”. Causa: il sedile non è bloccato e si trova in posizione girata. Soluzione: ruotare il sedile utilizzando la maniglia presente sotto di esso sul lato destro o sinistro.
- Page 149 BRACCIOLO C A U S A S O L U Z I O N E Problema: il montascale non si muove in nessuna direzione e il display mostra un “-”. Causa: uno dei braccioli non è abbassato correttamente. Soluzione: abbassare completamente il bracciolo. CHIAVE ACCESO C A U S A...
- Page 150 BATTERIE TC RED light C A U S A S O L U Z I O N E Problema: il montascale non si muove in nessuna direzione e il LED presente sul telecomando si accende rossa quando quest'ultimo emette un comando. Causa: le batterie del telecomando sono scariche.
- Page 151 OBSTACOLO C A U S A S O L U Z I O N E Problema: il montascale si sposta solo in una direzione e il display mostra un “4/6”. Causa: è presente un ostacolo tra il montascale e la scalinata. Soluzione: spostare il montascale nella direzione opposta{A} e rimuovere l'ostacolo{B}.
-
Page 152: Appendices
APPENDICE PROMEMORIA pagina 150 FUNZIONAMENTO DI EMERGENZA pagina 151 CODICI DI DIAGNOSTICA pagina 153 PROMEMORIA ACCESO SPENTO [A]Quando il montascale non è in uso, estrarre la chiave dal contatto. [B]Non estrarre mai la spina dalla presa a muro. MANUALE PER L’USO... -
Page 153: Funzionamento Di Emergenza
FUNZIONAMENTO DI EMERGENZA ARRESTO [B.1]Quando il servoscala si arresta inaspettatamente e non si muove più, il volantino per la manovra di emergenza può essere usato per spostare il servoscala sul punto di ricarica. [B.2]Spegnere il servoscala. [B.3]Aprire il coperchio nella anteriore del telaio, premendo la linguetta nella parte superiore del coperchio {A}. - Page 154 [B.5]Girare il volantino della manovra manuale come indicato nel punto di accerro. Poi muovere il servoscala nella direzione desiderata. [B.6]Riposizionare il coperchio posteriore. [B.7]Riposizionare il volantino della manovra manuale {A} e il coperchio {B}. [B.8]Accendere il servoscala. MANUALE PER L’USO...
-
Page 155: Codici Di Diagnostica
Handicare. Annotare il codice di Display Azione Display Azione diagnostica quando si chiama Handicare per chiedere aiuto. Display vuoto Il servoscala si ricarica ma non si muove G U A S T O G U A S T O Display... - Page 156 Display Azione Display Azione Display Azione Tensione della batteria Joystick attivato Joystick attivato bassa G U A S T O Display Azione Display Azione Display Azione Tensione della batteria Relè di potenza principale Relè di potenza principale bassa non aperto non chiuso G U A S T O G U A S T O...
- Page 157 Display Azione Display Azione Display Azione Problema all'alimentazione Problema all'alimentazione Problema all'alimentazione elettrica mentre la batteria è elettrica durante la ricarica elettrica durante la ricarica in modalità "float" G U A S T O G U A S T O G U A S T O Display Azione...
-
Page 158: Manuale Per L'uso
MANUALE PER L’USO... - Page 160 Handicare Stairlifts B.V. Newtonstraat 35 1704 SB Heerhugowaard The Netherlands T +31 (0)72 576 88 88 F +31 (0)72 574 34 35 stairlifts@handicare.com www.handicare.com Handicare Accessibility Ltd. 82 First Avenue, Pensnett Estate Kingswinford, West Midlands DY6 7FJ, England T +44 (0)1384 408700 F +44 (0)1384 408719 enquiries@handicare.co.uk...