Table of Contents
Advertisement
Quick Links
TREADMILL OWNER'S MANUAL
MANUEL DU PROPRIÉTAIRE DU TAPIS ROULANT
MANUAL DEL PROPIETARIO DE LA CAMINADORA
Read the TREADMILL GUIDE before using this OWNER'S MANUAL.
Lire le GUIDE D'UTILISATION DU TAPIS ROULANT avant de se référer au présent MANUEL DU PROPRIÉTAIRE.
Lea la GUÍA DE LA CAMINADORA antes de utilizar este MANUAL DEL PROPIETARIO.
Advertisement
Table of Contents

Related Manuals for Horizon Fitness AT 7.0


Summary of Contents for Horizon Fitness AT 7.0
- Page 1 TREADMILL OWNER’S MANUAL MANUEL DU PROPRIÉTAIRE DU TAPIS ROULANT MANUAL DEL PROPIETARIO DE LA CAMINADORA Read the TREADMILL GUIDE before using this OWNER’S MANUAL. Lire le GUIDE D’UTILISATION DU TAPIS ROULANT avant de se référer au présent MANUEL DU PROPRIÉTAIRE. Lea la GUÍA DE LA CAMINADORA antes de utilizar este MANUAL DEL PROPIETARIO.
- Page 2 ENGLISH FRANÇAIS ESPAÑOL...
-
Page 3: Important Precautions
IMPORTANT PRECAUTIONS SAVE THESE INSTRUCTIONS When using an electrical product, basic precautions should always be followed, including the following: Read all instructions before assembly or use of this treadmill. It is the responsibility of the owner to ensure that all users of this treadmill are adequately informed of all warnings and precautions. - Page 4 DANGER TO REDUCE THE RISK OF ELECTRICAL SHOCK: Always unplug the equipment from the electrical outlet before cleaning, performing maintenance and putting on or taking off parts. WARNING TO REDUCE THE RISK OF BURNS, FIRE, ELECTRICAL SHOCK OR INJURY TO PERSONS: •...
- Page 5 WARNING TO REDUCE THE RISK OF BURNS, FIRE, ELECTRICAL SHOCK OR INJURY TO PERSONS: • Keep power cord away from heated surfaces. Do not pull on this power cord or apply any mechanical loads to this cord. • Do not remove any protective covers unless instructed by Customer Technical Support. Service should only be done by an authorized service a technician.
-
Page 6: Grounding Instructions
GROUNDING INSTRUCTIONS This product must be grounded. If a treadmill should malfunction or breakdown, grounding provides a path of least resistance for electrical current to reduce the risk of electrical shock. This product is equipped with a cord having an equipment-grounding conductor and a grounding plug. - Page 7 ASSEMBLY WARNING There are several steps during the assembly process where special attention must be paid. It is very important to follow the assembly instructions and to ensure the product is assembled correctly to reduce the risk of injury. Make sure all parts are firmly tightened before using the treadmill to ensure that the treadmill is stable and structurally sound.
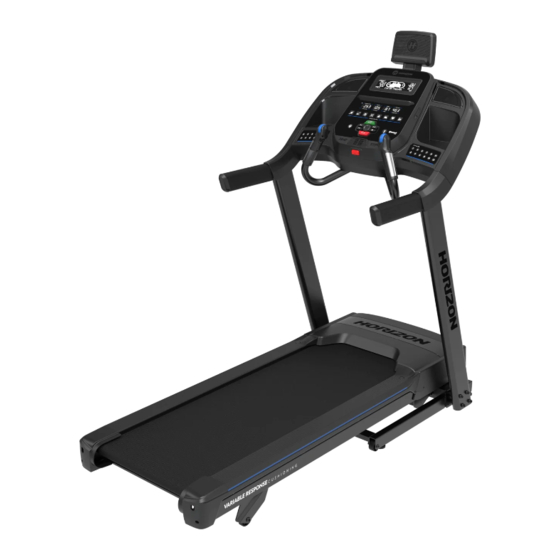
- Page 8 TABLET/READING RACK SPEAKERS CONTROL PANEL AND DISPLAY WINDOWS CONSOLE JOINT COVER CONSOLE FAN WATER BOTTLE HOLDER SAFETY KEY PLACEMENT CONSOLE MAST CONSOLE CONSOLE JOINT COVER PULSE GRIP HANDLEBARS CONSOLE MAST ON/OFF SWITCH POWER CORD FOOT LATCH (UNDERNEATH DECK) MOTOR COVER RUNNING BELT/RUNNING DECK SIDE RAIL BASE FRAME...
-
Page 9: Tools Included
TOOLS INCLUDED: WARNING FAILURE TO FOLLOW THESE INSTRUCTIONS COULD RESULT IN INJURY! 6 mm T-Wrench 6 mm L-Wrench WARNING 5 mm L-Wrench Screwdriver DO NOT ATTEMPT TO LIFT THE TREADMILL! Do not move or lift treadmill from PARTS INCLUDED: packaging until specified to do so in the assembly instructions. You may remove the plastic wrap from console masts. - Page 10 ASSEMBLY STEP- UNPACKING BANDING STRAP RED TRANSPORT BASE FRAME CABLE RED TRANSPORT CABLE RED TRANSPORT CABLE (LEFT & RIGHT SIDES) DECK FRAME WARNING Place the treadmill carton on a level flat surface with the bottom of the box on the ground. Cut banding straps on outside of box and remove box lid.
-
Page 11: Assembly Step
ASSEMBLY STEP 1 1.1 Open HARDWARE FOR STEP 1. HARDWARE FOR STEP 1 PART TYPE DESCRIPTION 1.2 Insert UPRIGHT GUIDE BOLT (A) into MAIN FRAME BRACKET (1) and fully tighten. UPRIGHT GUIDE BOLT M8X1.25PX11L-D10X18.5L BOLT M8X1.25PX80L-20L 1.3 Attach LEAD WIRE to bottom end of CONSOLE CABLE (2). - Page 12 ASSEMBLY STEP 2 2.1 Open HARDWARE FOR STEP 2. HARDWARE FOR STEP 2 PART TYPE DESCRIPTION 2.2 Gently place the CONSOLE (5) on top of the CONSOLE MASTS (3&4). The CONSOLE CABLE (2) is tucked HEX SOCKET BOLT M8X1.25PX15L into the RIGHT CONSOLE MAST (3). Using the lead FLAT WASHER Ø8.2XØ15.0X1.2T wire carefully pull the CONSOLE CABLE (2) out of the...
- Page 13 ASSEMBLY STEP 3 3.1 Open HARDWARE FOR STEP 3. HARDWARE FOR STEP 3 PART TYPE DESCRIPTION 3.2 Attach RIGHT SIDE PULSE RATE GRIP (7) BOLT M8X1.25PX15L to the underside of the CONSOLE (5) using 3 BOLTS (H & I), 3 SPRING WASHERS (J) and BOLT M8X1.25PX60L-30L 3 FLAT WASHERS (K).
- Page 14 ASSEMBLY STEP 4 4.1 Open HARDWARE FOR STEP 4. HARDWARE FOR STEP 4 PART TYPE DESCRIPTION 4.2 Insert TABLET HOLDER (14) into opening on CONSOLE (5) and attach with 3 BOLTS (L). BOLT M4X0.7PX10L...
- Page 15 ASSEMBLY STEP 5 - REMOVAL OF RED TRANSPORT CABLES WARNING FAILURE TO FOLLOW THESE INSTRUCTIONS COULD RESULT IN INJURY! Once the red transport cables have been detached from the treadmill, high pressure springs can cause the lower base frame to spring open. NEVER tip treadmill upside-down or on its side, and NEVER lift this unit if red transport cables are not connecting the upper deck frame to the lower base frame.
- Page 16 ASSEMBLY STEP 6 - MOVING TREADMILL 6.1 To move, make sure the treadmill is folded and securely latched. Then firmly grasp the handlebars, tilt the treadmill back (1) and roll (2). 6.2 Move treadmill off flattened box and into its final position, ready for use.
-
Page 17: Treadmill Operation
TREADMILL OPERATION This section explains how to use your treadmill’s console and programming. The BASIC OPERATION section in the TREADMILL GUIDE has instructions for the following: • LOCATION OF THE TREADMILL • USING THE SAFETY KEY • FOLDING THE TREADMILL •... - Page 18 A B C SEGMENT TIME INCLINE SPEED DISTANCE TOTAL TIME CALORIES PACE HEART RATE P R O G R A M S...
-
Page 19: Console Operation
CONSOLE OPERATION Note: There is a thin protective sheet of clear plastic on the overlay of the console that should be removed before use. A) LCD DISPLAY WINDOWS: Calories, Pace, Total Time, Heart Rate, Incline, Speed. B) LED DISPLAY: Segment Time, Incline, Speed, Distance, Total Time, Calories, Pace, Heart Rate. C) WORKOUT LED INDICATORS: indicates what workout is set for the current program. -
Page 20: Display Windows
START Press to Reset SEGMENT TIME INCLINE SPEED DISTANCE TOTAL TIME CALORIES PACE HEART RATE DISPLAY WINDOWS • SEGMENT TIME: Timer that counts up from 0 seconds and resets to 0 when you press the START/SPLIT key during a workout. •... -
Page 21: Getting Started
GETTING STARTED 1) Check to make sure no objects are placed on the belt that will hinder the movement of the treadmill. 2) Plug in the power cord and turn the treadmill ON. (The ON/OFF switch is next to the power cord.) 3) Stand on the side rails of the treadmill. - Page 22 INCLINE SCROLL WHEEL SPEED SCROLL WHEEL Roll forward/backward to increase/decrease incline. Roll forward/backward to increase/decrease speed INTERVAL BUTTON 1 INTERVAL BUTTON 2 HOW TO PROGRAM AND USE CUSTOM INTERVAL BUTTONS The programmable interval buttons located on the pulse rate grips are designed to help you customize this machine to match whatever workout you like to do the most.
- Page 23 WORKOUT PROFILES MANUAL: Control everything about your workout – from start to finish. This program is a basic workout with no pre-defined settings, allowing you to manually adjust the machine at any time. It begins with an incline at 0 and speed at 0.5 mph. DISTANCE: Push yourself and go further during your workout with 13 distance workouts.
- Page 24 FAT BURN: Relatively slow and steady is the name of the game to maximize your weight-loss goals. Promotes weight loss by increasing and decreasing the speed and incline, while keeping you in your fat burning zone. Speed and Incline changes, segments repeat every 30 seconds. Segment Warm Up Time...
- Page 25 TARGET HEART RATE: This program is designed for you to improve your overall cardiovascular fitness levels. You simply set your target heart rate. The program will then monitor and adjust the intensity level to maintain your heart rate within your targeted range while you exercise –...
- Page 26 7) MY FIRST 5K: This 9-week program is intended for inexperienced runners looking to run their first 5k or simply begin an exercise routine. It is designed specifically to keep you motivated and engaged, gradually building your strength, increasing your stamina and giving you the confidence it takes to complete your first 5k. Week Workout #1 Workout #2 Workout #3...
-
Page 27: Finishing Your Workout
8) CUSTOM: Allows you to create and reuse your perfect workout with a combination of a specific speed, incline and time or distance. The ultimate in personal programming. This is a time or distance based goal program. TO RESET THE CONSOLE Hold STOP key for 3 seconds. - Page 28 BLUETOOTH HEART RATE MONITORING The 7.0AT is equipped with multi-channel Bluetooth which enables you to wirelessly connect compatible Bluetooth heart rate monitoring devices to this treadmill. You will need to ensure that your wireless heart rate monitoring device is Bluetooth 4.0 compatible and is also “open” to sharing data.
- Page 29 CONNECTING VIA BLUETOOTH 4.0LE 1) Check to ensure that your music device is Bluetooth 4.0 compatible 2) Go into your device’s Bluetooth settings and scan for devices. 3) On your music device, locate the Bluetooth device list. Select your treadmill or elliptical unit that appears on this list. Wait for your music device to finish pairing with the unit.
-
Page 31: Limited Home-Use Warranty
LIMITED HOME-USE WARRANTY... -
Page 32: Exclusions And Limitations
Horizon Fitness or by fire, flood, wind, lightning, freezing, or other natural disasters one of its certified technicians before a replacement motor will of any kind, power reduction, fluctuation or failure from be authorized under warranty. - Page 33 • Delivery, assembly, installation, setup for original or replacement units or labor or other costs associated with • Horizon Fitness’ obligation under this warranty is limited to removal or replacement of the covered unit. replacing or repairing, at Horizon Fitness’ option, the same or comparable model.
-
Page 34: Assistance Technique
Horizon Fitness 1600 Landmark Drive, Horizon 7.0AT-04 10012021 © 2021 Horizon Fitness Cottage Grove WI, 53527 Designed & Engineered in the U.S.A. • Made in Vietnam | Conçu et élaboré aux États-Unis. • Fabriqué en Vietnam | Diseñado en los EE. UU. • Hecho en Vietnam...