Advertisement
- 1 Introduction
- 2 Package contents
- 3 Installation
- 4 Overview
- 5 First use of your telephone
- 6 Menu setting
- 7 Intercom
- 8 Phonebook
- 9 Set Speed Dial Key
- 10 SOS emergency call
- 11 Picture big button memories
- 12 Answering machine
- 13 REMOTE OPERATIONS
- 14 Alarm function
- 15 Talking function
- 16 Function First ring
- 17 MAINTENANCE
- 18 GUARANTEE
- 19 DECLARATIONS
- 20 Technical specifications
- 21 Documents / Resources
Introduction
Please refer to our website: www.geemarc.com for an up to date user guide, as there may be important updates and changes you need to be aware of!
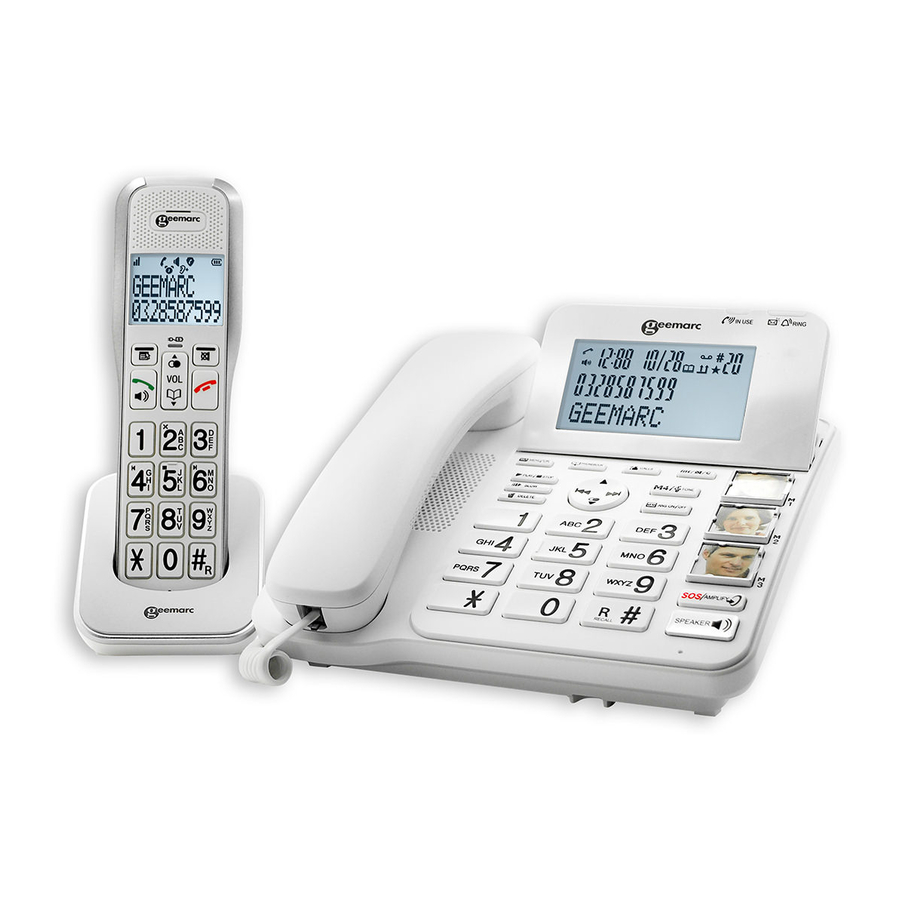
Congratulations on purchasing your Geemarc AMPLIDECT COMBI 595 telephone. This telephone offers all the advantages of cordless technology (compliant with Digitally Enhanced Cordless Telecommunications- DECT standard) together with an easy to see big button keypad, ideal for those who suffer with poor sight. This telephone is also hearing aid compatible. It is important that you read the instructions below in order to use your Geemarc telephone to its full potential.
Package contents
1 Telephone base, 1 Corded handset, 1 cordless Handset, 2 power adapters, 1 Charger, 1 Telephone line cord, 3 Ni-Mh batteries, 1 Quick user guide.
Installation
Connecting the telephone

Connect the telephone cable to the telephone line socket (A) and to the telephone wall socket (B).
Connect the handset curly cord to the base(E).
Connect the power adapter jack to base and charger (C) then connect the power adapter plug in mains power (D).
 NOTE: Use only the power adapters supplied with the phone.
Connecting the battery

Slide the battery cover downwards Install the 3 batteries into the socket as indicated, matching correct polarity (+,-).
Align the cover flat against the battery compartment, and then slide it upwards until it clicks into place.
Charging the batteries
Charge the batteries for at least 16 hours when charging for the first time.
Overview
Base overview

| 1 | LCD DISPLAY |
| 2 |  IN USE: ON during a call. IN USE: ON during a call. |
| 3 |  RING light RING light
|
| 4 |  MENU / OK MENU / OK
|
| 5 |  PHONEBOOK: PHONEBOOK:
|
| 6 |  CALLS (CALL LIST) CALLS (CALL LIST)
|
| 7 | INT / / MUTE / CLEAR / MUTE / CLEAR
|
| 8 | MEMORY KEYS (3 PHOTO SPEED DIAL KEYS; 1 TONE KEY - M4
|
| 9 |  VOLUME BOOST / SOS VOLUME BOOST / SOS
|
| 10 |  SPEAKER SPEAKER
|
| 11 | ALPHANUMERIC KEYPAD, STAR ( ), HASH/RECALL ( ), HASH/RECALL (  /R) /R)
|
| 12 | NAVIGATION KEYS
|
| 13 |  / / PLAY / STOP PLAY / STOP
|
| 14 |  SLOW SLOW
|
| 15 |  DELETE DELETE
|
| 16 |  ANS ON / OFF ANS ON / OFF
|
 UP
UP REPEAT / OGM
 MEMO / SKIP FORWARD
  DOWN / REDIAL LIST
 Handset overview

| 17 | EARPIECE |
| 18 | LCD DISPLAY |
| 19 |  CHARGE LIGHT CHARGE LIGHT
|
| 20 |  MENU / OK MENU / OK
|
| 21 |  UP / CALL LIST UP / CALL LIST
|
| 22 |  TALK ON / SPEAKERPHONE TALK ON / SPEAKERPHONE
|
| 23 |  DOWN / PHONEBOOK DOWN / PHONEBOOK
|
| 24 | MICROPHONE |
| 25 |  VOLUME BOOST / SOS VOLUME BOOST / SOS
|
| 26 |  TONE TONE
|
| 27 |  CANCEL / MUTE CANCEL / MUTE
|
| 28 |  TALK OFF TALK OFF
|
| 29 | ALPHANUMERIC KEYPAD, STAR (), 0, and HASH/RECALL ( R )
|
First use of your telephone
First use of your handset
After you have inserted the batteries, the display asks you to select your text language with the keys ▼/▲, press  to valid.
Then enter the date with the keypad and validate by pressing .
Then enter the correct hour with the keypad and validate by pressing .
Then select your talking language with the keys ▼/▲, press to valid.
General menu setting
The phone settings are always set in the same manner:
Press button to open the main menu. Then use ▼/▲buttons to select an entry and confirm it by pressing the button.
The factory preset PIN code is 0000.
Example: Set the display language on the base
Press  MENU/OK , then select ▼/▲ language, press MENU/OK, then select ▼/▲ desired language and then press MENU/OK to confirm.
Set the language on the handset
Press MENU/OK to confirm, then select ▼/▲ HS settings, press then select ▼/▲ language, press, than select ▼/▲ desired language and then press to confirm.
Menu setting
Base menu
CALL LOG: ► Incoming call list
PHOTO MEM: ►M1 ►M2 ►M3 ►M4
PHONEBOOK: ►ALL ►SPEED DIAL ►VIP
CALL BLOCK: ►BLACK LIST►SETTINGS(BLOCK MODE-W/O NUM)
INTERCOM: HANDSET 1-2-3 or ALL
DATE & TIME: ►DATE FORM ►TIME FORM ►SET DATE
TEXT LANG: ►ENGLISH ►FRANÇAIS ►DEUTCH ►ITALIANO ►NEDERLANDS ►ESPANOL ►PORTUGUES...
BS SETTING: ►RING SETUP ►KEY TONE ►FLASH TIME ►FIRST RING ►DEFAULT
PAGE ALL HS
REGISTER
SET SOS: ►SOS NUMBER ►SOS MSG ►SOS LANG
REMINDER: ►ALARM 1 ►ALARM 2 ►ALARM 3 ►ALARM 4 ►ALARM 5 ►ALARM 6 ►ALARM 7 ►ALARM 8 ►ALARM 9 ►ALARM 10
TLK DIGITS: ►OFF ►ON
ANS. SYS: ►PLAYBACK ►DEL OLD ►MEMO ►TAM ON/OFF ►SET TAM (TAM LANG, CALL SCREEN, TAM MSG, ANS. DELAY, REC. TIME, REMOTE ACC, CHANGE PIN, MSG ALERT)
Handset menu
CALL LOG: ►RECEIVED
PHOTO MEM: ►M1 ►M2 ►M3 ►M4
PHONEBOOK: ►ALL (ADD-VIEW-EDIT-DELETE-DELETE ALL-ADD VIP-ADD TO PM-ADD TO SD-STATUS) ►SPEED DIAL ►VIP
CALL BLOCK: ►BLACK LIST►SETTINGS(BLOCK MODE-W/O NUM)
INTERCOM: ►BASE or HANDSET X
BS SETTING: ►BS RINGER ►RING VOL ►FLASH TIME ►FIRST RING
HS SETTING: ►RING SETUP ►TONE SETUP ►AUTO BOOST ►TEXT LANG ►DATE & TIME ►REGISTER ►DEFAULT
SET SOS: ►SOS NUMBER ►SOS MSG ►SOS LANG
REMINDER: ►ALARM 1 ►ALARM 2 ►ALARM 3 ►ALARM 4 ►ALARM 5 ►ALARM 6 ►ALARM 7 ►ALARM 8 ►ALARM 9 ►ALARM 10
TLK DIGITS: ►ON ►OFF
ANS. SYS: ►PLAYBACK ►DEL OLD ►MEMO ►TAM ON/OFF ►SET TAM (TAM LANG, CALL SCREEN, TAM MSG, ANS. DELAY, REC. TIME, REMOTE ACC, CHANGE PIN, MSG ALERT)
Registration
NOTE: Handset and base station are pre-registered. Up to four handsets can be registered to a single base station.
Registration a handset
On Base: Press MENU/OK , select ▼/▲ REGISTER.
Press MENU/OK to see REGISTERING... (If the registration is successful, there will be a confirmation beep).
On Handset: Press . Use ▼/▲ to select HS SETTING. Press . Use ▼/▲ to select REGISTER.
Press and REGISTERING is display.
After a short delay, if the registration is successful, there will be a confirmation beep, and the handset display will go back to idle mode with the new handset number shown. The base display will also go back to idle mode.
Intercom
Internal Call
On Base: Press , and ▼/▲ to select HS 1 - 4.
Press MENU/OK to call the handset.
On Handset: Press  CANCEL MUTE, and ▼/▲ to select the desired handset number, Base or ALL and press MENU/OK.
Call All Handsets
Base: Press , and ▼/▲ to select ALL, press MENU/OK to connect.
On Handset: Make point 1 in chapter internal call and choose ALL.
Transfer an External Call On Base: Press MENU/OK twice, and ▼/▲ to select hanset number, press  on handset. After connection quit the call on base.
On Handset:
- Press
![]() MENU/OK, and ▼/▲ to select INTERCOM. Press
MENU/OK, and ▼/▲ to select INTERCOM. Press ![]() MENU/OK.
MENU/OK. - Choose the desired handset number, Base or ALL and press
![]() MENU/OK.
MENU/OK.
After connection quit the call on handset by pressing  .
.
Conference Call
On Handset or Base: Make procedure in chapter external call and choose the desired handset number with the key ▼/▲. After connection press and hold  until CONFERENCE is shown.
NOTE: Any party that hangs up during a conference call will leave the other party still connected with the external call.
Phonebook
Your phone can store up to 50 private phonebooks with names and numbers. Each phonebook entry can have a maximum of 20 digits for the phone number and 10 characters for the name.
Phonebook entries are stored alphabetically by name and are identical in the base and handset.
To add new entry
In idle mode:
On Base:
- Press
![]() MENU/OK, and ▼/▲ to select PHONEBOOK and press twice
MENU/OK, and ▼/▲ to select PHONEBOOK and press twice ![]() MENU/OK to access the phonebook list (or empty).
MENU/OK to access the phonebook list (or empty). - Press
![]() MENU/OK and select ADD.
MENU/OK and select ADD. - Press
![]() MENU/OK then enter phone number.
MENU/OK then enter phone number. - Press
![]() MENU/OK and enter the name.
MENU/OK and enter the name. - Press
![]() MENU/OK to save.
MENU/OK to save.
On handset:
- Press
![]() , and ▼/▲ to select PHONEBOOK and press
, and ▼/▲ to select PHONEBOOK and press ![]() twice to access the phonebook list (or empty).
twice to access the phonebook list (or empty). - Press
![]() and select ADD.
and select ADD. - Press
![]() then enter phone number.
then enter phone number. - Press
![]() and enter the name.
and enter the name. - Press
![]() to save.
to save.
 twice to access the phonebook list (or empty).
Set Speed Dial Key
On Handset
- Press
![]() MENU/OK and ▲/▼ to select PHONEBOOK.
MENU/OK and ▲/▼ to select PHONEBOOK. - Press
![]() MENU/OK and ▲/▼ to select SPEED DIAL.
MENU/OK and ▲/▼ to select SPEED DIAL. - Press
![]() MENU/OK, use. ▲/▼ to select the speed dial key.
MENU/OK, use. ▲/▼ to select the speed dial key. - Press
![]() MENU/OK , select ADD or EDIT.
MENU/OK , select ADD or EDIT. - Press
![]() MENU/OK then enter the phone number.
MENU/OK then enter the phone number. - Press
![]() MENU/OK then enter the NAME.
MENU/OK then enter the NAME. - Press
![]() MENU/OK to confirm.
MENU/OK to confirm.
To use one speed dial key, press and hold in idle mode the key between 1 to 9 for 3 seconds (you hear a beep of confirmation). It is the same speed dial keys for the base and for the handsets cordless.
SOS emergency call
SOS settings
You need to set the SOS numbers before you can make SOS emergency calls. On Base:
- Press
![]() MENU/OK, and ▼/▲ to select SET SOS.
MENU/OK, and ▼/▲ to select SET SOS. - Press
![]() MENU/OK, and ▼/▲ to select SOS NUMBER.
MENU/OK, and ▼/▲ to select SOS NUMBER. - Press
![]() MENU/OK and ▼/▲ to select the SOS number to edit (SOS 1, SOS 2, SOS 3 or SOS 4).
MENU/OK and ▼/▲ to select the SOS number to edit (SOS 1, SOS 2, SOS 3 or SOS 4). - Press
![]() MENU/OK and select ADD to enter a new number or EDIT to modify the number stored already.
MENU/OK and select ADD to enter a new number or EDIT to modify the number stored already. - Press
![]() MENU/OK and enter a phone number or edit the number stored already.
MENU/OK and enter a phone number or edit the number stored already. - Press
![]() MENU/OK and enter a new name or edit the name stored already.
MENU/OK and enter a new name or edit the name stored already. - Press
![]() MENU/OK to confirm or
MENU/OK to confirm or ![]() to delete.
to delete.
On handset:
- Press
![]() , and ▼/▲ to select SET SOS.
, and ▼/▲ to select SET SOS. - Press
![]() , and ▼/▲ to select SOS NUMBER.
, and ▼/▲ to select SOS NUMBER. - Press
![]() and ▼/▲ to select the SOS number to edit (SOS 1, SOS 2, SOS 3 or SOS 4).
and ▼/▲ to select the SOS number to edit (SOS 1, SOS 2, SOS 3 or SOS 4). - Press
![]() and select ADD to enter a new number or EDIT to modify the number stored already.
and select ADD to enter a new number or EDIT to modify the number stored already. - Press
![]() and enter a phone number or edit the number stored already.
and enter a phone number or edit the number stored already. - Press
![]() and enter a new name or edit the name stored already.
and enter a new name or edit the name stored already. - Press
![]() to confirm or
to confirm or![]() to delete.
to delete.
 to delete.
Make SOS emergency calls
On Base
Press and hold 2 seconds  on the base to launch the emergency calling sequence from the SOS 1 number to SOS 4 number. A call will be first dialed to the SOS 1 number. If the SOS 1 number does not answer in 60 seconds, the call be will made to the SOS 2 number, and so on. See note.
On handset
Press and hold 3 seconds  on the handset to launch the emergency calling sequence from the SOS 1 number to SOS 4 number. A call will be first dialed to the SOS 1 number. If the SOS 1 number does not answer in 60 seconds, the call be will made to the SOS 2 number, and so on. See note.
NOTE:
- The other party receiving the SOS message must press any number on their phone to open the SOS call. Thereafter by pressing any number on their phone every two minutes will keep the emergency call open else the phone stops the call 10 seconds after.
- To stop the procedure launch by error, press and hold the SOS key until the alarm SOS stop.
Record SOS messages
You can record your customized SOS message to be played when you dial out an SOS emergency call otherwise the default message will be played.
On Base
- Press
![]() MENU/OK, and ▼/▲ to select SET SOS.
MENU/OK, and ▼/▲ to select SET SOS. - Press
![]() MENU/OK, and ▼/▲ to select SOS MSG.
MENU/OK, and ▼/▲ to select SOS MSG. - Press
![]() MENU/OK and ▼/▲ to select RECORD.
MENU/OK and ▼/▲ to select RECORD. - Press
![]() MENU/OK to start SOS message recording and "RECORDING ANNC..." will be displayed.
MENU/OK to start SOS message recording and "RECORDING ANNC..." will be displayed. - Press
![]() MENU/OK to save your SOS message.
MENU/OK to save your SOS message.
On handset:
- Press
![]() , and ▼/▲ to select SET SOS.
, and ▼/▲ to select SET SOS. - Press
![]() , and ▼/▲ to select SOS MSG.
, and ▼/▲ to select SOS MSG. - Press
![]() and ▼/▲ to select RECORD.
and ▼/▲ to select RECORD. - Press
![]() to start SOS message recording and "RECORDING" will be displayed.
to start SOS message recording and "RECORDING" will be displayed. - Press
![]() to save your SOS message.
to save your SOS message.
Play SOS messages
On Base
- Press
![]() MENU/OK, and ▼/▲ to select SET SOS.
MENU/OK, and ▼/▲ to select SET SOS. - Press
![]() MENU/OK, and ▼/▲ to select SOS MSG.
MENU/OK, and ▼/▲ to select SOS MSG. - Press
![]() MENU/OK and ▼/▲ to select PLAY.
MENU/OK and ▼/▲ to select PLAY. - Press
![]() MENU/OK to to start SOS message playback.
MENU/OK to to start SOS message playback. - Press
![]() PLAY/STOP to stop SOS message playback.
PLAY/STOP to stop SOS message playback.
On handset:
- Press
![]() , and ▼/▲ to select SET SOS.
, and ▼/▲ to select SET SOS. - Press
![]() , and ▼/▲ to select SOS MSG.
, and ▼/▲ to select SOS MSG. - Press and ▼/▲ to select PLAY.
- Press
![]() to start SOS message playback.
to start SOS message playback. - Press
![]() or 5 key to stop SOS message playback.
or 5 key to stop SOS message playback.
Picture big button memories
You have the choice to store 3 picture memories and one direct memory on the base.
On Base:
- Press
![]() MENU/OK , and ▼/▲ to select PHOTO MEM.
MENU/OK , and ▼/▲ to select PHOTO MEM. - Press
![]() MENU/OK , and ▼/▲ to select M1 to M4.
MENU/OK , and ▼/▲ to select M1 to M4. - Press
![]() MENU/OK and ▼/▲ to select ADD or EDIT and VOICE TAG.
MENU/OK and ▼/▲ to select ADD or EDIT and VOICE TAG. - Press
![]() MENU/OK then enter number.
MENU/OK then enter number. - Press
![]() MENU/OK then enter name.
MENU/OK then enter name. - Press
![]() MENU/OK to save.
MENU/OK to save.
On handset:
- Press
![]() , and ▼/▲ to select PHOTO MEM.
, and ▼/▲ to select PHOTO MEM. - Press
![]() , and ▼/▲ to select M1 to M4.
, and ▼/▲ to select M1 to M4. - Press
![]() and ▼/▲ to select ADD or EDIT and VOICE TAG.
and ▼/▲ to select ADD or EDIT and VOICE TAG. - Press
![]() then enter number.
then enter number. - Press
![]() then enter name.
then enter name. - Press
![]() to save.
to save.
You have the option to enter a voice name in choose VOICE TAG and RECORD at the point 3.
If you receive a call with the number registered with a voice tag, you can hear the voice name on the base and on the handset.
NOTES:
- To use a picture big button memory in idle mode, press the picture on the base.
- If you want to pass the call from the speakerphone to the handset, lift the handset off the base to take the call.
- If the handset is not placed on the base, press
![]() to take the line in speakerphone mode and place the handset on the base.
to take the line in speakerphone mode and place the handset on the base.
 to take the line in speakerphone mode and place the handset on the base.
Answering machine
Your telephone base includes a telephone answering machine that records unanswered calls when it is on. The answering machine can store up to 59 messages within the maximum recording time of approximately 15 minutes. As well as recording incoming messages, you can record memos for other users of your phone.
Switching Answering Machine On/Off
On Base:
Press  ANS ON/OFF to switch the answering machine ON or OFF.
On handset:
- Press
![]() , and ▼/▲ to select ANS.SYS.
, and ▼/▲ to select ANS.SYS. - Press
![]() , and ▼/▲ to select TAM ON/OFF
, and ▼/▲ to select TAM ON/OFF - Press
![]() and ▼/▲ to select ON or OFF.
and ▼/▲ to select ON or OFF. - Press
![]() to confirm.
to confirm.
Play Messages on TAM
If you have new messages, the display will show e.g.2 NEW MESSAGES, which means you have 2 new messages. The new messages are played first, and then are saved as old messages, until they are deleted. Old messages are played again after all new messages are played completely.
On Base:
Press  PLAY/STOP to start the playback.
On handset:
- Press
![]() , and ▼/▲ to select ANS.SYS.
, and ▼/▲ to select ANS.SYS. - Press
![]() , and ▼/▲ to show PLAYBACK.
, and ▼/▲ to show PLAYBACK. - Press
![]() to start message playback and the screen displays the date and hour of the message received.
to start message playback and the screen displays the date and hour of the message received. - During message playback, press ▼/▲ to adjust the message playback volume respectively.
NOTES: After new message is played, the new message will be saved as an old message automatically unless it is deleted.
- Press
![]() and ▼/▲ to select STOP, FORWARD, PREVIOUS or DELETE to perform the following functions during message playback.
and ▼/▲ to select STOP, FORWARD, PREVIOUS or DELETE to perform the following functions during message playback.
- STOP: Stop the current message playback and return to the ANS. MACHINE menu.
- SLOW ON: to reduce the speed of the playback.
- FORWARD: Skip to play the next message. The date and hour information of the next message will display if there is next message. ●
- PREVIOUS: Skip to repeat playing the current message from the beginning. The date and hour information of the current message will display.
- DELETE: Delete the current message and the next message will be played.
- Press
![]() to confirm the setting.
to confirm the setting.
Set the Answer Delay
You can set the number of rings before the answering machine answers and starts playing your OGM. You can set the answering machine to answer after two to ten rings or TIME SAVER.
The TIME SAVER function answers calls after 6 ring signals, until the first new message has been registered then the answering machine switches to answering after approximately 2 signals. This is useful when using remote access; if you call up the answering machine and there is no reply after four rings it means there are no messages recorded and you can hang up before you are charged for the call.
On handset:
- Press
![]() , and ▼/▲ to select ANS.SYS.
, and ▼/▲ to select ANS.SYS. - Press
![]() , and ▼/▲ to show SET TAM.
, and ▼/▲ to show SET TAM. - Press
![]() and ▼/▲ to select ANSWER DELAY.
and ▼/▲ to select ANSWER DELAY. - Press
![]() and ▼/▲ to choose: 2 RINGS, 4 RINGS, 6 RINGS, 8 RINGS, 10 RINGS or TOLL SAVE.
and ▼/▲ to choose: 2 RINGS, 4 RINGS, 6 RINGS, 8 RINGS, 10 RINGS or TOLL SAVE. - Press
![]() to confirm the setting.
to confirm the setting.
REMOTE OPERATIONS
If you are away from your home, you can call your answering machine to switch on or off the answering machine and listen to your messages remotely using another tone-dialing phone.
- Place a call from a tone-dialing phone.
- When the answering machine answers the call and starts playing OGM, press
![]() .
. - Enter the 4-digit Remote Access PIN (default PIN is 0000).
- Press the following keys to carry out your desired function.
| KEY | FUNCTION | |
| While message is not playing | While message is playing | |
| 2 | Delete the current message playback | |
| 4 | Repeat playing the current message from the beginning. Press twice to skip backward to the previous message | |
| 5 | Stop the current message playback | |
| 6 | Skip forward to play the next message | |
| 7 | Turn on the answering machine | |
| 9 | Turn off the answering machine | |
 | Enter the 4-digit remote access PIN | |
NOTES:
- When your answering machine memory is full, the answer mode will change to ANSWER ONLY automatically.
- It will change to ANS & RECORD mode automatically after some messages have been deleted.
- You cannot delete new messages until they have been listened to.
FUNCTION MESSAGE ALERT
When you have a new message, you can hear a beep every 10 seconds. If you want deactivate this beep, follow the procedure.
Using the handset:
- Press
![]() , and ▼/▲ to select ANS.SYS.
, and ▼/▲ to select ANS.SYS. - Press
![]() , and ▼/▲ to show SET TAM.
, and ▼/▲ to show SET TAM. - Press
![]() and ▼/▲ to select MSG ALERT.
and ▼/▲ to select MSG ALERT. - Press
![]() and ▼/▲ to select OFF.
and ▼/▲ to select OFF. - Press
![]() to confirm.
to confirm.
Alarm function
You have the choice to enter 10 Alarms.
On handset:
- Press
![]() , and ▼/▲ to select REMINDER.
, and ▼/▲ to select REMINDER. - Press
![]() , and ▼/▲ to select your alarm.
, and ▼/▲ to select your alarm. - Press
![]() and ▼/▲ to select ON/OFF.
and ▼/▲ to select ON/OFF. - Press
![]() and select ON.
and select ON. - Press
![]() and enter the time.
and enter the time. - Press
![]() and choose the frequency.
and choose the frequency. - Press
![]() to confirm.
to confirm.
Talking function
You have the choose to activate or deactivate the function Talking Digits. Activate: this function announces the digit dial or the CID number when you receive a call and that you have subscribed to the service.
On Base:
- Press
![]() MENU/OK, and ▼/▲ to select TLK DIGITS.
MENU/OK, and ▼/▲ to select TLK DIGITS. - Press
![]() MENU/OK, and ▼/▲ to select ON to OFF.
MENU/OK, and ▼/▲ to select ON to OFF. - Press
![]() MENU/OK to confirm.
MENU/OK to confirm.
On handset:
- Press
![]() , and ▼/▲ to select TLK DIGITS.
, and ▼/▲ to select TLK DIGITS. - Press
![]() , and ▼/▲ to select ON to OFF.
, and ▼/▲ to select ON to OFF. - Press
![]() to confirm.
to confirm.
Function First ring
Sometimes, our phone rings one time to inform that we have any voice message on the line. To remove this ringer, you must activate the function.
On the base In idle mode:
- Press
![]() MENU/OK, and ▼/▲to select BS SETTING.
MENU/OK, and ▼/▲to select BS SETTING. - Press
![]() MENU/OK and ▼/▲to select FIRST RING.
MENU/OK and ▼/▲to select FIRST RING. - Press
![]() MENU/OK and select ON.
MENU/OK and select ON. - Press
![]() to save.
to save.
MAINTENANCE
Clean the surface of the housing with a soft, fluff-free cloth. Do not use any cleaning agents or solvents.
GUARANTEE
From the moment your Geemarc product is purchased, Geemarc guarantee it for the period of two years. During this time, all repairs or replacements (at our discretion) are free of charge. Should you experience a problem then contact our help line or visit our website at www.geemarc.com.
The guarantee does not cover accidents, negligence or breakages to any parts. The product must not be tampered with or taken apart by anyone who is not an authorized Geemarc representative. The Geemarc guarantee in no way limits your legal rights.

YOUR RECEIPT IS PART OF YOUR GUARANTEE AND MUST BE RETAINED AND PRODUCED IN THE EVENT OF A WARRANTY CLAIM.
Please note: The guarantee applies to the United Kingdom only.
DECLARATIONS
CE Directives
Geemarc Telecom SA hereby declares that this product is in compliance with the essential requirements and other relevant provisions of the Radio and Telecommunications Terminal Equipment Directive RED 2014/53/UE. The CE declaration of conformity may be consulted at www.geemarc.com
Recycling Directives
The WEEE (Waste Electrical and Electronic Equipment) has been put in place for the products at the end of their useful life are recycled in the best way. When this product is finished with, please do not put it in your domestic waste bin. Please use one of the following disposal options:
- Remove the batteries and deposit them in an appropriate WEEE skip.
Deposit the product in an appropriate WEEE skip. - Or, hand the old product to the retailer. If you purchase a new one, they should accept it.
Thus if you respect these instructions you ensure human health and environmental protection.
Technical specifications
Basic Information
Valid Range: Indoor : 50m I Outdoor: 300m
Handset Operating Time: Standby time: 100 hours Talk time: 10 hours approx
RF Parameter
Frequency: 1.88 GHz to 1.9GHz
Nb Channels: 10
Power Supply
Base: Input:100-240V 50/60Hz; Output: 6V, 800mA adapter
Charger: Input:100-240V 50/60Hz; Output: 6V, 450mA adapter
Handset: 3 batteries, AAA 1.2V/600mAh rechargeable
For product support and help visit our website at ww.geemarc.com
United Kingdom:
5B Swallow Court, Swallowfields, Welwyn Garden City, Hertfordshire, AL7 1SB,UK telephone 01707 387602 or fax 01707 832529

Documents / Resources
References
Download manual
Here you can download full pdf version of manual, it may contain additional safety instructions, warranty information, FCC rules, etc.
Advertisement
Thank you! Your question has been received!


Need Assistance?
Do you have a question about the AMPLIDECT COMBI 595 that isn't answered in the manual? Leave your question here.