Table of Contents
Advertisement
Quick Links
An Operation Manual with more detailed explanations and other documents
related to this product can be viewed on the following website.
You must read the Usage and Safety Precautions before use.
© 2022 ZOOM CORPORATION
Copying or reprinting this manual in part or in whole without permission is prohibited.
You might need this manual in the future. Always keep it in a place where you can access it easily.
The contents of this manual and the specifications of the product could be changed without notice.
Quick Tour
www.zoom.jp/docs/m3
Advertisement
Table of Contents

Related Manuals for Zoom MicTrak M3


Summary of Contents for Zoom MicTrak M3
- Page 1 You must read the Usage and Safety Precautions before use. © 2022 ZOOM CORPORATION Copying or reprinting this manual in part or in whole without permission is prohibited. You might need this manual in the future. Always keep it in a place where you can access it easily.
-
Page 2: Inserting Microsd Cards
Inserting microSD cards • Supported recording media: microSDHC: 4 GB – 32 GB microSDXC: 64 GB – 1 TB • Estimated recording times 32 GB: 11 hours 256 GB: 88 hours • Always turn the power off before inserting or removing a microSD card. •... - Page 3 This function will turn the power off automatically if it is not used for the set amount of time. function Installing M3 Edit & Play Download M3 Edit & Play from the product page on the ZOOM website (zoomcorp.com) zoomcorp.com to the computer. Follow the installation guide to install M3 M3 Edit &...
- Page 4 Connecting the M3 to M3 Edit & Play Connect the M3 with the computer. Use a USB cable that supports data transfer. USB (Type-C) Turn the M3 on. Launch M3 Edit & Play. “Connected” will appear at the top left of the app screen.
- Page 5 Setting the date and time When connected to M3 Edit & Play, the date and time will be set automatically to be the same as on the computer. Setting the battery type and automatic power off function Select the type of batteries used in the M3. Battery Type The options are Alkaline (dry cell), Ni-MH (rechargeable) and Lithium (dry cell).
-
Page 6: Setting Up The Mic
Setting up the mic Attaching the shock mount Attaching to cameras, including single-lens reflex and mirrorless... - Page 7 Making synchronization with camera images easier when editing Use a cable to connect the (line out) jack on the M3 to the audio input jack on the camera. Then record the M3 sound with the camera too. • To prevent vibrations from being transmitted through the connection cable to the M3, secure the cable to the shock mount.
-
Page 8: Turning The Power On
Turning the power on Always format microSD cards in order to maximize their performance after purchasing them new or using them with a different device. Formatting the microSD card while starting up Press and hold while pressing Press The POWER, STEREO and LO CUT indicators will All the LEDs will blink, and the microSD card will light, and the REC/PLAY indicator will blink. - Page 9 Remaining battery charge indications POWER indicator Remaining battery charge Lit green sufficient Remaining battery charge Blinking orange (slowly) Blinking orange Almost no battery charge (quickly) REC/PLAY indicator Making M3 settings Adjusting the recording level is not necessary because the M3 records in 32-bit Float WAV format with dual A/D converter circuits.
-
Page 10: Playing Recordings
Recording When recording with the M3, in addition to recording files that mix in side mic signals to capture stereo, RAW recording files that capture signals from the mid and side mics as is are also recorded on the microSD card. The REC/PLAY indicator will light red This ends recording. -
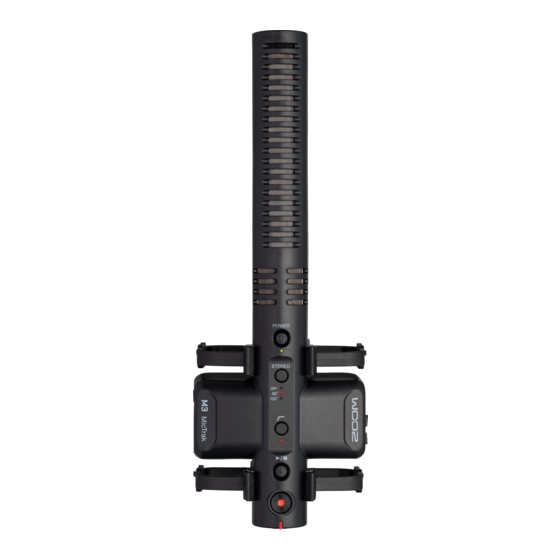
Page 11: Functions Of Parts
Functions of parts ■ Top ■ Left side ■ Right side ⑦ LINE OUT jack This stereo mini jack can be used to output sound. Connect this to the external input of a single-lens reflex/mirrorless camera, for example. ⑧ USB (Type-C) port This can be used to supply power from an external source, connect to a computer for use as an audio interface and make settings... -
Page 12: Other Functions
→ Check the connections. → We recommend using microSD cards that have been → Check the headphone volume. confirmed to operate with this recorder. See the ZOOM website (zoomcorp.com) for information about microSD Built-in mic sound is distorted → Move the M3 away from the sound source. Use a cards that have been confirmed to work with this unit.