Table of Contents
Advertisement
Quick Links
Operation Manual
You must read the Usage and Safety Precautions before use.
©2022 ZOOM CORPORATION
Copying or reprinting this manual in part or in whole without permission is prohibited.
Product names, registered trademarks and company names in this document are the property of their respective companies. All trademarks and
registered trademarks in this document are for identification purposes only and are not intended to infringe on the copyrights of their respective owners.
Proper display is not possible on grayscale devices.
Advertisement
Table of Contents

Related Manuals for Zoom MicTrak M3


Summary of Contents for Zoom MicTrak M3
- Page 1 Operation Manual You must read the Usage and Safety Precautions before use. ©2022 ZOOM CORPORATION Copying or reprinting this manual in part or in whole without permission is prohibited. Product names, registered trademarks and company names in this document are the property of their respective companies. All trademarks and registered trademarks in this document are for identification purposes only and are not intended to infringe on the copyrights of their respective owners.
-
Page 2: Notes About This Operation Manual
• Recording from copyrighted sources, including CDs, records, tapes, live performances, video works and broadcasts, without permission of the copyright holder for any purpose other than personal use is prohibited by law. ZOOM CORPORATION will not assume any responsibility related to infringements of copyrights. -
Page 3: Table Of Contents
Contents Notes about this Operation Manual........................2 M3 overview................................. 5 Realizing high audio quality throughout recording and editing................5 Super directivity realized............................9 Mid-side format sound capture system........................9 Functions of parts..............................10 Recording process..............................14 Making preparations..............................15 Supplying power................................ 15 Inserting microSD cards............................ - Page 4 Specifications................................49...
-
Page 5: M3 Overview
M3 overview Realizing high audio quality throughout recording and editing With dual A/D converter circuits and support for 32-bit float WAV files, the M3 can maintain the highest audio quality from recording to editing. Recording Dual AD converter circuits enable recording from quiet to loud volumes without any need to make gain adjustments. - Page 6 Dual A/D converter circuit overview For each input circuit, the M3 has two A/D converters with different input gains. This design enables high-quality audio recording without the need to adjust gain settings, a step that normally had been indispensable. Providing amazing dynamic range By combining two A/D converters, a wide dynamic range not possible with a single A/D converter has been realized.
- Page 7 Switching between two A/D converters The M3 constantly monitors data from the two A/D converters and automatically selects the one that provides the best recording results. Low noise No clipping Low noise because high-gain because low-gain because high-gain AD converter selected AD converter selected AD converter selected...
- Page 8 32-bit float WAV file overview 32-bit float WAV files have the following advantages over conventional 16/24-bit WAV files. These features enable the quality of the sound during recording to be maintained even when editing afterward. Resolution advantage 32-bit float WAV files have the advantage of being able to maintain high resolution even at low volumes. As a result, quiet sounds can be made louder when editing after recording without degrading their quality.
-
Page 9: Super Directivity Realized
Super directivity realized With a single mic capsule and an original sound tube structure, a high signal-to-noise ratio and super directivity have been realized. This is ideal for use as a mic mounted on a DSLR camera. Mid-side format sound capture system Mid-side format is used to capture stereo audio with mid and side mics. -
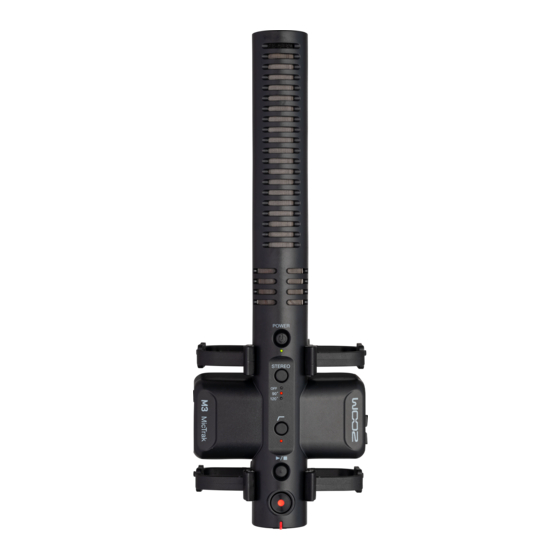
Page 10: Functions Of Parts
Functions of parts ■ Top ❶ Built-in shotgun mic (mid-side format) This is a super-directional shotgun mic. The inclusion of a side mic enables stereo recording. ❷ POWER button/indicator This turns the power on/off. When the power is on, the POWER indicator lights as follows. •... - Page 11 ❹ LO CUT button/indicator Low frequencies can be cut to reduce the sound of wind and pop noises, for example. The LO CUT indicator lights when the low cut function is on. ❺ PLAY/STOP button This starts and stops playback of the most recently recorded file. ❻...
- Page 12 Left and right sides ■ Left side ■ Right side ❶ LINE OUT jack This stereo mini jack can be used to output audio. Connect the external input of a DSLR camera or other device here. ❷ USB port (Type-C) This can be used to supply power from an external source, connect to a computer for use as a USB mic and make settings with the dedicated application.
- Page 13 Front/bottom ■ Front ■ Bottom ❶ microSD card slot Insert a microSD card here. ❷ Battery compartment cover (→ Installing Open this when installing or removing AA batteries. batteries)
-
Page 14: Recording Process
Recording process Recording follows the process shown below. (→ Inserting microSD • Insert a microSD card cards) (→ Installing → Connecting an AC • Supply power batteries, adapter) Preparation before (→ Formatting the microSD card while starting • Turn the power on → Starting up without formatting the microSD recording card) (→ Attaching to a... -
Page 15: Making Preparations
Making preparations Supplying power The M3 can be powered by batteries or a power supply connected to the USB port (AC adapter, USB bus power or portable battery). When a power supply is connected to the USB port, it will be used before the batteries. ... - Page 16 Connecting an AC adapter Connect the cable of the dedicated AC adapter (AD-17) to the USB port (Type-C), and connect the adapter to an outlet. USB (Type-C) Using other power sources By connecting a computer to the USB port (Type-C), the M3 can be operated using USB bus power. In addition, a 5V portable battery (commercially-available) can also be used for power.
-
Page 17: Inserting Microsd Cards
Inserting microSD cards When the power is off, open the microSD card slot cover, and insert a microSD card all the way into the slot with the pins facing up. To remove a microSD card, push it further into the slot and then pull it out. Close the microSD card cover. -
Page 18: Formatting The Microsd Card While Starting Up
Formatting the microSD card while starting up Before using a microSD card for the first time with the M3, always format it to maximize performance. Using a microSD card that has not been formatted by the M3 could cause dropouts when recording or recording to fail. - Page 19 Press to start formatting. All the indicators will blink and the microSD card will be formatted. Press any button other than to cancel formatting. NOTE: • Always format microSD cards in order to maximize their performance after purchasing them new or using them with a different device.
-
Page 20: Starting Up Without Formatting The Microsd Card
Starting up without formatting the microSD card Press and hold The M3 power will turn on, and the POWER and REC/PLAY indicators will light. Turning the power off Press and hold until the POWER indicator becomes unlit. NOTE: • When the power is turned off, the current settings will be saved in the M3. •... -
Page 21: Attaching To A Camera
Attaching to a camera Use the included shock mount to use the M3 mounted on a DSLR camera, for example. The shock mount can reduce vibrations and other noise when mounted on a DSLR camera, for example. Attach the M3 to the shock mount Slide the shock mount onto the camera accessory shoe and tighten the screw to attach it. -
Page 22: Making Hardware Settings
Use the included connection cable to connect the LINE OUT jack on the M3 with the external input jack on the camera. This enables inputting the output sound from the M3 to the camera. By also recording the M3 sound on the camera, synchronizing with the camera video will be easier when editing. -
Page 23: Making Input Settings
Making input settings Adjusting the stereo width The stereo width can be adjusted by changing the side mic level. This setting does not affect the M/S RAW format recording files. Press to adjust the stereo width. Pressing this cycles through the settings, which are shown by the indicators. Setting Explanation This turns off... -
Page 24: Reducing Noise (Low-Frequency Cut)
Reducing noise (low-frequency cut) Low frequencies can be cut to reduce the sound of wind pop noises, for example. Press to light the indicator. -
Page 25: Recording
Recording When recording with the M3, in addition to recording files that mix in side mic signals to capture stereo, RAW format files that capture signals from the mid and side mics as is are also recorded on the microSD card. -
Page 26: Recording
Recording Press The REC/PLAY indicator will light red and recording will start. NOTE: If the remaining battery charge becomes low while recording, the REC/PLAY indicator will blink orange. Press to stop. HINT: By pressing and holding when starting recording, all other operations can be disabled while recording (REC HOLD). -
Page 27: Playing Recordings
Playing recordings The most recently recorded file can be played back. Connect headphones, for example, to the PHONE OUT jack. Press The REC/PLAY indicator will blink green and playback will start. Press to stop playback. HINT: Using the M3 Edit & Play application, the stereo width of M/S RAW format recording files can be adjusted (→ Using M3 Edit &... -
Page 28: Managing Files
Managing files Files created by the M3 are saved on the microSD card. M3 folder and file structure Folder and file structure When recording with the M3, files are created on microSD cards in the following manner. Root 220101_001.WAV 220101_002.WAV 220101_001_RAW.WAV MS_RAW 220101_002_RAW.WAV... - Page 29 Recording file naming File names are assigned in the following format. File name example Explanation ❶ Date The set date is used. ❷ Take number This number is increased by one every time recording is started anew.
-
Page 30: Transferring Files To Computers
Transferring files to computers By connecting the M3 to a computer, files on the microSD card can be checked and moved. Start the M3 in File Transfer mode to connect it to a computer. Use a USB cable (Type-C) to connect the M3 and the computer. USB (Type-C) NOTE: Use a USB cable that supports data transfer. - Page 31 Disconnecting from a computer Disconnect on the computer. • Windows: Select the M3 from "Safely Remove Hardware and Eject Media”. • macOS: Drag the M3 icon to the Trash and drop it. Disconnect the USB cable connecting the M3 and the computer. NOTE: Always conduct step 1 before disconnecting the USB cable.
-
Page 32: Using As A Usb Mic
Using as a USB mic Signals input to the M3 can be sent to computers, smartphones and tablets, and playback signals from these devices can be output from the M3. Moreover, the M3 can also record audio while being used as a USB mic. Connecting computers, smartphones and tablets Use a USB cable (Type-C) to connect the M3 to the computer, smartphone or tablet. - Page 33 When connecting with an iPhone: Follow the procedures below to connect with an iPhone. 1. Power the M3 with batteries. 2. Use a Lightning to USB Camera Adapter to connect the M3 and the iPhone. USB (Type-C) NOTE • Do not record or play files when using connected to an iPhone. The M3 power could fail and connection with the iPhone could be interrupted.
-
Page 34: Managing The Firmware
Updating the firmware The M3 firmware can be updated to the latest version. Files for the latest firmware updates can be downloaded from the ZOOM website (zoomcorp.com). Follow the instructions in the “M3 Firmware Update Guide” on the M3 download page. -
Page 35: Using M3 Edit & Play
Using M3 Edit & Play M3 Edit & Play is a computer application that can be used, for example, to make M3 settings as well as to adjust the volume and stereo width of M/S RAW format files recorded by the M3 and export them as ordinary stereo files. - Page 36 ❹ SD card This shows the remaining space and remaining recordable time on the microSD card loaded in the M3. (→ Checking the remaining space on the microSD card) ❺ File browser (→ Selecting Use this to browse WAV files on the computer and select files to adjust in M3 Edit & Play. files) ❻...
-
Page 37: Installing M3 Edit & Play
Installing M3 Edit & Play Download M3 Edit & Play to the computer from zoomcorp.com. NOTE: The latest version of M3 Edit & Play can be downloaded from the above website. Installing M3 Edit & Play on the computer Follow the instructions in the Installation Guide to install it. -
Page 38: Making And Checking Various M3 Settings
Making and checking various M3 settings Connect the M3 to a computer to make and check various M3 settings. (→ Formatting the microSD card while starting → Starting up without Turn the M3 the power on formatting the microSD card). Use a USB cable (Type-C) to connect the M3 and the computer. USB (Type-C) NOTE: Use a USB cable that supports data transfer. - Page 39 Setting Explanation Ni-MH Nickel-metal hydride batteries Lithium Lithium batteries Setting the time until the power turns off automatically (Auto Power Off) The M3 can be set to automatically turn off if it is not operated for a specific amount of time. To keep the power on at all times, set Auto Power Off...
-
Page 40: Selecting Files
Selecting files The file browser can be used to browse WAV files on the computer and to select files to play and adjust. Files recorded on devices other than the M3 cannot be selected. ❶ Move to the folder up one level Click this to move to the folder one level above. -
Page 41: Playing Files
Playing files (→ M3 Edit & Play screen Use the playback area to play files. overview) (→ Selecting Use the file browser to select the desired file for playback. files) The stereo width and gain can be adjusted while the file is playing. ❶... - Page 42 Setting the stereo width Use this to adjust the stereo width of M/S RAW format files recorded by the M3. This cannot be adjusted for ordinary stereo files. ❶ Stereo width Drag the slider to adjust it. Increasing the angle strengthens the stereo sound. Numbers next to the slider (90º...
- Page 43 Checking levels The volume can be checked in real time during playback. The level changes according to the stereo width and gain settings. NOTE: (→ Using the export If this exceeds 0 dB, exporting in 24-bit linear format will result in clipping. function)
-
Page 44: Using The Export Function
Using the export function Regular stereo files can be exported after adjusting the stereo width and volume of files recorded with the (→ Selecting Select the file to export files). (→ Playing Adjust the stereo width and volume while playing it back files). - Page 45 Input the file name in the save dialog and save the file.
-
Page 46: M3 Edit & Play Application Menu
M3 Edit & Play information Information about the application can be viewed. In Windows, select Help > About. In Mac, select ZOOM M3 Edit & Play > About ZOOM M3 Edit & Play. Help M3 documents can be checked on the Internet. -
Page 47: Appendix
Appendix Troubleshooting If you think that the M3 is operating strangely, check the following items first. Recording/playback trouble Power will not turn ON (→ Supplying • Check the power supply. power) There is no sound or output is very quiet • Check the mic orientation. (→ Attaching to a •... - Page 48 • Due to their characteristics, using nickel metal hydride batteries (especially high-capacity ones) or lithium batteries should enable longer use than alkaline batteries when power consumption is high.
- Page 49 Specifications Inputs Mid mic Directionality Super cardioid (Mono shotgun) Input gain Adjustment unnecessary (dual A/D converter circuit used) Maximum sound pressure 133 dB SPL input Side mic Directionality Bidirectional Input gain Adjustment unnecessary (dual A/D converter circuit used) Maximum sound pressure 119 dB SPL input Outputs...
- Page 50 Power 2 AA batteries (alkaline, lithium, or rechargeable NiMH) AC adapter (ZOOM AD-17): DC 5 V/1 A • USB bus power is supported. Estimated continuous operation times using No headphones Alkaline batteries: about 12 hours batteries connected, NiMH batteries (1900 mAh): about 11 •...
- Page 51 ZOOM CORPORATION 4-4-3 Kanda-surugadai, Chiyoda-ku, Tokyo 101-0062 Japan zoomcorp.com Z2I-4804-01...