Advertisement
Quick Links
π
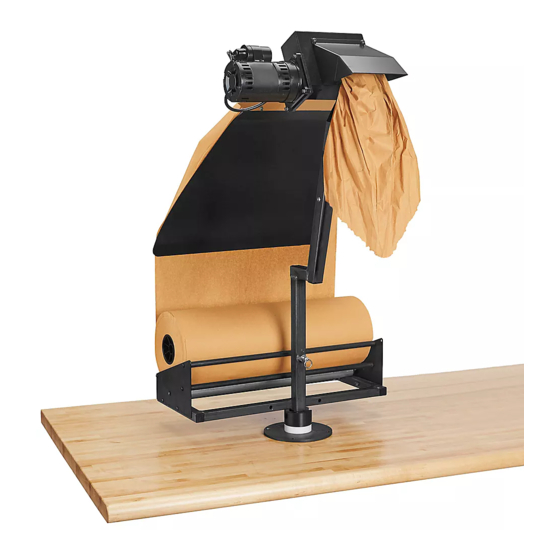
H-5334
TABLETOP PAPER
MACHINE
TOOLS INCLUDED
1/8"
5/16"
Allen Wrench
1.
Remove all parts from the three shipping cartons.
2. Position the tabletop base on flat workstation
surface.
3. Rotate the base so the
shaft channel is facing
the direction you want the
paper to exit the machine
from. (See Figure 1)
4. Fasten the base to
workstation using holes
in base. (Figure 1)
NOTE: Mounting
bolts not included.
5. Rotate black collar so
the shaft channel is on
the opposite side of
the groove in the collar.
(Figure 1)
6. Fasten spring-loaded
pin and spacer using a
1/2" wrench all the way
into the welded nut on
the front of the bottom
mast. (Figure 2)
PAGE 1 OF 2
1-800-295-5510
uline.com
TOOL NEEDED
1/2" Wrench
ASSEMBLY
Figure 1
Shaft
Channel
Black
Collar
Collar
Groove
Tabletop Base
Figure 2
7.
While pulling
spring-loaded
pin, place bottom
mast onto the
shaft of the
tabletop base.
Lower the body
so crossbar fits
into black collar
groove.
(See Figure 3)
8. Release spring-loaded pin and rotate body until the
pin clicks into the channel on the shaft.
9. Position top mast
so the paper exit
is facing front.
Insert the top mast
into the top of
the bottom mast.
Secure with 3/8-16
x 3/4" bolts and
3/8" lock washers
(2 each). (See
Figure 4)
10. Pull spring-loaded
pin out and turn
unit 180 degrees.
Figure 3
Bottom
Mast
Black
Collar
Groove
Figure 4
Top
Mast
Bottom
Mast
0915 IH-5334
Advertisement

Related Manuals for U-Line H-5334


Summary of Contents for U-Line H-5334
- Page 1 π H-5334 1-800-295-5510 uline.com TABLETOP PAPER MACHINE TOOLS INCLUDED TOOL NEEDED 1/8" 5/16" 1/2" Wrench Allen Wrench ASSEMBLY Remove all parts from the three shipping cartons. While pulling Figure 3 spring-loaded 2. Position the tabletop base on flat workstation pin, place bottom surface.
- Page 2 ASSEMBLY CONTINUED 11. Place paper ramp onto paper entrance funnel 12. Rotate unit 180 degrees back to original position, and secure with 10-32 x 1/2" bolts (6), ensuring bolt with paper exit shoot facing front. head is on the inside of the funnel. Secure with #10 13.