Table of Contents
Advertisement
Available languages
Available languages
Quick Links
π
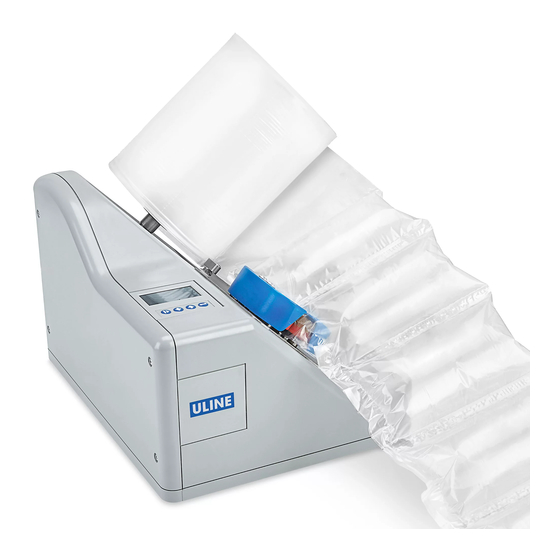
H-7241
AIR CUSHION MACHINE
BOX CONTENTS
• Air Cushion Machine
• Film Roll Holder
• Spacing Gauge
• Maintenance Kit
• Power Cord
• User Manual
(Includes Teflon® Belts)
Film Roll Holder
Main Power Switch
and Power Socket
WARNING! Please read and understand
instructions fully before operating the
Uline Air Cushion machine.
PAGE 1 OF 27
1-800-295-5510
uline.com
Control Panel
Sealing Unit
Guide Bar
External Input
Connection
PARTS
Unlock Knob
WARNING! To guarantee personal safety,
the following instructions must be carefully
observed.
Para Español, vea páginas 10-18.
Pour le français, consulter les pages 19-27.
Film Roll Holder
Guide Bar
Air Injector
USB-B Connector
0120 IH-7241
Advertisement
Table of Contents

Related Manuals for U-Line H-7241


Summary of Contents for U-Line H-7241
- Page 1 Para Español, vea páginas 10-18. Pour le français, consulter les pages 19-27. π H-7241 1-800-295-5510 uline.com AIR CUSHION MACHINE BOX CONTENTS • Air Cushion Machine • Film Roll Holder • Spacing Gauge • Maintenance Kit • Power Cord • User Manual...
-
Page 2: Work Area
SAFETY WORK AREA USE AND CARE • Keep the work area clean and well lit. • Switch machine off and disconnect the plug from the power source before performing any operation • Place the machine on a flat, dry surface. to the machine. -
Page 3: Technical Specifications
TECHNICAL SPECIFICATIONS Voltage 95 – 250 VAC; 50/60 Hz Power Consumption (max.) 97 W Power Consumption 76 W Power Consumption (stand-by mode) 6.2 W Recommended Main Fuse 3.15 AMP 14⁄ x 14⁄" Dimensions Height 13" ~33 LFM Transport Speed Weight 15.65 lbs. -
Page 4: Setting Up The Device
SETTING UP THE DEVICE ASSEMBLY OF THE FILM ROLL HOLDER LOADING A FILM ROLL 1. Remove the machine 1. Slide the film roll onto the Figure 4 Figure 1 and the blue film roll film roll holder. Ensure that shaft from the box. the film is oriented to unwind Insert the metal part from the underside of the... - Page 5 SETTING UP THE DEVICE CONTINUED POWER SWITCH AND CONNECTIONS START FILM PRODUCTION After checking the power supply, the system can be Once a menu is selected with its pre-set parameters the switched on. The main switch is on position "I." machine is ready to operate.
-
Page 6: Factory Settings
SETTING UP THE DEVICE CONTINUED Display air settings Change runtime settings Amount of air is Minimum setting is 1 second. now adjustable. Maximum setting is 2,400 seconds. Runtime [s] Runtime [s] Press to decrease air. Press to decrease runtime. Press to increase air. - Page 7 CHANGING THE BELTS 1. Remove the blue covers on 4. Repeat steps 2 and 3 with the bottom sealing unit. Figure 8 both the top and bottom 5. Reattach the blue covers sealing units using included Figure 10 using the included Allen key Allen key.
-
Page 8: Replacing The Blade
REPLACING THE BLADE Make sure to disconnect from the power supply. 3. Pull the blade to the right Figure 13 side. (See Figure 13) 1. Turn the locking knob Figure 11 clockwise to unlock the top CAUTION! Sharp blade. sealing unit. (See Figure 11) Blade 4. -
Page 9: Troubleshooting
TROUBLESHOOTING OPERATING ISSUE RECOMMENDATIONS No power to machine Check power cord is connected to both machine and outlet. Check main power switch is on. Check power fuse. No display after power on Check power fuse. Display shown but machine will not start. Contact Uline Customer Service at 1-800-295-5510. -
Page 10: Contenido De La Caja
π H-7241 800-295-5510 uline.mx MÁQUINA PARA ACOJINADO CONTENIDO DE LA CAJA • Máquina para Acojinado • Soporte del Rollo de Película • Medidor de Espacio • Kit de Mantenimiento • Cable Eléctrico • Manual del Usuario PARTES Perilla de Desbloqueo Panel de Control Soporte del Rollo de Película... -
Page 11: Uso Y Cuidado
SEGURIDAD ÁREA DE TRABAJO USO Y CUIDADO • Mantenga el área de trabajo limpia y bien • Apague la máquina y desconecte el enchufe de la iluminada. fuente de energía antes de llevar a cabo cualquier operación a la máquina. Esto incluye reemplazo de •... -
Page 12: Especificaciones Técnicas
ESPECIFICACIONES TÉCNICAS Voltaje 95 – 250 VAC; 50/60 Hz Consumo de Energía (máx.) 97 W Consumo de Energía 76 W Consumo de Energía (modo de espera) 6.2 W Fusible Principal Recomendado 3.15 AMP 37.3 x 36.4 cm (14⁄ x 14⁄") Dimensiones Altura 33 cm (13") - Page 13 CONFIGURAR EL DISPOSITIVO ENSAMBLE DEL SOPORTE DEL ROLLO DE PELÍCULA CARGAR UN ROLLO DE PELÍCULA 1. Remueva la máquina 1. Deslice la película para Diagrama 4 Diagrama 1 y el eje azul para insertarla en el soporte rollo de película del rollo de película.
- Page 14 CONTINUACIÓN DE CONFIGURAR EL DISPOSITIVO INTERRUPTOR DE ENERGÍA Y CONEXIONES COMENZAR LA PRODUCCIÓN DE PELÍCULA Después de verificar la fuente de energía, el sistema Una vez que se seleccione un menú con sus se puede encender. El interruptor principal está en la parámeteros preconfigurados, la máquina está...
-
Page 15: Configuraciones De Fábrica
CONTINUACIÓN DE CONFIGURAR EL DISPOSITIVO Visualizar configuración de aire Cambiar configuración de tiempo de Ejecución La cantidad de aire ya es ajustable. Configuración mínima es de 1 segundo. Oprima para reducir el aire. Runtime [s] Runtime [s] Configuración máxima es de Oprima para aumentar el aire. - Page 16 CAMBIAR LAS CORREAS 1. Remueva las cubiertas 4. Repita los pasos 2 y 3 con la unidad de sellado Diagrama 8 azules tanto en la unidad de inferior. sellado superior como en 5. Vuelva a fijar las cubiertas la inferior utilizando la llave Diagrama 10 azules utilizando la llave Allen incluida.
- Page 17 REEMPLAZAR LA NAVAJA Asegúrese de desconectar de la fuente de energía. 3. Jale la navaja hacia el Diagrama 13 lado derecho. 1. Gire la perilla de bloqueo (Vea Diagrama 13) Diagrama 11 en sentido de las manecillas del reloj para desbloquear ¡PRECAUCIÓN! Navaja la unidad superior de filosa.
-
Page 18: Solución De Problemas
SOLUCIÓN DE PROBLEMAS PROBLEMA DE FUNCIONAMIENTO RECOMENDACIONES La máquina no recibe corriente Verifique que el cable eléctrico esté conectado tanto a la máquina como al enchufe. Verifique que el interruptor principal de energía esté encendido. Verifique el fusible de energía. No hay visualización después de Verifique el fusible de energía. -
Page 19: Contenu De La Boîte
π H-7241 1-800-295-5510 uline.ca MACHINE À COUSSIN D'AIR CONTENU DE LA BOÎTE • Machine à coussin d'air • Support de rouleau de film • Jauge d'espacement • Ensemble d'entretien • Cordon d'alimentation • Manuel de l'utilisateur PIÈCES Bouton de déverrouillage... - Page 20 SÉCURITÉ ZONE DE TRAVAIL UTILISATION ET SOIN • Maintenez la zone de travail propre et bien éclairée. • Éteignez la machine et débranchez la fiche de la source d'alimentation avant d'effectuer toute • Placez la machine sur une surface plate et sèche. opération.
-
Page 21: Spécifications Techniques
SPÉCIFICATIONS TECHNIQUES Tension 95 à 250 VCA; 50/60 Hz Consommation électrique (max.) 97 W Consommation électrique 76 W Consommation électrique (mode de veille) 6,2 W Fusible principal recommandé 3,15 A 37,3 x 36,4 cm (14 ⁄ x 14 ⁄ po) Dimensions Hauteur 33 cm (13 po) -
Page 22: Réglage De L'appareil
RÉGLAGE DE L'APPAREIL MONTAGE DU SUPPORT DE ROULEAU DE FILM CHARGEMENT DU ROULEAU DE FILM 1. Retirez la machine et 1. Glissez le film sur le support Figure 4 Figure 1 l'arbre porte-rouleau de rouleau de film. Assurez- de film bleu de la vous que le film est orienté... - Page 23 RÉGLAGE DE L'APPAREIL SUITE COMMUTATEUR ET CONNEXIONS DÉMARRAGE DE LA PRODUCTION Après vérification de la source d'alimentation, vous Lorsque vous avez sélectionné un menu et ses pouvez allumer l'appareil. Le commutateur principal est paramètres, la machine est prête à l'emploi. Chaque en position «...
-
Page 24: Réglages D'usine
RÉGLAGE DE L'APPAREIL SUITE Affichage des paramètres d'air Changer le réglage de temps d'exécution La quantité d'air est maintenant réglable. Le réglage minimal est de 1 seconde. Appuyez sur pour moins d'air. Runtime [s] Runtime [s] Le réglage minimal est de 2 400 Appuyez sur pour plus d'air. - Page 25 REMPLACEMENT DES COURROIES 1. Retirez les couvercles 4. Répétez les étapes 2 et 3 avec l'unité de scellage Figure 8 bleus situés sur les unités inférieure. de scellage inférieure et 5. Replacez les couvercles supérieure à l'aide d'une Figure 10 bleus à...
-
Page 26: Remplacement De La Lame
REMPLACEMENT DE LA LAME Assurez-vous que l'appareil est débranché de toute 3. Tirez la lame vers le côté Figure 13 source d'alimentation. droit. (Voir Figure 13) 1. Tournez le bouton de Figure 11 MISE EN GARDE! Lame verrouillage dans le sens tranchante horaire pour déverrouiller l'unité... -
Page 27: Dépannage
DÉPANNAGE PROBLÈME DE FONCTIONNEMENT RECOMMANDATIONS La machine n'est pas alimentée Vérifiez que le cordon d'alimentation est branché dans la machine et dans la prise de courant. Vérifiez que le commutateur principal est allumé. Vérifiez le fusible. Aucun affichage après l'allumage Vérifiez le fusible.