
Related Manuals for ASROCK Mars ADL Series


Summary of Contents for ASROCK Mars ADL Series
-
Page 2: Safety Information
Safety Information Your system is designed and tested to meet the latest standards of safety for information technology equipment. However, to ensure your safety, it is important that you read the following safety instructions. Setting up your system • Read and follow all instructions in the documentation before you operate your system. • Do not use this product near water or a heated source such as a radiator. - Page 3 This device complies with Part 15 of the FCC Rules. Operation is subject to the following two conditions: (1) this device may not cause harmful interference, and (2) this device must accept any interference received, including interference that may cause undesired operation. This equipment has been tested and found to comply with the limits for a Class B digital device, pursuant to part 15 of the FCC Rules.
- Page 4 The terms HDMI® and HDMI High-Definition Multimedia Interface, and the HDMI logo are trademarks or registered trademarks of HDMI Licensing LLC in the United States and other countries. INTEL END USER SOFTWARE LICENSE AGREEMENT IMPORTANT - READ BEFORE COPYING, INSTALLING OR USING. LICENSE.
- Page 5 Licensee’s intellectual property rights, to incorporate or otherwise utilize those comments and suggestions. TERMINATION OF THIS LICENSE. Intel or the sublicensor may terminate this license at any time if Licensee is in breach of any of its terms or conditions. Upon termination, Licensee will immediately destroy or return to Intel all copies of the Software.
- Page 6 Product Specifications/ Especificaciones del producto/ 製品仕様 / Технические характеристики/ 产品规范 Intel® Core™ i5-1235U Processor/ Core™ i3-1215U Processor/ Celeron® Processor 7305 Procesador Intel® Core™ i5-1235U Procesador Core™ i3-1215U/ Procesador Celeron® 7305 Intel® Core ™ i5-1235U プロセッサー / Core ™ CPU/ CPU/ CPU / ЦП/ CPU i3-1215U プロセッサー...
- Page 7 Предусмотрен 2 слот M.2 SSD (поддерживаются SSD-накопители M.2 PCIe 3.0x4/ SATA3 типа 2260/ 2280 & SSD- накопители M.2 PCIe 4.0x4 типа 2260/ 2280) 支持 2 x M.2 SSD 插槽 (支持 PCIe 3.0x4/ SATA3 类型 2260/ 2280 M.2 SSD & PCIe 4.0x4 类型 2260/ 2280 M.2 SSD)...
- Page 8 HDMI*1 (4K@60 Hz)/ VGA*1/ USB 3.2 Gen2 Type-A*2/ LAN*1/ DC Jack/ Headphone Jack/ Mic-in HDMI*1 (4K@60 Hz)/ VGA*1/ USB 3.2 Gen2 Tipo-A*2/ LAN*1/ Conector CC/ Conector de auriculares/ Entrada de micro HDMI*1 ( 4K@60 Hz )/ Rear I/O/ E/S en posterior/ VGA*1/ USB 3.2 Gen2 Type-A*2/ LAN*1/ リア...
- Page 9 128.7x72.2x24.3mm 128,7 x 72,2 x 24,3 mm Stand/ Soporte/ スタンド / 128.7x72.2x24.3mm Подставка/ 支架 128,7 x 72,2 x 24,3 мм 128.7x72.2x24.3mm 194mm (L)*150mm (W) *26mm (H) 194 mm (Largo) * 150 mm (Ancho) * 26 mm (alto) Dimension/ Dimensiones/ 寸法 / Габариты/ 尺寸 194mm (長さ) x 150mm ( 幅 ) x 26mm ( 高さ) 194 (Д) х...
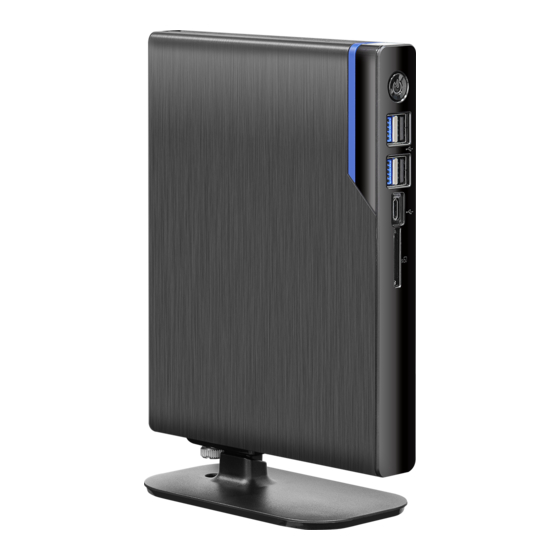
- Page 10 System Front View/ Vista frontal del sistema/ システム前面図 / Вид системы спереди/ 系统正视图 Feature Item USB 2.0 Ports USB 4.0 Thunderbolt 4 Type-C Port Card Reader Base stand screw USB 3.2 Gen2 Type-A Ports Nº Producto característico Puertos USB 2.0 Puerto USB 4.0 Thunderbolt 4 Tipo C Lector de tarjeta...
- Page 11 System Rear View/ Vista trasera el sistema/ システム背面図 / Вид системы сзади/ 系统后视图 Feature Item D-Sub Output HDMI Output USB 3.2 Gen2 Ports LAN Port DC IN Headphone Jack Microphone Input Kensington lock Nº Producto característico Salida D-Sub Salida HDMI Puertos USB 3.2 Gen2 Puerto LAN Entrada DC...
- Page 12 System Rear View/ Vista trasera el sistema/ システム背面図 / Вид системы сзади/ 系统后视图 № Компоненты Выход D-Sub Выход HDMI Порты USB 3.2 Gen2 Порт LAN Вход питания постоянного тока Гнездо для наушников Микрофонный вход Противокражный замок Kensington 编号 功能项 D-Sub 输出 HDMI 输出...
- Page 13 Connection Examples (Front)/ Ejemplos de conexión (Frontal)/ 接続例 ( 前面 )/ Примеры подключений (фронтальные порты)/ 连接示例 (前) USB Cable Cable USB/ USB ケーブル / Кабель USB/ USB 线 Thunderbolt Type C Cable Cable Thunderbolt Tipo C/ Type C ケーブル / Thunderbolt Кабель...
- Page 14 Connection Examples (Rear)/ Ejemplos de conexión (Traseros)/ 接続例 ( 背面 )/ Примеры подключений (тыловые порты)/ 连接示例 (后) USB Cable Computer Display Cable USB/ USB ケーブル / Pantalla del ordenador/ Кабель USB/ USB 线 コンピューターディスプレイ / Компьютерный монитор/ 计算器显示器 HD TV Televisión HD/ HD テレビ...
- Page 15 Vesa Mount/Stand Installation/ Montaje VESA/Instalación de soporte/ Vesa マウント / スタンドの取り付け / Установка кронштейна VESA и подставки/ Vesa 底座 / 支架安装 Installing the VESA Bracket Attach the VESA Bracket to the rear of a compatible display using the four screws. *Choose mounting holes depending on the mounting hole pattern of your LCD screen (75 mm ×...
- Page 16 Installing the Base Stand Attach the base stand to the unit, then hand tighten the screw. Instalar la base del soporte Conecte la base del soporte a la unidad, y a continuación, apriete los tornillos. ベー ススタンドの取り付け ベーススタンドをユニッ トに取り付け、 ネジを手で締めます。 Установка...
- Page 17 Key Parts Installation Partes clave de la instalación/ 主要部品の取り付け / Установка основных компонентов/ 主要零部件安装 Removing the Top Case Remove the four screws first. Sacar la carcasa superior Primero quite los cuatro tornillos. トップカバーの取り外し 最初に、 ネジを取り外します。 Снятие верхней крышки корпуса Сначала удалите 4 винта. 拆除顶部机箱...
- Page 18 To remove the top case, place your fingers in the edge as shown in the image below. Then, lift the cover. Para quitar la carcasa superior, coloque los dedos en el borde como se muestra en la imagen de abajo. A continuación, levanta la carcasa.
- Page 19 Installing the M.2 SSD/ Instalar el SSD M.2/ M.2 SSD の取り付け / Установка SSD-накопителя M.2/ 安装 M.2 SSD 1. Locate the M.2 Slots on the motherboard 1. Localice la ranura M.2 en la placa base 1. マザーボードの M.2 スロッ トを探します。 1.
- Page 20 3. Prepare the M.2 heatsink and screws that come with the package. Before securing the M.2 heatsink, make sure to align the notch on the SSD to the standoff on the motherboard. Then tighten the screws with a screwdriver to secure the M.2 heatsink into place.
- Page 21 If yo are not using the M.2 heatsink, follow the steps below to install your M.2 SSD. Si no utiliza el disipador térmico M.2, siga los pasos que se indican a continuación para instalar la unidad de estado sólido SSD M.2. M.2 ヒートシンクを使用していない場合は、...
- Page 22 2. Prepare the M.2 standoffs that come with the package, and hand tighten them into the nut. 2. Prepare los separadores M.2 incluidos con el paquete y apriételos a mano en la tuerca. 2. パッケージに付属の M.2 スタンドオフを準備し、 ナッ トに手で締めます。 2. Подготовьте опорные стойки M.2, входящие в комплект поставки, и вручную затяните...
- Page 23 3. Carefully insert the M.2 SSD into the slot. Then tighten the screw that comes with the package to secure the M.2 SSD to the motherboard. *Please do not overtighten the screw as this might damage the module and M.2 heatsink. 3.
- Page 24 *15G067049000AK* 15G067049000AK...