Table of Contents
Advertisement
Version 1.0
Published May 2015
Copyright©2015 ASRock Inc. All rights reserved.
Copyright Notice:
No part of this documentation may be reproduced, transcribed, transmitted, or
translated in any language, in any form or by any means, except duplication of
documentation by the purchaser for backup purpose, without written consent of
ASRock Inc.
Products and corporate names appearing in this documentation may or may not
be registered trademarks or copyrights of their respective companies, and are used
only for identiication or explanation and to the owners' beneit, without intent to
infringe.
Disclaimer:
Speciications and information contained in this documentation are furnished for
informational use only and subject to change without notice, and should not be
constructed as a commitment by ASRock. ASRock assumes no responsibility for
any errors or omissions that may appear in this documentation.
With respect to the contents of this documentation, ASRock does not provide
warranty of any kind, either expressed or implied, including but not limited to
the implied warranties or conditions of merchantability or itness for a particular
purpose.
In no event shall ASRock, its directors, oicers, employees, or agents be liable for
any indirect, special, incidental, or consequential damages (including damages for
loss of proits, loss of business, loss of data, interruption of business and the like),
even if ASRock has been advised of the possibility of such damages arising from any
defect or error in the documentation or product.
his device complies with Part 15 of the FCC Rules. Operation is subject to the following
two conditions:
(1) this device may not cause harmful interference, and
(2) this device must accept any interference received, including interference that
may cause undesired operation.
CALIFORNIA, USA ONLY
he Lithium battery adopted on this motherboard contains Perchlorate, a toxic substance
controlled in Perchlorate Best Management Practices (BMP) regulations passed by the
California Legislature. When you discard the Lithium battery in California, USA, please
follow the related regulations in advance.
"Perchlorate Material-special handling may apply, see www.dtsc.ca.gov/hazardouswaste/
perchlorate"
Website: http://www.asrock.com
Advertisement
Table of Contents

Related Manuals for ASROCK Beebox Series


Summary of Contents for ASROCK Beebox Series
-
Page 1: Copyright Notice
(including damages for loss of proits, loss of business, loss of data, interruption of business and the like), even if ASRock has been advised of the possibility of such damages arising from any defect or error in the documentation or product. -
Page 2: Important Safety Instructions
Important Safety Instructions Pay close attention to the following safety instructions before performing any of the operation. Basic safety precautions should be followed to protect yourself from harm and the product from damage: • Operation of the product should be carried out by suitably trained, qualiied, and certiied personnel only to avoid risk of injury from electrical shock or energy hazard. -
Page 3: Contact Information
Contact Information If you need to contact ASRock or want to know more about ASRock, you’re welcome to visit ASRock’s website at http://www.asrock.com; or you may contact your dealer for further information. For technical questions, please submit a support request form at http://www.asrock.com/support/tsd.asp... -
Page 4: Table Of Contents
How to Install the 2.5-inch Hard Drive How to Install the Memory Modules (DDR3 Low Voltage (1.35V)) How to Install the VESA Bracket Positions of the Beebox series Chapter 4 Software and Utilities Operation Installing Drivers ASRock APP Shop 4.2.1 UI Overview 4.2.2 Apps... - Page 5 4.2.4 Setting Creating Windows® 7 Installation Disk with USB 3.0 Drivers Packed Chapter 5 UEFI SETUP UTILITY Introduction 5.1.1 UEFI Menu Bar 5.1.2 Navigation Keys Main Screen Advanced Screen 5.3.1 CPU Coniguration 5.3.2 Chipset Coniguration 5.3.3 Storage Coniguration 5.3.4 IntelRMT Coniguration 5.3.5 Super IO Coniguration 5.3.6 ACPI Coniguration 5.3.7 USB Coniguration...
-
Page 6: Chapter 1 Introduction
In case any modiications of this documentation occur, the updated version will be available on ASRock’s website without further notice. If you require technical support related to this product, please visit our website for speciic information about the model you are using. -
Page 7: Product Speciications
1.2 Product Speciications Full System Full System Beebox series Barebone (With OS) (Without OS) Intel® Quad-Core N3150 Processor (Up to 2.08 GHz) Intel® Dual-Core Intel® Dual-Core N3000 Processor N3050 Processor (Fanless Design) (Up to 2.16 GHz) Windows® 10 Microsot® Windows® 10 32-bit / 10 64-bit / Home 8.1 64-bit / 7 64-bit compliant... - Page 8 23 / Zorin OS 10 / Arch Linux 2015.10.01 / clonezilla-live-20150915- wily-amd64 / Android-x86-4.4-r3 compliant * For Beebox N3000 series, it is not recommended to install 2.5” HDD. If you install the 2.5” HDD, please keep the Beebox series in a vertical position to ensure better cooling performance.
-
Page 9: Chapter 2 Product Overview
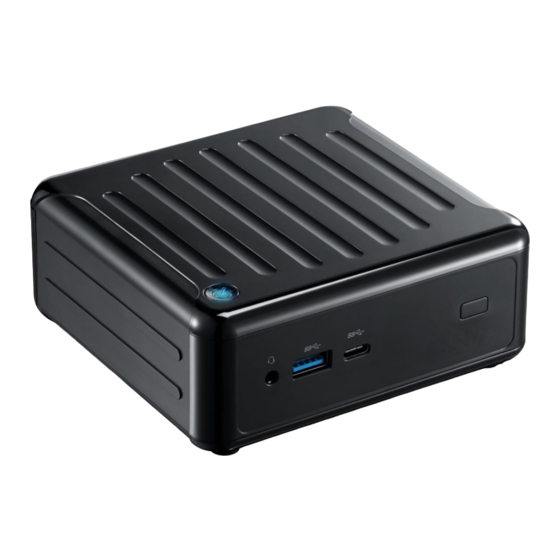
Chapter 2 Product Overview his chapter provides diagrams showing the location of important components of the Beebox series. 2.1 Front View Description Headphone & Microphone USB 3.0 (Type A) USB 3.0 (Type C) IR Sensor Window... -
Page 10: Rear View
Beebox series 2.2 Rear View Description DC-In HDMI RJ-45 Kensington Lock Slot USB 3.0 (Type A) *DisplayPort *To use DisplayPort as a display output, please connect your monitor/display to HDMI Port when installing OS system. his DisplayPort only supports DP to D-Sub dongle and does not support DP to HDMI dongle and DP to DVI dongle. -
Page 11: Inside View
2.3 Inside View Description WiFi-802.11ac + BT Module mSATA Slot SATA 3.0 Connector SO-DIMM Slots Clear CMOS Pad *Clear CMOS Pad allows you to clear the data in CMOS. To clear CMOS, disconnect the power supply and short the Clear CMOS Pad. Hard disk drive tray (compatible with 2.5"... -
Page 12: Chapter 3 Hardware Installation
Beebox series Chapter 3 Hardware Installation his chapter helps you install or remove important components. 3.1 How to Remove the Bottom Case 1. Remove the four screws on the bottom case. 2. hen lit up and remove the bottom panel.. -
Page 13: How To Remove The Wireless Module
3.2 How to Remove the Wireless Module 1. Disconnect the two antenna cables from the WiFi Module by liting the clips. 2. Remove the screw that holds the WiFi Module in place. 3. Carefully pull the WiFi Module from the slot and remove it. -
Page 14: How To Install The Msata Ssd
Beebox series 3.3 How to Install the mSATA SSD 1. Locate the mSATA slot on the motherboard. 2. Carefully insert the mSATA SSD into the slot. 3. Tighten the screw to secure the mSATA SSD to the motherboard. -
Page 15: How To Install The 2.5-Inch Hard Drive
3.4 How to Install the 2.5-inch Hard Drive 1. Remove the four screws on the bottom case. hen lit up and remove the bottom panel. 2. Unscrew the four screws that hold the HDD cage in place. 3. Install the HDD in the cage using the four screws. hen connect the SATA cable to the HDD. - Page 16 Beebox series 4. Attach the HDD cage to the bottom panel and secure it using the four screws. 5. Connect the SATA Data and Power Cable to the motherboard and reinstall the bottom panel. 6. Align the three latches on the bottom panel with the three latch holes on the chassis.
-
Page 17: How To Install The Memory Modules (Ddr3 Low Voltage (1.35V))
3.5 How to Install the Memory Modules (DDR3 Low Voltage (1.35V)) 1. he Beebox series requires DDR3L SO-DIMM (1.35V). 2. For dual channel coniguration, you always need to install identical (the same brand, speed, size and chip-type) DDR3L SO-DIMM pairs. -
Page 18: How To Install The Vesa Bracket
Beebox series 3.6 How to Install the VESA Bracket 1. Attach the two screws to the base of the Beebox series. 2. 2. Attach the VESA Bracket to the rear of a compatible display using the four screws. *Choose mounting holes depending on the mounting hole pattern of your LCD screen (75 mm ×... -
Page 19: Positions Of The Beebox Series
Beebox series can be placed in vertical or horizontal position. Horizontal Position Vertical Position Wall-mounted *Please note that keeping the Beebox series in a vertical position will ensure better cooling performance. USB Power On Function: USB Power On Function allows system power on via USB keyboard/mouse. -
Page 20: Chapter 4 Software And Utilities Operation
Beebox series Chapter 4 Software and Utilities Operation 4.1 Installing Drivers he Support CD that comes with the motherboard contains necessary drivers and useful utilities that enhance the motherboard’s features. Running The Support CD To begin using the support CD, insert the CD into your CD-ROM drive. he CD automatically displays the Main Menu if “AUTORUN”... -
Page 21: Asrock App Shop
Double-click on your desktop to access ASRock APP Shop utility. *You need to be connected to the Internet to download apps from the ASRock APP Shop. 4.2.1 UI Overview Category Panel Hot News... -
Page 22: Apps
Beebox series 4.2.2 Apps When the "Apps" tab is selected, you will see all the available apps on screen for you to download. Installing an App Step 1 Find the app you want to install. he most recommended app appears on the let side of the screen. he other various apps are shown on the right. - Page 23 Step 3 If you want to install the app, click on the red icon to start downloading. Step 4 When installation completes, you can ind the green "Installed" icon appears on the upper right corner. To uninstall it, simply click on the trash can icon *he trash icon may not appear for certain apps.
- Page 24 Beebox series Upgrading an App You can only upgrade the apps you have already installed. When there is an available new version for your app, you will ind the mark of "New Version" appears below the installed app icon. Step 1 Click on the app icon to see more details.
-
Page 25: Bios & Drivers
4.2.3 BIOS & Drivers Installing BIOS or Drivers When the "BIOS & Drivers" tab is selected, you will see a list of recommended or critical updates for the BIOS or drivers. Please update them all soon. Step 1 Please check the item information before update. Click on to see more details. -
Page 26: Setting
Beebox series 4.2.4 Setting In the "Setting" page, you can change the language, select the server location, and determine if you want to automatically run the ASRock APP Shop on Windows startup. -
Page 27: Creating Windows® 7 Installation Disk With Usb 3.0 Drivers Packed
• Windows® 7 64-bit PC Instructions Step 1 Create a new folder on your computer. Here we name the folder "asrock" as an example. Step 2 Create another two subfolders. Name the subfolder "mount" and "usb3" as examples. Step 3 Insert Windows®... - Page 28 Beebox series Step 6 Copy all 12 iles under the folders "HCSwitch" (x64) and "Win7" (x64) in the "Drivers" to the subfolder "usb3" created in Step 2. Step 7 Open the "Start" menu and type "command" or "cmd" to launch the command prompt as an administrator.
- Page 29 Step 9 To add USB 3.0 drivers into "boot.wim" in order to install Windows® 7 by lash3.0, please input the following commands in order and wait until the each process completes. dism /mount-wim /wimile:boot.wim /index:2 /mountdir:mount dism /image:mount /add-driver /driver:usb3\iusb3hub.inf dism /image:mount /add-driver /driver:usb3\iusb3xhc.inf dism /image:mount /add-driver /driver:usb3\iusb3hcs.inf dism /unmount-wim /mountdir:mount /commit...
- Page 30 Beebox series In this step, please particularly pay attention to the Index number in the irst command. Index represents the diferent versions of Windows® 7. Please check the followings for the versions you use: Index : 1 Windows 7 HOMEBASIC...
-
Page 31: Chapter 5 Uefi Setup Utility
Chapter 5 UEFI SETUP UTILITY 5.1 Introduction his section explains how to use the UEFI SETUP UTILITY to conigure your system. You may run the UEFI SETUP UTILITY by pressing <F2> or <Del> right ater you power on the computer, otherwise, the Power-On-Self-Test (POST) will continue with its test routines. -
Page 32: Navigation Keys
Beebox series 5.1.2 Navigation Keys Use < > key or < > key to choose among the selections on the menu bar, and use < > key or < > key to move the cursor up or down to select items, then press <Enter>... -
Page 33: Main Screen
5.2 Main Screen When you enter the UEFI SETUP UTILITY, the Main screen will appear and display the system overview. -
Page 34: Advanced Screen
Beebox series 5.3 Advanced Screen In this section, you may set the conigurations for the following items: CPU Coniguration, Chipset Coniguration, Storage Coniguration, IntelRMT Coniguration, Super IO Coniguration, ACPI Coniguration, USB Coniguration and Platform Trust Technology. Setting wrong values in this section may cause the system to malfunction. -
Page 35: Cpu Coniguration
5.3.1 CPU Coniguration Intel SpeedStep Technology Intel SpeedStep technology allows processors to switch between multiple frequencies and voltage points for better power saving and heat dissipation. CPU C States Support Enable CPU C States Support for power saving. It is recommended to keep C1, C6 and C7 all enabled for better power saving. - Page 36 Beebox series Power Gear Toggle between three operational modes (Eco, Normal and Sport) to maximize performance or conserve energy. Eco Mode: Reduces your computer’s performance and saves energy. Normal Mode: Balance performance with power consumption. Sport Mode: Use more power to achieve the highest performance.
-
Page 37: Chipset Coniguration
5.3.2 Chipset Coniguration DRAM Voltage (1.35V) Use this to conigure DRAM Voltage (1.35V). he default value is [Auto]. Refresh Rate 2X Enable or disable Refresh Rate 2X. Primary Graphics Adapter Select a primary VGA. Share Memory Conigure the size of memory that is allocated to the integrated graphics processor when the system boots up. -
Page 38: Onboard Lan
Beebox series Onboard HDMI HD Audio Enable audio for the onboard digital outputs. Onboard LAN Enable or disable the onboard network interface controller. PCIE1 Link Speed Select the link speed for PCIE1. Deep S5 Conigure deep sleep mode for power saving when the computer is shut down. -
Page 39: Storage Coniguration
5.3.3 Storage Coniguration SATA Controller(s) Enable/disable the SATA controllers. SATA Mode Selection AHCI: Supports new features that improve performance. AHCI (Advanced Host Controller Interface) supports NCQ and other new features that will improve SATA disk performance. Aggressive Link Power Management Aggressive Link Power Management allows SATA devices to enter a low power state during periods of inactivity to save power. -
Page 40: Intelrmt Coniguration
Beebox series 5.3.4 IntelRMT Coniguration Intel RMT Support Enable to load Intel RMT (Ready Mode Technology) SSDT table. -
Page 41: Super Io Coniguration
5.3.5 Super IO Coniguration CIR controller Enable or disable the CIR Controller. -
Page 42: Acpi Coniguration
Beebox series 5.3.6 ACPI Coniguration Suspend to RAM It is recommended to select auto for ACPI S3 power saving. ACPI HPET Table Enable the High Precision Event Timer for better performance and to pass WHQL tests. PCIE Device Power On Allow the system to be waked up by a PCIE device and enable wake on LAN. - Page 43 RTC Alarm Power On Allow the system to be waked up by the real time clock alarm. Set it to By OS to let it be handled by your operating system. USB Keyboard/Remote Power On Allow the system to be waked up by an USB keyboard or remote controller. USB Mouse Power On Allow the system to be waked up by an USB mouse.
-
Page 44: Usb Coniguration
Beebox series 5.3.7 USB Coniguration Legacy USB Support Enable Legacy USB Support. AUTO option disables legacy support if no USB devices are connected. DISABLE option will keep USB devices available only for EFI applications. -
Page 45: Platform Trust Technology
5.3.8 Platform Trust Technology Security Device Support Enable to activate Firmware Trusted Platform Module (fTPM) security for your hard disk drives. -
Page 46: Tools
Save UEFI iles in your USB storage device and run Instant Flash to update your UEFI. Internet Flash ASRock Internet Flash downloads and updates the latest UEFI irmware version from our servers for you. Please setup network coniguration before using Internet Flash. - Page 47 Network Coniguration Use this to conigure internet connection settings for Internet Flash. Internet Setting Enable or disable sound efects in the setup utility. UEFI Download Server Select a server to download the UEFI irmware.
-
Page 48: Hardware Health Event Monitoring Screen
Beebox series 5.5 Hardware Health Event Monitoring Screen his section allows you to monitor the status of the hardware on your system, including the parameters of the CPU temperature, motherboard temperature, fan speed and voltage. -
Page 49: Security Screen
5.6 Security Screen In this section you may set or change the supervisor/user password for the system. You may also clear the user password. Supervisor Password Set or change the password for the administrator account. Only the administrator has authority to change the settings in the UEFI Setup Utility. Leave it blank and press enter to remove the password. -
Page 50: Boot Screen
Beebox series 5.7 Boot Screen his section displays the available devices on your system for you to conigure the boot settings and the boot priority. Fast Boot Fast Boot minimizes your computer's boot time. In fast mode you may not boot from an USB storage device. - Page 51 Boot Beep Select whether the Boot Beep should be turned on or of when the system boots up. Please note that a buzzer is needed. Full Screen Logo Enable to display the boot logo or disable to show normal POST messages. AddOn ROM Display Enable AddOn ROM Display to see the AddOn ROM messages or conigure the AddOn ROM if you've enabled Full Screen Logo.
- Page 52 Beebox series CSM (Compatibility Support Module) Enable to launch the Compatibility Support Module. Please do not disable unless you’re running a WHCK test. If you are using Windows 8.1 64-bit and all of your devices support UEFI, you may also disable CSM for faster boot speed.
-
Page 53: Exit Screen
5.8 Exit Screen Save Changes and Exit When you select this option the following message, “Save coniguration changes and exit setup?” will pop out. Select [OK] to save changes and exit the UEFI SETUP UTILITY. Discard Changes and Exit When you select this option the following message, “Discard changes and exit setup?”... - Page 54 Beebox series Contact Information If you need to contact ASRock or want to know more about ASRock, you’re welcome to visit ASRock’s website at http://www.asrock.com; or you may contact your dealer for further information. For technical questions, please submit a support request form at http://www.asrock.com/support/tsd.asp...