ClearSounds CSC1000 Operating Manual
Hide thumbs
Also See for CSC1000:
- User manual (297 pages) ,
- Operating manual (180 pages) ,
- Quick start manual (2 pages)

Related Manuals for ClearSounds CSC1000


Summary of Contents for ClearSounds CSC1000
- Page 1 Operating Manual ® ClearSounds CSC1000 ™ Amplified Freedom Phone ™ with Full ClearDigital Power 1 – ENGLISH...
-
Page 2: Table Of Contents
TABLE OF CONTENTS PRIOR TO USE Congratulations ............pg. 4 Important Safety Instructions ....... pg. 4-6 Location of Controls ..........pg. 7-9 Keys Descriptions ............pg. 10 Installation Steps ..........pg. 11-14 BASIC TELEPHONE FUNCTIONS Amplification ............. pg. 14-15 Ringer Setting ............ pg. 16-17 Visual Indicator ............pg. - Page 3 CALLER ID General Information ..........pg. 34 Receiving & Storing Caller ID Records ....pg. 34-35 Talking Caller ID ............pg. 35 Caller ID on Call Waiting ..........pg. 36 Review Caller ID ............pg. 36 Dial from Caller ID ...........pg. 37 Delete Caller ID ............pg. 37 Store Caller ID ...........
-
Page 4: Prior To Use
PRIOR TO USE INDUSTRY CANADA WARRANTY POLICY Congratulations on your purchase of the CSC1000 phone from ClearSounds Communications®. Please read this User Manual carefully in order to get the best use out of your new telephone. This phone is designed for individuals with mild to severe hearing loss. - Page 5 WARNING: Use only the power supply indicated in the User’s Manual. WARNING: To avoid the possibility of electrical shock, do not use this product near water (For example, near a bathtub, wash basin, kitchen sink or laundry tub, in a wet basement or near a swimming pool) while in the bathtub or shower or when you are wet.
- Page 6 WARNING: Never push any object through the slots in the telephone. They can touch dangerous voltage points or short out parts that could results in risk of fire or electrical shock. WARNING: Do not cover slots and opening on the units, they are needed for ventilation and protection against overheating.
-
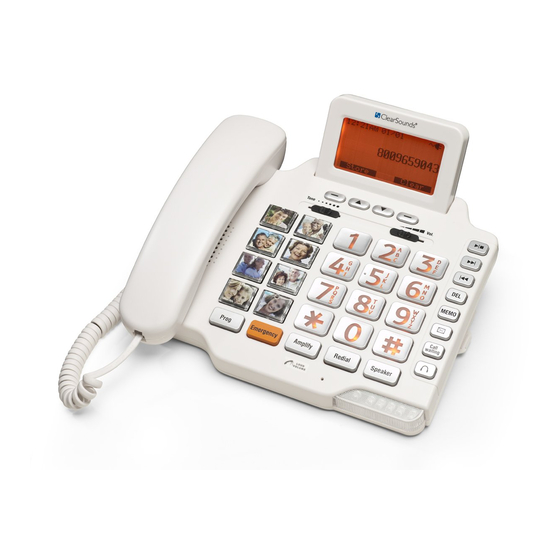
Page 7: Location Of Controls
█ LOCATION OF CONTROLS Diagram 1 01. Hook Switch 16. Headset Key 02. Handset Hanger Tab 17. Message waiting / 03. Large LCD/Caller ID Screen New call LED 04. Left Soft Key 18. In Use LED Indicator 05. Right Soft Key 19. - Page 8 LOCATION OF CONTROLS (continued) BACK SIDE Diagram 2 LEFT SIDE RIGHT SIDE Diagram 3 Diagram 4 LEFT SIDE RIGHT SIDE 34. Audio Headset/ 37. ON/OFF New Call/Voice (3.5mm) Neckloop Jack Mail Indicator Switch 35. Telephone 38. Speakerphone and Ringer (2.5mm) Headset / Neckloop Jack Volume Controls 36.
- Page 9 BACK SIDE 29. Port for (optional) WALL PLATE ClearSounds Bed Shaker ADAPTER 30. RINGER - Strobe & Shaker / Only Shaker / Only Strobe 31. Amplification Reset Override Switch (ON/OFF) 32. AC Power Adapter Jack 33. Phone Line Cord Jack UNDERSIDE 39.
-
Page 10: Keys Descriptions
█ KEYS DESCRIPTIONS (21) Make/Answer/End a call Activates the speakerphone if pressed during a call, as described on page 18 (22) Last number redial, as described on page 27 or insert a pause when pre-dialing a number (6) Up or Down or scroll for menu options. -
Page 11: Installation Steps
ClearSounds® Customer Service Department at 1-800-965-9043. 1. PARTS CHECKLIST Check the contents of the box - The CSC1000 should contain: 1. Handset and handset cord 2. Phone base 3. Telephone line cords (one 6 inch and one 6 ft cord) 4. - Page 12 potential interference, the phone should not be located near electronic equipment, such as personal computers, television or microwave ovens. Begin by removing the clear plastic Caller ID protective tab. This film tab is only for display and to protect your Caller ID display during shipping.
- Page 13 Screw head Wall Diagram 9 Diagram 10 1. Slide the handset hanger tab out and reverse its position (rotate it 180 degrees). Slide it back into place so that the hook points up (see Diagram 6). This will keep the handset from falling out of the cradle when it is mounted on the wall.
-
Page 14: Basic Telephone Functions
BASIC TELEPHONE FUNCTIONS █ Using the Amplification Function Your ClearSounds® CSC1000 is equipped with a specialized amplification function designed to adjust to your needs. You may press the Amplify key to temporarily increase the volume of the handset during a call. To return to normal, press the key again. -
Page 15: Amplification
Please Note: The Amplify key controls both the loudness & tone frequency of the handset. Using the Amplification Reset Override Switch (#31) The ClearSounds® CSC1000 is designed with unique features to protect users from being exposed to dangerous sound levels. You are able to switch between automatic or manual amplification, and you should select the setting that best suits your needs. -
Page 16: Ringer Setting
█ Ringer Setting You can adjust the ringer of your phone as high as +95 dB. There are 2 methods to set this feature. Method 1 (Volume Only) By adjusting volume on the right side of the phone In standby mode, you can adjust the ringer volume by using the Volume Control V- or V+ on the right side of the phone. - Page 17 When the phone rings, the pad will vibrate with each ring of the phone. NOTE: Your ClearSounds® CSC1000 comes from the factory preset to both Strobe & Shaker position. If you would like to override the factory preset, simply change the selection on the back of the phone (see Diagram 2).
-
Page 18: Visual Indicator
█ Using your Visual Indicator The red flashing visual indicator on the base will flash to alert you to new calls received or if you have a voice mail message waiting from your service provider. To turn this feature OFF, see page 34. -
Page 19: Make A Call
2. Adjust your volume by using the volume control V- or V+ located on right side of the phone. 3. To end the call, press the Speaker key again on the base. Using a Headset or Neckloop (see page 20) █... - Page 20 5. To change back from speakerphone to handset use, simply pick up the handset to disable the speakerphone. The speakerphone indicator turns OFF. 6. To change back from handset to speakerphone, simply press the Speaker key and then hang up the handset. The speakerphone indicator turns ON and the handset is disabled.
- Page 21 into the handset, lift the handset, listen for dial tone and dial the number. Speak into the handset and adjust your volume. To end the call, replace the handset to the base. 3. If you are using the 3.5mm Audio jack and want to speak into the speakerphone, press the Speaker key, listen for dial tone and dial the number.
-
Page 22: Menu Navigation/Telephone Setting Menu
MENU NAVIGATION / TELEPHONE SETTING █ MENU To Access a MENU Option 1. To display the menu list, press the Menu soft key. 2. To scroll through menu options, press ▲ or ▼ repeatedly. 3. To select a menu item, Press the Select soft key when the desired menu item appears on the display. -
Page 23: Dialing Mode
█ Dialing Mode Setting Your ClearSounds® CSC1000 comes from the factory preset for touch-tone service. Should you need to change this setting based on the type of telephone service you have, use Tone for touch-tone service or Pulse for rotary dialing. NOTE: If you are not sure which dialing mode to select, please contact your local phone service provider. -
Page 24: Talking Dialing
█ Talking Dialing Setting Your ClearSounds® CSC1000 comes from the factory preset for Talking Dialing Mode set to ON. This feature allows you to pre-dial the number you wish to call and you will hear the number announced as you dial as well as display the numbers on the LCD. -
Page 25: One-Touch Memory
• When reviewing CID records, the phone will announce the number. • When reviewing phonebook entries, the phone will announce the number or recorded message. • When using the Redial function, the phone will announce the number or recorded message. To change this setting: 1. - Page 26 2. Press the Prog key, the display will show “--->?” 3. Press one of the Memory dial keys, the display will show “Saved”. 4. Repeat for each Memory dial key you want to use. After storing the 8 Photo Memory Numbers, you may want to utilize the Memory Card to write down the name or phone number that corresponds with each Photo Key.
-
Page 27: Inserting Photos
█ Inserting Photos In Memory Buttons 1. Cut your photo using the template provided as a guide. 2. Remove the transparent cover of the memory key and insert the photo and replace the cover or slide the photo in the top slot of the cover. █... -
Page 28: Hold Function
Unhold soft key. █ Call Waiting Button (Flash) Your ClearSounds® CSC1000 comes from the factory preset for Caller ID on Call Waiting ON. To change this setting: 1. Press the Menu soft key to display the main menu list. - Page 29 Otherwise, after 1 minute, the display will automatically return to the main screen. Your ClearSounds® CSC1000 comes from the factory preset for Flash Time to 600ms. To change this setting: 1. Press the Menu soft key to display the main menu list.
-
Page 30: Display Setting
DISPLAY SETTINGS Use this feature to customize the display settings according to your needs. █ LCD Contrast Settings 1. Press the Menu soft key to display the main menu list. 2. Press the Select soft key to access Set Display. 3. -
Page 31: Set Hour
If you have Caller ID service, the date and hour will be automatically set when you receive your first call. If you currently do not have Caller ID service through your phone company, please follow the directions below. You can change the format of the time and date to your preference. -
Page 32: Set Weekday
Note: if you select 12 hour clock, AM/PM will appear at the right of the time in standby mode. █ LCD DESCRIPTION Your CSC1000 has a large LCD screen that provides useful information. Your screen has a backlight that automatically switches off after 15 seconds of inactivity. You may permanently turn ON the LCD backlight by using the switch on the back of the display and select the ON position. -
Page 33: Reviewing Voice Mail Messages
If you forget to connect the phone line cord, “No line” will show on the screen. When you press the Menu soft key, the display will show the main menu. Use the ▲or ▼key to scroll through the menu and select the desired one and then press the Select soft key to confirm. -
Page 34: Caller Id
If you have new messages, you will hear a stutter dial tone when you pick up the handset. The CSC1000 has a message indicator light, which will blink when you have new messages and will continue to flash until the message has been retrieved. -
Page 35: Talking Caller Id
REPT in the display. █ Talking Caller ID Setting Your ClearSounds® CSC1000 comes from the factory preset for Talking Caller ID Mode set to ON and will announce the caller’s number between rings. To change this setting: 1. -
Page 36: Caller Id On Call Waiting
█ Caller ID on Call Waiting When you subscribe to Call Waiting Caller ID service from your local telephone provider, the telephone will display the Caller ID information of the second call while you are on the first call. Caller ID info displayed Caller two’s information is displayed 1. -
Page 37: Dial From Caller Id
Dialing a Number from the Caller List Use ▲ or ▼ to locate the desired record. If you need to change the dialing format (7 digits, 10 digits or 11 digits), simply press the * key until you see the desired format of the number you would like to dial. -
Page 38: Answering Machine General Information/Keys Descriptions
and end the recording. Your recording will immediately play back for your confirmation. Number Stored will appear. 5. To exit, press the Exit soft key once to return to the main screen. Otherwise, after 1 minute, the display will automatically return to the main screen. TELEPHONE ANSWERING MACHINE (TAM) OPERATION The answering machine will hold up to 10 minutes of messages. -
Page 39: Turn On/Off Answering Machine
To Turn the Answering Machine ON/OFF 1. Press the Menu soft key to display the main menu list. 2. Press ▲ or ▼ to move to TAM setup and then press the Select soft key. 3. Press the Select soft key to choose TAM ON/OFF. 4. - Page 40 5. Press ▼ to choose Record OGM and then press the Select soft key. Speak clearly into the microphone, which is located below the Redial button. 6. The display will show Record OGM?. Press Yes to confirm or press No to cancel. 7.
-
Page 41: Record A Memo
5. The current OGM will be played. During the process the display will show Playing OGM. You can press the Exit soft key to stop and exit. 6. If you do not like your message, record your message again or restore it to the default one. To Restore the Outgoing Message To delete the recorded OGM and restore it to the default one: 1. - Page 42 and held during the whole process. 2. Release the MEMO key to end the recording. Screening Calls 1. When the answering machine answers the call, listen while the caller leaves a message. 2. To speak to the caller, pick up the handset or press the Speaker key.
- Page 43 Press the [ ►►▌] key once to play the next message. Press the [ ►▌■ ] key once or the Exit soft key to stop playing and exit. Please Note: If you would like to listen to the message(s) through your handset, simply pick up the handset and press the Start Message key [►▌■] and then you will also be able to perform any other message function key.
-
Page 44: Security Id And Remote Access
1. Press the Menu soft key to display the main menu list. 2. Press ▼ to move to TAM setup and then press the Select soft key. 3. Press ▼ to choose Ring number and then press the Select soft key. 4. -
Page 45: Play Message
1. Dial your telephone number from any touch tone telephone. 2. When the outgoing message starts to play, you may enter the remote access mode by inputting the security ID. 3. After you enter the security ID, the system will play the menu of commands. -
Page 46: Add Phonebook Entries
Character Map To enter a specific alphanumeric character, press the relevant key one or more times for the required character according to the following table: once for the first character, twice for the second and so on. Clarification: • If you want to shift the case between upper and lower, between entering letters, press the * key. - Page 47 4. The display shows “Record Voice”. Press the Yes soft key to confirm or the No soft key to cancel. If you press Yes, you can start to record the name of this entry (up to 6 seconds). You can also press the End soft key to confirm and end the recording.
-
Page 48: View Phonebook Entries
█ Viewing the Phonebook Entries 1. Press the PhoneBk soft key to enter the phonebook. 2. Press ▲ or ▼ repeatedly until the desired entry is highlighted. 3. Press the View soft key to view the details. 4. To exit, press the Exit soft twice to return to the main screen. -
Page 49: Vip Setting
• Edit: allows you to edit the selected entry. • Erase: allows you to delete the selected entry. Note: After editing the name, you need to press the ▼ to edit the number. █ VIP Setting This feature allows you to assign one specific melody to everyone in your phonebook. -
Page 50: Troubleshooting
TROUBLESHOOTING No dial tone 1. Check that all phone cord connections (including the curly cord) and AC adapter are security plugged into the telephone and wall jack. 2. Check that the phone is in the correct dialing mode: tone or pulse (page 23). 3. - Page 51 Can’t be heard by other party 1. Check that all phone cord connections are securely plugged into the telephone and wall jack. 2. Make sure extension phones are on the hook at the same time you’re using the phone. It is normal for the volume to drop when additional extension phones are used at the same time.
-
Page 52: Technical Specifications
3.5mm shaker Features and Specifications subject to change without notice. Purchase accessories for Your Clearsounds Phone: Optional Shaker: ClearSounds CS-SHK (connects easily to your phone to signal incoming calls. Optional Neckloop: CS-CLA7V2 (connects easily to your phone’s 2.5mm Telephone Headset jack for hands-free conversations). -
Page 53: Fcc Wants You To Know
[US: CLSTE12BCSC1000 ]. If requested, this number must be provided to the telephone company. 2. If the ClearSounds® CSC1000 Amplified Freedom Phone™ with causes harm to the telephone network, Full ClearDigital Power™... - Page 54 Company or to one of our authorized agents. Service can be facilitated through our office at: ClearSounds Communications, Inc. 1743 Quincy Avenue, Suite 155, Naperville, IL 60540 U.S.A INDUSTRY CANADA CS03 STATEMENT This product meets the applicable Industry Canada technical specification.
- Page 55 If your home has specially wired alarm equipment connected to the telephone line, ensure the installation of the CSC1000 does not disable alarm equipment. If you have questions about what will disable alarm equipment, consult your telephone provider or a qualified installer.
- Page 56 Be sure to save your sale receipt as proof of purchase date should you need warranty service. Your CSC1000 Phone comes with a (1) year limited warranty from the date of purchase. This product is warranted by ClearSounds against manufacturing defect in material and workmanship under normal use.
- Page 57 Authorization number and shipping instructions before shipping the product to us. Any shipment without a (RMA) Return Merchandise Authorization number will not be accepted and will be returned to you at your expense. All authorized returned products must be accompanied with proof of purchase and a brief explanation of the problem.
- Page 58 58 – ENGLISH...
- Page 59 59 – ENGLISH...
- Page 60 Service in United States and Canada, contact: ClearSounds Communications Attention: Repair Center 1743 Quincy Avenue, Suite 155 Naperville, IL 60540 800-965-9043 Check our website www.clearsounds.com for additional information and to download additional manuals and information. 60 – ENGLISH...