Advertisement
- 1 Overview
- 2 Hookup
- 3 Connecting to a Computer
- 4 UC Surface Control Software
- 5 Studio One Artist Quick Start
- 6 Technical Information
- 7 Dinner is Served
- 8 Videos
- 9 Documents / Resources

Overview
Introduction

About this manual: We suggest that you use this manual to familiarize yourself with the features, applications, and correct connection procedures for your Quantum 2626 interface before trying to connect it to your computer. This will help you avoid problems during installation and setup.
Throughout this manual you will find Power User Tips that can quickly make you a Quantum 2626 expert. In addition to the Power User Tips, you will find an assortment of tutorials throughout this manual. These tutorials are designed to help you get the most out of your Quantum 2626 and its suite of companion software.
Companion Products
Thanks for choosing PreSonus! As a solutions company, we believe the best way to take care of our customers (that's you) is to ensure that you have the best possible experience from the beginning of your signal chain to the end. To achieve this goal, we've prioritized seamless integration throughout every design phase of these products from day one. The result is systems that communicate with each other as intended—straight out of the box—without excessive configuration hassles.
We're here for you. Find out more at www.presonus.com.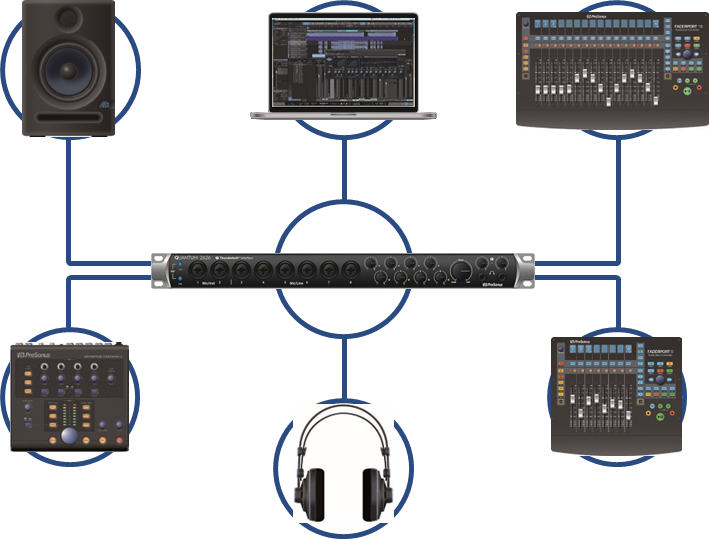
Studio One Artist Features
All PreSonus audio interfaces include PreSonus Studio One Artist recording software, which comes with more than 4 GB of plug-ins, loops, and samples, giving you everything you need for music recording and production. The Quick Start Guide in Section 6 of this manual will help you configure your Quantum 2626 and provide you with a brief overview of Studio One's features.
- Cue Mix provides complete integrated control over all Quantum functions
- Unlimited track count, inserts, and sends
- 20 high-quality, Native Effects™ plug-ins; amp modeling (Ampire), delay (Analog Delay, Beat Delay), distortion (RedLightDist™), dynamics processing (Channel Strip, Compressor, Gate, Expander, Fat Channel, Limiter, Tricomp™), equalizer (Channel Strip, Fat Channel, Pro EQ), modulation (Autofilter, Chorus, Flage, Phaser, X-Trem), reverb (Mixverb™, Room Reverb), and utility (Binaural Pan, Mixtool, Phase Meter, Spectrum Meter, Tuner)
- More than 4 GB of loops, samples, and instruments, featuring: Presence™ XT virtual sample player, Impact virtual drum machine, SampleOne™ virtual sampler, Mai Tai virtual polyphonic analog modeling synth, Mojito virtual analog-modeled subtractive synthesizer
- Innovative and intuitive MIDI mapping
- Powerful drag-and-drop functionality for faster workflow
- Available for macOS and Windows
What is in the Box
Your Quantum 2626 interface package contains the following:

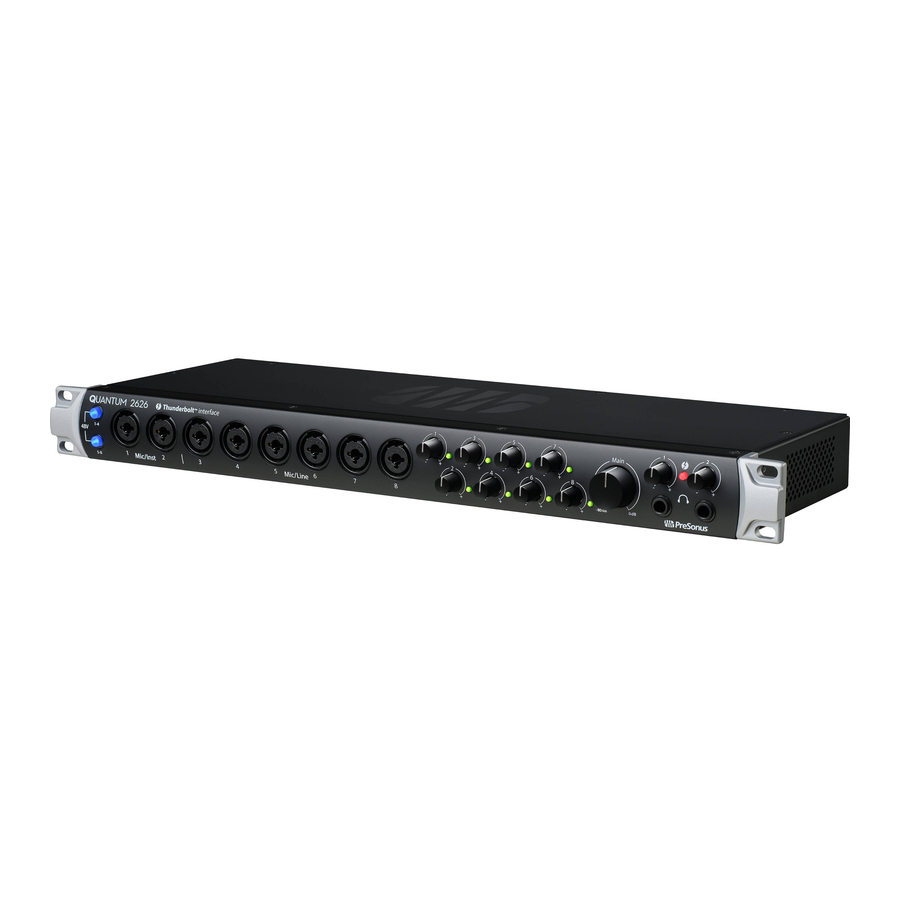
PreSonus Quantum 2626 Thunderbolt Audio Interface and Studio Command Center

External power supply

Quantum 2626 Quick Start Guide

PreSonus Health Safety and Compliance Guide
Power User Tip: All companion software and drivers for your Quantum 2626 interface interface are available for download from your My PreSonus user account. Simply visit http://my.presonus.com and register your Quantum 2626 interface to receive downloads and licenses.
Hookup
Front Panel Connections and Controls

About XMAX Preamps and Combo Jacks. Your Quantum 2626 interface is equipped with 8 PreSonus XMAX microphone preamplifiers for use with all types of microphones. The XMAX design provides a Class A input buffer, followed by a dual-servo gain stage. This arrangement results in ultra-low noise and wide gain control, allowing you to boost signals without increasing noise. The Quantum 2626 provides two Mic/Inst inputs and six Mic/Line inputs on the front panel.
Each analog input on the Quantum 2626 interface features a combo jack. This convenient connector accepts either a ¼-inch phone plug or an XLR plug.
Microphone/Instrument inputs. The ¼-inch TS connectors on Channels 1 and 2 are for use with instruments (guitar, bass, etc.). When an instrument is plugged into the instrument input, the mic preamp is bypassed, and the signal is routed to the instrument preamplifier stage.
Microphone/Line inputs. The ¼-inch TRS connectors on Channels 3 through 8 are for use with line-level sources (synths, keyboards, effects processors, etc.). When a devilce is plugged into the Line input, the mic preamp is bypassed, and the signal is routed to the instrument preamplifier stage.
Please note: As with any audio input device, plugging in a microphone or an instrument, or turning phantom power on or off will create a momentary spike in the audio output of your Quantum 2626 interface. Because of this, we highly recommend that you turn down the channel trim before changing connections or turning phantom power on or off. This simple step will add years to life of your audio equipment.
Preamp Gain: Use this control to adjust the level of the microphone preamps for each Channel.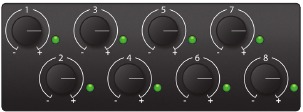
48V: The Quantum 2626 interfaces provide 48V phantom power in two banks of four microphone preamps. When 48V is active, the blue LED at the top of that channel's meters will illuminate.
Phantom power is only required for condenser microphones and can severely damage unbalanced dynamic mics, especially ribbon mics. Therefore, switch phantom power off for all channels where it is not required.
XLR connector wiring for phantom power:
Pin 1 = GND
Pin 2 = +48V
Pin 3 = +48V
Main. The Main knob can control any or all of the outputs on the rear panel of your Quantum 2626 and has a range of -80 dB to 0 dB. In addition to level control, the main outputs have the following controls: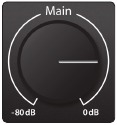
Headphones. Your Quantum 2626 interface provides two headphone outputs, each with its own level control. Both headphone outputs share a stream with the Main Outputs.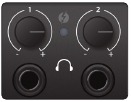
Sync light. This light is the clock source / sync indicator. It lets you know if you unit is receiving word clock correctly.
- Blue. When this light is blue, your Quantum 2626 is correctly synced via Thunderbolt, word clock, ADAT, or S/PDIF
- Flashing red and blue. Quantum 2626 is in the process of trying to sync to a received clock signal.
- Red. Quantum 2626 is either not synced to your computer or its external clock source is not present.
- Flashing purple. The identify button is active in UC Surface.
Power User Tip: Word clock is the timing signal with which digital devices sync frame rates. Proper word clock sync prevents digital devices from having pops, clicks, and distortion in the audio signal due to mismatched digital audio transmission. In general, you will use your Quantum 2626 interface as the master clock in your studio; it provides high-quality word clock for this purpose. However, if you would like to use another device as the master clock, you can set the input source for clocking in UC Surface. See Section 4.1 for details.
Back Panel Connections
Line Outputs. Quantum 2626 interfaces have 8 TRS Balanced Line Outputs to route to external devices, such as headphone amps, signal processors, and additional monitors. Each output has an independent playback stream. Every line output is DC coupled to provide control voltage to external analog equipment. This feature can be used with any plug-in that supports it.
Main Outs. These are the main outputs for Quantum 2626. The output level of the Main Outputs is controlled by the Main level control on the front of the unit. Like the eight line outputs, the main outputs are sourced from playback streams 1 and 2. Both Main Outputs are DC coupled to provide control voltage to external analog equipment. This feature can be used with any plug-in that supports it.
Preamp Outs and Line Returns. These line-level connections for channels 1 and 2 allow you to insert outboard hardware like compressors and EQs into the signal chain.
Line Returns are normalled to the channel 1 and 2 preamp outputs, so they take precedence over the corresponding Mic/Inst input on the front of the Quantum 2626.
Power user tip: the Line Returns can also be used to input line-level devices that have their own volume control; synths, channel strips, preamps, etc.
Word Clock In and Out. These BNC connections allow Quantum 2626 to receive and transmit word clock to and from other digital audio devices.
Power User Tip: In UC Surface, when using the BNC Clock input, you will need to set "BNC" as the Clock Source and set the sample rate to correspond to that of the external device. See Section 4.1 for details. A 75Ω BNC word clock cable is required to achieve proper sync.
S/PDIF In and Out. The S/PDIF connections allow two channels of audio to be transmitted and received at rates up to 24-bit, 96 kHz. The S/PDIF I/O also allows all Quantum 2626 interfaces to send and receive word clock to external digital devices.
Power User Tip: In UC Surface, you will need to set "S/PDIF" as the Clock Source and the sample rate to correspond to the external device when using an external S/PDIF device as your master clock. See Section 4.1 for details.
ADAT – S/MUX In and Out. These are the ADAT – Dual S/MUX connections for your external digital devices. When recording or playing back at 44.1 or 48 kHz, each ADAT I/O will provide 8 of the 16 available channels consecutively, from left to right. When recording or playing back at 88.2 or 96 kHz, each connection will provide four of the available eight channels.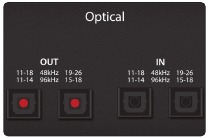
These inputs and outputs do not function at 176.4 or 192 kHz:
| ADAT 1 Input | ADAT 2 Input | ADAT 1 Output | ADAT 2 Output | |
| 44.1 / 48 kHz | Channels 11-18 / 7-14 | Channels 19-26 / 15-22 | Channels 17-24 / 9-16 | Channels 25-32 / 17-24 |
| 88.2 / 96 kHz | Channels 11-14 / 7-10 | Channels 15-18 / 11-14 | Channels 17-20 / 9-12 | Channels 21-24 / 13-16 |
When connecting a DigiMax DP88 to your Quantum interface, the ADAT connections will also send and receive preamp control information for the DigiMax DP88, so that it can be controlled directly from UC Surface or Studio One.
Power User Tip: In UC Surface, you will need to set "ADAT 1" as the Clock Source and the sample rate to correspond to the external device when using an external ADAT device as your master clock. See Section 4.1 for details. The ADAT 2 input cannot be used to receive word clock.
Thunderbolt port. Use this port to connect your Quantum 2626 interface to your computer.
Note: If your computer has Thunderbolt 2 ports, you'll need a bi-directional Thunderbolt 3 to Thunderbolt 2 adapter.
MIDI I/O. These are the MIDI input and output connections. MIDI stands for "Musical Instrument Digital Interface." However, MIDI can be used for many things other than instruments and sequencing. The MIDI inputs and outputs allow connection to a variety of MIDI-equipped hardware, such as keyboard controllers, and can be used to send and receive MIDI Machine Control and MIDI Time Code.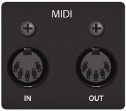
Note: MIDI does not carry audio signals but is frequently used to trigger or control an audio source, such as a virtual instrument or hardware synthesizer. You should ensure that MIDI data is correctly sent and received by the appropriate hardware or software. You may also need to route hardware sound sources' audio to the inputs of your Quantum 2626 interface. Please consult the User's Manual of your MIDI devices for help with MIDI setup and usage.
Power Button. This turns your Quantum 2626 on and off.
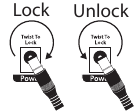
Power Connection. This is where you connect the Quantum 2626 interface's external power supply. Your Quantum interface is equipped with a twist-lock power connection, keep this in mind when connecting disconnecting it from your interface.
Quantum Hookup Diagram
See www.presonus.com for the latest system requirements.
DigiMax-series preamps or other compatible hardware
Connecting to a Computer
Your Quantum 2626 interface is loaded with professional audio tools and flexible monitoring controls. Before connecting to a computer, please visit www.presonus.com/products/Quantum/techspecs to verify the latest system requirements.
Note: The speed of your processor, amount of RAM, and capacity, size, and speed of your hard drives will greatly affect the overall performance of your recording system. A faster processor and more RAM can reduce signal latency (delay) and improve overall performance.
The Universal Control installer for macOS and Windows is available for download from your My PreSonus user account. This bundled installer includes Universal Control, UC Surface, and the audio driver for your Quantum 2626. To begin, you must first visit http://my.presonus.com, create or log into your user account, and register your Quantum 2626 interface. Once registered, all software downloads will be available from within your My PreSonus user account.
Installation for Windows and macOS
Connect your Quantum 2626 interface to an available Thunderbolt port and launch the Universal Control installer. The installer will take you through each step of the installation process. This application will install the macOS or Windows drivers as well as UC Surface. Please read each message carefully.
It is recommended that you quit all applications before you start the installation.
The Universal Control installer will take you through each step of the installation process.
Using a Quantum 2626 Interface with Popular Audio Applications
Complete setup instructions for Studio One Artist and a brief tutorial on its features can be found in Section 6 of this manual. However, you can use your Quantum 2626 interface with any audio-recording application that supports Core Audio or ASIO. Please consult the documentation that came with your audio application for specific instructions on how to select the Quantum 2626 interface driver as the audio-device driver for your software.
Below are basic driver-setup instructions for a few popular audio applications.
Ableton Live
- Launch Ableton Live.
- Go to Options | Preferences | Audio.
- Choose Driver Type: ASIO | Audio Device: ASIO PreSonus Quantum 2626 Go to Input Config: Enable and select the desired Input channels.
- Go to Output Config: Enable and select the desired Output channels.
Apple Logic
- Launch Logic.
- Go to Logic | Preferences | Audio.
- Click on the Devices Tab.
- On the Core Audio tab, check Enabled.
- Select PreSonus Quantum 2626 from the device menu.
- You will be asked if you'd like to relaunch Logic. Click try (re)launch.
- Your Quantum 2626 features custom I/O labels for faster workflow. To enable these labels for use in Logic, go to Options | Audio | I/O Labels.
- The second column in the pop-up window will be named Provided by Driver. Activate each of these labels for your Quantum 2626. When you are done, close this window.
Avid Pro Tools 10+
- Launch Pro Tools.
- Go to Setup | Hardware and select Quantum 2626 from the Peripherals list. Click OK.
- Go to Setup | Playback Engine and select Quantum 2626 from the menu at the top of the window. Click OK.
Cakewalk by Bandlab
- Launch Cakewalk by Bandlab.
- Go to Edit | Preferences
- In the Devices tab, uncheck the output driver for the Generic Low Latency Driver. This is usually on by default, and will not let you check anything unless it's unchecked.
- Check all the Quantum input and output driver boxes
- Click the "Apply" and "OK" buttons.
- Click the Driver Settings tab
- Set the Playback Timing Master to "Quantum ASIO driver Main Out L/Line Out 1"
- Set the Record Timing Master to: "Quantum ASIO driver Mic/Instrument In 1" 9. Click the "Apply" and "OK" buttons.
Steinberg Cubase
- Launch Cubase.
- Go to Devices | Device Setup.
- Select "VST Audio System" from the Devices column in the Device Setup.
- Select PreSonus Quantum 2626 from the ASIO Driver dropdown list.
- Click "Switch" to begin using the Quantum 2626 driver.
- Once you have successfully changed the driver, go to Devices | VST Connections to enable your input and output buses.
UC Surface Control Software
UC Surface is a powerful control software for your Quantum 2626 interface. These control functions are completely integrated inside Studio One. UC Surface allows users of other popular DAW applications to access these functions. UC Surface provides preamp level controls, phantom power, line-level input sensitivity switching, main encoder assignments, and, for Quantum 2626 users, mute/dim and mono functions.
UC Surface is designed to verify that your Quantum 2626 interface has the correct firmware version installed. You will be prompted if your Quantum 2626 interface needs its firmware updated. Click on the Update Firmware button to begin the update.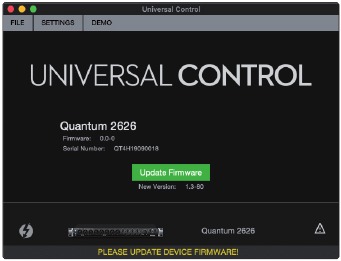
Do not power off or disconnect your Quantum 2626 interface during the firmware update. Once the firmware update is successfully completed, you will be alerted and instructed to disconnect your power supply and Thunderbolt cable and reconnect it before rebooting your device. It is not sufficient to simply power down your unit, you must disconnect the power source.
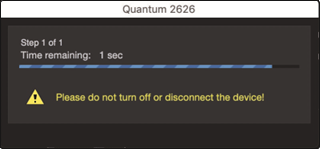
When the firmware update is complete, you must disconnect the physical power source from your Quantum 2626 interface and reconnect it. Powering it off it will not complete the update process.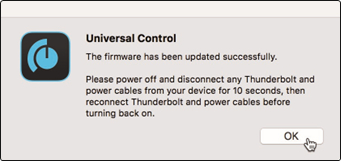
UC Surface Launch Window
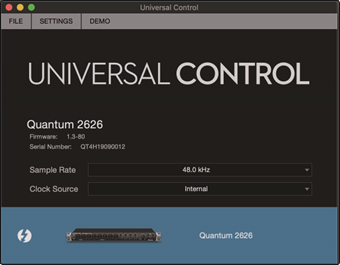
Sample Rate. Changes the sample rate.
You can set the sample rate to 44.1, 48, 88.2, 96, 176.4, or 192 kHz. A higher sample rate will increase the fidelity of the recording but will increase the file size and the amount of system resources necessary to process the audio.
Clock Source. Sets the digital clock source.
From this menu, you can set the clock source for your Quantum 2626 interface: Internal, External S/PDIF, or External ADAT.
Please note: Only ADAT 1 can be used as a clock source input for your Quantum 2626.
ADAT Inputs
When a DigiMax DP88 is connected to your Quantum interface's ADAT Input and Output, you will be presented with ADAT controls, allowing you to remote control your DigiMax DP88's preamps and phantom power.
RTA
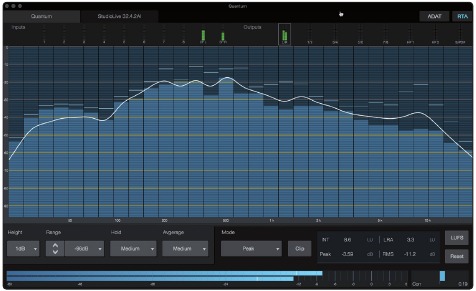
UC Surface provides a real-time analyzer (RTA) in which x = frequency and y = amplitude for every input and output. An RTA provides a close visual representation of what you are hearing. It provides a view of the long-term spectrum of the signal, such as the one third-octave spectrum long-term average of a musical performance.
To enable the RTA for any input or output, select its meter from the top of the screen.
The Quantum RTA provides several customization features that allow you to view the RTA in the way that is most useful for your application.
Height. This provides a more or less granular display for the RTA.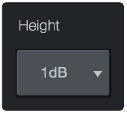
Range. Use the Range controls to set the upper and lower decibel limits that the RTA will display.
Hold. Use this control to set the peak hold time for each band of the RTA.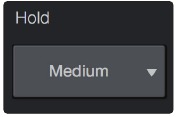
Average. Averaging is a mathematical process that takes multiple data samples and performs division to acquire a statistically more accurate calculation of the response. That's a technical way of saying that it slows down the "real-time" of a real-time analyzer.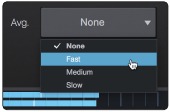
At the bottom of the screen, you will find the signal meter.
This meter can be customized for your application.
Meter Style. This menu allows you to change the type of output metering displayed at the bottom of the screen.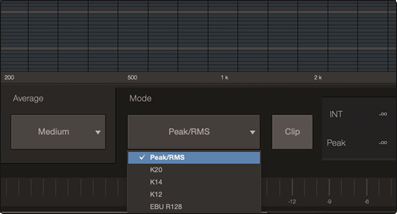
- Peak. This type of metering displays the instantaneous level of the audio signal.
- K-20, K-14, and K-12. K-System metering displays loudness metering and dynamic range. Select the scale based on the genre or media format. K-20 is used for film, classical music, and high-fidelity recordings. It provides the most dynamic range visualization. K-14 is used for mainstream pop, rock, and country. K-12 is used for broadcast and radio and provides the least dynamic range visualization.
- EBU R128. Displays the perceived loudness of the signal based on the EBU R128 standard.
Studio One Artist Quick Start
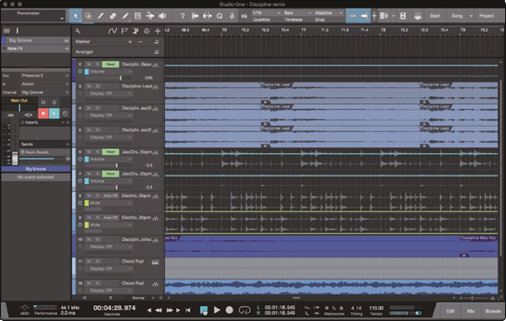
All PreSonus professional recording products come with Studio One Artist recording and production software. Whether you are about to record your first album or your fiftieth, Studio One Artist provides you with all of the tools necessary to capture and mix a great performance. PreSonus audio interfaces also have access to advanced functions in Studio One's exclusive Cue Mix feature for PreSonus interfaces.
Power User Tip: As a valued PreSonus customer, you are eligible for a discount upgrade to Studio One Professional. For more details on the Studio One upgrade program for PreSonus customers, please visit http://studioone.presonus.com/.
Installation and Authorization
Once you have installed the drivers for your audio interface and connected it to your computer, you can use the included PreSonus Studio One Artist musicproduction software to begin recording, mixing, and producing your music. To install Studio One Artist, log into your My PreSonus account and register your interface. Your product key for Studio One Artist will automatically be registered to your My PreSonus account with your hardware registration.
Downloading and running the Studio One installer.
To install Studio One Artist, download the Studio One Artist installer from your My PreSonus account to the computer on which you will use it.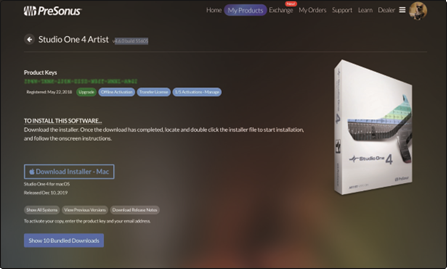
- Windows users: Launch the Studio One Artist installer and follow the onscreen instructions.
- Mac users: Drag the Studio One Artist application into the Applications folder on your Mac hard drive.
Authorizing Studio One
When Studio One is launched for the first time on your computer, it will communicate with your My PreSonus account and verify your registration. To ensure a seamless authorization process, make sure to download your installer to the computer on which you will be using it and be sure that your computer is connected to the Internet when you launch the application for the first time.
Installing bundled content for Studio One Artist.
Studio One Artist comes bundled with an array of demo and tutorial materials, instruments, loops, and samples. The Studio One Artist bundle includes all that you need to begin producing music.
The first time you launch Studio One Artist, you will be prompted to install its companion content. Select the content you wish to add and click "Install." The content will automatically begin to download and install from your My PreSonus user account.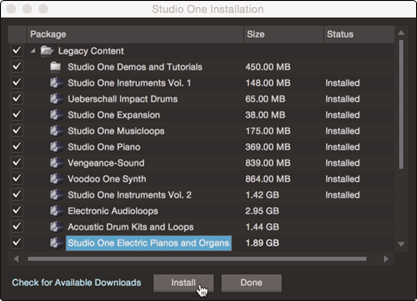
Power User Tip: You may be prompted to enter your My PreSonus user account information. Clicking "Remember Credentials" will allow you to have immediate access to any content you purchase from the PreSonus Marketplace.
Setting Up Studio One
Studio One Artist was designed to work with PreSonus interfaces and provides unique interoperability and simplified setup. When Studio One Artist is launched, by default you will be taken to the Start page. On this page, you will find document-management and device-configuration controls, as well as a customizable artist profile, a news feed, and links to demos and tutorials from PreSonus. If you have an Internet connection on your computer, these links will be updated as new tutorials become available on the PreSonus Web site.
Complete information on all aspects of Studio One Artist is available in the Reference Manual PDF located within Studio One. The information in this tutorial covers only the basic aspects of Studio One Artist and is intended to get you set up and recording as quickly as possible.
Configuring Audio Devices
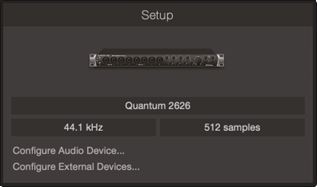
- In the middle of the Start page, you will see the Setup area. Studio One Artist automatically scans your system for all available drivers and selects a driver. By default, it will choose a PreSonus driver if one is available.
![PRESONUS - Quantum 2626 - Configuring Audio Devices Step 1 Configuring Audio Devices Step 1]()
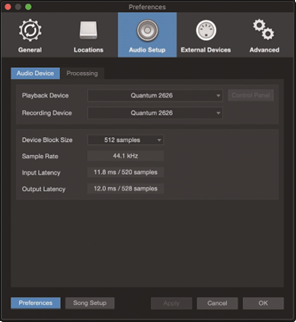
- If you do not see your device listed on the Start page when you launch Studio One, click on the Configure Audio Devices link in the Setup area to open the Options window.
![PRESONUS - Quantum 2626 - Configuring Audio Devices Step 2 Configuring Audio Devices Step 2]()
In the Options window, click on the Audio Setup tab and select your device driver from the pull-down.
Configuring MIDI Devices
From the External Devices window in Studio One Artist, you can configure your MIDI keyboard controller, sound modules, and control surfaces. This section will guide you through setting up your MIDI keyboard controller and sound modules. Please consult the Reference Manual located within Studio One for complete setup instructions for other MIDI devices.
If you are using a third-party MIDI interface or USB MIDI-controller keyboard, you must install any required drivers for these devices before beginning this section. Please consult the documentation that came with your MIDI hardware for complete installation instructions.
If you do not have any MIDI devices, please skip to Section 5.3.
Setting up an external MIDI keyboard controller from the Start page.
A MIDI keyboard controller is a hardware device that is generally used for playing and controlling other MIDI devices, virtual instruments, and software parameters. In Studio One Artist, these devices are referred to as Keyboards, and they must be configured before they are available for use. In some cases, your MIDI keyboard controller is also used as a tone generator. Studio One Artist views the controller and tone-generation functions as two different devices; a MIDI keyboard controller and a sound module. The MIDI controls (keyboard, knobs, faders, etc.) will be set up as a Keyboard. The sound modules will be set up as an Instrument.
You can set up your external MIDI devices from the Setup area in the Start page. Before setting up a new Song for recording, take a moment to configure external devices.
Make sure you have connected the MIDI Out of your external MIDI controller to a MIDI In on your PreSonus audio interface (if available) or other MIDI interface. If you are using a USB MIDI controller, connect it to your computer and power it on.
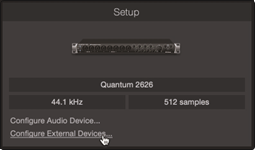
- Click on the Configure External Devices link in the Setup area on the Start page to launch the External Devices window.
![PRESONUS - Quantum 2626 - Setting up an external MIDI keyboard controller from the Start page Step 1 Setting up an external MIDI keyboard controller from the Start page Step 1]()
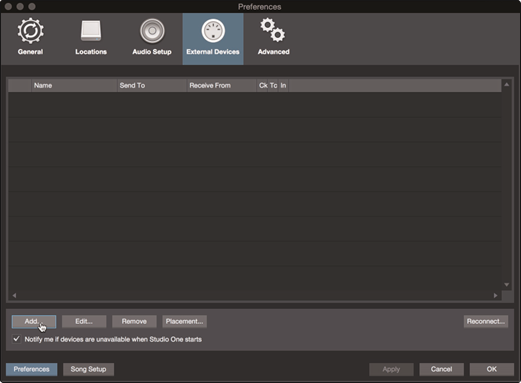
- Click the Add button. This will launch the Add Device window.
![PRESONUS - Quantum 2626 - Setting up an external MIDI keyboard controller from the Start page Step 2 Setting up an external MIDI keyboard controller from the Start page Step 2]()
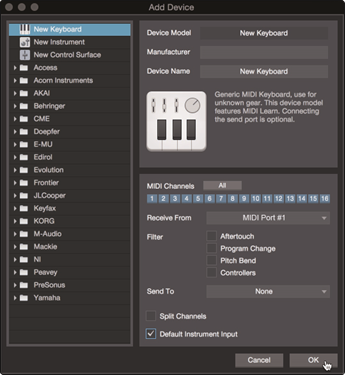
- From the menu on the left, select your MIDI controller from the list of manufacturers and models. If you do not see your MIDI controller listed, select New Keyboard. At this point, you can customize the name of your keyboard by entering the manufacturer and device names.
![PRESONUS - Quantum 2626 - Setting up an external MIDI keyboard controller from the Start page Step 3 Setting up an external MIDI keyboard controller from the Start page Step 3]()
- You must specify which MIDI channels will be used to communicate with this keyboard. For most purposes, you should select all MIDI channels. If you are unsure of which MIDI channels to choose, select all 16.
- Studio One allows you to filter out specific control functions. If you would like Studio One to ignore Aftertouch, Pitch Bend, Program Change, or All CC messages, enable filtering for any or all of these messages.
- In the Receive From drop-down menu, select the MIDI interface input from which Studio One Artist will receive MIDI data (that is, the MIDI port to which your keyboard is connected).
Power User Tip: In the Send To drop-down menu, select the MIDI interface output from which your Studio One Artist will send MIDI data to your keyboard. If your keyboard controller doesn't need to receive MIDI data from Studio One, you can leave this unselected. - If this is the only keyboard that you will use to control your external synthesizers and virtual instruments, you should check the box next to Default Instrument Input. This will automatically assign your keyboard to control all MIDI devices in Studio One Artist.
- Click OK.
If you have a sound module that you'd like to connect, leave the External Devices window open and proceed to the next part of this section. If not, you can close the window and skip to Section 6.3.
Setting up an external MIDI sound module from the Start page.
MIDI instrument controllers (keyboards, MIDI guitars, etc.) send musical information in the form of MIDI data to tone modules and virtual instruments, which respond by generating sound, as instructed. Tone modules can be standalone sound devices or can be integrated into a MIDI instrument, such as a keyboard synthesizer. Studio One Artist refers to all tone generators as Instruments. Once you have set up your MIDI keyboard controller, take a moment to configure your sound module.
Make sure you have connected the MIDI In of your external sound module to the MIDI Out of your MIDI interface.
- In the External Devices window, click the Add button.
![PRESONUS - Quantum 2626 - Setting up an external MIDI sound module from the Start page Step 1 Setting up an external MIDI sound module from the Start page Step 1]()
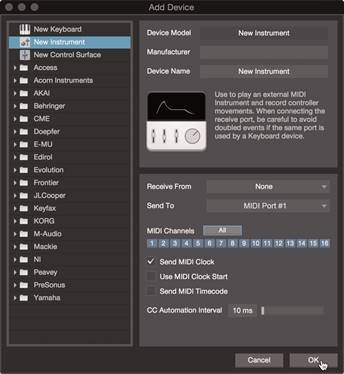
- Select your device in the menu on the left. If your device is not listed, select New Instrument. At this point you can customize the name of your keyboard by entering the manufacturer and device names.
![PRESONUS - Quantum 2626 - Setting up an external MIDI sound module from the Start page Step 2 Setting up an external MIDI sound module from the Start page Step 2]()
- Specify which MIDI channels will be used to communicate with this sound module. For most purposes, you should select all MIDI channels. If you are unsure of which MIDI channels to select, we suggest you select all 16.
- In the Send To menu, select the MIDI interface output from which Studio One Artist will send MIDI data to your sound module. Click OK and close the External Devices window. You are now ready to start recording in Studio One Artist.
The rest of this Quick Start Guide will go over how to set up a Song and will discuss some general workflow tips for navigating through the Studio One Artist environment.
Creating a New Song
Now that you've configured your audio and MIDI devices, let's create a new Song. We'll start by setting up your default audio I/O.
- From the Start page, select Create a New Song.
![PRESONUS - Quantum 2626 - Creating a New Song Step 1 Creating a New Song Step 1]()
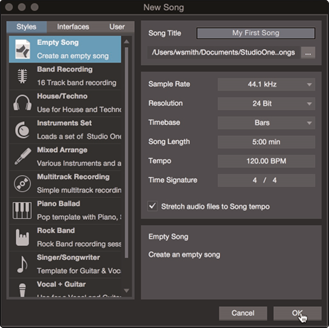
- In the New Song window, name your Song and choose the directory in which you'd like it saved. You'll notice a list of templates on the left. These templates provide quick setups for a variety of devices and recording situations. The section will describe creating a Song from an empty session.
![PRESONUS - Quantum 2626 - Creating a New Song Step 2 Creating a New Song Step 2]()
- Select Empty Song from the Templates list. At this point, you should give your Song a name and select your preferred sample rate and bit depth for recording and playback. You can also set the length of your Song and the type of time format you would like the timeline to follow (notation bars, seconds, samples, or frames). Click the OK button when you are finished.
Power User Tip: If you plan to import loops into your Song, make sure that the Stretch Audio Files to Song Tempo option is selected. This will automatically import loops at the correct BPM.
Configuring Your I/O
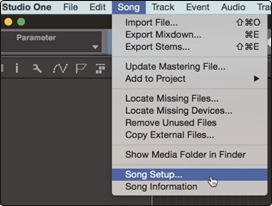
- Click on Song | Song Setup to set your sample rate and resolution and configure your audio I/O.
![PRESONUS - Quantum 2626 - Configuring Your I/O Step 1 Configuring Your I/O Step 1]()
- Click on the Audio I/O Setup tab.
![PRESONUS - Quantum 2626 - Configuring Your I/O Step 2 Configuring Your I/O Step 2]()
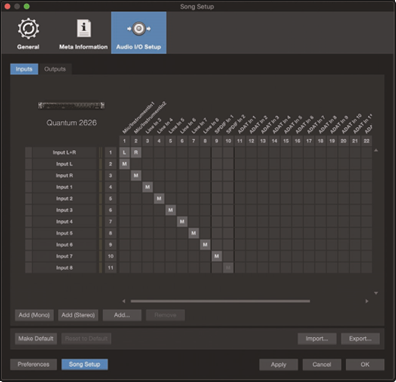
- From the Inputs tab, you can enable any or all of the inputs on your PreSonus Quantum audio interface that you'd like to have available. We recommend that you create a mono input for each of the inputs on your interface. If you plan on recording in stereo, you should also create a few stereo inputs.
![PRESONUS - Quantum 2626 - Configuring Your I/O Step 3 Configuring Your I/O Step 3]()
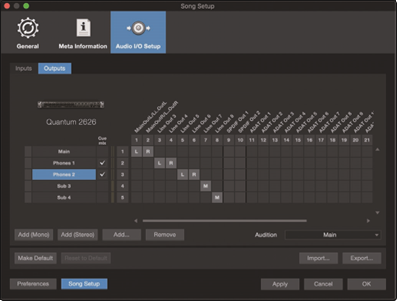
Power User Tip: If you plan on using the Talkback mic, you will need to enable it as an input for your session and create a track for it. - Click on the Outputs tabs to enable any or all of the outputs on your Quantum audio interface. In the lower right corner, you will see the Audition select menu. This allows you to choose the output from which you will audition audio files prior to importing them into Studio One Artist. In general, you will want this to be the main output bus.
![PRESONUS - Quantum 2626 - Configuring Your I/O Step 4 Configuring Your I/O Step 4]()
Power User Tip: If you would like this I/O configuration to be the same every time you open Studio One, click the Make Default button.
Studio One allows you to create monitor mixes right from the console. To enable this function, you must designate at least one output pair to be a Cue Mix output. Click on the Cue Mix box next to any output pair you'd like to use as a monitor mix output to enable this feature. For more information, see Section 5.4.
Creating Audio and MIDI Tracks
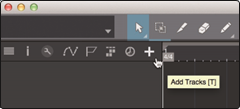
- In the upper left corner of the Arrange window, you will notice several buttons. The button furthest to the right is the Add Tracks button. Click on this button to open the Add Tracks window.
![PRESONUS - Quantum 2626 - Creating Audio and MIDI Tracks Step 1 Creating Audio and MIDI Tracks Step 1]()
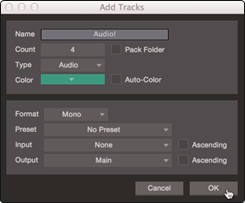
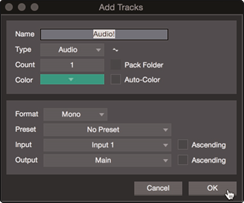
- In the Add Tracks window, you can customize the track name and color, add a preset rack of effects, and set the physical source for the input and output of your audio tracks. Most important, you can select the number and type of tracks you'd like to create.
![PRESONUS - Quantum 2626 - Creating Audio and MIDI Tracks Step 2 Creating Audio and MIDI Tracks Step 2]()
- Audio. Use this track type to record and playback audio files.
- Instrument. Use this track to record and playback MIDI data to control external MIDI devices or Virtual Instrument plug-ins.
- Automation. This track type lets you create automated parameter controls for your session.
- Folder. This track helps you to manage your session as well as to quickly edit multiple tracks at once.
Power User Tip: If you would like to add an audio track for each of the available inputs, simply go to Track | Add Tracks for All Inputs.
Track anatomy: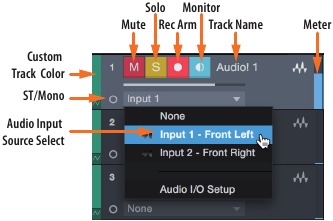
Note: MIDI tracks are nearly identical to Audio tracks. The Input Source list for MIDI tracks lists available external MIDI devices as well as any virtual instruments that have been added to the Song.
Recording an Audio Track
- To begin recording, create an audio track from the Add Tracks window, set its input to Input 1 on your Quantum 2626 interface, and connect a microphone to the same input.
![PRESONUS - Quantum 2626 - Recording an Audio Track Step 1 Recording an Audio Track Step 1]()
- Select Record Enable on the track. Turn up the Input 1 level on your audio interface while speaking/singing into the microphone. You should see the input meter in Studio One Artist react to the input. Adjust the gain so the input level is near its maximum without clipping (distorting).
![PRESONUS - Quantum 2626 - Recording an Audio Track Step 2 Recording an Audio Track Step 2]()
You are now ready to start recording. For complete instructions, please consult the Studio One Reference manual located in Help | Studio One Reference Manual.
Adding Virtual Instruments and Effects
You can add plug-ins and instruments to your Song by dragging-and-dropping them from the browser. You can also drag an effect or group of effects from one channel to another, drag in customized effects chains, and instantly load your favorite virtual-instrument preset without ever scrolling through a menu.
Opening the browser.
In the lower right corner of the Arrange window are three buttons:
- The Edit button opens and closes the audio and MIDI editors.
- The Mix button opens and closes the Mixer window.
- The Browse button opens the browser, which displays all of the available virtual instruments, plug-in effects, audio files, and MIDI files, as well as the pool of audio files loaded into the current session.
Drag-and-drop virtual instruments.
To add a virtual instrument to you session, open the browser and click on the Instrument button. Select the instrument or one of its patches from the instrument browser and drag it into the Arrange view. Studio One Artist will automatically create a new track and load the instrument as the input.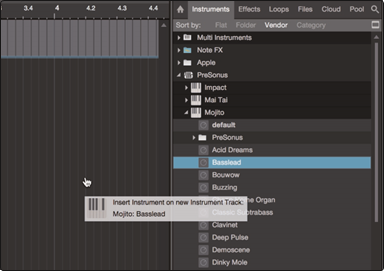
Drag-and-drop effects.
To add a plug-in effect to a track, click the Effects button in the browser and select the plug-in or one of its presets in the effects browser. Drag-and-drop the selection over the track to which you would like to add the effect.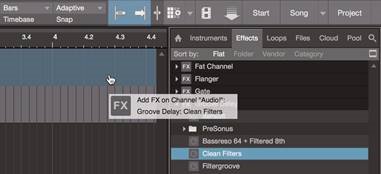
Drag-and-drop audio and MIDI files.
Audio and MIDI files can be quickly located, auditioned, and imported into your Song by dragging them from the file browser into the Arrange view. If you drag the file to an empty space, a new track will be created with that file placed at the position to which you dragged it. If you drag the file to an existing track, the file will be placed as a new part of the track.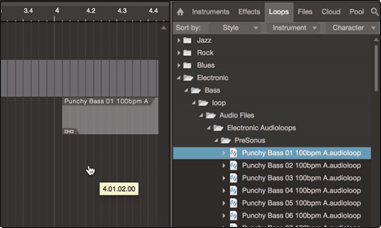
Monitor Mixing in Studio One
You can set up monitor mixes with your Quantum 2626 interface using Studio One's unique Cue Mix feature. This feature takes over the monitor mix control software for your Quantum 2626 interface and provides level and pan control from within Studio One. Simply designate a pair or pairs of outputs as a cue mix, and you'll find the Cue Mix controls in your Studio One mixer.
You can create a cue mix and send it to any output on your Quantum (Mains, Headphones, General Purpose, ADAT, or S/PDIF). You simply need to create an output bus and enable Cue Mix.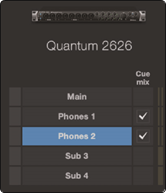
Power User Tip: It is possible to designate the main output as a cue mix. This is helpful if you often record yourself and require quick access to monitoring for live inputs. When the main output is designated as a Cue Mix, a button will appear on any audio channel, with an assigned audio input in the Console, below the Mute, Solo, Record, and Monitor buttons.
Cue Mix Functions
Once you have created a cue mix output, you will notice a special Send object in the channels of the Console. This Send object is called a Cue Mix object.
In the Small Console view, Cue Mix objects appear in the far left column of the extended channel.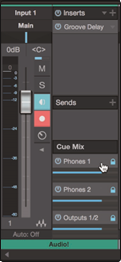
In the Large Console view, Cue Mix objects appear below the Send device rack on each channel.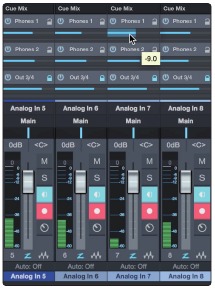
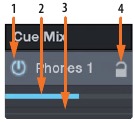
- Activate Button. To completely remove any channel from a Cue Mix, simply deactivate the Cue Mix object for that channel. In most instances, you will leave this enabled.
- Horizontal Level Fader. This is the channel's Cue Mix volume control. By default this level will be identical to the level set on the channel's fader. Once you move the Cue Mix level fader, the volume of that channel in the Cue Mix will be independent of the main mix or any other cue mix in the session.
- Pan Control. This sets the pan position for the channel in the Cue Mix outputs. Like volume, panning is identical to the main mix by default.
- Lock to Channel button. By default, the Lock to Channel button is enabled, and level and pan values are locked to the Channel level and pan controls for the Main mix. This means that each Cue Mix will be identical to the Main mix in the Console. Changing the level or panning in the Main mix will change the level or panning in the Cue Mix. However, changing the level or panning in the Cue Mix object will unlock both settings, allowing independent control of level and panning for each channel in each Cue Mix. Thus, the level and panning for channels in a Cue Mix can be completely different from the related level and pan in the Main mix. At any time, you can lock the Cue Mix level and pan back to the channel settings by clicking on the Lock to Channel button.
Punching In
The Quantum 2626's unique integration with Studio One and ultra-low latency performance make punching in easier than ever. This section will guide you through setting up a punch in so that there is no change sonically between audio you're playing back and the audio you're recording.
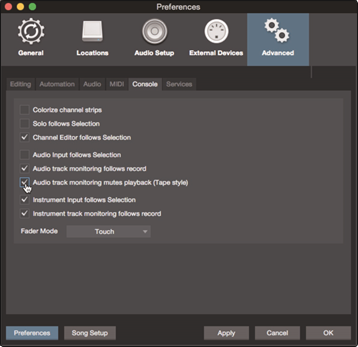
- Before you begin, go to Studio One>Preferences and click on the Advanced tab.
![PRESONUS - Quantum 2626 - Punching In Step 1 Punching In Step 1]()
- On the Console preference tab, check the box next to "Audio track monitoring mutes playback (Tape Style). This will allow you use Cue Mix to monitor during a punch in. Click Apply and then OK.
![PRESONUS - Quantum 2626 - Punching In Step 2 Punching In Step 2]()
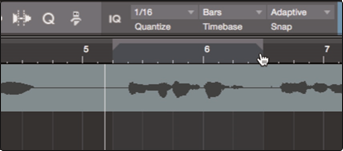
- After you have recorded your audio, set the punch in and out points in the timeline.
![PRESONUS - Quantum 2626 - Punching In Step 3 Punching In Step 3]()
- Enable the Autopunch button the left of the Metronome settings in the transport.
![PRESONUS - Quantum 2626 - Punching In Step 4 Punching In Step 4]()
- Record Arm your track, making sure to disable input monitoring.
You're now ready to punch in. Simply rewind to the point in the song at which you'd like to start and click record.![PRESONUS - Quantum 2626 - Punching In Step 5 Punching In Step 5]()
Technical Information
Specifications
| Microphone Preamp (XLR Balanced) | |
| Type | XLR Female (via Combo), Balanced Remote |
| Maximum Input level | +10 dBu (Balanced, min. gain) |
| Gain Control Range | 60 dB |
| Frequency Response | 20 Hz to 20 kHz (+/- 0.15 dB, unity gain, 48 kHz) |
| Dynamic Range | > 110 dB (A-wtd, min. gain) |
| Total Harmonic Distortion | < 0.005% (1 kHz, min. gain) |
| EIN | < -131 dBu (max gain, 40Ω, 22 kHz BW, A-wtd) |
| Input Impedance | 1.6kΩ |
| Phantom Power | +48V, > 8 mA per input |
| Instrument Inputs | |
| Type | ¼" TS Female (via Combo), Unbalanced |
| Maximum Input Level | +15 dBu (Unbalanced, min. gain) |
| Gain Control Range | 60 dB |
| Frequency Response | 20 Hz to 20 kHz (+/- 0.15 dB, unity gain, 48 kHz) |
| Dynamic Range | > 106 dB (A-wtd, min. gain) |
| Total Harmonic Distortion | < 0.005% (1kHz, min. gain) |
| Input Impedance | > 1 MΩ |
| Line Inputs | |
| Type | ¼" TRS Female (via Combo), Balanced |
| Maximum Input Level | +18 dBu (Balanced, min. gain) |
| Frequency Response | 20 Hz to 20 kHz (+/- 0.15 dB, unity gain, 48 kHz) |
| Dynamic Range | > 118 dB (A-wtd, min. gain) |
| Total Harmonic Distortion | < 0.005% (1 kHz, min. gain) |
| Input Impedance | 10 kΩ |
| Line Outputs | |
| Type | ¼" TRS Female, impedance balanced, DC Coupled |
| Maximum Output Level | +18 dBu (Balanced) |
| Frequency Response | 20 Hz to 20 kHz (+/- 0.15 dB, unity gain, 48 kHz) |
| Dynamic Range | > 118 dB (A-wtd) |
| Total Harmonic Distortion | < 0.0035% (1 kHz, +4 dBu) |
| Output Impedance | 51Ω |
| Main Outputs | |
| Type | ¼" TRS Female, impedance balanced |
| Maximum Output Level | +18 dBu (Balanced) |
| Frequency Response | 20 Hz to 20 kHz (±0.05 dB, unity gain, 48 kHz) |
| Dynamic Range | > 118 dB (A-wtd) |
| Total Harmonic Distortion | < 0.0035% (1 kHz, +4 dBu) |
| Output Impedance | 51Ω |
| Headphone Outputs | |
| Type | ¼" TRS Female, Stereo, Unbalanced, x2 |
| Maximum Output Level | 175 mW/channel (56Ω load) |
| Frequency Response | 20 Hz to 20 kHz (±0.5 dB, 48 kHz) |
| Dynamic Range | > 110 dB (A-wtd) |
| Total Harmonic Distortion | < 0.03% (1 kHz) |
| Headphone Impedance (working range) | 16Ω to 300Ω |
| Crosstalk | |
| Input to Input | < -110 dB |
| Output to Output | < -115 dB |
| Input to Output | < -120 dB |
| Signal Level LED | |
| Clip | -0.5 dBFS |
| Signal | -50 dBFS |
| Digital Audio | |
| Connection Type | Thunderbolt 3 |
| ADC Dynamic Range | 115 dB (A-wtd) |
| DAC Dynamic Range | 115 dB (A-wtd) |
| Bit Depth | 24 bits |
| Internally Supported Sample Rates | 44.1, 48, 88.2, 96, 176.4, 192 kHz |
| Clock | |
| Jitter | < 70 ps RMS (20 Hz – 20 kHz) |
| Jitter Attenuation | > 60 dB (1 ns in => 1 ps out) |
| Power | |
| 12 VDC, 5A, external power supply | |
| Clock | |
| Jitter | < 70 ps RMS (20 Hz – 20 kHz) |
| Jitter Attenuation | >60 dB (1 ns in => 1 ps out) |
| Physical | |
| Height | 1.75" (44.45 mm) |
| Width: | 19" (482.6 mm) |
| Depth | 7" (177.8 mm) |
| Weight: | 6 lbs (2.72 kg) |
Dinner is Served
Added bonus: PreSonus' previously Top Secret recipe for...
Andouille & German Red Cabbage Po-Boys
Ingredients:
- 1 small Onion
- 3 Tbsp. fresh Ginger
- 1 small head Red Cabbage
- 1 tsp Salt
- 3 Tbsp. Honey
- ¼ cup Red Vinegar
- 12 oz Andouille or Bratwurst Sausage sliced lengthwise
- ¼ lb. Muenster Cheese
- Creole or German Mustard to taste
- 1 loaf French Bread
Cooking Instructions:
- Heat 2 tablespoon vegetable oil in large skillet. Add onions and ginger, then cook them for about 3 minutes until onions begin to wilt. Add cabbage, vinegar, and honey, and then cook for about 5 minutes. Add salt to taste and set aside.
- Heat oil in a skillet till hot. Add sausage cut side down till nice and brown, turn and cook for about 5 minutes till thoroughly cooked.
- Slice bread lengthwise, lay a bed of cabbage, then sausage, and cheese on top. Toast under the broiler or in a hot oven till cheese is melted and bread is crisp.
- Spread mustard on bread. Sandwich can then be cut into 2-3 pieces and shared (or not if you're really hungry).
BONUS: Extra cabbage can be used as a condiment with meat, eggs, sandwiches, etc.

© 2020 PreSonus Audio Electronics, Inc. All Rights Reserved. DigiMax, PreSonus, StudioLive, and XMAX are trademarks or registered trademarks of PreSonus Audio Electronics, Inc. Capture, Impact, Mixverb, Presence, RedLightDist, SampleOne, Studio One, and Tricomp are trademarks or registered trademarks of PreSonus Software Ltd. Mac and Mac OS are registered trademarks of Apple, Inc., in the U.S. and other countries. Windows is a registered trademark of Microsoft, Inc., in the U.S. and other countries. Other product names mentioned herein may be trademarks of their respective companies. All specifications subject to change without notice... except the recipe, which is a classic.
VideosPreSonus Quantum 2626 review video
M1 Mac + Presonus Quantum 2626 | Recording Hardware Synths (video)
Documents / Resources
References
Download manual
Here you can download full pdf version of manual, it may contain additional safety instructions, warranty information, FCC rules, etc.
Advertisement
Thank you! Your question has been received!






Need Assistance?
Do you have a question about the Quantum 2626 that isn't answered in the manual? Leave your question here.