PRESONUS FIREPOD Manual
24-bit/96k recording interface with 8 microphone preamplifiers
Hide thumbs
Also See for FIREPOD:
- How to use (1 page) ,
- Manual del usuario (23 pages) ,
- Manual (22 pages)
Table of Contents
Advertisement
Advertisement
Table of Contents

Related Manuals for PRESONUS FIREPOD


Summary of Contents for PRESONUS FIREPOD
- Page 2 PreSonus repair facility postage prepaid, insured and properly packaged. PreSonus reserves the right to update any unit returned for repair. PreSonus reserves the right to change or improve the design of the product at any time without prior notice. This warranty does not cover claims for damage due to abuse, neglect, alteration or attempted repair by unauthorized personnel, and is limited to failures arising during normal use that are due to defects in material or workmanship in the product.
-
Page 3: Table Of Contents
1.1 Introduction 2 Installation and Set up 2.1 Computer Requirements 2.2 Installation of FIREPOD Drivers 2.3 FIREPOD Control Panel (Windows XP only) 2.4 CUBASE LE – Quick Start Up 2.5 Testing your FIREPOD with Cubase LE 3 Controls & Connections 3.1 Front Panel Layout and Descriptions... -
Page 4: Overview
Loaded with 24-bit 96K converters, eight PreSonus microphone preamplifiers and Cubase LE 48- track recording software, the FIREPOD is ready to go out of the box for professional quality computer recording. All you need is a computer with FireWire connection, a few microphones and... -
Page 5: Installation Of Firepod Drivers
- CD should auto run. (If not, navigate to CD and double click on FirePod_Installer.exe) There are three Parts to the installation of your FIREPOD. The installer will take you through each step. Please read each message carefully as the time at which you connect and power on your FIREPOD for the first time is critical to a successful installation. - Page 6 INSTALLATION AND SET UP WINDOWS XP INSTALLATION DETAILS Make sure FIREPOD is NOT connected to your system and click Next. Click Next to set up driver in selected Destination folder. Click Next to prepare your system for installation of Drivers...
- Page 7 INSTALL ATION AND SETUP NOW CONNECT YOUR FIREPOD AND TURN IT ON. At this time the ” Found New Hardware Wizard” will automatically appear. Click Next to install FIREPOD ASIO Driver.
- Page 8 INSTALLATION AND SET UP Click Next to Install FIREPOD MIDI Driver Check Box and click Continue. Wait a few seconds for the final “ Found New Hardware Wizard” to appear. Click Next to Install WDM Driver...
-
Page 9: Firepod Control Panel (Windows Xp Only)
PreSonus at 225-216-7887). After you have installed the OSX update, connect your FIREPOD to a FireWire port on your computer and turn on your FIREPOD. Your FIREPOD sync light should flash red and then stay blue to signify that your FIREPOD is properly sync’... - Page 10 (Note that Control Panel settings will be saved upon power down.) Latency – Sets the amount of delay time of your FIREPOD. (1.5ms – 24ms). Latency is the time it take for the computer to process audio. Lower latency settings demands more CPU resources. In the case of inconsistent audio (i.e.
-
Page 11: Cubase Le - Quick Start Up
Once you have installed your FIREPOD drivers, if you plan on using CUBASE LE included with your FIREPOD, install the CUBASE LE installation CD and run the installer. Make sure to keep your CD envelope sleeve handy to reference the serial number during installation. - Page 12 INSTALLATION AND SET UP ASIO Driver (pull down menu) – select PreSonus ASIO Driver then OK. Click Switch to save PreSonus Driver Selection...
-
Page 13: Testing Your Firepod With Cubase Le
2 . 5 T E S T I N G Y O U R F I R E P O D W I T H C U B A S E L E In order to test your FIREPOD, do the following: Launch Cubase LE and make sure that you have selected the PreSonus FIREPOD ASIO driver as described above in Section 2.4. - Page 14 1 trim control on the front panel of the FIREPD while speaking into the microphone. You should see the input meter react to your speaking. Adjust trim so that input level at maximum without clipping. Connect a set of headphones to the FIREPOD headphone output. Click the monitor button in Cubase LE for Audio 01.
-
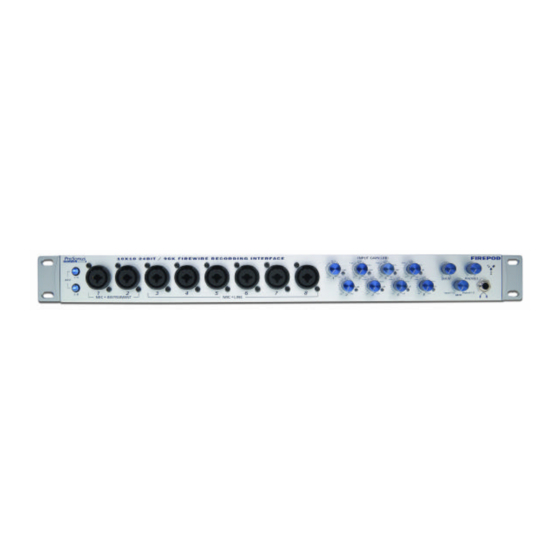
Page 15: Controls & Connections
Combo connector. This revolutionary style connector lets you use either ¼” phone or XLR connectors in the same female input. The first two channels of the FIREPOD are ¼” instrument and microphone XLR inputs. The line level inputs for these two channels are on the back panel of the FirePod. - Page 16 Main. This knob allows control over the output level for the MAIN CR OUTPUT 1 and 2 on the back of the FIREPOD. It has a range of -80db to +10dB. Mix. The mix knob is like a balance control. It balances the headphone MAIN and CUE outputs between Inputs 1-8 and playback outputs 1 and 2.
-
Page 17: Back Panel Layout And Descriptions
6 pin firewire jacks. If your computer has a 4 pin connector, then you will need to get a 4 to 6 pin connector to connect your FirePod to your computer. One of these ports (either one) should be used to connect the FIREPPOD to a FireWire port on your computer. -
Page 18: Application Notes
EQ’ s, etc. Simply connect the Preamp Output jack, balanced or unbalanced to the input of the external processor. Then connect the FirePod’ s Line Input jack to the output of the external processor. The signal is now routed out of the FIREPOD, into the external processor, then back into the FIREPOD. -
Page 19: Recording Rock Band Diagram
4 . 3 R E C O R D I N G R O C K B A N D D I A G R A M With the FIREPOD you can simultaneously record and play back up to 10 channels. Since it is loaded with eight preamplifiers, you can have eight microphones plugged into the FIREPOD along with SPDIF for digital input to record a full band. -
Page 20: Technical
Pops and Clicks The light on the front right panel of the FIREPOD is a clock (sync) indicator. It lets you know if your unit is receiving word clock correctly. Word clock is the manner by which digital devices sync frame rates. Proper word clock sync prevents digital devices from having pops, clicks, or distortion in the audio signal (due to mismatched digital audio transmission). - Page 21 Power Issues Q: I just bought a FIREPOD from (dealer name goes here) in (city and state go here) and I live in Morocco. When I plugged in my FIREPOD it caught on fire and smoke came out of the top. What do I A: PreSonus has a distributor in almost every country.
-
Page 22: Specifications
TECHNICAL 5.2 FIREPOD SPECIFICATIONS Preamp Bandwidth.....................10Hz to 50kHz Preamp Input Impedance..................1.3k Ohms Instrument Input Impedance ..................1M Ohms Preamp THD ......................<0.005% Preamp EIN ....................... -125dB Preamp Gain ........................ 54dB Preamp Send Output Impedance ................. 51 Ohms Preamp Return Input Impedance................10K Ohms Line Trim.........................