Bose L1 Model II Manual
Hide thumbs
Also See for L1 Model II:
- Owner's manual (180 pages) ,
- Application manual (13 pages) ,
- Technical data sheet (8 pages)
Table of Contents
Advertisement
Quick Links
S
I
AFETY
NFORMATION
Please read this owner's guide
Please take the time to follow the instructions in this owner's guide carefully. It will help you set up and operate your
system properly and enjoy its advanced features. Please save this owner's guide for future reference.
WARNING: To reduce the risk of fire or electrical shock, do not expose the system to rain or moisture.
WARNING: To reduce the risk of electric shock, do not disassemble this system unless you are qualified.
Refer servicing to qualified service personnel.
The lightning flash with arrowhead symbol within an equilateral triangle alerts the user to the presence
of uninsulated, dangerous voltage within the system enclosure that may be of sufficient magnitude to
constitute a risk of electrical shock.
The exclamation point within an equilateral triangle, as marked on the system, is intended to alert the user
to the presence of important operating and maintenance instructions in this owner's guide.
CAUTION: This product shall be connected to a mains socket outlet with a protective earthing connection.
CAUTION: Make no modifications to the system or accessories. Unauthorized alterations may compromise safety,
regulatory compliance, and system performance.
CAUTION: No naked flame sources, such as lighted candles, should be placed on the apparatus.
CAUTION: Where the mains plug is used as the disconnect device, such disconnect device shall remain readily
operable.
Note: The product must be used indoors. It is neither designed nor tested for use outdoors, in recreation vehicles, or on
boats.
This product conforms to the EMC Directive 89/336/EEC and to the Low Voltage Directive 73/23/EEC.
The complete Declaration of Conformity can be found at www.Bose.com/static/compliance/index.html.
Advertisement
Table of Contents

Related Manuals for Bose L1 Model II


Summary of Contents for Bose L1 Model II
- Page 1 Note: The product must be used indoors. It is neither designed nor tested for use outdoors, in recreation vehicles, or on boats. This product conforms to the EMC Directive 89/336/EEC and to the Low Voltage Directive 73/23/EEC. The complete Declaration of Conformity can be found at www.Bose.com/static/compliance/index.html.
-
Page 2: Safety Instructions
MPORTANT AFETY NSTRUCTIONS 1. Read these instructions. 14. Refer all servicing to qualified service personnel. Servicing is required when the apparatus has 2. Keep these instructions. been damaged in any way, such as power-supply 3. Heed all warnings. cord or plug is damaged, liquid has been spilled 4. -
Page 3: Connections And Controls
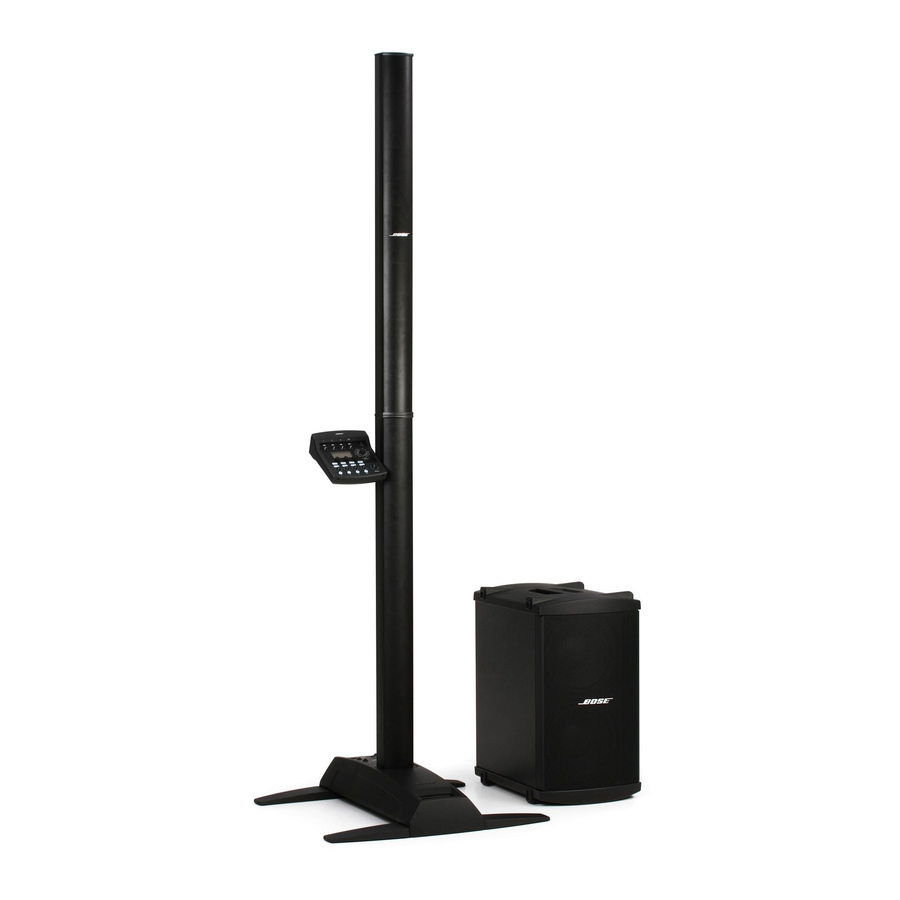
Svenska Nederlands Italiano Français Svenska Nederlands Español Français Deutsch Italiano Deutsch Español Dansk English English Dansk NTRODUCTION Connections and controls The top panel of the power stand provides system connectors and controls (Figure 2). Figure 2 Power stand top panel Power/Fault LED Indicates power status. -
Page 4: Positioning Your System
Svenska Nederlands Italiano Français Svenska Nederlands Español Français Deutsch Italiano Deutsch Español Dansk English English Dansk YSTEM ETUP Positioning your system Placing the power stand in the right location is an important part of setting up this product. Determining the best location for your performance depends on several things. •... -
Page 5: Model Ii Power Stand
This procedure tells you how to set up the loudspeaker sections in the power stand. If you plan to mount the T1 ToneMatch audio engine on the L1 model II system, see “Adding a T1 ToneMatch audio engine (optional)” on page 12 before installing the top section of the loud- speaker. -
Page 6: Connecting To Ac Power
Power switch AC Mains CAUTION: Bose recommends using a quality surge suppressor on all electronic equipment. Voltage variations and spikes can damage electronic components in any system. A quality suppressor, which can eliminate the vast majority of failures attributed to surges, may be pur-... - Page 7 English English Dansk Deutsch Español Dansk Français Deutsch Italiano Nederlands Español Français Svenska Italiano Nederlands Svenska YSTEM ETUP Connecting the B1 bass module You can place the B1 bass module either vertically or horizontally on the floor. It fits neatly bewteen the legs of the power stand.
-
Page 8: Adding A Second B1 Bass Module (Optional)
English English Dansk Deutsch Español Dansk Français Deutsch Italiano Nederlands Español Français Svenska Italiano Nederlands Svenska YSTEM ETUP Adding a second B1 bass module (optional) The bass module output of the power stand can adequately drive one or two B1 bass modules. -
Page 9: Operating Information
T1 ToneMatch audio engine, refer to its owner’s guide for more information on setup and operation. Single musician A solo musician might play a single instrument through the L1 model II system (Figure 11). A solo musician also might play an instrument and use a microphone for vocals (Figure 12 on page 16). -
Page 10: Multiple Musicians
T1 ToneMatch audio engine Multiple musicians In this scenario, a keyboard-guitar duo sings and plays through a single T1 ToneMatch audio engine and an L1 model II system. Figure 13 Single L1 model II system with multiple instruments and T1 ToneMatch audio... - Page 11 L1 model II systems. Each musician plays and sings through a single T1 ToneMatch audio engine and L1 model II system. Figure 14 Multiple L1 model II systems, each with a T1 ToneMatch audio engine T1 ToneMatch audio engine...
- Page 12 DJs use many types of input sources (CD player, turntable, MP3 player, etc.) plugged into a mixer. In this scenario, two mixer outputs can be fed into two L1 model II systems for stereo sound. Figure 15 Two L1 model II systems, a mixer, and input devices...
-
Page 13: Care And Maintenance
Troubleshooting If you experience problems while using this product, try the following solutions. If you still can’t solve the problem, please call the Bose Live Music Product and Technical Support Team direct at (877) 335-2673 to arrange for service. Recommended troubleshooting tools •... - Page 14 Microphone is • Orient the microphone so that it is not pointing directly at its respective L1 model II encountering feedback ® Cylindrical Radiator loudspeaker.