Table of Contents
Advertisement
Available languages
Available languages
Quick Links
Advertisement
Table of Contents

Related Manuals for Oster GCSTCS-412


Summary of Contents for Oster GCSTCS-412
- Page 1 MODELO GCSTCS-412 MODEL Manual de Instrucciones PLANCHA TURBO STEAM LEA TODAS LAS INSTRUCCIONES ANTES DE USAR ESTE APARATO Instruction Manual TURBO STEAM IRON READ ALL INSTRUCTIONS BEFORE USING THIS APPLIANCE GCSTCS-412_18ESM4 (LA).indd 1 10/8/18 10:06...
-
Page 2: Precauciones Importantes
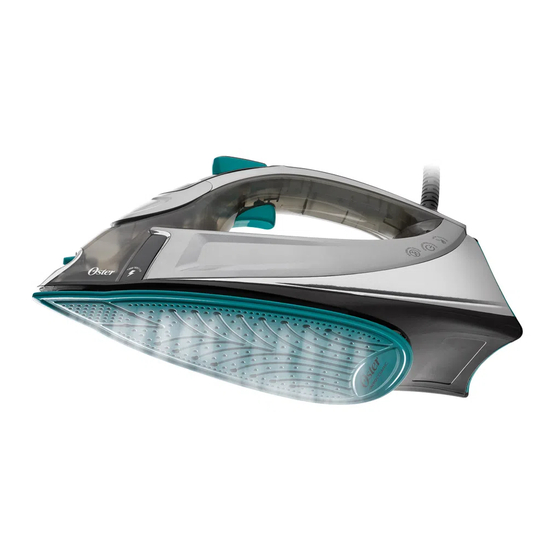
PRECAUCIONES IMPORTANTES Cuando use algún aparato eléctrico siempre deben seguirse precauciones básicas de seguridad incluyendo las siguientes: Lea todas las instrucciones antes de usar • Utilice el aparato solamente con el fin para el que ha sido diseñado. • Para protegerse contra el riesgo de un choque eléctrico, no sumerja el aparato en agua ni en ningún otro líquido. • S iempre apague el aparato (Off) antes de enchufar o desenchufar del tomacorriente. Nunca tire del cable para desenchufar el aparato del tomacorriente, en vez de tirar, sujete el enchufe y jálelo para desconectar el aparato. • N o permita que el cable toque las superficies calientes. Deje enfriar el aparato por completo antes de guardarlo. Envuelva el cable alrededor del aparato de forma holgada cuando lo almacene. - Page 3 MASTER® PROFESSIONAL 1. Salida del Spray Mist 2. Orificio para Cargar Agua con Tapa 3. Dial de selección de vapor 4. Botón de selección de telas 5. B otón Shot of Steam / Vapor Vertical 6. Accionador de Spray Mist 7. Mango con Asa Blanda 8. C ordón giratorio de 360° 9. T anque de Agua Transparente / Linea de Llenar Máxima 10. B otón de auto-limpieza 11. Suela de Cerámica 12. Tip de Precisión 13. Sistema Antisarro (no se ilustra) Visite www.oster.com para una Guía de Planchado y Sugerencias de Planchado Español - 2 GCSTCS-412_18ESM4 (LA).indd 2 10/8/18 10:06...
-
Page 4: Planchando En Seco
Para Llenar el Tanque de Agua (use agua de grifo) 1. A segúrese de que la plancha esté desenchufada. Ponga la palanca de vapor en (Dry) (Seco). 2. L evante la Tapa del Orificio del Tanque de Agua. La tapa se puede retirar y se puede volver a colocar cuidadosamente en las ranuras. 3. L lene una taza de medir con agua del grifo. Vierta el agua en el depósito de agua. ADVERTENCIA: Para prevenir el riesgo de quemaduras, tenga cuidado al llenar una plancha caliente con agua. Las partes de metal calientes, el agua caliente y el vapor pueden causar lesiones. Planchando en Seco 1. Asegúrese de que la palanca del vapor esté en la posición (Dry) (Seco). 2. Enchufe el cable en un tomacorriente de 127 voltios. 3. P resione el Botón “Selector de tela” para seleccionar la tela deseada. Permita que la plancha caliente hasta que la luz de espere/listo cambie a azul indicando que la unidad está lista. Mientras la plancha se está calentando, asegúrese de que esté... -
Page 5: Cuidado De Su Plancha Después Del Uso
Consejo: Cuando use el vapor vertical sobre las prendas, cuélguelas de una percha para obtener mejores resultados. También se puede usar en cortinas y cortinados colgados. Para usar el vapor vertical: 1. A segúrese de que la plancha se haya calentado y la luz indicadora de listo ha cambiado a azul. 2. S ostenga la plancha en posición vertical, con la plancha cerca de la tela que desea vaporizar pero sin tocarla. 3. Estire la tela de forma que permanezca tensa. 4. P resione el botón Shot of Steam a intervalos de aproximadamente 3 segundos a medida que mueve la plancha por la zona arrugada. ADVERTENCIA: Para prevenir el riesgo de quemaduras, mantenga la mano alejada de la zona que está vaporizando. ADVERTENCIA: NO vaporice las prendas mientras las tenga puestas ya que esto puede provocar lesiones. Función de Apagado Automático Apaga la plancha si se deja en una posición específica por mucho tiempo para prevenir accidentes. Si deja la plancha: • e n posición horizontal sin moverla, o la vuelca accidentalmente, automáticamente dejará de calentar al cabo de 30 segundos la luz de espere/listo parpadeará en rojo para hacerle saber que la plancha ha dejado de calentar. - Page 6 Manteniendo de Su Plancha Limpieza de la Base Apague la plancha siguiendo las instrucciones de arriba. Limpie la base si se acumula almidón o algún otro residuo. Para limpiar la base: 1. No sumerja la plancha. Deje enfriar la plancha y luego pásele un paño suave y húmedo. ADVERTENCIA: No use limpiadores abrasivos, esponjas de metal ni vinagre para limpiar la base. Esto dañará el acabado. Pase la plancha por un paño de puro algodón para eliminar cualquier residuo. Uso de la Función de Auto-Limpieza Apague la plancha siguiendo las instrucciones de arriba. 1. Apague y desconecte la plancha. 2. Mueva la Palanca de Vapor para atrás y adelante varias veces para quitar los restos y los minerales de la Válvula de Vapor. Esto mantiene el agua fluyendo en el compartimiento del vapor. 3. Llene el tanque con agua de grifo hasta la marca de llenado 4. Enchufe la plancha, presione el botón de selección de tela para seleccionar Lino, y deje que la plancha caliente hasta que la luz indicadora de listo se ponga azul. 5. Apague y desenchufe la plancha. Sostenga la plancha sobre un fregadero en una posición horizontal. Presione y mantenga apretado el botón de auto-limpieza.
-
Page 7: Important Safeguards
IMPORTANT SAFEGUARDS When using electrical appliances, basic safety precautions should always be followed including the following: Read All Instructions Before Use • Only use an iron for its intended use. • To avoid the risk of electric shock, do not immerse the iron in water or other liquids. • A lways turn the iron to “Off” before plugging or unplugging the iron from the electrical outlet. Never pull on the cord to disconnect the iron from the electrical outlet; instead, grasp the plug and pull on the plug to disconnect the iron. • D o not let the cord touch hot surfaces. Let the iron cool completely before putting the iron away. Coil the cord loosely around the iron when storing. • A lways disconnect the iron from the electrical outlet before filling the iron with water, emptying the water from the iron, and when the iron is not in use. • D o not operate the iron with a damaged cord or in the event the iron has been dropped or damaged. To avoid the risk of electric shock, do not disassemble or attempt to repair the iron. Take it to a qualified service center for examination and repair. Incorrect assembly or repair might result in a risk of electric shock, a risk of fire or injury to person when the iron is used after reassembly or repair. • C lose supervision is required for any appliance used by or near children. Do not leave the iron unattended while the iron is connected or on an ironing board. - Page 8 MASTER® PROFESSIONAL IRON 1. Spray Mist Release 2. Covered Water Fill Hole 3. Steam Select Lever 4. Fabric Select Button 5. S hot of Steam/ Vertical Steam Button 6. Spray Mist Trigger 7. Soft Grip Handle 8. 3 60° Swivel Cord 9. S ee-Through Water Reservoir / Maximum Fill Line 10. S elf Clean Button 11. Ceramic Soleplate 12. Precision Tip 13. Anti-Calcium System (not shown) Visit www.oster.com for an Ironing Guide and Ironing Tips English - 2 GCSTCS-412_18ESM4 (LA).indd 2 10/8/18 10:07...
-
Page 9: Dry Ironing
To Fill the Water Reservoir (use tap water) 1. M ake sure the iron is unplugged. Set the Steam Lever to (Dry). 2. Lift the Water Fill Hole Cover. 3. F ill an easy-pour measuring cup with tap water. Pour water into water reservoir. WARNING: To prevent the risk of burns, be careful when filling a hot iron with water. Hot metal parts, hot water and steam can cause injuries. Dry Ironing 1. Make sure the Steam Lever is turned to the (Dry) setting. 2. Plug the cord into a 127V outlet. 3. P ress the +/- buttons to select desired Fabric Setting. Allow the iron to heat until wait/ ready light turns solid blue, indicating the unit is ready. While the iron is heating, make sure it is sitting on its heel rest on a stable, protected surface. Note: While the Steam Lever is turned to the (Dry) setting, you may still use the SHOT OF STEAM or SPRAY MIST feature, as long as the fabric setting is set to wool, cotton, ®... -
Page 10: Caring For Your Iron After Use
WARNING: To prevent the risk of burns, keep your hand away from the area being steamed. WARNING: DO NOT steam garments while wearing them; this may result in injuries. Auto-Off Feature Turns iron off if left in one position too long to avoid accidents. If you leave the iron: • I n a horizontal position without moving it, or accidentally tip the iron over, it will automatically stop heating after 30 seconds. The wait/ready light will blink red to let you know that the iron has stopped heating. • In a vertical position (on its heel rest) without moving it, the iron will automatically turn off after 15 minutes. The wait/ready light will blink red to let you know that the iron has stopped heating. IMPORTANT: When the auto-off feature has been activated, the unit will beep 6 times and the indicator light will blink. To reset the iron: Move iron back and forth and reheat until the “Ready” indicator light turns solid blue. WARNING: Motion Smart Auto-Off is a safety feature, not a recommended means for ® turning your iron off. See “Caring for Your Iron After Use” for information on turning off your iron and storing it safely between use. Caring for Your Iron After Use Turning Off Your Iron: Turn the Steam Lever to (Dry) and press the Fabric Select Buttons until OFF is illuminated. Unplug the iron from the power source. -
Page 11: Anti-Calcium System
1. Turn off and unplug iron. 2. Move Steam Lever back and forth to remove debris and minerals from Steam Valve. This keeps water flowing into the steam chamber. 3. Fill water reservoir with tap water to MAX line. 4. Plug in iron, press Fabric Select Button to select Linen setting and heat until the indicator light turns solid blue. 5. Turn off and unplug iron. Holding iron over a sink in a horizontal position, press Self- Clean Button and hold. Water will begin dripping from the steam vents. Slowly rock iron side to side and front to back for 30 seconds. Dip nose of the iron slightly below the rear to circulate water. Release Self-Clean Button after one minute. 6. Open fill cap and empty remaining water. Carefully dry soleplate with a towel. 7. Plug in iron and set Fabric setting to Linen and Heat for 2 minutes to dry out completely. Set Fabric Select Dial to Off, unplug the iron, and allow to cool. Anti-Calcium System The iron houses an anti-calcium filter in the reservoir, which eliminates impurities from the water. This is a permanent system located inside the water reservoir. To prolong the efficiency of this filter, follow these steps occasionally: 1. U nplug the iron and allow it to cool. 2. U se an easy-pour measuring cup to mix ¾ cup water and 1 teaspoon salt. Pour mixture into water reservoir. 3. L eave the solution in the water reservoir for 15 minutes, shaking occasionally, and then empty it. 4. Fill the water reservoir a second time with the salt water solution, shaking occasionally and empty it again after 15 minutes. -
Page 12: Características Eléctricas
Características eléctricas de los modelos de la serie: GCSTCS-412-XXX Electric characteristics of series models: Voltaje/Voltage Frecuencia/Frequency Potencia/Power 127 V 1 500 W XXX en donde X es cualquier numero entre 0 y 9 o cualquier letra entre A y Z. XXX where X is any number between 0 and 9 or any letter between A and Z. La siguiente información es para México solamente. The following information is intended for Mexico only. PLANCHA TURBO STEAM MODELOS: GCSTCS-412-013 IMPORTADOR: NEWELL BRANDS DE MÉXICO, S.A. DE C.V. AV. JUÁREZ NO. 40-201, EX–HACIENDA DE SANTA MÓNICA, TLALNEPANTLA, ESTADO DE MÉXICO, C.P. 54050, R.F.C. SME570928G90, TEL. 53660800 PAÍS DE ORIGEN: CHINA PAÍS DE PROCEDENCIA: CHINA, E.U.A. LEA EL INSTRUCTIVO ANTES DE USAR EL APARATO CARACTERÍSTICAS ELÉCTRICAS 60 Hz 1500 W 127 V © 2018 Sunbeam Products, Inc. Todos los derechos reservados. Distribuido por Sunbeam Latin America, LLC,...