Table of Contents
Advertisement
Advertisement
Table of Contents

Related Manuals for Tecsun PL-368


Summary of Contents for Tecsun PL-368
- Page 1 TECSUN PL-368 FM STEREO / LW / MW / SW-SSB RECEIVER TECSUN ELECTRONIC IND. LTD.
-
Page 3: Table Of Contents
CONTENTS GETTING STARTED PL-368 at a glance ................1 Powering your device ................6 Charging the battery ................6 Setting the clock ..................7 Setting the FM frequency range ............7 Setting the MW (AM) frequency range and tuning step ......7 Enabling/Disabling longwave (LW) ............ - Page 4 Setting the alarm station ..............21 Snooze function ................... 22 Keylock ....................22 Temperature unit display (Celsius or Fahrenheit) ........ 22 MISCELLANEOUS Synchronous detection: An introduction ..........23 Troubleshooting ..................26 Lithium battery safety instructions ............27 Radio maintenance ................27 PL-368 specifications ................28...
-
Page 5: 368 At A Glance
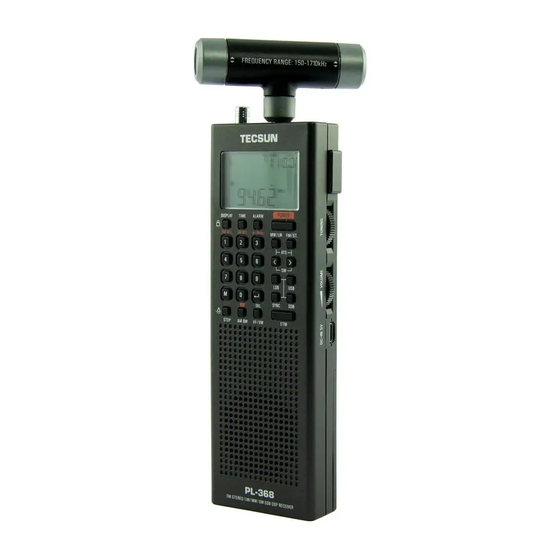
PL-368 at a Glance – Location of Controls DISPLAY/ : Display mode / Keylock TIME: Set / Display clock ALARM: Alarm setting POWER: Power switch / Sleep timer [ 0 ] - [ 9 ]: Numeric keys [ 1 ] / [ FM SET ]: FM range setting... - Page 6 PL-368 at a Glance – Location of Controls SSB sideband selection LSB: Lower sideband USB: Upper sideband SYNC: Synchronous detection SSB: Enable/Disable SSB mode Band selection / ATS [ MW/LW ]: MW/LW [ FM/ST. ]: FM/Stereo switch [ < ], [ > ]: SW meter band selection...
- Page 7 PL-368 at a Glance – Location of Controls External MW/LW ferrite bar antenna : Stereo headphone jack LW/MW ANTENNA: Socket for external MW/LW ferrite bar antenna FM/SW telescopic whip antenna Belt clip TUNING: Multifunctional knob VOLUME: Multifunctional knob DC-IN 5V: DC input/charging...
- Page 8 PL-368 at a Glance – Display indication dBμ: Signal strength unit dB: Signal-to-noise ratio unit S/N: Signal-to-noise ratio AL: Alarm time mb: SW/SSB meter band PRESET: Memory location Temp.: Temperature Charge: Charging indicator Display indication examples: Signal strength/Signal to noise ratio:...
- Page 9 PL-368 at a Glance – Display indication : SW / MW / LW unit display : Enhanced Tuning Mode : Tuning step indicator : FM unit display : Keylock Displays time/frequency Frequency band, Sideband indicator FM: FM LW: Longwave MW: Medium Wave (AM) SW: Shortwave...
-
Page 10: Powering Your Device
Powering Your Device This device is powered by a BL-5C 3.7V rechargeable lithium (Li-ion) battery. Open the battery compartment and install the battery following the correct polarity. The device can also be powered by connecting a DC 5V/0.5A power adapter to the micro-USB type-B socket. Note: Connecting an external power supply causes interference when listening to radio frequencies. -
Page 11: Setting The Clock
Setting the Clock (24-hour format) 1) Press and hold [ TIME ] until the clock time starts flashing. 2) Use the numeric keys to enter the current time (hours + minutes is four digits), or rotate the [ TUNING ] and [ VOLUME ] knobs to adjust the time, and then press [ TIME ] to confirm the setting. -
Page 12: Using The Device
USING THE DEVICE Turning the device on/off: Quick press the [ POWER ] button. Volume control: Rotate the [ VOLUME ] knob upwards or downwards to select your desired volume level. VF (View Frequency) and VM (View Memory) VF: VF mode is used when searching for new radio signals. Press the [ VF/VM ] button. -
Page 13: Tuning Into Stations
TUNING INTO STATIONS Turn on the device, then quick press the [ FM/ST. ], [ MW/LW ], [ < ] or [ > ] (for SW) button to select your desired frequency band. You can tune into your favorite stations using any of the following tuning methods. Manual Tuning In VF mode, rotate the [ TUNING ] knob to search for your desired stations. -
Page 14: Sw / Ssb Meter Band Selection
SW / SSB Meter Band Selection Quick press [ < ] or [ > ] to change SW or SSB meter bands: SW meter bands: 120m / 90m / 75m / 60m / 49m / 41m / 31m / 25m / 22m / 19m / 16m / 15m / 13m / 11m SSB meter bands: 160m / 80m / 60m / 40m / 30m / 24m / 20m / 17m / 15m / 12m / 10m... -
Page 15: Auto Tuning Storage (Ats)
Auto Tuning Storage (ATS) Automatically tune into and store FM, LW, MW and SW stations Operation for FM and MW/LW: 1) Quick press [ FM/ST. ] or [ MW/LW ] to select the frequency band. 2) Press and hold the [ FM/ST. ] or [ MW/LW ] button until “PRESET” flashes and the frequency starts running. -
Page 16: Storing Stations During Auto Scan
Storing Stations During Auto Scan To avoid any unwanted stations that might be stored during Auto Tuning Storage (ATS), store stations manually during “Auto Scan” (see also page 1) In VF mode, press and hold the [ VF/VM ] button. The device will auto scan the entire frequency band for available stations. -
Page 17: Deleting Stored Stations
DELETING STORED STATIONS Deleting a Single Station 1) Enter the memory (VM) mode and select the station that you wish to delete. 2) Press and hold the [ ] (DEL.) button until “ ” and “PRESET ” flash on the display. 3) Quick press the [ ] button to confirm and delete the unwanted station. -
Page 18: Deleting All Stored Stations
Deleting All Stored Stations It is possible to delete all stations from the memory (including ETM) simultaneously. 1) Turn the device off. 2) Press and hold the [ ] (DEL.) button untill “dEL” and “ALL” flash on the display. 3) Quick press the [ POWER ] button to confirm and delete all stored stations. - Page 19 Example LW/MW The ETM memory for LW/MW consists of 6 time-specific memories: 0609: 06:00 - 09:59 1013: 10:00 - 13:59 1417: 14:00 - 17:59 1821: 18:00 - 21:59 2201: 22:00 - 01:59 0205: 02:00 - 05:59 An ETM scan performed at 11:35 in the morning falls in the 10:00-13:59 hour time-range and any stations found are stored in ETM memory 1013.
- Page 20 The picture on the right shows the starting screen that is briefly displayed when entering the ETM memory for SW. In this example, “E20” indicates that the current listening time is between 20:00 and 20:59, whereas “ ” indicates that the last time an ETM scan was done during this time-range the device found 136 broadcasting frequencies.
-
Page 21: Using Etm+ To Scan And Store Stations
Using ETM+ to Scan and Store Stations 1) Quick press the [ ETM ] button, the display indicates “ETM”. 2) Select the frequency band. 3) Press and hold the [ ETM ] button to start scanning for stations. 4) When scanning is complete, the display shows the number of broadcast frequencies found (e.g. -
Page 22: Other Settings And Features
Other Settings and Features Auto Sorting Memory This device can automatically organize all stored stations. In power off mode, press and hold the [ ] (0) button until the station memory preset indicator on the display starts running. This feature deletes duplicate stations and sorts the sequence of stored stations from low to high frequency. -
Page 23: Am Bandwidth Selection
AM Bandwidth Selection Quick press [ AM BW ] repeatedly, or quick press and then rotate the [ VOLUME ] knob, to select a bandwidth to enhance the intelligibility of longwave, medium wave (AM) and shortwave signals. Selectable bandwidths are: LW/MW: 2.5, 3.5, and 9.0kHz. -
Page 24: Display Mode
Display Mode When listening to the radio, quick press [ DISPLAY ] repeatedly to select your preferred display mode. The top right corner of the display can show signal strength/signal-to-noise ratio, clock time, alarm time, temperature, or the memory location of the frequency (in VM mode only). Add Seconds to the Clock With the device turned off, press and hold [ 8 ] to add seconds to the clock. -
Page 25: Setting The Alarm Time
Setting the Alarm Time 1) Press and hold [ ALARM ] until the alarm time in the upper right corner of the display starts flashing. 2) While still flashing, use the numeric keys to enter the time (4 digits in total), or rotate the [ TUNING ] knob to adjust the hour and the [ VOLUME ] knob to adjust the minutes, and then press [ ALARM ] to confirm. -
Page 26: Snooze Function
Snooze Function When the alarm goes off, press [ DISPLAY ] to temporarily turn off the alarm. The alarm icon “ ” flashes on the display and the alarm will go off again after 5 minutes. To turn off the snooze function, quick press the [ POWER ] button. -
Page 27: Synchronous Detection: An Introduction
Synchronous Detection: An introduction For demodulating AM signals, most radios use diode envelope detectors. When the amplitude modulated signal passes through the inductor- capacitor loop, it will produce distortion, and the envelope detector will also produce distortion. Therefore, one of the best ways to demodulate the AM signal is to use a synchronous detector. - Page 28 Example 4: The carrier phase shift is caused by the asymmetry of the skywave transmission or radio intermediate frequency phase. Envelope Synchronous Spectrum Phasor Diagram Signal Detector Output Detector Output Carrier Carrier Carrier Carrier Carrier Carrier Carrier Carrier The chart shows the demodulation output waveforms of the envelope detector and synchronous detector.
- Page 29 These forms of amplitude modulation, which cannot be demodulated by the envelope detector, arise from fairly common situations. Although the broadcast signal is transmitted as a conventional double-sideband AM wave, the detuning and skywave reflection of the radio will change this AM signal into one or a combination of the forms shown in the chart.
-
Page 30: Troubleshooting
Troubleshooting... -
Page 31: Lithium Battery Safety Instructions
Lithium Battery Safety Instructions Improper replacement of the lithium battery may result in an explosion. Replace only with a lithium battery of the same type or equivalent (the lithium battery used in this device is a BL-5C rechargeable lithium battery). Do not expose the battery to heat sources (e.g. -
Page 32: Pl-368 Specifications
PL-368 Specifications Frequency range 153-513 kHz Longwave (LW): Medium wave (MW): 520-1710 kHz / 522-1620 kHz Shortwave (SW): 1711-29999 kHz 64-108 / 76-108 / 87-108 / 88-108 MHz Frequency tuning steps Longwave (LW) AM broadcast: 9 kHz / 1 kHz... - Page 33 Noise limit sensitivity < 10mV / m Longwave (S / N = 26dB) : < 1mV / m Medium wave (S / N = 26dB) : < 20μV Shortwave (S / N = 26dB) : < 3μV FM (S / N = 30dB): Selectivity >...
- Page 34 TECSUN R A D I O S A U S T R A L I A TECSUN RADIOS AUSTRALIA 24/9 Powells Road, Brookvale, NSW 2100 Australia Ph: +61 2 9939 4377 Email: info@tecsunradios.com.au www.tecsunradios.com.au...