Grizzly G0555 Owner's Manual
14" ultimate bandsaw
Hide thumbs
Also See for G0555:
- Owner's manual (68 pages) ,
- Instruction manual (55 pages) ,
- Parts list (5 pages)
Table of Contents
Advertisement
Quick Links
Advertisement
Table of Contents

Related Manuals for Grizzly G0555


Summary of Contents for Grizzly G0555
- Page 1 MODEL G0555 14" ULTIMATE BANDSAW OWNER'S MANUAL COPYRIGHT © AUGUST, 2002 BY GRIZZLY INDUSTRIAL, INC. REVISED JULY, 2007. WARNING: NO PORTION OF THIS MANUAL MAY BE REPRODUCED IN ANY SHAPE OR FORM WITHOUT THE WRITTEN APPROVAL OF GRIZZLY INDUSTRIAL, INC.
- Page 2 ���� ������ �������� �������� ������ ������������ �� ��� ������ ������ ���������� ����������� ��� ������� �� ���� ������������������ ������� �� ����� ���������� ��� ������ ��� ������������ ����� �� ���� ������ ��� ������ �� ������� �������� ������� ��������� ����������� ������������� �� ������ ���...
-
Page 3: Table Of Contents
Machine Data Sheet ... 3 Bandsaw Features ... 5 SECTION 1: SAFETY ... 6 Safety Instructions for Machinery ... 6 Additional Safety Instructions for Bandsaws . 8 SECTION 2: CIRCUIT REQUIREMENTS ... 9 110V/220V Operation ... 9 Grounding ... 10 Extension Cords ... -
Page 4: Introduction
INTRODUCTION Foreword We are proud to offer the Model G0555 14" Ultimate Bandsaw. This machine is part of a grow- ing Grizzly family of fine woodworking machinery. When used according to the guidelines set forth in this manual, you can expect years of trouble-free, enjoyable operation and proof of Grizzly’s com-... -
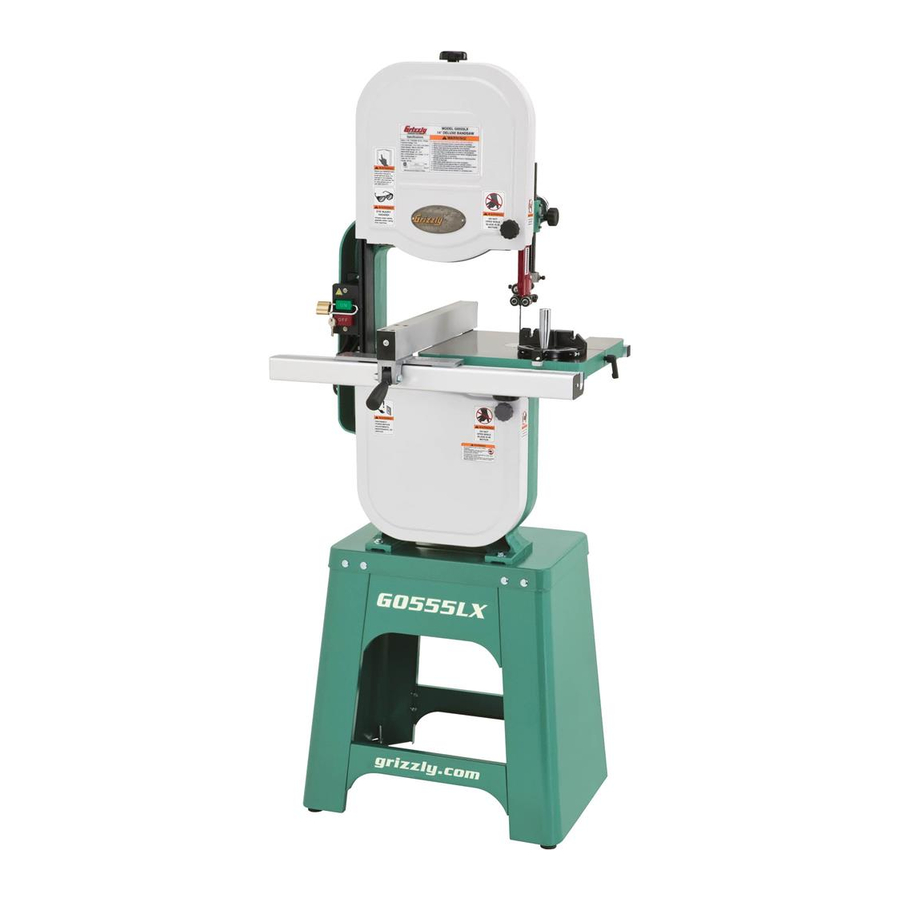
Page 5: Machine Data Sheet
Customer Service #: (570) 546-9663 · To Order Call: (800) 523-4777 · Fax #: (800) 438-5901 MODEL G0555 THE ULTIMATE 14" BANDSAW Product Dimensions: Weight... 167 lbs. Length/Width/Height...26-3/8 x 30-1/4 x 66-1/2 in. Foot Print (Length/Width)... 24-1/2 x 17-1/2 in. - Page 6 The information contained herein is deemed accurate as of 7/11/2007 and represents our most recent product specifications. Model G0555 Due to our ongoing improvement efforts, this information may not accurately describe items previously purchased. PAGE 2 OF 2 G0555 14" Ultimate Bandsaw...
-
Page 7: Bandsaw Features
H. Blade Tension Adjustment Knob — Controls minor/moderate blade tension adjustments. G0555 14" Ultimate Bandsaw Blade Tracking Adjustment Knob — Controls the tilt angle of the upper wheel, which defines how the blade will track on the wheel. -
Page 8: Section 1: Safety
�������� ���������������������������������������������� ��� �������� ����� ���� ������ ��� ������� ������� ����� ����������� ����� ��������� ��� �������� ������������������������������������� �� ����� ������� ��������� ���� ����� �� ����� ��� ��������� �� ��������� ����� �� �������� ������������������ ������������������������������������ ��������� ����������� G0555 14" Ultimate Bandsaw... - Page 9 ��� �������� ��������� ���� ������ ����������������������������������������� �������������������������������������������� ������������������������������������� ��� ���� ���� ������ ��� �� ����� ��� ���� ��������� ������ ����� ���������� G0555 14" Ultimate Bandsaw ��� ������ ��������������������������������������� ����� ���� ���������� ��������� ������� ����� ����������������� ��� ����� ������ ����� ���������������������...
-
Page 10: Additional Safety Instructions For Bandsaws
Use this and other machinery with caution and respect. Failure to do so could result in serious per- sonal injury, damage to equipment, or poor work results. G0555 14" Ultimate Bandsaw... -
Page 11: Section 2: Circuit Requirements
220V Circuit ... 15 Amps G0555 14" Ultimate Bandsaw Plug Type The Model G0555 comes prewired with a NEMA 5-15 plug. If you wish to rewire the motor to 220V, we recommend using the following plug (see Figure 3 for an example): 220V Plug &... -
Page 12: Grounding
• The extension cord must also contain a ground wire and plug pin. • A qualified electrician MUST size cords over 50 feet long to prevent motor damage. • Use a minimum of 14 gauge cord. G0555 14" Ultimate Bandsaw... -
Page 13: Section 3: Set Up
SECTION 3: SET UP Unpacking The Model G0555 Bandsaw is shipped from the manufacturer in 2 carefully packed cartons. If you discover the machine is damaged after you have signed for delivery, please call Customer Service immediately for advice. Save the containers and all packing materials for possible inspection by the carrier or its agent. - Page 14 In the event that any non-proprietary parts are missing (e.g. nuts or washers), we would be glad to replace them, or for the sake of expediency, replacements can be obtained at your local hard- ware store. G0555 14" Ultimate Bandsaw...
-
Page 15: Hardware Recognition Chart
Hardware Recognition Chart Use this chart to match up hardware pieces during the assembly process! G0555 14" Ultimate Bandsaw -13-... -
Page 16: Clean Up
Floor Load: Your Model G0555 14" Ultimate Bandsaw represents a moderate weight load in a small footprint. Most commercial floors are suitable for the Model G0555. Some resi- dential floors may require additional build up to support both the machine and the opera- tor. -
Page 17: Assembling Stand
(8) M6-0.8 x 16 hex bolts, (8) 6mm flat washers, and (8) M6-0.8 flange nuts from the hardware bag. Your assembly should now look like Figure 8. G0555 14" Ultimate Bandsaw Figure 8. Second stand side attached to assembly. Thread a ⁄... - Page 18 Figure 11. Leveling stand. Tighten the hex nuts on the feet, so that they are against the underside of the stand and will lock the feet in place to keep the stand level. G0555 14" Ultimate Bandsaw...
-
Page 19: Mounting Bandsaw
The bandsaw should now be mounted to the stand as shown in Figure 12. Figure 12. Bandsaw mounted to stand. G0555 14" Ultimate Bandsaw Mounting Trunnion Base To mount the trunnion base: Place the trunnion base on the bandsaw as shown in Figure 13. -
Page 20: Installing Positive Stop
Figure 15. Secure table to trunnion with knobs from hardware bag. Place the table insert in the center of the table, so that it sits flush with the table top surface. Insert the pin into the end of the table slot. G0555 14" Ultimate Bandsaw... -
Page 21: Installing Fence
Thread the M8-1.0 hex nut from the hardware bag onto the fence handle threads, then thread the fence handle into the fence. G0555 14" Ultimate Bandsaw Tighten the hex nut (already on the fence handle threads) down to the fence body to keep the fence handle from rotating. -
Page 22: Connecting Dust Hose
Coplanar Tracking. (For Coplanar Tracking, see the “Wheel Alignment” instructions in Section 6: Service Adjustments.) The wheels on the Model G0555 were aligned at the factory, so Center Tracking is the only adjust- ment that needs to be performed when the saw is new. -
Page 23: Test Run
NOTICE Changes in the blade tension may change the blade tracking. G0555 14" Ultimate Bandsaw Test Run Once the assembly is complete and you have performed the “Blade Tracking” instructions, you need to test run the machine to continue with the remainder of the adjustments. -
Page 24: Tensioning Blade
DISCONNECT BANDSAW FROM POWER! Familiarize yourself with the support bearing controls shown in Figure 20. Assembly Lock Bolt Knurled Knob Thumbscrew Figure 20. Support bearing controls. Loosen the assembly lock bolt. G0555 14" Ultimate Bandsaw Support Bearing... - Page 25 ������� Figure 22. Blade should be aligned approxi- mately 0.016" away from the bearing edge. G0555 14" Ultimate Bandsaw For a quick gauge, fold a dollar bill in half twice (four thicknesses of a dollar bill is approximately 0.016") and place it between the support bearing and the blade as shown in Figure 23.
-
Page 26: Adjusting Blade Guides
Figure 26. Thumbscrew Figure 26. Blade guide bearings against both Blade Guide Bearing NOTICE sides of blade. G0555 14" Ultimate Bandsaw... -
Page 27: Adjusting Positive Stop
Figure 27. Adjust the positive stop bolt to raise or lower the table until the table is 90˚ to the blade. G0555 14" Ultimate Bandsaw Figure 27. Squaring table to blade. Secure the plastic knobs and lock the posi- tive stop bolt by tightening the check-nut. -
Page 28: Aligning Table
NOTICE Adjusting the fence parallel to the miter slot does not guarantee straight cuts. The miter slot may need to be adjusted parallel to the side of the blade. Refer to the "Aligning Table" section. G0555 14" Ultimate Bandsaw... -
Page 29: Section 4: Operations
WE STRONGLY RECOMMEND that you read books, trade magazines, or get formal training to maximize the potential of your machine. G0555 14" Ultimate Bandsaw clothing The bandsaw is one of the most versatile wood cutting tools in the shop. It is capable of perform-... -
Page 30: Table Tilt
Raise/lower the guide post so that there is not more than 1" from the top of the workpiece to the bottom of the blade guide assembly. Lock the guide post in place with the lock knob. G0555 14" Ultimate Bandsaw Guide Post Lock Knob... -
Page 31: Ripping
For plywood and other processed wood, ripping simply means cutting down the length of the workpiece. DO NOT operate the Model G0555 with- out an adequate dust collection system. This machine creates substantial amounts of wood dust while in operation. Failure to use a dust collection system can result in short and long-term respiratory illness. -
Page 32: Crosscutting
Maximum cutting height for this bandsaw is 6". The Model G0555 14" Bandsaw is capable of resawing, provided the saw is set up properly. Use common sense when resawing. Attempting... -
Page 33: Cutting Curves
Relief cuts also make backing the workpiece out easier, if needed. G0555 14" Ultimate Bandsaw NOTICE The list below displays blade widths and the corresponding minimum radii each size of blade for the Model G0555. Width ⁄ "... ⁄ "... -
Page 34: Blade Speed
Figure 32. Cutting multiple pieces at once. -32- Blade Speed The Model G0555 offers blade speeds of 1500 & 3200 FPM. For general woodworking and most cutting operations, we recommend using the 3200 FPM speed. Keep in mind, the results from different speeds are related to the type of blade being used—whenever determining SPEED, also... -
Page 35: Blade Information
Measured by the circumference, blade lengths are usually unique to the brand of your bandsaw and the distance between wheels. The Model G0555 is designed for blades that are 92 ⁄ " long. Refer to the current Grizzly catalog for prices and ordering information. - Page 36 Straight Cutting — Use the largest width • blade that you own. The Model G0555 will accept blades up to ⁄ " wide. Narrow blades can cut tight curves (a small radius) but are not very good at cutting straight lines because they naturally wander (blade lead).
-
Page 37: Blade Changes
(7) using a blade with a lumpy or improp- erly finished braze or weld and (8) continuously running the bandsaw when not in use. G0555 14" Ultimate Bandsaw Blade Changes Always disconnect power to the machine when changing blades. -
Page 38: Scale Calibration
Figure 38 and adjust it to match the width of the cut workpiece. Tighten the screws and the scale is now cor- rectly calibrated. Figure 38. Scale recalibration screws. G0555 14" Ultimate Bandsaw... -
Page 39: Section 5: Maintenance
G0555 14" Ultimate Bandsaw The table and other non-painted surfaces on the maintenance. Model G0555 should be protected against rust and pitting. Wiping the saw clean after every use ensures that wood dust is not allowed to trap moisture against bare metal surfaces. -
Page 40: Section 6: Service
(facing ⁄ ", bandsaw front) of the adjustment slot. Replacing Belt Wheel Mount Bolt Figure 40. Wheel mount bolt. G0555 14" Ultimate Bandsaw... -
Page 41: Shimming Table
Follow the “Aligning Miter Slot” instructions in Section 4: Set Up. G0555 14" Ultimate Bandsaw Blade Lead Most bandsaw blades will not appear to cut straight when using the fence or miter gauge. -
Page 42: Wheel Alignment
– ensuring that it touches both the top and bottom rim – and adjust the tracking knob to see how the straightedge lines up with the upper wheel. G0555 14" Ultimate Bandsaw... - Page 43 Measure how many you will need and place them on the mounting shaft. G0555 14" Ultimate Bandsaw Replace the wheel, any remaining washers, and the securing nut. Tighten the blade as it will be used during operation before you check the wheels.
-
Page 44: Blade Tensioner
13. Make sure there is no tension on the blade when the lever is released. If all the tension is not released, the lower spacer needs to be threaded farther down the shaft toward the sliding bracket. Upper Spacer Lower Spacer G0555 14" Ultimate Bandsaw... -
Page 45: Wiring Diagram
����� ����� ������ ������� � � � � � � � � G0555 14" Ultimate Bandsaw -43-... -
Page 46: Troubleshooting
1. Install rubber pads under stand. 2. Adjust wheel alignment. 3. Re-install tires. 4. Replace belt. 5. Replace blade. 6. Replace wheels. connections. shorted wires. terminals or worn insulation. terminals or worn insulation. Feed workpiece slower. G0555 14" Ultimate Bandsaw... -
Page 47: Aftermarket Accessories
Aftermarket Accessories Optional Bandsaw Blades Blades for the G0555 14" bandsaw are available with raker, hook, and skip tooth styles, and blades from " - " in the current Grizzly catalog. 6" Extension Block Kit - H3051 Increase your cutting capacity from 6" to 12" cut- ting height with this bolt-on 6"... -
Page 48: Parts
-46- G0555 14" Ultimate Bandsaw... - Page 49 WING NUT M8-1.25 P0555032 KNOB BOLT M8-1.25 X 45 P0555033 TENSION KNOB BOLT P0555034 STEEL PIN P0555035 UPPER WHEEL HINGE P0555038 COIL SPRING G0555 14" Ultimate Bandsaw PART # DESCRIPTION P0555039 SQUARE NUT M10-1.5 P0555040 UPPER WHEEL P0555041 WHEEL TIRE PN24M HEX NUT M12-1.25...
- Page 50 139 P0555139 NYLON NUT M8-1.25 140 P0555140 SUPPORT PLATE 141 P0555141 FIXED BASE 142 PLW04M LOCK WASHER 8MM 143 PB09M HEX BOLT M8-1.25 X 20 144 P0555144 G0555 ID/WARNING LABEL SAFETY GLASSES LABEL PLABEL-11 DO NOT OPEN LABEL PLABEL-20 UNPLUG BANDSAW LABEL PLABEL-18...
- Page 51 206 PB83M HEX BOLT M6-1.0 X 16 207 PW03M FLAT WASHER 6MM 208 PFN02M FLANGE NUT M6-1.0 G0555 14" Ultimate Bandsaw PART # 209 P0555209 UPPER STAND BRACE 210 P0555210 LOWER STAND BRACE 211 PN08 212 PW04M 213 P0555213 STAND FOOT...
- Page 52 327 PW03M PART # DESCRIPTION HEX NUT M8-1.25 FLANGE SCREW M4-.7 X 6 HEX NUT M6-1.0 LOCK WASHER 6MM CAP SCREW M6-1.0 X 16 HEX BOLT M6-1.0 X 20 FLANGE SCREW M4-.7 X 10 FLAT WASHER 6MM G0555 14" Ultimate Bandsaw...
- Page 53 ���������������������������������������������������������������������������������� � ������������������������������������������������������������������������������������ ����� ����������������������� ������ � ������������������������ ���� ��������������������� ���������������������������� ������ ������������������������ ���������� � ���������������� ���������������������������� ������������������������������� ��������������������������� ��� ��������� ����������� �� ����� �� � ��������� ������ �� ���� �� ���� ��� ��������� �������� �� ���� �� ������� ������ �������� ��� ��������� �� ������� ��� ����������� �� �������� ������������� ���...
- Page 54 ���������������������� ���������������������� ����������������������������������� ����������������������������������� ������������������������������������� �������������������������������������� ������� ����������� ���� ���� ��� ���� ����������� �� ���������� �������������������������������������� ����� ����� ����...
-
Page 55: Warranty And Returns
WARRANTY AND RETURNS Grizzly Industrial, Inc. warrants every product it sells for a period of 1 year to the original purchaser from the date of purchase. This warranty does not apply to defects due directly or indirectly to misuse, abuse, negligence, accidents, repairs or alterations or lack of maintenance. - Page 56 ��� ������ ��� ���� ���� ������� ����� ��� ������� ����� ��� �������� ��� ������� � � � ���� ����� ��� � � �������� ������ ��� � ����� ������ � �� ��� �������� ������� � ������ �������� ������ ������� ������ �� ����� ������...