Table of Contents
Advertisement
Quick Links
Advertisement
Table of Contents

Related Manuals for Kenwood ProTalk TK-3701D


Summary of Contents for Kenwood ProTalk TK-3701D
- Page 1 TK-3701D USER MANUAL B5A-3234-00/01_EN...
-
Page 2: Table Of Contents
CONTENTS PREPARATION ....................3 INSTALLING/ REMOVING THE BATTERY PACK ............3 CHARGING THE BATTERY PACK ................4 INSTALLING THE BELT CLIP ..................5 INSTALLING THE CAP OVER THE SPEAKER/ MICROPHONE JACKS ....5 INSTALLING THE SPEAKER/ MICROPHONE OR HEADSET ........6 ORIENTATION .................... -
Page 3: Preparation
PREPARATION INSTALLING/ REMOVING THE BATTERY PACK The battery pack is not charged at the factory; charge it before use. CAUTION ◆ Do not short the battery terminals or dispose of the battery by fire. ◆ Never attempt to remove the casing from the battery pack. Align the battery pack with the back of the transceiver, then press the battery pack and transceiver firmly together until the release latch on... -
Page 4: Charging The Battery Pack
CHARGING THE BATTERY PACK ATTENTION: ◆ Always switch OFF a transceiver equipped with a battery pack before inserting the transceiver into the charger. Plug the AC adapter cable into the jack located on the rear of the charger. Plug the AC adapter into an AC outlet. Slide a battery pack or a transceiver equipped with a battery pack into the charging slot of the charger. -
Page 5: Installing The Belt Clip
INSTALLING THE BELT CLIP If necessary, attach the belt clip using the two Belt clip supplied M3 x 8 mm binding screws. Note: ◆ If the belt clip is not installed, its mounting location may get hot during continuous transmission or when left sitting in a hot environment. -
Page 6: Installing The Speaker/ Microphone Or Headset
INSTALLING THE SPEAKER/ MICROPHONE OR HEADSET Note: ◆ The transceiver is not fully water resistant when using a speaker/ microphone or headset. ◆ Use the Phillips #1 screwdriver. Insert the speaker/ microphone plugs into the speaker/ microphone jacks of the transceiver. Place the locking bracket over the speaker/ microphone plugs so that the locking tabs insert into the transceiver grooves. -
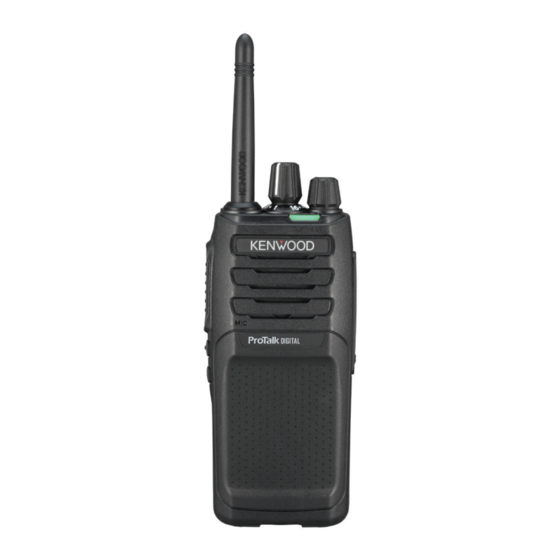
Page 7: Orientation
ORIENTATION ab c Antenna Speaker Microphone Battery pack a Selector Rotate to change the operating channel. b LED indicator Refer to the “LED Indicator Status” {p. 9}. c Power switch/ Volume control Turn clockwise to switch the transceiver ON. To switch the transceiver OFF, turn counterclockwise until a click sounds. -
Page 8: Basic Operation
BASIC OPERATION POWER ON Turn the Power switch/ Volume control clockwise to switch the transceiver power ON. • A beep will sounds. ADJUST THE VOLUME Rotate the Power switch/ Volume control to adjust the volume. • Clockwise increases the volume and counterclockwise decreases the volume. Note: ◆... -
Page 9: Receive Voice
RECEIVE VOICE The LED lights in green. When the other party transmits it, you hear the voice of the other party. POWER OFF After use, turn off the power. To switch the transceiver power OFF, turn the Power switch/ Volume control fully counterclockwise, until a click sounds. -
Page 10: Self-Programming Mode
SELF-PROGRAMMING MODE This transceiver allows you to reprogram each of the channels with different frequencies and QT/DQT (Analogue)/ Common ID (Digital) settings. The table below lists the default channel settings. Zone 1 (Analogue) Channel Number Frequency (MHz) QT/DQT 446.006250 94.8 Hz 446.093750 88.5 Hz 446.031250... - Page 11 Zone 3 (Digital) Channel Number Frequency (MHz) Common ID 446.003125 446.009375 446.015625 446.021875 446.028125 446.034375 446.040625 446.046875 446.053125 446.059375 446.065625 446.071875 446.078125 446.084375 446.090625 446.096875...
-
Page 12: Self-Programming Flow
SELF-PROGRAMMING FLOW The flow of Self-programming is as follows. [PTT] + [Side 1] + Power On Release [PTT] + [Side 1] Select the Zone Number [Side 1] / [Side 2] [PTT] Setup Mode Selection [Side 1] / [Side 2] : Change between setup modes. [PTT] : Enter to selected setup mode. -
Page 13: Zone Selection
ZONE SELECTION With the transceiver power OFF, press and hold the PTT switch and Side 1 button while turning the transceiver power ON. • Continue to hold the PTT switch and Side 1 button until the LED lights yellow and the transceiver announces “Self”. Release the PTT switch and Side 1 button. -
Page 14: Frequency Setup
FREQUENCY SETUP During Setup Mode Selection, rotate the Selector to select a channel number. • The transceiver announces the zone number and channel number. Press the Side 1 or Side 2 button to select the Frequency Setup Mode. • The transceiver announces “Channel”. Press the PTT switch to enter the Frequency Setup Mode. - Page 15 Frequency Table Digital Table Number Frequency (MHz) Table Number Frequency (MHz) 446.103125 446.003125 446.109375 446.009375 446.115625 446.015625 446.121875 446.021875 446.128125 446.028125 446.134375 446.034375 446.140625 446.040625 446.146875 446.046875 446.153125 446.053125 446.159375 446.059375 446.165625 446.065625 446.171875 446.071875 446.178125 446.078125 446.184375 446.084375 446.190625 446.090625 446.196875 446.096875...
-
Page 16: Qt/Dqt Setup (Analogue)
QT/DQT SETUP (ANALOGUE) Quiet Talk (QT) and Digital Quiet Talk (DQT) are functions that reject undesired signals on your channel. You will hear a call only when you receive a signal that contains a matching QT tone or DQT code. If a call containing a different tone or code is received, squelch will not open and you will not hear the call. - Page 17 QT/DQT Table QT frequency QT frequency Table Number Table Number DQT Code DQT Code 67.0 Hz 136.5 Hz 71.9 Hz 141.3 Hz 74.4 Hz 146.2 Hz 77.0 Hz 151.4 Hz 79.7 Hz 156.7 Hz 82.5 Hz 162.2 Hz 85.4 Hz D132N 88.5 Hz D155N...
-
Page 18: Common Id Setup (Digital)
COMMON ID SETUP (DIGITAL) Common ID is a signaling system designed for Digital communications. When a channel is setup with an ID, squelch will only open when a call containing a matching Common ID is received. If a call containing a different Common ID is made on the same channel you are using, you will not hear the call. -
Page 19: Channel Confirmation Mode
CHANNEL CONFIRMATION MODE To confirm your channel settings: With the transceiver power OFF, press and hold the PTT switch while turning the transceiver power ON. • Continue to hold the PTT switch until the LED lights yellow and the transceiver announces “Confirm”. Release the PTT switch. -
Page 20: Button Function Programming Mode
BUTTON FUNCTION PROGRAMMING MODE This transceiver allows you to reprogram the Side 1 and Side 2 buttons with any of the functions listed in the table below. Explanations on the use of each function are provided under “PROGRAMMABLE FUNCTIONS” {p. 22}. Functions List Table Press... - Page 21 To change the functions of the Side 1 and Side 2 buttons: With the transceiver power OFF, press and hold the Side 1 and Side 2 buttons while turning the transceiver power ON. • Continue to hold the Side 1 and Side 2 buttons until the LED lights yellow and the transceiver announces “Setup”.
-
Page 22: Programmable Functions
PROGRAMMABLE FUNCTIONS Calling Alert Calling alert tones help identify yourself to party members and inform them that you are calling. Your dealer can set up your transceiver with 1 of 10 calling alert tones. If each party member uses a different tone, it is easy to know who is calling. To make a call, press the button programmed as Calling Alert. - Page 23 Scan Press this button to start scanning the transceiver channels. Second Channel Scan: This scan type to start the Second Channel Scan on the current zone. The Second Channel Scan is set by your dealer. Priority Scan: The Priority channel is a channel that is given first priority to while scanning.
-
Page 24: Voice Operated Transmission (Vox)
VOICE OPERATED TRANSMISSION (VOX) VOX (VOX/ Semi-VOX) operation allows you to transmit hands-free. VOX can only be used if you are using a supported headset. VOX Type VOX: When the voice level to the microphone is higher than the reference level (VOX Gain Level), the transceiver automatically starts transmission. - Page 25 Note: ◆ If a headset is connected to the transceiver while the VOX function is switched ON and the VOX Gain level is configured to a higher, more sensitive level, louder received signals may cause the transceiver to start transmission. ◆...
-
Page 26: Second Ptt Function
SECOND PTT FUNCTION Apart from the channel you normally select, you can use another channel (Second PTT channel) with a dedicated [Second PTT]. • The Second PTT function can be activated by your dealer. Operation Press the button programmed as [Second PTT] to move to the second PTT channel. -
Page 27: Background Operations
BACKGROUND OPERATIONS TIME-OUT TIMER (TOT) The Time-out Timer prevent callers from using a channel for an extended duration. If you continuously transmit for the duration programmed by your dealer (default is 60 seconds), transmission will stop and an alert tone will sound. To stop the tone, release the PTT switch. -
Page 28: All Reset Mode
ALL RESET MODE At some point in time, you may desire to reset the transceiver settings to their default values. This function will reset all channels to their default frequencies and Common ID (Digital)/ QT/DQT (Analogue), the VOX function to its default status, and all buttons to their default functions. -
Page 29: Troubleshooting Guide
TROUBLESHOOTING GUIDE Problem Solution Cannot turn the transceiver • The battery pack may be dead. Recharge or replace power ON. the battery pack. • The battery pack may not be installed correctly. Remove the battery pack and install it again. Battery power dies shortly after •... -
Page 30: Specifications
SPECIFICATIONS RF Output Power 0.5 W e.r.p. Audio Output Power 1 W (internal speaker) / 500 mW (external output) ± 0.5 ppm Frequency Stability Operating Voltage 7.5 V DC ±20 % Operating Temperature –30°C - +60°C Range Dimensions (W x H x D) (Projections not included 54 ×... - Page 31 © 2020...