Table of Contents
Advertisement
Quick Links
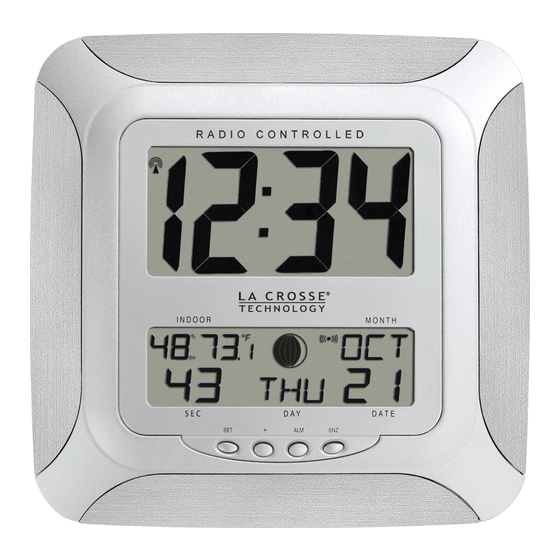
ATOMIC CLOCK WITH TEMPERATURE, HUMIDITY AND
FEATURES:
ATOMIC CLOCK:
LCD1
display
LCD2
display
Function keys
• WWVB Radio controlled time with manual time setting
• Time display: hour, minute, second
• Alarm setting with snooze function
• Complete calendar display
• Weekday display (3 languages to choose from: English, French and Spanish)
• Time zone setting
• Daylight savings time ON/OFF option (DST)
• Indoor temperature display
• Indoor humidity display
• Wall mount or freestanding
• Moon phase display
WS-8236U
MOON PHASE
Instruction Manual
1
Hanging holes
Battery cover
Foldable stands
Advertisement
Table of Contents

Related Manuals for La Crosse Technology WS-8236U-AL


Summary of Contents for La Crosse Technology WS-8236U-AL
- Page 1 WS-8236U ATOMIC CLOCK WITH TEMPERATURE, HUMIDITY AND MOON PHASE Instruction Manual FEATURES: ATOMIC CLOCK: Hanging holes LCD1 display LCD2 Battery cover display Function keys Foldable stands • WWVB Radio controlled time with manual time setting • Time display: hour, minute, second •...
-
Page 2: To Install And Replace Batteries In The Atomic Clock
TO INSTALL AND REPLACE BATTERIES IN THE ATOMIC CLOCK The atomic clock uses 3 x AA, 1.5V batteries. To install and replace the batteries, please follow the steps below: Pull down on the tab at the top of the battery cover and lift up to remove the cover. Insert batteries observing the correct polarity (see marking inside battery compartment). -
Page 3: Manual Settings
+ key : To change any values in manual set mode or alarm set mode ALM key : To enter into the alarm set mode To set the alarm ON/OFF To display the alarm time in normal mode display To exit the setting modes SNZ key : To activate the snooze function during alarm ATOMIC CLOCK LCD SCREEN DESCRIPTIONS... -
Page 4: Lcd Contrast Setting
After completion of the above described procedures in “Setting up” the manual setting modes can be entered by pressing and holding the SET key for 5 seconds. The following settings can now be programmed: Default (Factory) Setting LCD contrast setting •... -
Page 5: Radio-Controlled Time Setting
Press and release the + key to select the desired time zone. Press and release the SET key to confirm the time zone setting and continue to the DST (Daylight Saving Time) setting. Note: The time zones from –4 to –10 hours will be displayed with 3 characters abbreviations: •... -
Page 6: Language Setting
Press and release the + key to select radio-controlled time ON or OFF. Press and release the SET key to confirm the radio-controlled time setting and continue to the Language setting. Note: Turn off the radio-controlled time feature only if you DO NOT want the clock to automatically update itself. -
Page 7: Year Setting
Press and release the SET key to confirm the Time setting and continue to the Year setting. Note: The unit will still try to receive the signal every day despite it being manually set. When it does receive the signal, it will change the manually set time into the received time. During reception attempts the WWVB tower icon will flash. -
Page 8: Exit The Manual Setting Modes
Note: The date can only be set in conjunction with the selected month. For example, it is not possible to set the date 30 if the month of February is selected. EXIT THE MANUAL SETTING MODES To return to the normal display mode from anywhere in manual setting mode simply press •... -
Page 9: Wwvb Radio Controlled Time
WWVB RADIO CONTROLLED TIME The NIST radio station, WWVB, is located in Ft. Collins, Colorado and transmits the exact time signal continuously throughout the United States at 60 kHz. The signal can be received up to 2,000 miles away through the internal antenna in the atomic clock. However, due to the nature of the Earth’s Ionosphere, reception is very limited during daylight hours. -
Page 10: Positioning The Atomic Clock
MOON PHASES FOR THE WS-8236U New Moon Small Waxing Large Waxing First Quarter Small Waxing Large Waxing Crescent Crescent Gibbous Gibbous Full Moon Large Waning Small Waning Last Quarter Large Waning Small Waning Gibbous Gibbous Crescent Crescent POSITIONING Before permanently mounting ensure that the atomic clock is able to receive WWVB signals from the desired location. -
Page 11: Troubleshooting
WALL MOUNTING 1) Using a straight edge, horizontally space at about 2“ (50 mm) three screw positions on a wall. 2) Install three mounting screws (not included) into a wall —leaving approximately 0.19“ (5mm) extended from the wall. 3) Place the atomic clock onto the screws, using the hanging holes on the backside. -
Page 12: Specifications
• When cleaning the LCD and casing, use a soft damp cloth only. Do not use solvents or scouring agents. • Do not submerge the unit into water. • Immediately remove all low powered batteries to avoid leakage and damage. Replace only with new batteries of the recommended size. -
Page 13: Warranty Information
La Crosse Technology, Ltd or La Crosse Technology, Ltd’s authorized service center. La Crosse Technology, Ltd will repair or replace this product, at our option and at no charge as stipulated herein, with new or reconditioned parts or products if found to be defective during the limited warranty period specified above. - Page 14 LA CROSSE TECHNOLOGY, LTD WILL NOT ASSUME LIABILITY FOR INCIDENTAL, CONSEQUENTIAL, PUNITIVE, OR OTHER SIMILAR DAMAGES ASSOCIATED WITH THE OPERATION OR MALFUNCTION OF THIS PRODUCT. THIS PRODUCT IS NOT TO BE USED FOR MEDICAL PURPOSES OR FOR PUBLIC INFORMATION. THIS PRODUCT IS NOT A TOY.