Table of Contents
Advertisement
Quick Links
Advertisement
Table of Contents

Related Manuals for La Crosse Technology WT-5130


Summary of Contents for La Crosse Technology WT-5130
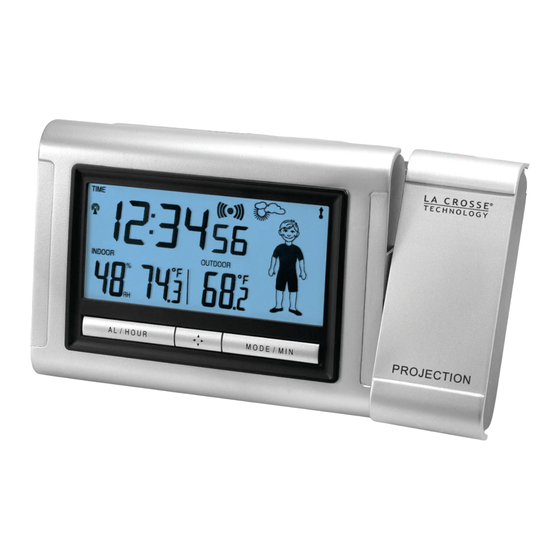
- Page 1 WT-5130ER Radio-Controlled Alarm Clock with Time Projection...
-
Page 2: Table Of Contents
ABLE OF CONTENTS About this Manual…………………………..……….………………………………..3 Before you Begin (inventory of items)……..…………….………………………….3 Glossary of Common Terms……………..……………………….…………………4 Quick Set-up Guide……………………………..……………...……………………..5 Detailed Set-up Guide……………………..……..………..…….………….……6-11 Battery Installation……………………………..……………………………6-7 Program Mode……………………………..…………………………………..7 Programming Sequence………………..……………………………………..8 Function Buttons……………………………………………………………….8 LCD Contrast Setting………..………………………………………………..8 Time Zone Setting…………………………………………………………..8-9 Manual Time Setting..……………………………………………………..9-10 Year, Month, & Day Setting.……………..……..…………………………...10 12/24-Hour Time Setting…………………………………………………….10 °C/°f Setting……………………….………………………………………10-11 DST (daylight saving time) Setting…………………………………………11... -
Page 3: About This Manual
1991 and continues to be on the cutting-edge of this technology in America. This manual will guide you step-by-step through setting up your La Crosse Technology device. Use this manual to become familiar with projection alarm clock, and save it for future reference. EFORE YOU BEGIN Please verify the contents of your projection alarm clock before beginning the set-up. -
Page 4: Glossary Of Common Terms
LOSSARY OF COMMON TERMS NIST* The National Institute of Standards and Technology maintains the primary frequency standard for the United States. The NIST also coordinates the United States time and frequency standards with other world standards. The NIST provides time and frequency services for United States clientele. -
Page 5: Quick Set-Up Guide
UICK SET-UP GUIDE Hint: Use good quality alkaline batteries and avoid rechargeable batteries. 1. Place the projection alarm and remote temperature sensor 3-5 feet apart. 2. Batteries should not be installed into either unit for 15 minutes. 3. Place the batteries into the remote temperature sensor first and then into the projection alarm. -
Page 6: Detailed Set-Up Guide
ETAILED SET-UP GUIDE A. BATTERY INSTALLATION 1. REMOTE TEMPERATURE TRANSMITTER a. Remove the battery cover. b. Observing the correct polarity, install 2 AA batteries. The batteries will fit tightly (to avoid start-up problems make sure that they do not spring free during installation). -
Page 7: Program Mode
NOTES: • After the batteries have been installed a tone will sound, and the LCD (Liquid Crystal Display) will activate. • The indoor temperature/humidity and the remote temperature will be displayed. Also, the time will appear as “-:--”. • The WWVB search is automatically initiated, and a tower icon appears and flashes with the time colon (no tower icon will appear if the WWVB is too weak to be detected, and the time display will remain on “-:--”). -
Page 8: Programming Sequence
C. PROGRAMMING SEQUENCE 1. LCD Contrast Setting 2. Time Zone Setting 3. Manual Time Display 4. Year, Day & Date Setting 5. 12/24-Hour Setting 6. °C/°F Setting 7. Daylight Saving Time On/Off D. FUNCTION BUTTONS There are 3 function buttons located on the front of the projection alarm and one on the top. -
Page 9: Manual Time Setting
2. Press and release the “SNOOZE/ADVANCE MODE” bar to advance to the time zone selection. 3. In the indoor temperature/humidity section of the LCD, the time zone will flash. 4. Press and release the “SET/+/MIN” button to select the appropriate time zone. There are 24 time zones to choose from (based relative to the international time standard of GMT (“Greenwich Mean Time”). -
Page 10: Year, Month, & Day Setting
2. Press and release the “SNOOZE/ADVANCE MODE” bar to advance to the Year Setting. 3. Press and release the “SET/+/MIN” button to advance the year. The range for the year is 2003-20029. 4. Press and release the “SNOOZE/ADVANCE MODE” bar to confirm the year and advance to the Month and Day setting. -
Page 11: Dst (Daylight Saving Time) Setting
4. Press and release the “SET/+/MIN” button to toggle between DST ON and OFF. 5. Press and release the “SNOOZE/ADVANCE MODE” bar to confirm the DST setting and complete the set-up sequence. The DST default is “ON”, meaning that the WWVB will automatically NOTE: change the time according to Daylight Saving Time in the spring and fall. -
Page 12: Features And Operations
EATURES & OPERATIONS A. FEATURES 1. Projection of time and/or remote temperature 2. EL backlight 3. Display of indoor temperature/humidity or alarm time 4. Indoor temperature and humidity 5. Remote outdoor temperature 6. Time alarm 7. Weather Forecast & Weather boy icon B. -
Page 13: Indoor Humidity
3. The indoor temperature will take time to adjust to the surrounding temperature as the sensor is inside the case. 4. If the remote temperature is placed next to the projection alarm, more often than not the temperatures will not be exact with one another. - Page 14 a. Press and hold “AL/HOUR” button for 3 seconds until the alarm time is flashing. b. Press and release “AL/HOUR” to advance the hour, and “SET/+/MIN” to advance the minute. The time will display “PM” if set to PM, and display nothing if set to c.
-
Page 15: Changing Display Mode
H. CHANGING DISPLAY MODE (INDOOR TEMPERATURE/HUMIDITY OR ALARM TIME) There are two possible display modes in the indoor temperature/humidity section of the LCD (lower left). To change the display press and release the “SET/+/MIN” button to toggle between the two modes. I. - Page 16 After setting up, readings for weather forecasts should be NOTE: disregarded for the next 12-24 hours. This will allow sufficient time for the projection alarm clock to collect air pressure data at a constant altitude and therefore result in a more accurate forecast. Common to weather forecasting, absolute accuracy cannot be guaranteed.
- Page 17 WEATHER BOY FORECASTING ICONS: A total of 15 Weather Boy icons combinations can be displayed depending on outdoor temperature and air pressure recorded from the remote temperature sensor only. Once the temperature and air pressure are recorded, the projection alarm clock automatically display the appropriate Weather Boy icon as an indication of current weather and suggestion for dressing up accordingly.
-
Page 18: Mounting
B. Mounting with adhesive tape A. MOUNTING WITH SCREWS 1. Remove the mounting bracket from the remote temperature sensor. The bracket should snap off easily. 2. Place the mounting bracket over the desired location. Through the three screw holes of the bracket, mark the mounting surface with a pencil. -
Page 19: Troubleshooting
• Do not try to repair the units. Contact La Crosse Technology for Repairs. ROUBLESHOOTING The Projection is faint Problem 1) Change intensity setting 2) Use AC adapter Solution 3) Darken surroundings 4) Use fresh batteries (if AC is not used) The LCD is faint. -
Page 20: Specifications
4) Contact La Crosse Technology. NOTE: For any questions not answered, contact La Crosse Technology with the contact information found at the end of this instructional manual. PECIFICATIONS FOR WT-5130ER Temperature 14°F to 98.4°F with 0.2°F resolution (indoor) Measuring range: -22°F to 157.8°F... - Page 21 La Crosse Technology, Ltd or La Crosse Technology, Ltd’s authorized service center. La Crosse Technology, Ltd will repair or replace this product, at our option and at no charge as stipulated herein, with new or reconditioned parts or products if found to be defective during the limited warranty period specified above.
-
Page 22: Warranty & Contact Information
LA CROSSE TECHNOLOGY, LTD WILL NOT ASSUME LIABILITY FOR INCIDENTAL, CONSEQUENTIAL, PUNITIVE, OR OTHER SIMILAR DAMAGES ASSOCIATED WITH THE OPERATION OR MALFUNCTION OF THIS PRODUCT. - Page 23 (1) this device may not cause harmful interference, and (2) this device must accept any interference received, including interference that may cause undesired operation. Freq. 433.92 MHz La Crosse Technology Made in China WT-5130ER FCC ID: OMO-01RX (Receiver), OMO-01TX (transmitter) THIS DEVICE COMPLIES WITH PART 15 OF THE FCC RULES.