
Related Manuals for E-FLITE EFL87850


Summary of Contents for E-FLITE EFL87850
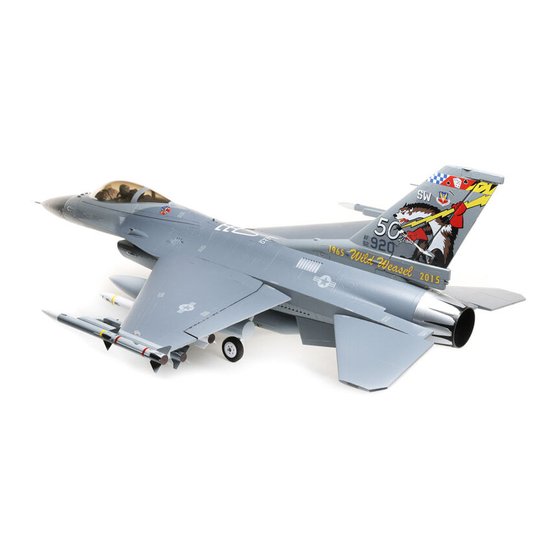
- Page 1 F-16 Falcon 80mm EDF EFL87850 EFL87870 Instruction Manual Bedienungsanleitung Manuel d’utilisation Manuale di Istruzioni...
- Page 2 NOTICE All instructions, warranties and other collateral documents are subject to change at the sole discretion of Horizon Hobby, LLC. For up-to-date product literature, visit horizonhobby.com or towerhobbies.com and click on the support or resources tab for this product. MEANING OF SPECIAL LANGUAGE The following terms are used throughout the product literature to indicate various levels of potential harm when operating this product: WARNING: Procedures, which if not properly followed, create the probability of property damage, collateral damage, and serious injury OR create a high probability of superficial injury.
-
Page 3: Table Of Contents
Box Contents Quick Start Information Set up your transmitter Transmitter Setup using the transmitter setup chart High Rate Low Rate Aileron: Measured at p = 15mm p = 11mm the root of the aileron. q = 15mm q = 11mm Elevator: Measured p = 32mm p = 25mm... -
Page 4: Decal Application
Decal Application Apply the included peel and stick decals to customize the aircraft as desired. F-16 Falcon 80mm EDF... - Page 6 F-16 Falcon 80mm EDF...
- Page 7 #11 #10...
-
Page 8: Select Technology (Bnf Basic)
SAFE Select Technology (BNF Basic) ® The BNF Basic version of this airplane includes SAFE Select technology which can SAFE Select can be configured three ways; offer an extra level of protection in flight. Use the following instructions to make the •... - Page 9 Wing Installation 1. Slide the short large diameter wing tube (10 x 420mm) (A) into the front hole in the fuselage. 2. Slide the long, small diameter wing tube (7.75 x 750mm) (B) into the rear hole in the fuselage. 3.
- Page 10 Vertical Stabilizer Installation 1. Slide the vertical stabilizer (A) in the fuselage vertical stabilizer pocket. 2. Secure the vertical stabilizer with two M3x26mm countersunk machine screws (B) (2mm hex driver required). Nose Cone Installation 1. Align and attach the nose cone to the fuselage. Magnets will secure the nose cone in place.
-
Page 11: Scale Accessories Optional
Scale Accessories Optional Armament Installation The dummy missile and drop tank stores may be installed for flight or removed as desired. 1. Insert the mounting tabs, of the wing tip missile rails (A and B), into the bracket on each wing tip, noting that the beveled side is facing to the outside. -
Page 12: Receiver Installation (Arf Plus)
Receiver Installation (ARF Plus) Afterburner Ring Installation (Sold Separately) To add the optional Afterburner Ring. An extension lead is already installed in the fuselage for the afterburner ring. The end of the lead is taped under the vertical stabilizer mounting structure inside the fuselage. -
Page 13: Receiver Installation (Arf Plus)
Receiver Installation (ARF Plus) The Spektrum AR637T receiver is recommended for ths airplane. If you choose to install another receiver, ensure that it is at least a 6-channel full range (sport) receiver. Refer to your receiver manual for correct installation and operation instructions. Installation (AR637T shown) 1. -
Page 14: Battery Installation And Esc Arming
Battery Installation and ESC Arming Battery Selection A 6S 4000-7000mAh LiPo battery is required. The Spektrum 5000mAh 22.2V 6S 30C LiPo battery (SPMX50006S30) is recommended. Refer to the Optional Parts List for other recommended batteries. If using a battery other than those listed, the battery should be within the range of capacity, dimensions and weight of the Spektrum LiPo battery packs to fit in the fuselage. -
Page 15: Transmitter And Receiver Binding (Bnf Basic)
Transmitter and Receiver Binding (BNF Basic) General Binding Tips • The included receiver has been specifically programmed • Once bound, the receiver will retain its bind settings for operation of this aircraft. Refer to the receiver manual for that transmitter until you re-bind. for correct setup if the receiver is replaced. -
Page 16: Select Switch Designation
SAFE Select Switch Designation ® SAFE Select technology can be assigned to any open switch (2 or 3 position) Assigning a switch ® Mode 1 and 2 transmitters controlling a channel (5–9) on your transmitter. Once assigned to a switch, SAFE select 1. -
Page 17: Control Surface Direction
Control Surface Direction Switch on the transmitter and connect the battery. Use the transmitter to operate the aileron, elevator, and rudder controls. View the aircraft from the rear when Aileron stick checking the control directions. Ailerons 1. Move the aileron stick to the left. The right aileron should move down and the left aileron up, which will cause the aircraft to bank left. -
Page 18: Dual Rates And Control Throws
Dual Rates and Control Throws Program your transmitter to set the rates and control throws based on your Low Rate High Rate experience level. These values have been tested and are a good starting point to 11mm (7/16”) p 15mm (9/16”) p achieve a successful first flight. -
Page 19: Flying Tips And Repairs
Flying Tips and Repairs Consult local laws and ordinances before choosing a flying location. If landing on grass, it is best to hold full up elevator after touchdown and when taxiing to prevent the nose from digging in. Once on the ground, avoid sharp turns Getting Started until the plane has slowed enough to prevent scraping the wingtips. -
Page 20: Thrust Reversing (Optional)
Thrust Reversing (Optional) The Avian™ Smart ESC in this aircraft is equipped with thrust reversing, but it must be enabled before it will function. Reversing the motor can be helpful when Set up the transmitter according to the setup chart, and bind your transmitter to the taxiing, or for shortening the ground roll after a landing. -
Page 21: Post Flight
Post Flight 1. Disconnect the flight battery from the ESC (required for safety and battery life). 5. Repair or replace all damaged parts. 2. Power OFF the transmitter. 6. Store the flight battery apart from the aircraft and monitor the battery charge. 3. -
Page 22: Troubleshooting Guide As3X
Troubleshooting Guide AS3X Problem Possible Cause Solution Damaged rotor or nose cone Replace rotor or nose cone Imbalanced rotor Balance the rotor Motor vibration Replace parts or correctly align fan unit or other parts and tighten fasteners as needed Oscillation Loose receiver Align and secure receiver in fuselage Loose aircraft controls... -
Page 23: Replacement Parts
Optional Parts Replacement Parts Part # Description Part # Description EFLA250 Park Flyer Tool Assortment, 5 pc EFL01095 Landing gear sequencer: SU-30 and F-16 SMART Battery Checker and Servo Driver EFL87876 Fuselage: F-16 Falcon 80mm EDF SPMXBC100 (IC3 - use SPMXCA507) EFL87877 Wing Set: F-16 Falcon 80mm EDF DYN1405... -
Page 24: Ama National Model Aircraft Safety Code
AMA National Model Aircraft Safety Code Academy of Model Aeronautics National Model Aircraft Safety Code Effective January 1, 2018 A model aircraft is a non-human-carrying device capable of sustained flight within visual line of sight of the pilot or spotter(s). It may not exceed limitations of this code and is intended exclusively for sport, recreation, education and/or competition. -
Page 25: Contact Information
It should be deposited at an appropriate facility to enable recovery and recycling. EFL F-16 Falcon 80mm BNF Basic (EFL87850); Hereby, Horizon Hobby, LLC EU Manufacturer of Record: declares that the device is in compliance with the following: EU Radio Equipment... - Page 26 © 2021 Horizon Hobby, LLC. E-flite, AS3X, DSM, DSM2, DSMX, Spektrum Airware, Bind-N-Fly, BNF, the Bind-N-Fly logo, SAFE, the SAFE logo, ModelMatch, and the Horizon Hobby logo are trademarks or registered trademarks of Horizon Hobby, LLC. The Spektrum trademark is used with permission of Bachmann Industries, Inc. All other trademarks, service marks and logos are property of their respective owners.