Viper 5901 Owner's Manual
Responder lc security and remote start
Hide thumbs
Also See for 5901:
- Owner's manual (65 pages) ,
- Owner's manual (60 pages) ,
- Installation manual (64 pages)

Related Manuals for Viper 5901


Summary of Contents for Viper 5901
- Page 1 Responder LC Model 5901 Security and Remote Start Owner’s Guide © 2008 Directed Electronics, Vista, CA G5702V 2008-08...
-
Page 3: Table Of Contents
Government regulations ...5 Warning! Safety first ...7 What is included ...10 Important information ...10 Your warranty...10 Replacement remote controls ...11 Out of Range Notification ...11 System maintenance ...11 Charging the Battery ...12 Low battery indicator ...12 Battery Replacement ...13 Responder LC 2-Way ...14 LC 1-way companion ...15 Transmitter configuration ...15 Using the system ...17... - Page 4 2-way remote ...46 Programming options ...47 Security & convenience expansions ...49 Glossary of terms ...51 LCD layout ...53 Quick reference guide ...55 Limited lifetime consumer warranty ...57...
-
Page 5: Government Regulations
Government regulations This device complies with Part 15 of FCC rules. Operation is subject to the fol- lowing two conditions: (1) This device may not cause harmful interference, and (2) This device must accept any interference received, including interference that may cause undesirable operation. - Page 6 Control Center To satisfy FCC RF exposure compliance requirements, the device and its antenna must maintain a separation distance of 20 cm or more from the person’s body, except for the hand and wrists, to satisfy RF exposure compliance. This device complies with the Industry Canada Radio Standards Specification RSS 210.
-
Page 7: Warning! Safety First
Warning! Safety first The following safety warnings must be observed at all times: Due to the complexity of this system, installation of this product must only be performed by an authorized Directed dealer. When properly installed, this system can start the vehicle via a command signal from the remote control transmitter. - Page 8 WARNING! It is the responsibility of the owner to ensure the parking/emergen- cy brake properly functions. Failure to do so can result in personal injury or prop- erty damage. We recommend the owner have the parking / emergency brake system inspected and adjusted by a qualified automotive shop biannually. Use of this product in a manner contrary to its intended mode of operation may result in property damage, personal injury, or death.
- Page 9 This product is designed for fuel injected vehicles only. Use of this product in a standard transmission vehicle must be in strict accordance with this guide. This product should not be installed in any convertible vehicles, soft or hard top with a manual transmission. Installation in such vehicles may pose certain risk.
-
Page 10: What Is Included
What is included • 1 five-button, 2-way Supercode Responder LC remote control (p/n 7752V) • 1 five-button, 1-way Supercode remote control • The control module with Stinger™DoubleGuard®two-stage shock sensor • Control center with integrated status LED and Valet override switch (P/N 6711T) •... -
Page 11: Replacement Remote Controls
ed if your warranty registration is not returned. Make sure you receive the warranty registration from your dealer. It is also necessary to keep your proof of purchase, which reflects that the product was installed by an authorized dealer. ➢ Replacement remote controls Your system comes with one Responder LC remote control (P/N 7752V and one companion remote control (P/N... -
Page 12: Charging The Battery
➢ Charging the Battery • Plug in the USB charger (alternately a standard mini USB cable connected to any standard USB port on any laptop or desktop computer can also be used (cable not included). • The LCD displays “CHARGE” while the battery level bars within the battery icon flash. -
Page 13: Battery Replacement
➢ Battery Replacement Slide the door up to expose the battery beneath the holder. Remove the expired battery. Place the new battery into the remote control. When power is returned the remote control is ready for use. ➢ Multi-car control capability You can operate the 2-way remote control system for two cars, with full command capability for both vehicles. -
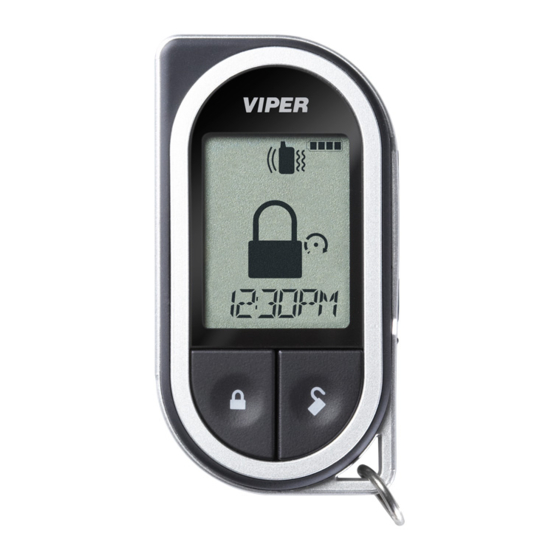
Page 14: Responder Lc 2-Way
Responder LC 2-Way Feature Description LCD (2-way) Lock button Unlock button Auxiliary button Remote start button Function button Charge Port (2-way) Label Battery Door (1-way) Transmit LED (1-way) Note: If the keypad is locked, first press Activity/icon display Press for one second to arm. Press for one second to disarm. -
Page 15: Lc 1-Way Companion
LC 1-way companion Note: See call-out table for 2 way on previous page. ➢ Transmitter configuration Direct Access Level Button Arm/Lock (Panic) Disarm/Unlock Remote Start A U X On/Off A U X Trunk Release A U X A U X Advance Level Change Car (3s), Enter... - Page 16 access “Request temperature” or “Runtime remaining” press the but- ton the specified amount of times, and then hold. Note: Pressing more than one button simultaneously generates an Error tone. © 2008 Directed Electronics. All rights reserved.
-
Page 17: Using The System
Using the system Please note the screen shot to the right of a feature indicates what the display looks like when this feature is activated. Command Press one time to Arm Feedback Lock Icon will appear, and one beep from remote Notes Press/hold for 1.5 seconds to Arm A U X... - Page 18 Disarm Command Press one time to Disarm Feedback Unlock icon appears and remote beeps A U X twice The siren in the vehicle will “chirp” twice, and the parking lights will flash. The 2-way remote will twice “chirp” and the confirm disarming.
- Page 19 minutes and 1 minute of runtime remaining, it sends the 2-way remote control a paging signal. Points to remember : If the hood is open or if the brake pedal is pressed, the vehicle will not remote start. The remote start shuts down: •...
- Page 20 A U X Command Press and hold for 1.5 seconds to activate the Trunk Release. Feedback The trunk icon appears and the re- mote plays a short tone. Notes This is an optional feature. See your sales rep/installer for details factory default icon and text is trunk.
-
Page 21: Car Finder
To enter or exit valet mode with the valet/program switch: Turn At anytime during the next 10 seconds, press and release the Valet switch. Now the Status LED lights constantly if you have entered Valet® Mode, and shuts off when exiting Valet Mode. When locking the system in Valet Mode, the screen displays “valet”... - Page 22 Cabin temperature Command Press and release Hold for 1.5 seconds. Feedback Screen will display current in cabin temperature. Notes Cabin temperature is displayed on the remote. one time, then © 2008 Directed Electronics. All rights reserved.
-
Page 23: Additional Arming Features
Additional arming features ➢ Arm Features: Silent arm Command Press Feedback Screen changes to the lock icon Notes Arms the system without chirps The system arms without the confirmation chirp. The parking lights will flash once. The 2-way remote will not “chirp” and the lock icon will appear to confirm arming. - Page 24 Warn-Away response is triggered by: • Lesser or lighter vibrations or impacts (detected by the Stinger Doubleguard shock sensor) • An optional Proximity Sensor (508D) triggered in the outer zone Full Alarm response is triggered by: • Heavier impact to the vehicle (detected by the Stinger Double- Guard shock sensor).
-
Page 25: System Override
sponse will reset. ➢ System override To disarm the system without a remote control: You will need to use your Override Switch located on your systems control center (see diagram below) to disarm the system. The Override Switch disarms the system only if you have the vehicle key. To check proper operation: •... -
Page 26: Modified Arming Modes
➢ Modified Arming Modes The Responder LC gives you an unprecedented level of control over how it will protect your car. “Normal arming” means that all the Re- sponder LC security features are active automatically. You can turn some security features off on a one-time basis. Turning off the Warn Away response After arming, you can turn off the Warn-Away response on a one-time basis. -
Page 27: Disarm Features
will beep once. Silent Mode 2 - Turning off the siren You can turn off the vehicle siren and flashing lights on a one-time basis, leaving the system’s paging feature as the only alarm response. Note: Call the police immediately if you witness a crime in progress. Paging range varies with terrain and environmental conditions. -
Page 28: Additional Remote Start Features
Additional remote start features Manual Transmission If the vehicle has a manual transmission the proper steps must be fol- lowed before leaving the parked vehicle or the remote start feature is disabled. Make sure the engine is running and the doors on the vehicle are closed. - Page 29 running. If the vehicle shuts down when locking, then the unit did not enter valet take-over mode. Timer mode Command Press Feedback Small timer icon appears and text reads “timer start on”. The vehicle will confirm with 4 fast parking light flash- Notes Enables or disables the remote start timer mode.
- Page 30 Turn the ignition on. Timer Mode is exited and the parking lights flash slowly four times. Note: The Bitwriter can change the amount of times the remote start activates and, it can change the intervals between activations in timer mode. Turbo Timer mode Short run turbo mode keeps the engine running after arriving at your destination for a programmable period of 1, 3, 5 or 10 minutes.
- Page 31 still enabled). You can still remote start the vehicle after the turbo timer has timed out and shut off the vehicle. For safety reasons, if a door is opened or if the alarm is triggered while you are away, the remote start exits the manual transmission mode and does not remote start until the MTS sequence is re-initiated.
- Page 32 remote will respond with error tone. Rear defogger Command Press start is on.) Feedback Defogger icon appears on remote and text reads Defrost Notes While the remote start is running the defroster will manu- ally be turned on for one remote start cycle. When the remote start shuts down, the defroster will work normally.
- Page 33 will shut down when locking). Press the button on the remote 3 times and then press the button. The 2 way remote will beep once and flash the The parking lights on the vehicle will flash 5 times fast confirming entry into smart start mode The vehicle will now remote start when the cabin temperature reaches the programmed thresholds or when the vehicle battery...
-
Page 34: Auxiliary Features
Auxiliary features Aux 1 Command Press Feedback The screen will show a text of the item activated * Notes This is an optional feature. See your sales rep/installer for details. The Auxiliary output controls: Aux 2 Command Press Feedback Text will display the item activated * Notes This is an optional feature. -
Page 35: Remote Control Feature Programming
Remote control feature programming The Responder LC 2-way remote control has menus for configuring the remote control user features and for programming the remote to the system control module. Before you start make sure the keypad is unlocked. (See page 14) To program the remote user features: Press and hold the the car indicator at 3 seconds). -
Page 36: Remote Setup Options
display area of the screen, press and hold the beeps to confirm entry into the selected feature menu. To access feature menu options, scroll up pressing the scroll down by pressing the When the feature option that you want to program is displayed in the LCD text area, press and hold the feature. -
Page 37: Menu Option Descriptions
Feature Opt 1 Button press beep System type Remote start & Security Clock set Clock time ➢ Menu option descriptions • Auto keypad lock Automatically locks the remote buttons when the buttons are not used for 60 seconds. Prevents “accidental” presses of the remote. Press then Note: If the auto keypad lock feature is programmed On, the remote auto-... - Page 38 • Remote start display: Clock, temperature or runtime Allows you to choose what is displayed in the text during the remote start sequence. Clock displays the current time during remote start. Temperature displays the current cabin temperature during the remote start. Runtime displays the runtime remaining during the remote start.
-
Page 39: Sensor Adjust
down the menu. After you select the time increment (hour /min ), press minute flashes. Press the press the button to move down to the hour or minute you want to set. Once the desired time has been reached you can either choose “back” in the menu or press ➢... -
Page 40: Safety Features
Safety features This system has several important safety features to ensure proper op- eration of the motor and prevent accidental damage to the engine or its components. ➢ Starter anti-grind circuitry Whenever the vehicle is remote started, advanced anti-grind circuitry prevents the starter from engaging, even if the key is turned to the start position. -
Page 41: Diagnostics
Diagnostics The microprocessor at the heart of your system is constantly monitoring all of the switches and sensors connected to it. It is designed to detect any faulty switches and sensors and prevent them from disabling the entire system. The microprocessor will also record and report any trig- gers that occurred during your absence. -
Page 42: Disarming
Note: Bypass Notification does not occur when the system is in Silent Mode or if the notification chirps have been programmed off by the installer. ➢ Disarming Extra chirps heard when disarming the system are the Tamper Alert. If four chirps are heard when disarming the system, then the security system was triggered in your absence. -
Page 43: Table Of Zones
Disarm Disarm Disarm ➢ Table of zones A zone is represented by the number of LED flashes used by the system to identify a particular type of input. Standard input assignments are listed in the following table, along with spaces to write in any optional sensors or switches that have been installed. -
Page 44: Nuisance Prevention® Circuitry
For example: If zone 3 was active or triggered, the LED will blink three times with a two-second pause. Then it will blink three times again, and repeat until the ignition is turned on. ➢ Nuisance prevention® circuitry Your system has Directed’s Nuisance Prevention® Circuitry (NPC). It prevents annoying repetitive trigger sequences due to faulty door pin switches or environmental conditions such as thunder, jackhammers, airport noise, etc. -
Page 45: Owner Recognition
• 7 flashes: manual transmission mode is enabled and not initialized • 8 flashes: neutral safety wire has no ground or the remote start defeat toggle switch is off. Keep a record of the number of flashes, to assist your installer when taking the vehicle in for service. -
Page 46: Power Saver Mode
Power saver mode ➢ System Your system will automatically enter Power Saver Mode while armed or in Valet Mode, after a period of time in which no operation has been performed. This lowers the current draw on the vehicle’s battery. Power Saver Mode takes over under the following conditions: Power Saver when the system is armed: After the system has been... -
Page 47: Programming Options
Programming options Your system has many custom programmable options. Some may re- quire installation labor. Ask your authorized dealer for details. The following is a list of the programmable options, with the factory settings in Bold. Active • arming (remote only) passive arming with or without locking the doors (automatic arming without locking the doors 30 seconds after the last door has been closed), or Auto Re-arm with or without locking the doors (Automatically arms 60 seconds after disarm if... - Page 48 how long a security system can sound before it is considered a nuisance. If your installer is programming the security system with the Directed Bitwriter®, the full triggered response can be programmed for any duration ranging from 1 to 180 seconds. Siren tones and chirp volume: •...
-
Page 49: Security & Convenience Expansions
Security & convenience expansions Listed below are some of the many expansion options available. Please consult your dealer for a complete explanation of all the options avail- able to you. Audio Sensor: Metal on glass, glass cracking, and breaking glass produce distinctive acoustic signatures. The 506T audio sensor uses a microphone to pick up sounds, then analyzes them with propri- etary acoustic software to determine if the glass has been struck. - Page 50 Power Window Control: Automatic power window control is provided with the 529T and 530T systems. These can operate power windows, and can roll them up automatically when the system is armed, roll them down, or both up and down. Ultrasonic Cabin Sensor: Using the 509U Ultrasonic cabin sensor pro- vides a field of protection inside the car to protect your belongings.
-
Page 51: Glossary Of Terms
Glossary of terms 2-Way Remote: A hand-held, remote control which operates the various functions of your system and receives feedback and pages from the alarm system. Control Center: The control center contains the system’s radio-frequency antenna, the valet and override switch, and the Status LED. For maximum remote-control range, the Control Center is usually lo- cated at the top of the windshield, centered near the rear-view mirror. - Page 52 to the vehicle or glass. Trigger or Triggered Sequence: This is what happens when the alarm “goes off ” or “trips.” The triggered sequence of your system consists of the siren sounding and parking lights flashing for the programmed duration. Valet Button: A small push button switch located on your systems control center.
-
Page 53: Lcd Layout
LCD layout Armed Locked disarmed Unlocked Alarm Remote Start Timer Mode Manual Transmission En- abled © 2008 Directed Electronics. All rights reserved. Thermometer/Smart start Battery Status Hood (Trigger) Hood (Zone bypass) Trunk (Trigger) Trunk (Zone bypass) Pager On Pager Off... - Page 54 Vibration On Pager Tone On Siren Silent Mode 2 Transmit Receive Out of Range Sensor Sensor Bypassed Car Door (Zone bypass) * This feature is not available. Car Door Home (Garage - Open) * Home (Garage Close) * Car 1 Car 2 All Zones Defroster...
-
Page 55: Quick Reference Guide
Quick reference guide Arming To arm, press Silent Arm Press one time and then press Disarming To disarm, press tones. Silent Disarm Press one time and then press Disarming without a remote While the alarm is triggering. Turn on the ignition. Press and release the Valet button within 15 seconds. - Page 56 Location of Shutdown Toggle Switch___________________ Rear Defogger Press four times, and then press (only after remote start is ON.) Valet Mode Press two times and then , remote beeps one time. When valet Mode is turned OFF, the remote beeps two-times. Valet take over Before turning off the engine, press and release .
-
Page 57: Limited Lifetime Consumer Warranty
Limited lifetime consumer warranty Directed Electronics. (“Directed”) promises to the original purchaser to repair or replace (at Directed’s election) with a comparable reconditioned model any Directed unit (hereafter the “unit”), excluding without limitation the siren, the remote transmitters, the associated sensors and accessories, which proves to be defective in workmanship or material under reasonable use during the lifetime of the vehicle provided the following conditions are met: the unit was purchased from an authorized Directed dealer, the unit was professionally... - Page 58 WITHOUT LIMITATION, LIABILITY FOR THEFT, DAMAGE AND/OR VANDALISM. THIS WARRANTY DOES NOT COVER LABOR COSTS FOR MAINTENANCE, REMOVAL OR REINSTALLATION OF THE UNIT OR ANY CONSEQUENTIAL DAMAGES OF ANY KIND. IN THE EVENT OF A CLAIM OR A DISPUTE INVOLVING DIRECTED OR ITS SUBSIDIARY, THE VENUE SHALL BE SAN DIEGO COUNTY IN THE STATE OF CALIFORNIA.
- Page 60 The company behind this system is Directed Electronics Since its inception, Directed Electronics has had one purpose, to provide consumers with the finest vehicle security and car stereo products and accessories available. The recipient of nearly 100 patents and Innovations Awards in the field of advanced electronic technology.