Table of Contents
Advertisement
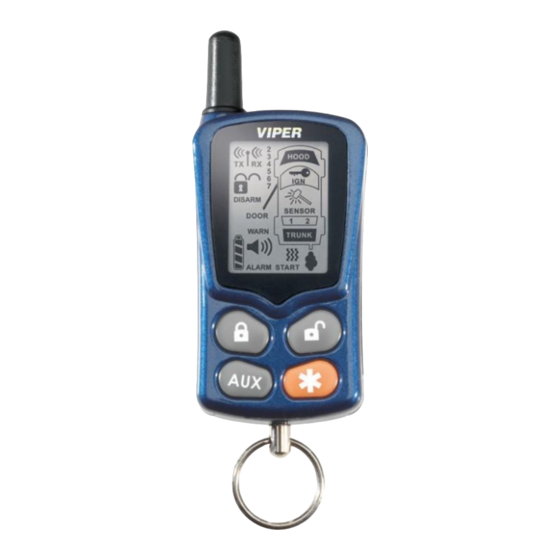
Receive Indicator
Auxiliary Channel Output
Signal
Indicator
Transmit
Indicator
Arm/Disarm
Arming/
Disarming
Status
Door Switch
Input
Warn Away®
Response
Siren Status
Battery Level
Trigger
Response
Arm Button
Auxiliary
Button
The company behind Viper
Systems is Directed Electronics, Inc.
Vista, CA 92081
www.directed.com
Since its inception, Directed Electronics has had
one purpose, to provide consumers with the
finest vehicle security and car stereo products
Hood Switch
Input
and accessories available. The recipient of nearly
100 patents and Innovations Awards in the field
Ignition
of advanced electronic technology, Directed
Switch Input
Sensor
Electronics, Inc. is ISO 9001 registered.
Response
Sensor 1
Quality Directed Electronics products are sold and
Full Trigger &
Warn Away®
serviced throughout North America and around
Sensor 2
Full Trigger &
the world.
Warn Away®
Trunk
Call (800) 274-0200 for more information about
Switch Input
our products and services.
Remote Start
Vibrate Mode
Disarm
Button
©
2006 Directed Electronics All rights reserved.
Remote Start
Button
®
Auto Security
5301V 05-06
G
Directed Electronics is committed to delivering
world-class quality products and services that
excite and delight our customers
[ R E M O T E
S T A R T
W I T H
S E C U R I T Y
n o w
w i t h
[
]
O W N E R' S
G U I D E
N O O N E D A R E S C O M E C L O S E
®
®
S Y S T E M ]
M
O
D
E
L
5900
Advertisement
Table of Contents

Related Manuals for Viper 5900


Summary of Contents for Viper 5900
- Page 1 ® Receive Indicator The company behind Viper ® Auto Security Auxiliary Channel Output Systems is Directed Electronics, Inc. Signal Vista, CA 92081 Indicator www.directed.com Since its inception, Directed Electronics has had [ R E M O T E S T A R T...
- Page 2 M M o o d d e e l l 5 5 9 9 0 0 0 0 ➤ O O w w n n e e r r ’ ’ s s G G u u i i d d e e...
-
Page 3: L L I I M M I I T T E E D D L L I I F F E E T T I I M M E E C C O O N N S S U U M M E E R R W W A A R R R R A A N N T T Y Y
l l i i m m i i t t e e d d l l i i f f e e t t i i m m e e c c o o n n s s u u m m e e r r w w a a r r r r a a n n t t y y Directed Electronics ("Directed") promises to the original purchaser to repair or replace with a comparable reconditioned model any Directed unit (hereafter the "unit"), exclud- ing without limitation the siren, the remote transmitters, the associated sensors and acces-... - Page 4 CONSEQUENTIAL DAMAGES OF ANY KIND. IN THE EVENT OF A CLAIM OR A DISPUTE INVOLVING DIRECTED OR ITS SUBSIDIARY, THE PROPER VENUE SHALL BE SAN DIEGO COUNTY IN THE STATE OF CALIFORNIA. CALIFORNIA STATE LAWS AND APPLICABLE FEDERAL LAWS SHALL APPLY AND GOVERN THE DISPUTE.
-
Page 5: Table Of Contents
t t a a b b l l e e o o f f c c o o n n t t e e n n t t s s l l i i m m i i t t e e d d l l i i f f e e t t i i m m e e c c o o n n s s u u m m e e r r w w a a r r r r a a n n t t y y ................. . i i s s t t a a n n d d a a r r d d t t r r a a n n s s m m i i t t t t e e r r c c o o n n f f i i g g u u r r a a t t i i o o n n . - Page 6 d d i i a a g g n n o o s s t t i i c c s s ........................3 3 5 5 arming diagnostics .
- Page 7 s s t t a a n n d d a a r r d d t t r r a a n n s s m m i i t t t t e e r r c c o o n n f f i i g g u u r r a a t t i i o o n n controls the A A r r m m and P P a a n n i i c c On/Off function.
- Page 8 w w h h a a t t i i s s i i n n c c l l u u d d e e d d ➤ A control module ➤ SST 2-way receiver/antenna ➤ One four-button transmitter ➤...
-
Page 9: Your Warranty
➜ your warranty Your warranty registration must be completely filled out and returned within 10 days of purchase. Your product warranty will not be validated if your warranty registration is not returned. Make sure you receive the warranty registration from your dealer. It is also necessary to keep your proof of purchase, which reflects that the product was installed by an authorized dealer. -
Page 10: Caution
a separation distance of 20 cm or more from the person’s body, except for the hand and wrists, to satisfy RF exposure compli- ance. This device is designed to be used in a person’s hands and its operating configurations do not support normal transmis- sions while it is carried in pockets or holsters next to a persons’... - Page 11 r r e e m m o o t t e e c c o o n n t t r r o o l l d d i i a a g g r r a a m m note:The Program button is located on the back of the remote.
- Page 12 s s t t a a n n d d a a r r d d r r e e m m o o t t e e c c o o n n f f i i g g u u r r a a t t i i o o n n 1.
- Page 13 s s y y s s t t e e m m m m a a i i n n t t e e n n a a n n c c e e This system needs no specific maintenance beyond remote control battery replacement.
-
Page 14: Standard Configuration
t t r r a a n n s s m m i i t t t t e e r r f f u u n n c c t t i i o o n n s s The receiver uses a computer-based Learn Routine to learn the transmitter buttons. -
Page 15: Standard Icon Configurations
Button The remote start feature is turned On/Off by pressing this button twice. Buttons The remote start timer mode function of the system is controlled by pressing these buttons simultaneously. Buttons The Turbo/Short Run feature is controlled by these buttons (refer to the Turbo/Short Run section for additional details). - Page 16 Icon The receive icon will be displayed while the remote control is receiving a page from the vehicle. Icon The signal icon will be displayed if a command is transmitted to the vehicle but a command page is not received. Icon The armed status icon will be displayed when the system is locked and armed.
- Page 17 Icon The siren icon will be displayed as an indicator that the siren is sounding. Icon The alarm icon will be displayed if the system has been violated, and will continue to be displayed until the 60-second siren cycle is complete. Icon The vibrate icon will be displayed when the Vibrate Mode is on.
- Page 18 Icon The Sensor 2 icon will be displayed if an additional Dual-Stage sensor has been triggered as a full-triggered or Warn Away sequence. ® Icon The hammer icon will flash when either Sensor 1 or 2 has been triggered as either a Warn Away response or triggered sequence.
-
Page 19: System Signal Paging Features
r r e e m m o o t t e e o o p p e e r r a a t t i i o o n n a a n n d d p p r r o o g g r r a a m m - - m m i i n n g g i i n n s s t t r r u u c c t t i i o o n n s s The remote start system operates at 434 MHz and incorporates Directed’s proprietary XHF2 out-board Responder Technology remote... - Page 20 Alarm Page If the alarm system is triggered while armed, an Alarm Page will be sent to the remote control. After receipt of an Alarm Page, the LCD icons will display the alarm system status information and the remote control will generate Alarm Page alerts. An Alarm Page alert is a single beep or vibration from the remote control every 60 seconds to alert the user that the alarm system was triggered and will continue until the alarm page is cleared.
-
Page 21: Programmable Remote Control Features
➜ programmable remote control features To enter programming mode Press the Program button on the back of the remote or hold the four remote control buttons on the front of the remote simultane- ously until one long beep is heard. Programming Mode has now been entered. -
Page 22: Warning! Safety First
Illumination On/Off Within five seconds of entering Programming Mode, press The remote will beep once for on, twice for off and the light will turn on/off with each press. Page Mode On/Off After entering Programming Mode, press within five seconds to toggle on and off. When the Page Mode is on, the remote control will wake up periodically to check for messages from the security module. - Page 23 partially enclosed area without ventilation (such as a garage). When parking in an enclosed or partially enclosed area or when having the vehicle serviced, the remote start system must be disabled using the installed toggle switch. It is the user's sole responsibility to properly handle and keep out of reach from children all remote control transmitters to assure that the system does not unintentionally remote start the vehicle.
- Page 24 ➤ After the remote start module has been installed, contact your authorized dealer to have him or her test the remote start module by performing the Safety Check outlined in the product installation guide. If the vehicle starts when performing the Neutral Safety Shutdown Circuit test, the remote start unit has not been properly installed.
-
Page 25: Active Arming
➜ active arming You can arm the system by pressing of your transmitter for one second. When the system arms, you will hear a short siren sound, or chirp, and see the parking lights flash once. If the power door locks are controlled by the system, the doors will also lock. While the system is armed, the status LED will flash approximately once per second, indicating that the system is actively protecting your vehicle. - Page 26 note: If any protected entry point (such as a door or a switch-protected trunk or hood) is open, the system will not passively arm (unless forced passive arming is pro- grammed on. See Programming Options section.) Addi- tionally, each time a sensor is triggered during the arming countdown, the 30-second countdown starts over.
-
Page 27: Multi-Level Security Arming
➜ multi-level security arming Multi-Level Security Arming allows you to select which of the system's inputs or sensors will be active and which will be bypassed when the system is armed. (See Table of Zones section of this guide.) Pressing (only in Standard Configuration) again within five seconds of arming the system will activate the Multi- Level Security feature. -
Page 28: Arming While Driving
➜ arming while driving Your security system can be armed while driving the vehicle! Simply press on the transmitter for two seconds while the vehicle is running. The siren will chirp once to indicate that the security system is armed, and then once more to indicate that the ignition is on. -
Page 29: Disarming Without A Transmitter
system will not disarm, but rather reset. This prevents you from disabling the system should you wish to disarm it without visu- ally checking the vehicle. Pressing after resetting the system will disarm the system; pressing this button during the first six seconds of the triggered sequence will disarm the security system immediately. -
Page 30: Silent Mode
Number of Presses_____________________________________ important! The Valet button can be programmed to respond to 1-5 presses for the disarm function. You must check with the installer to verify the programming for your individual unit. ➜ silent mode To temporarily turn off the arm or disarm chirps, use Silent Mode™. -
Page 31: Valet Mode
➜ valet mode You can prevent your security system from automatically arming and triggering by using Valet Mode. This is very useful when ® washing the vehicle or having it serviced. In Valet Mode, the ® security system will not arm, even with the remote transmitter, but all convenience functions (door locks, trunk release, etc.) will continue to work normally. - Page 32 up the engine, as well as adjust the interior temperature of the vehicle with the climate control system. If interior heating or cooling is desired, the climate controls must be preset, and the fan blower must be set to the desired level prior to remote starting the vehicle.
-
Page 33: Valet Take-Over
When you are ready to drive the vehicle: 1. Insert the ignition key and turn it to the ON (not the START) position. 2. Press the brake pedal. note: If the brake pedal is pressed before the key is in the ON position, the engine will shut down. -
Page 34: Short-Run/Turbo
® To perform Valet Take-Over: 1. Before turning off the engine, press and release on the transmitter twice within 3 seconds. Then wait five seconds. 2. Turn the ignition key to the OFF position. (The engine will stay running.) 3. The engine will run until the pre-programmed time elapses or a shut-down input is received. -
Page 35: Timer Mode
Turn off the key, the engine will keep running. Exit and secure the vehicle. The engine will turn off after the programmed run time. ➜ timer mode By pressing the remote buttons the parking lights will flash 4 times and then start the vehicle and run for the set duration. -
Page 36: Starter Anti-Grind Circuitry
Timer Mode should be used only in important! ! open areas. Never start and run the vehicle in an enclosed space such as a garage or carport. To exit timer mode, turn the ignition switch on any time the engine is running. The parking lights will flash 4 times, indicat- ing timer mode has been exited. -
Page 37: Disabling The Remote Start System
➜ disabling the remote start system This feature allows your system's remote start unit to be temporarily disabled to prevent the vehicle from being remote started accidentally. This feature is useful if the vehicle is being serviced or stored in an enclosed area. To disable the remote start, move the shutdown toggle switch to the OFF position. -
Page 38: Nuisance Prevention Circuitry
pedal will shut down the motor at any time during remote start operation, as well as preventing the remote start from activating while it is being pressed. ➜ nuisance prevention circuitry Your system has Directed’s Nuisance Prevention Circuitry ™ (NPC ). -
Page 39: Arming Diagnostics
note: Arming and disarming the system does not reset this function! The only ways to reset a bypassed zone are for it to not trigger for 60 minutes, or to turn on the igni- tion. If testing your system, it is important to remember that the NPC programming can cause zones to be ™... -
Page 40: Disarming Diagnostics
delay and you arm your security system before the interior light turns off, you may hear a second Bypass Notification chirp. Once the light turns off, however, the security system resumes normal monitoring. note: Bypass Notification does not occur when the sys- tem is in Silent Mode or if the notification chirps have been programmed off by the installer. -
Page 41: System Status Chirps
➜ system status chirps The siren will chirp when arming/disarming the system. The pattern of chirps will audibly report the system’s status as described below. Action Number of Chirps Description System armed 1 (3-second delay), 1 System armed with Bypass Notification Disarm System disarmed Disarm... -
Page 42: Interpreting Zone Diagnostics
sensors Ignition trigger ➜ interpreting zone diagnostics Warn Away responses are not reported by arming or disarming diagnostics. If you receive a Bypass notification when arming or a Tamper Alert notification when disarming, look at the LED. Active or triggered zones will be indicated by a pattern of blinks by the LED. - Page 43 even if you use the remote control out of range of the vehicle. However, if the remote has been pressed many times out of range of the vehicle, or the battery has been removed, it may fall out of sync with the control unit and fail to operate the system. To re- sync the remote simply press several times within range of the vehicle.
- Page 44 vehicle, one for each user. note: Owner Recognition cannot be programmed with- out a Bitwriter and the necessary software. Check with ® your dealer for more information. r r a a p p i i d d r r e e s s u u m m e e l l o o g g i i c c This Directed system will store its current state to non-volatile memory.
-
Page 45: To Enter Programming Mode
➤ Power Saver in Valet Mode: When the system enters Valet ® ® Mode the LED illuminates steadily. If the vehicle is not used (ignition is not turned on) for a one hour period while the system is in Valet Mode, the LED will shut off. -
Page 46: Sensor Icon Selection (Hood/Trunk)
➜ Sensor icon selection (hood/trunk) to toggle display selections between hood only (1 beep), trunk only (2 beeps), or hood and trunk (3 beeps) on the LCD display. The installer will have set the remote up to correctly display the installation (hood pin only, trunk pin only, or hood and trunk pin installed). - Page 47 ➤ A A c c t t i i v v e e arming (transmitter only) or passive arming (auto- matic arming 30 seconds after the last door has been closed). ➤ Arming/disarming siren chirps o o n n or off. ➤...
- Page 48 note: When the system passively arms after one hour, the entry point that has been left open, and anything con- nected to the same zone, is bypassed and cannot trigger the system. However, the remaining inputs to the system are fully operational. ➤...
- Page 49 note: This feature will only function if the FailSafe ® Starter Kill relay has been installed. ➤ Siren tones and chirp volume. The output of the Revenger ™ Soft Chirp siren consists of six different tones in sequence. ™ Any of these tones can be eliminated by a dealer, resulting in a unique, easily identifiable siren sound.
- Page 50 The 520T keeps the system armed, triggers Backup Battery: the alarm and keeps the starter interrupt active if main battery is disconnected. Prevents the vehicle’s hood from being opened Hood Lock: without a key, keeping thieves away from the system’s siren, the battery connections, and other components under the hood.
- Page 51 g g l l o o s s s s a a r r y y o o f f t t e e r r m m s s The “brain” of your system. Usually hidden under- Control Unit: neath the dash area of the vehicle.
- Page 52 alarm “goes off ” or “trips.” The triggered sequence of your system consists of the siren sounding and parking lights flashing for the programmed duration. A small push button mounted at a discretionary Valet Switch: location inside the vehicle. It is used to override the starter inter- rupt when a transmitter is lost or damaged, or to enter or exit Valet Mode.
-
Page 53: Quick Reference Guide
Quick Reference Guide Arming ■ To arm, press . When the system arms, you will hear a short chirp, and the parking lights will flash once. Arming while driving ■ To arm the system while driving, press on your transmitter while the vehicle is running. - Page 54 The company behind this system is Directed Electronics Since its inception, Directed Electronics has had one purpose, to provide consumers with the finest vehicle security and car stereo products and accessories available. The recipient of nearly 100 patents and Innovations Awards in the field of advanced electronic technology, Directed is ISO 9001 registered.