Advertisement
Quick Links
Day One+
ACX7100-48L
IN THIS GUIDE
Step 1: Begin | 1
Step 2: Up and Running | 7
Step 3: Keep Going | 11
Step 1: Begin
IN THIS SECTION
Meet the ACX7100-48L | 1
Install the ACX7100-48L | 2
Power On | 4
In this guide, we provide a simple, three-step path, to quickly get you up and running with your new ACX7100-48L. We've
simplified and shortened the installation and configuration steps, and included how-to videos. You'll learn how to install
an AC-powered ACX7100-48C in a rack, power it up, and configure basic settings. If you need instructions for installing
a DC-powered ACX7100-48L, see the
Meet the ACX7100-48L
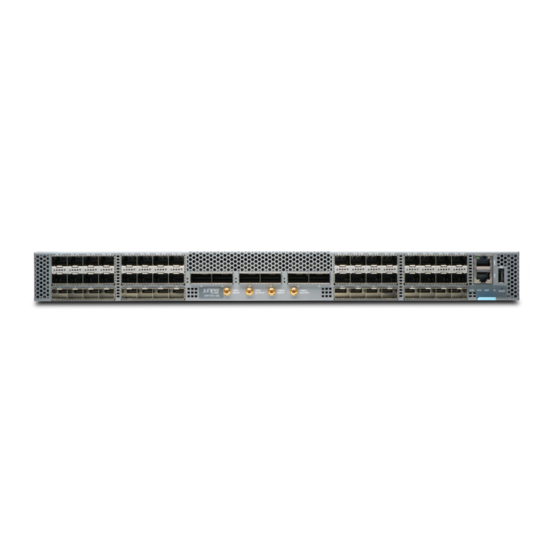
The ACX7100-48L is a high-performance router, featuring a 1-U form factor that provides high port density, reliability,
and scalability. You can deploy the router as an aggregation solution in a service provider metro network or in a data
center that hosts edge computing applications.
ACX7100-48L Hardware Guide.
Advertisement

Related Manuals for Juniper Day One+ ACX7100-48L


Summary of Contents for Juniper Day One+ ACX7100-48L
- Page 1 Day One+ ACX7100-48L IN THIS GUIDE Step 1: Begin | 1 Step 2: Up and Running | 7 Step 3: Keep Going | 11 Step 1: Begin IN THIS SECTION Meet the ACX7100-48L | 1 Install the ACX7100-48L | 2 Power On | 4 In this guide, we provide a simple, three-step path, to quickly get you up and running with your new ACX7100-48L.
- Page 2 With 48 SFP and 6 QSFP56-DD ports, the ACX7100-48L routers enable a wide variety of configurations that include support for 10-Gbps, 25-Gbps, 40-Gbps, 50-Gbps, 100-Gbps, and 400-Gbps speeds. We ship these routers with redundant power supplies. You can order ACX7100-48L routers with front-to-back airflow (AIR OUT or AFO) or back-to-front airflow (AIR IN or AFI), and with AC or DC power supplies.
- Page 3 A management host such as a laptop or desktop PC A serial-to-USB adapter (if your laptop or desktop PC doesn’t have a serial port) A grounding cable: 14-10 AWG (2-5.3 mm²), stranded wire, or as permitted by the local code, with a Panduit LCD10-10A-L or equivalent lug attached Two M5 pan head screws to secure the grounding lug CAUTION:...
- Page 4 6. While you’re holding the router in place, have a second person insert and tighten the rack mount screws to secure the mounting rails to the rack rails. Make sure they tighten the screws in the two bottom holes first, and then tighten the screws in the two top holes.
- Page 5 1. Wrap and fasten one end of the ESD grounding strap around your bare wrist, and connect the other end to one of the ESD grounding points on the router. 2. Use two M5 pan head screws to secure the grounding lug and attached cable to the chassis. Attach the lug through the left rail and blade assembly to the chassis.
- Page 6 9. Slide the power cord retainer loop toward the power supply until the loop is snug against the base of the coupler. 10. Press the tab on the loop, and draw out the loop into a tight circle. WARNING: Ensure that the power cord does not block access to router components or drape where people can trip on it.
-
Page 7: Step 2: Up And Running
Step 2: Up and Running IN THIS SECTION Plug and Play | 8 Customize the Basic Configuration | 8 Now that the ACX7100-48L is powered on, let’s do some initial configuration to get it up and running on the network. It’s simple to configure and manage the ACX7100-48L using the CLI. -
Page 8: Plug And Play
Plug and Play The ACX7100-48L router ships with factory-default settings that enable plug-and-play operation. These settings load as soon as you power on the router. Customize the Basic Configuration You can easily customize the factory-default configuration with just a few commands. Initially, you’ll need to make changes through the console port. - Page 9 4. Start the CLI. [vrf:none] root@re0:~# cli 5. Enter configuration mode. root@re0> configure 6. Stop the chassis auto-upgrade process. [edit] root@re0# delete chassis auto-image-upgrade 7. Stop zero-touch provisioning (ZTP). [edit] root@re0# delete system commit factory-settings NOTE: ZTP is enabled on the ACX7100-48L in the factory-default configuration. You must stop ZTP before you configure any settings.
- Page 10 2>/dev/null) 10. (Optional) Give the router a name. If the name includes spaces, enclose the name in quotation marks (“ ”). [edit] root@re0# set system host-name host-name 11. Configure the default gateway. [edit] root@re0# set routing-options static route 0.0.0.0/0 next-hop destination-ip 12.
-
Page 11: What's Next
Configure user access and authentication features User Access and Authentication Administration Guide for Junos OS Evolved Manage software upgrades for your ACX7100-48L Installing Software on ACX Series Devices See, automate, and protect your network with Juniper Visit the Security Design Center Security... -
Page 12: General Information
Juniper Portal Juniper Networks, the Juniper Networks logo, Juniper, and Junos are registered trademarks of Juniper Networks, Inc. in the United States and other countries. All other trademarks, service marks, registered marks, or registered service marks are the property of their respective owners. Juniper Networks assumes no responsibility for any inaccuracies in this document. Juniper Networks reserves the right to change, modify, transfer, or otherwise revise this publication without notice.