
Related Manuals for FoodSaver VS2198 Series


Summary of Contents for FoodSaver VS2198 Series
- Page 1 User Guide CUT & SEAL VACUUM SEALER For more usage tips and safety information, please refer to this Reference Guide or visit our website. AU: foodsaver.com.au 1300 881 861 NZ: foodsaver.co.nz 0800 786 232 VS2198 Series...
- Page 2 ..Product Features ..“How To” Section ..How To Make A Bag From A FoodSaver Roll ® How To Vacuum Seal with FoodSaver Bags ®...
- Page 3 16. Vacuum packaging is not a FoodSaver Appointed Service substitute for the heat process of Centre for examination, repair or preserving. Perishables still need adjustment. to be refrigerated or frozen. AU: foodsaver.com.au 1300 881 861 NZ: foodsaver.co.nz 0800 786 232...
- Page 4 Vacuum Channel during the sealing process. Then leave an additional 2.5cm of bag material for each time you plan to reuse bag. 5. Do not create your own side seams for a FoodSaver Bag. These bags are ®...
- Page 5 Welcome to FoodSaver Vacuum Sealing ® System Congratulations… You are about to enjoy the freshness benefits of FoodSaver , The #1 Selling Brand ® of Vacuum Sealing Systems. For years, the FoodSaver Vacuum Sealing System has ® helped millions of households keep food fresh longer in the refrigerator, freezer and pantry.
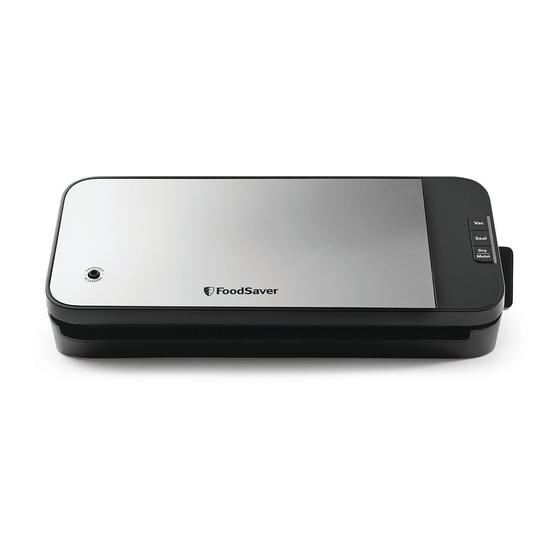
- Page 6 D. Dry/Moist Mode F. Upper Foam Gasket G. Roll Storage H. Cutter Bar I. Lower Foam J. Extra Wide K. Vacuum L. Removable Drip Gasket Sealing Strip Channel Tray Handheld Sealer Hose 1. Use with FoodSaver Zipper Bags and ® Containers...
- Page 7 Flashes when vacuum cycle is engaged and becomes constant when vacuum cycle is finished. Seal Button This button has three uses: 1. Press to create a seal when making bags from a FoodSaver Roll. ® 2. Press to immediately stop the vacuum process and begin sealing the bag. This prevents crushing delicate items such as bread, cookies and pastries.
- Page 8 How to... 1. Make a Bag from a FoodSaver Roll ® 1. Open lid and place roll into Roll Storage. 2. Lift up Roll Cutter Bar and place bag material beneath the Cutter Bar. Pull bag material to edge until it is on top of the sealing strip and close lid.
- Page 9 2. Vacuum Seal with FoodSaver Bags ® 1. Place item(s) in bag, allowing at least 7.5 cm of space between bag contents and top of bag. 2. Open appliance lid and place open end of bag into Vacuum Channel. 3. Close lid and turn Easy Lock Latch to OPERATE position.
- Page 10 How to... 3. Use Handheld Sealer with FoodSaver Vacuum ® Containers 1. Prepare container according to FoodSaver Container ® Guidelines (see manual that comes with your FoodSaver Containers). ® 2. Insert one end of the Handheld Sealer Hose into Connect Accessory Hose to both accessory port on appliance &...
- Page 11 2. Press Handheld Sealer over gray circle on bag and press Vacuum button. 5. Open FoodSaver Containers After Sealing ® FoodSaver Preserve & Marinate Containers ® To release vacuum and open, turn valve to Marinate/ Open position. AU: foodsaver.com.au 1300 881 861 NZ: foodsaver.co.nz 0800 786 232...
- Page 12 Care and Cleaning of your Vacuum Sealer To Clean Appliance: Remove Power Cord from electrical outlet. Do not immerse in liquid. Remove all food around gaskets Check Gaskets and around Drip Tray to make sure they are free from food materials. Wipe off Gasket with warm soapy cloth if needed. Upper and Lower Gaskets may be removed for cleaning.
- Page 13 IMPORTANT: Vacuum sealing is NOT a substitute for refrigeration or freezing. Any perishable foods that require refrigeration must still be refrigerated or frozen after vacuum sealing. AU: foodsaver.com.au 1300 881 861 NZ: foodsaver.co.nz 0800 786 232...
- Page 14 7.5 cm at room temperature. room you normally leave between contents and To reheat foods in a microwave in a FoodSaver ® seal. Simply cut sealed edge and remove cheese. Bag, always cut corner of the bag before placing When you’re ready to reseal the cheese, just drop...
- Page 15 When freezing soft fruits or berries, it is best tray until solid. Remove frozen liquid from pan and vacuum seal in a FoodSaver Bag. You can stack to pre-freeze them for 1-2 hours or until solidly ®...
- Page 16 Simply follow the directions to vacuum seal items using FoodSaver Bags, ® Containers and Zipper Bags. • To keep emergency kits safe and dry, vacuum seal flares, batteries, flashlights, matches, candles, first aid kits, extra food and other necessities.
- Page 17 Vacuum Pump is running, but bag is not evacuating. Vacuum Pump is • If making a bag from a roll, make sure one end of bag is sealed. See How running, but bag to Make a Bag from a FoodSaver Vacuum Sealing Roll. ® is not evacuating •...
- Page 18 New Zealand. • For additional tips and answers to frequently asked questions, go to AU: foodsaver.com.au or NZ: foodsaver.co.nz and click the “Support” tab. Container does not • The lid of the container must be correctly placed on and aligned to the...
- Page 19 Australia) or New Zealand Consumer Guarantees Act (if your product was purchased in New Zealand). Upon receipt of your claim, FoodSaver will seek to resolve your difficulties or, if the product is defective, advise you on how to obtain a replacement or refund.
- Page 20 660–670 Great South Road, Greenlane, Auckland Newell Australia Pty Ltd. ABN 68 075 071 233 Made in China to FoodSaver’s specification. Due to minor changes in design or otherwise, the product you buy may differ slightly from the one shown here.