Table of Contents
Advertisement
Quick Links
Owner's Manual
Español 13 • Français 25 • Русский 37 • Deutsch 49
CAUTION: DO NOT EXCEED MAXIMUM LISTED WEIGHT CAPACITY. SERIOUS INJURY OR PROPERTY DAMAGE MAY OCCUR!
75 x 75
100 x 100
WARRANTY REGISTRATION
Register your product today and be
automatically entered to win an ISOBAR
surge protector in our monthly drawing!
tripplite.com/warranty
1111 W. 35th Street, Chicago, IL 60609 USA • tripplite.com/support
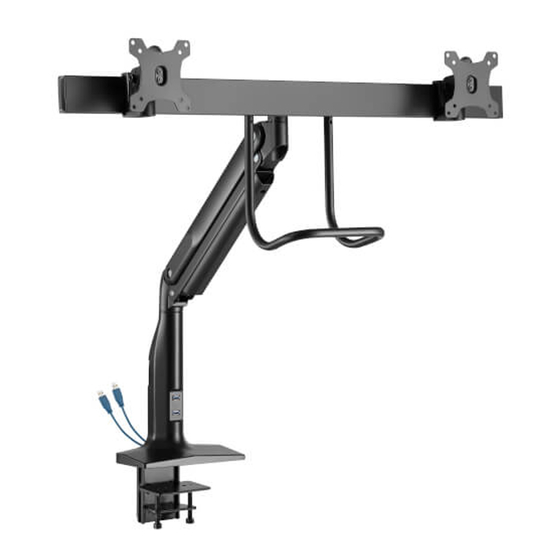
Precision Placement
Dual-Display
Desk Clamp with
Antimicrobial Tape
Model: DMPDD1735AM
35"
MAX
®
Copyright © 2021 Tripp Lite. All rights reserved.
1
with USB 3.0 Port
22 lb. x2
22 lb. x2
(10 kg x2)
(10 kg x2)
MAX
MAX
* Antimicrobial tape on handle aids in resisting the
growth of bacteria, viruses, fungi, mold and mildew.
*
Advertisement
Table of Contents

Related Manuals for Tripp Lite DMPDD1735AM


Summary of Contents for Tripp Lite DMPDD1735AM
- Page 1 WARRANTY REGISTRATION Register your product today and be automatically entered to win an ISOBAR ® surge protector in our monthly drawing! tripplite.com/warranty 1111 W. 35th Street, Chicago, IL 60609 USA • tripplite.com/support Copyright © 2021 Tripp Lite. All rights reserved.
-
Page 2: Safety Instructions
PRODUCT REGISTRATION Visit tripplite.com/warranty today to register your new Tripp Lite product. You’ll be automatically entered into a drawing for a chance to win a FREE Tripp Lite product!* * No purchase necessary. Void where prohibited. Some restrictions apply. See website for details. -
Page 3: Component Checklist
Component Checklist IMPORTANT: Ensure you have received all parts according to the component checklist prior to installing. If any parts are missing or faulty, visit tripplite.com/support for service. (x1) (x1) (x1) (x1) (x1) (x1) 115x52 mm Antimicrobial Tape (x1) (x1) (x1) (x2) (x1) - Page 4 Assembly Base Assembly and Desk Installation Edge Installation 10-40 mm 0.4-1.6 in.
- Page 5 Assembly 40-84 mm 1.6-3.3 in.
- Page 6 Assembly Base Assembly and Desk Installation Hole Installation Ø 10 mm (Ø 0.375 in.) 10-84 mm (0.4-3.3 in.)
- Page 7 Assembly...
- Page 8 Assembly Attaching the Arm to the Base Attaching the Mounting Bracket to the Arm...
- Page 9 Assembly Attaching the Handle Attaching the Universal Plate to the Mounting Bracket Too Long Too Short Do not over-tighten screws. Use an assistant or mechanical lifting equipment when attaching the universal plate to the mounting bracket.
- Page 10 Assembly Balancing the Arm To properly balance the arm with monitors mounted, adjust the spring tension using the supplied hex key as follows: First, position and firmly hold the arm horizontally as shown. If the arm drops, turn the Ask for assistance should you require it. adjustment screw counter- clockwise until it stays in a horizontal position.
- Page 11 Assembly Adjustment and Applying the Antimicrobial Tape Note: If the display does not stop at your desired position, tighten the screws as shown.
- Page 12 Maintenance • Check that the bracket is secure and safe to use at regular intervals (at least every three months). • Please visit tripplite.com/support if you have any questions. 1111 W. 35th Street, Chicago, IL 60609 USA • tripplite.com/support 21-04-287 • 93-3E7F_RevA...
-
Page 13: Manual Del Propietario
* La cinta antimicrobiana sobre las manijas ayuda a inhibir el crecimiento de bacterias, virus, moho y manchas de humedad. MÁS DE AÑOS 1111 W. 35th Street, Chicago, IL 60609, EE. UU. • tripplite.com/support Copyright © 2021 Tripp Lite. Todos los derechos reservados. -
Page 14: Instrucciones De Seguridad
Tripp Lite tiene una política de mejora continua. Las especificaciones están sujetas a cambio sin previo aviso. Las fotografías e ilustraciones pueden diferir... - Page 15 Lista de Comprobación de Componentes IMPORTANTE: Antes de proceder a instalar, asegúrese de haber recibido todas las partes de acuerdo con la lista de comprobación de componentes. Si faltase alguna parte o estuviese dañada, visite tripplite.com/support para solicitar servicio. (x1) (x1) (x1) (x1)
- Page 16 Ensamble Ensamble de Base e Instalación en Escritorio Instalación en el Borde 10 a 40 mm 0.4" a 1.6"...
- Page 17 Ensamble 40 a 84 mm 1.6" a 3.3"...
- Page 18 Ensamble Ensamble de Base e Instalación en Escritorio Instalación en Orificio Ø 10 mm [Ø 0.375"] 10 a 84 mm [0.4" a 3.3"]...
- Page 19 Ensamble...
- Page 20 Ensamble Colocación del Brazo a la Base Colocación del Soporte de Instalación en el Brazo...
- Page 21 Ensamble Colocación de la Manija Colocación de la Placa Universal al Soporte de Instalación Demasiado Demasiado Grande corto No apriete excesivamente los tornillos. Use un ayudante o equipo de elevación mecánico al instalar la placa universal en el soporte de instalación.
- Page 22 Ensamble Balanceo del Brazo Para balancear correctamente el brazo con los monitores instalados, ajuste la tensión del resorte usando la llave hexagonal suministrada de la siguiente manera: Si el brazo cae, gire el tornillo Primero, coloque y sostenga firmemente el brazo horizontalmente de ajuste en sentido opuesto como se muestra.
- Page 23 Ensamble Ajuste y Aplicación de la Cinta Antimicrobiana Nota: Si la pantalla no se detiene en su posición deseada, apriete los tornillos como se muestra.
- Page 24 Mantenimiento • Compruebe a intervalos regulares (al menos trimestralmente) que el soporte esté bien instalado y sea seguro para usarse. • Si tiene alguna pregunta, visite por favor tripplite.com/support. MÁS DE AÑOS 1111 W. 35th Street, Chicago, IL 60609, EE. UU. • tripplite.com/support 21-04-287 •...
-
Page 25: Manuel De L'utilisateur
* Le ruban antimicrobien sur la poignée aide à empêcher la croissance des bactéries, des virus, des champignons et des moisissures. 1111 W. 35th Street, Chicago, IL 60609 USA • tripplite.com/support Droits d'auteur © 2021 Tripp Lite. Tous droits réservés. -
Page 26: Consignes De Sécurité
Puisque les utilisations individuelles sont sujettes à des variations importantes, le fabricant ne fait aucune déclaration ou garantie quant à l'aptitude ou l'adaptation de ces dispositifs pour une application spécifique. La politique de Tripp Lite en est une d'amélioration continue. Les caractéristiques techniques sont modifiables sans préavis. Les produits réels peuvent différer légèrement des photos et des illustrations. - Page 27 Liste de vérification des composants IMPORTANT : S'assurer d'avoir reçu toutes les pièces conformément à la liste de vérification des composants avant de procéder à l'installation. Si des pièces sont manquantes ou défectueuses, visiter tripplite.com/support pour obtenir de l'aide. (x1) (x1) (x1) (x1)
- Page 28 Assemblage Assemblage de la base et installation du bureau Installation sur le rebord 10 à 40 mm 0,4 à 1,6 po...
- Page 29 Assemblage 40 à 84 mm 1,6 à 3,3 po...
- Page 30 Assemblage Assemblage de la base et installation du bureau Installation avec un trou Ø 10 mm (Ø 0,375 po) 10 à 84 mm (0,4 à 3,3 po)
- Page 31 Assemblage...
- Page 32 Assemblage Fixation du bras à la base Fixation du support de montage au bras...
- Page 33 Assemblage Fixation de la poignée Fixation de la plaque universelle au support de montage Trop long Trop court Ne pas trop serrer les vis. Faire appel à un assistant ou utiliser de l'équipement de levage mécanique pour fixer la plaque universelle au support de montage.
- Page 34 Assemblage Équilibrage du bras Pour bien équilibrer le bras avec les moniteurs montés, ajuster la tension du ressort en utilisant la clé hexagonale fournie comme suit : Si le bras s'abaisse, tourner Dans un premier temps, positionner le bras sur le plan la vis de réglage dans le horizontal, puis le maintenir fermement en place comme sens contraire des aiguilles...
- Page 35 Assemblage Ajustement et application du ruban antimicrobien Remarque : Si l'écran ne s'arrête pas à la position souhaitée, serrer les vis comme illustré.
- Page 36 Entretien • Vérifier à intervalles réguliers que le support peut être utilisé de façon sûre et sécuritaire (au moins tous les trois mois). • Pour toute question, visiter tripplite.com/support. 1111 W. 35th Street, Chicago, IL 60609 USA • tripplite.com/support 21-04-287 • 93-3E7F_RevA...
-
Page 37: Руководство Пользователя
100 x 100 2 х 10кг 2 х 10кг * Противомикробная лента на рукоятке помогает препятствовать росту бактерий, вирусов, грибков, плесени и гнили. 1111 W. 35th Street, Chicago, IL 60609 USA • tripplite.com/support Охраняется авторским правом © 2021 Tripp Lite. Перепечатка запрещается. - Page 38 с большим разнообразием конкретных применений производитель не дает каких-либо заверений или гарантий относительно пригодности данных изделий для какого-либо конкретного применения или их соответствия каким-либо конкретным требованиям. Компания Tripp Lite постоянно совершенствует свою продукцию. B связи с этим возможно изменение технических характеристик без предварительного уведомления. Внeшний вид реальных изделий может несколько отличаться от представленного на фотографиях и иллюстрацияx.
- Page 39 Перечень комплектации ВНИМАНИЕ! Перед началом установки убедитесь в наличии всех деталей согласно перечню комплектации. В случае отсутствия или повреждения каких-либо деталей обратитесь за помощью на страницу tripplite.com/support. 1 шт. 1 шт. 1 шт. 1 шт. 1 шт. 1 шт. Противомикробная лента...
- Page 40 Порядок сборки Сборка основания и установка на столе Установка с креплением к краю стола 10-40 мм...
- Page 41 Порядок сборки или 40-84 мм...
- Page 42 Порядок сборки Сборка основания и установка на столе Установка в отверстие Ø 10 мм 10-84 мм...
- Page 43 Порядок сборки...
- Page 44 Порядок сборки Крепление рычага к основанию Крепление монтажного кронштейна к рычагу...
- Page 45 Порядок сборки Крепление рукоятки Крепление универсальной пластины к монтажному кронштейну Слишком Слишком длинный короткий Не перетягивайте винты. Обратившись за помощью или воспользовавшись механическим подъемным оборудованием, прикрепите универсальную пластину к монтажному кронштейну.
- Page 46 Порядок сборки Балансировка кронштейна Для надлежащего уравновешивания рычага с установленными мониторами отрегулируйте натяжение пружины с помощью поставляемого в комплекте торцевого ключа следующим образом: Для опускания рычага поверните Сначала установите и плотно удерживайте рычаг в горизонтальном положении, регулировочный винт против как показано на рисунке. При необходимости обратитесь за помощью. часовой...
- Page 47 Порядок сборки Регулировка и наклеивание противомикробной ленты Примечание. Если дисплей не останавливается в нужном положении, затяните винты, как показано на рисунке.
- Page 48 Техническое обслуживание • Регулярно (не реже, чем раз в три месяца) проверяйте надежность крепления кронштейна и безопасность его использования. • В случае возникновения каких-либо вопросов посетите страницу tripplite.com/support. 1111 W. 35th Street, Chicago, IL 60609 USA • tripplite.com/support 21-04-287 • 93-3E7F_RevA...
- Page 49 100 x 100 max. max. * Das antimikrobielle Klebeband am Griff hilft, dem Wachstum von Bakterien, Viren, Pilzen, Schimmel und Mehltau entgegenzuwirken. 1111 W. 35th Street, Chicago, IL 60609 USA • tripplite.com/support Copyright © 2021 Tripp Lite. Alle Rechte vorbehalten.
- Page 50 Einsatz sicher ist. Da die Anwendungen variieren können, übernimmt der Hersteller keine Garantie bezüglich der Eignung dieser Geräte für einen bestimmten Verwendungszweck. Tripp Lite hat den Grundsatz, sich kontinuierlich zu verbessern. Spezifikationen können ohne Ankündigung geändert werden. Fotos und Illustrationen können von den tatsächlichen Produkten leicht abweichen.
- Page 51 Komponentenliste WICHTIG: Überprüfen Sie, ob Sie alle in der Komponentenliste aufgeführten Teile erhalten haben, bevor Sie mit der Installation beginnen. Wenn Teile fehlen oder fehlerhaft sind, besuchen Sie tripplite.com/support für den Kundendienst. (x1) (x1) (x1) (x1) (x1) (x1) 115x52 mm antimikrobielles Klebeband (x1)
-
Page 52: Montage
Montage Sockelmontage und Tischinstallation Kanteninstallation 10 bis 40 mm 0,4 bis 1,6 Zoll... - Page 53 Montage oder 40 bis 84 mm 1,6 bis 3,3 Zoll...
- Page 54 Montage Sockelmontage und Tischinstallation Lochmontage Ø 10 mm (Ø 0,375 Zoll) 10 bis 84 mm (0,4 bis 3,3 Zoll)
- Page 55 Montage...
- Page 56 Montage Befestigen des Arms am Sockel Befestigen der Montagehalterung am Arm...
- Page 57 Montage Anbringen des Griffs Befestigen der Universalplatte an der Montagehalterung Zu lang Zu kurz Ziehen Sie die Schrauben nicht zu fest an. Um die Universalplatte an der Montagehalterung zu befestigen, werden zwei Personen oder eine mechanische Hebevorrichtung benötigt.
- Page 58 Montage Ausgleichen des Arms Um den Arm richtig mit den montierten Monitoren auszubalancieren, passen Sie die Federspannung mit dem im Lieferumfang enthaltenen Sechskantschlüssel wie folgt an: Wenn sich der Arm nach Positionieren und halten Sie den Arm zunächst horizontal, unten bewegt, drehen Sie wie gezeigt.
- Page 59 Montage Anpassen und Anbringen des antimikrobiellen Klebebands Hinweis: Wenn der Bildschirm nicht an der gewünschten Position anhält, ziehen Sie die Schrauben wie gezeigt fest.
- Page 60 Wartung • Stellen Sie in regelmäßigen Abständen (mindestens alle drei Monate) sicher, dass die Wandhalterung sicher angebracht ist. • Wenn Sie Fragen haben, besuchen Sie bitte tripplite.com/support. 1111 W. 35th Street, Chicago, IL 60609 USA • tripplite.com/support 21-04-287 • 93-3E7F_RevA...