Table of Contents
Advertisement
Available languages
Available languages
Quick Links
Owner's Manual
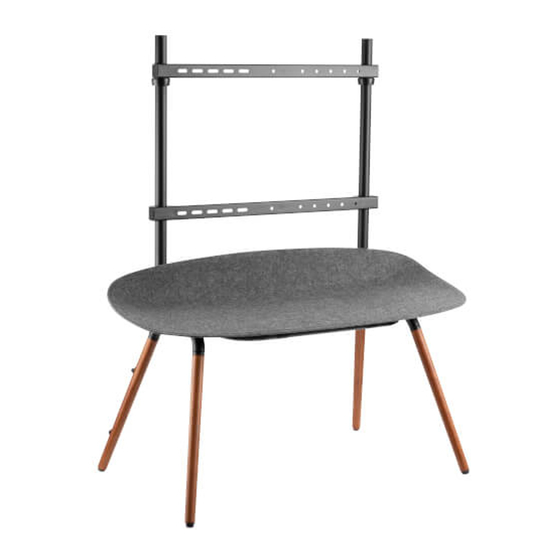
Portable Digital
Signage Stand
for 55" to 70"
Screens
Model: DMPDS5570S
200x200/300x200
300x300/400x200
400x300/400x400
600x400
Español 12 • Français 23 • Русский 34 • Deutsch 45
WARRANTY REGISTRATION
Register your product today and be
automatically entered to win an ISOBAR
surge protector in our monthly drawing!
tripplite.com/warranty
1111 W. 35th Street, Chicago, IL 60609 USA • tripplite.com/support
CAUTION: DO NOT EXCEED MAXIMUM LISTED WEIGHT CAPACITY. SERIOUS INJURY OR
PROPERTY DAMAGE MAY OCCUR!
70"
MAX
Copyright © 2021 Tripp Lite. All rights reserved.
(40 kg)
(40 kg)
®
1
88 lbs
88 lbs
RATED
RATED
Advertisement
Table of Contents

Related Manuals for Tripp Lite DMPDS5570S


Summary of Contents for Tripp Lite DMPDS5570S
- Page 1 WARRANTY REGISTRATION Register your product today and be automatically entered to win an ISOBAR ® surge protector in our monthly drawing! tripplite.com/warranty 1111 W. 35th Street, Chicago, IL 60609 USA • tripplite.com/support Copyright © 2021 Tripp Lite. All rights reserved.
-
Page 2: Safety Instructions
PRODUCT REGISTRATION Visit tripplite.com/warranty today to register your new Tripp Lite product. You’ll be automatically entered into a drawing for a chance to win a FREE Tripp Lite product!* * No purchase necessary. Void where prohibited. Some restrictions apply. See website for details. -
Page 3: Component Checklist
Component Checklist IMPORTANT: Ensure you have received all parts according to the component checklist prior to installing. If any parts are missing or faulty, visit tripplite.com/support for service. (x2) (x1) (x1) (x4) (x1) (x1) (x4) Package W (x8) (x4) (x4) (x1) 4mm Package P (x1) -
Page 4: Assembling The Stand
1. Assembling the Stand... - Page 5 1. Assembling the Stand...
- Page 6 1. Assembling the Stand Recommended 50–150 mm Notes: • Please secure the locking collar before attaching the display. • Make sure the screw holes face backward.
- Page 7 2. Attaching the Brackets to the Display Make sure the cable clips are attached to the upper bracket for the following security installations: Make sure the cable clips are attached to the upper bracket for the following security installations:...
- Page 8 3. Attaching the Display to the Stand...
- Page 9 3. Attaching the Display to the Stand To prevent the display from tipping, anti-fall wire rope should be installed.
-
Page 10: Maintenance
3. Attaching the Display to the Stand To prevent the display from tipping, anti-fall wire rope should be installed. Maintenance Check at regular intervals (at least every 3 months) to make sure the display is secure and safe to use. - Page 11 1111 W. 35th Street, Chicago, IL 60609 USA • tripplite.com/support 21-02-298 • 93-3DDB_RevA...
-
Page 12: Manual Del Propietario
400x300/400x400 MÁXIMO (40 kg) (40 kg) 600x400 CLASIFICADO CLASIFICADO English 1 • Français 23 • Русский 34 • Deutsch 45 1111 W. 35th Street, Chicago, IL 60609, EE. UU. • tripplite.com/support Copyright © 2021 Tripp Lite. Todos los derechos reservados. -
Page 13: Instrucciones De Seguridad
Tripp Lite tiene una política de mejora continua. Las especificaciones están sujetas a cambio sin previo aviso. Las fotografías e ilustraciones pueden diferir... - Page 14 Accesorios y Partes Incluidas en el Empaque IMPORTANTE: Antes de proceder a instalar, asegúrese de haber recibido todas las partes de acuerdo con la lista de comprobación de componentes. Si faltase alguna parte o estuviese dañada, visite tripplite.com/support para solicitar servicio. (x2) (x1) (x1)
- Page 15 1. Ensamble del Pedestal...
- Page 16 1. Ensamble del Pedestal...
- Page 17 1. Ensamble del Pedestal 50 a 150 mm recomendado Notas: • Asegure el collarín de bloqueo antes de instalar la pantalla. • Asegúrese de que los orificios de los tornillos miren hacia atrás.
- Page 18 2. Colocación de los Soportes en la Pantalla Asegúrese de que los clips del cable estén instalados en el soporte superior para las siguientes instalaciones de seguridad: Asegúrese de que los clips del cable estén instalados en el soporte superior para las siguientes instalaciones de seguridad:...
- Page 19 3. Colocación de la Pantalla en el Pedestal...
- Page 20 3. Colocación de la Pantalla en el Pedestal Para evitar que la pantalla se vuelque, debe instalarse una cuerda de alambre anticaída.
-
Page 21: Mantenimiento
3. Colocación de la Pantalla en el Pedestal Para evitar que la pantalla se vuelque, debe instalarse una cuerda de alambre anticaída. Mantenimiento Compruebe a intervalos regulares (al menos trimestralmente) que la pantalla esté firme y sea seguro usarla. - Page 22 1111 W. 35th Street, Chicago, IL 60609, EE UU • tripplite.com/support 21-02-298 • 93-3DDB_RevA...
-
Page 23: Manuel De L'utilisateur
(88 lb) (88 lb) 400x300/400x400 MAX. CAPACITÉ CAPACITÉ 600x400 NOMINALE NOMINALE English 1 • Español 12 • Русский 34 • Deutsch 45 1111 W. 35th Street, Chicago, IL 60609 USA • tripplite.com/support Droits d'auteur © 2021 Tripp Lite. Tous droits réservés. -
Page 24: Consignes De Sécurité
Puisque les utilisations individuelles sont sujettes à des variations importantes, le fabricant ne fait aucune déclaration ou garantie quant à l'aptitude ou l'adaptation de ces dispositifs pour une application spécifique. La politique de Tripp Lite en est une d'amélioration continue. Les caractéristiques techniques sont modifiables sans préavis. Les produits réels peuvent différer légèrement des photos et des illustrations. - Page 25 Liste de vérification des composants IMPORTANT : S'assurer d'avoir reçu toutes les pièces conformément à la liste de vérification des composants avant de procéder à l'installation. Si des pièces sont manquantes ou défectueuses, visiter tripplite.com/support pour obtenir de l'aide. (x2) (x1) (x1) (x4)
-
Page 26: Assemblage Du Support
1. Assemblage du support... - Page 27 1. Assemblage du support...
- Page 28 1. Assemblage du support 50 à 150 mm recommandé Remarques : • Bien fixer le collier de fixation avant de fixer l'écran. • S'assurer que les trous de vis font face vers l'arrière.
- Page 29 2. Fixation des supports à l'écran S'assurer que les serre-câbles sont fixés au support supérieur pour les installations de sécurité suivantes : S'assurer que les serre-câbles sont fixés au support supérieur pour les installations de sécurité suivantes :...
- Page 30 3. Fixer l'écran au support...
- Page 31 3. Fixer l'écran au support Pour empêcher l'écran de basculer, installer un câble d'acier antichute.
-
Page 32: Entretien
3. Fixer l'écran au support Pour empêcher l'écran de basculer, installer un câble d'acier antichute. Entretien Vérifier à intervalles réguliers (au moins tous les 3 mois) que l'écran peut être utilisé de façon sûre et sécuritaire. - Page 33 1111 W. 35th Street, Chicago, IL 60609 USA • tripplite.com/support 21-02-298 • 93-3DDB_RevA...
-
Page 34: Руководство Пользователя
300x300/400x200 До До 70" 400x300/400x400 40 кг 40 кг 600x400 English 1 • Español 12 • Français 23 • Deutsch 45 1111 W. 35th Street, Chicago, IL 60609 USA • tripplite.com/support Охраняется авторским правом © 2021 Tripp Lite. Перепечатка запрещается. -
Page 35: Указания По Технике Безопасности
с большим разнообразием конкретных применений производитель не дает каких-либо заверений или гарантий относительно пригодности данных изделий для какого-либо конкретного применения или их соответствия каким-либо конкретным требованиям. Компания Tripp Lite постоянно совершенствует свою продукцию. B связи с этим возможно изменение технических характеристик без предварительного уведомления. Внешний вид реальных изделий может несколько отличаться от представленного на фотографиях и иллюстрациях. - Page 36 Перечень комплектации ВНИМАНИЕ! Перед началом установки убедитесь в наличии всех деталей согласно перечню комплектации. В случае отсутствия или повреждения каких- либо деталей обратитесь за помощью на страницу tripplite.com/support. 2 шт. 1 шт. 1 шт. 4 шт. 1 шт. 1 шт. 4 шт.
- Page 37 1. Сборка подставки...
- Page 38 1. Сборка подставки...
- Page 39 1. Сборка подставки Рекомендуется 50–150 мм Примечания: • Перед установкой дисплея закрепите фиксирующую манжету. • Убедитесь в том, что резьбовые отверстия обращены назад.
- Page 40 2. Крепление кронштейнов к дисплею Убедитесь в том, что кабельные зажимы прикреплены к верхнему кронштейну для следующих систем обеспечения безопасности: Убедитесь в том, что кабельные зажимы прикреплены к верхнему кронштейну для следующих систем обеспечения безопасности:...
- Page 41 3. Крепление дисплея к подставке...
- Page 42 3. Крепление дисплея к подставке Во избежание опрокидывания дисплея необходимо установить проволочный трос, препятствующий его опрокидыванию.
- Page 43 3. Крепление дисплея к подставке Во избежание опрокидывания дисплея необходимо установить проволочный трос, препятствующий его опрокидыванию. Техническое обслуживание Регулярно (не реже, чем раз в 3 месяца) проверяйте надежность крепления дисплея и безопасность его использования.
- Page 44 1111 W. 35th Street, Chicago, IL 60609 USA • tripplite.com/support 21-02-298 • 93-3DDB_RevA...
- Page 45 88 lbs max. 400x300/400x400 (40 kg) (40 kg) 600x400 EINGESTUFT EINGESTUFT English 1 • Español 12 • Français 23 • Русский 34 1111 W. 35th Street, Chicago, IL 60609 USA • tripplite.com/support Copyright © 2021 Tripp Lite. Alle Rechte vorbehalten.
- Page 46 Einsatz sicher ist. Da die Anwendungen variieren können, übernimmt der Hersteller keine Garantie bezüglich der Eignung dieser Geräte für einen bestimmten Verwendungszweck. Tripp Lite hat den Grundsatz, sich kontinuierlich zu verbessern. Spezifikationen können ohne Ankündigung geändert werden. Fotos und Illustrationen können von den tatsächlichen Produkten leicht abweichen.
- Page 47 Komponentenliste WICHTIG: Überprüfen Sie, ob Sie alle in der Komponentenliste aufgeführten Teile erhalten haben, bevor Sie mit der Installation beginnen. Wenn Teile fehlen oder fehlerhaft sind, besuchen Sie tripplite.com/support für den Kundendienst. (x2) (x1) (x1) (x4) (x1) (x1) (x4) Paket W (x8) (x4) (x4)
- Page 48 1. Montieren des Ständers...
- Page 49 1. Montieren des Ständers...
- Page 50 1. Montieren des Ständers 50 bis 150 mm empfohlen Hinweise: • Befestigen Sie den Verschlussring, bevor Sie den Bildschirm anbringen. • Stellen Sie sicher, dass die Schraubenlöcher nach hinten zeigen.
- Page 51 2. Befestigung der Halterungen am Bildschirm Stellen Sie sicher, dass die Kabelclips für die folgenden Sicherheitsinstallationen an der oberen Halterung befestigt sind: Stellen Sie sicher, dass die Kabelclips für die folgenden Sicherheitsinstallationen an der oberen Halterung befestigt sind:...
- Page 52 3. Befestigen des Bildschirms am Ständer...
- Page 53 3. Befestigen des Bildschirms am Ständer Um ein Kippen des Bildschirms zu verhindern, sollte ein Fallschutzdrahtseil installiert werden.
- Page 54 3. Befestigen des Bildschirms am Ständer Um ein Kippen des Bildschirms zu verhindern, sollte ein Fallschutzdrahtseil installiert werden. Wartung Überprüfen Sie in regelmäßigen Abständen (mindestens alle 3 Monate), ob der Bildschirm sicher angebracht ist.
- Page 55 1111 W. 35th Street, Chicago, IL 60609 USA • tripplite.com/support 21-02-298 • 93-3DDB_RevA...