Table of Contents
Advertisement
Quick Links
Advertisement
Table of Contents

Related Manuals for Airlink101 AWLL3055


Summary of Contents for Airlink101 AWLL3055
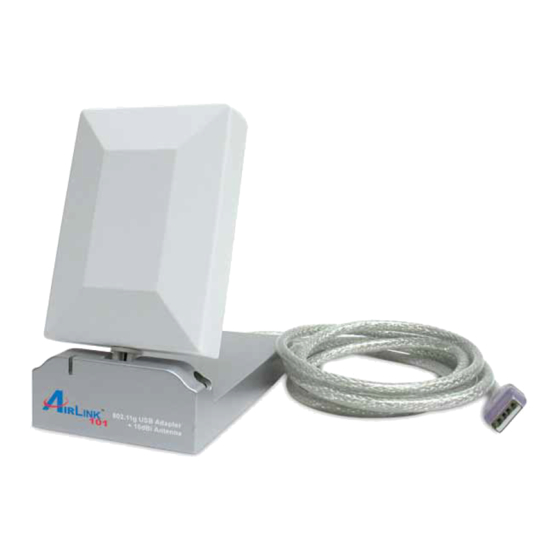
- Page 1 802.11g USB Adapter with +10dBi Antenna Model # AWLL3055 User’s Manual Ver. 1A...
-
Page 2: Table Of Contents
Table of Contents 1. I ... 4 NTRODUCTION 1.1 Features ... 4 1.2 Package Contents ... 4 2. I NSTALLATION ROCEDURES 2.1 Install Utility Software ... 5 2.2 Install Driver ... 8 3. C USB A ONFIGURING DAPTER AS A 3.1 Configuring General Settings ... -
Page 3: Interference Statement
Interference Statement This equipment has been tested and found to comply with the limits for a Class B digital device, pursuant to Part 15 of FCC Rules. These limits are designed to provide reasonable protection against harmful interference in a residential installation. This equipment generates, uses, and can radiate radio frequency energy and, if not installed and used in accordance with the instructions, may cause harmful interference to radio communications. -
Page 4: Introduction
1. Introduction The 802.11g USB 2.0 Adapter with +10dBi Patch Antenna (hereafter called USB adapter), compliant with IEEE 802.11b/g, is a high-efficiency wireless adapter for wireless networking at home, in office, or in public places. This USB adapter connects directly to any USB-ready desktop/notebook computers, so that you can share files, printers, and high-speed access to the Internet over your existing wireless network easily, without disassembling your computer. -
Page 5: Installation Procedures
2. Installation Procedures 2.1 Install Utility Software Note: Before installing the utility software, DO NOT insert the USB adapter into your computer. If the adapter is inserted already, Windows will detect the adapter and request for a driver. Click Cancel to quit the wizard and remove the adapter from your computer. - Page 6 Step 3 Click Next at the welcome screen. Step 4 Click Next to accept the default destination location for the driver to be installed in or click Browse to select the desired location.
- Page 7 Step 5 For Windows XP, click Continue Anyway at the Windows Logo Compatibility screen. For Windows 2000, click Yes at the Digital Signature screen. Step 6 Remove the Driver & Utility CD from your CD drive and then restart your computer.
-
Page 8: Install Driver
2.2 Install Driver Note: In most cases, Windows will automatically install the driver after the computer is restarted. If the Found New Hardware Wizard appears, follow the instructions below. The Found New Hardware Wizard will look different depending on your operating system. -
Page 9: Configuring Usb Adapter As A Wireless Client
For Windows 2000, click Yes at the Digital Signature screen. For Windows 98SE or ME, insert the Windows 98SE or ME CD if prompted to do so and click OK. Step 4 Click Finish. Restart the computer if you are prompted to do so. 3. - Page 10 Note to Windows XP Users: If you encounter the Wireless Zero Configuration dialog box, click Yes to enable the Wireless LAN Utility to configure your USB adapter. Step 1 Select the SSID of your wireless router/access point from the Available Network list and click on the Connect this site button.
- Page 11 Step 2 Verify that the adapter has adequate Signal Strength and Link Quality and then restart the computer. Mode: Select from Station or Access Point. For more information regarding Access Point, please refer to the next section, 4. Configuring USB Adapter as an Access Point.
- Page 12 Current Network Information: Displays the network information of the wireless router/access point that the USB adapter is currently connected to. More Setting: Click on this button to access the USB adapter’s configuration settings, including WEP and WPA encryption settings.
-
Page 13: Configuring General Settings
3.1 Configuring General Settings Click Change to configure the adapter’s General Connection Setting. Channel: This setting is for Access Point Mode only. Tx Rate: Select the desired transmission rate, or leave the default setting of Auto to allow the adapter to automatically select the optimum rate. SSID: You can manually enter the SSID of the wireless router/access point you wish to connect to. -
Page 14: Configuring Encryption Security
3.2 Configuring Encryption Security Click WEP Encryption Key Setting to configure the WEP settings. Click Change to configure the WEP Key Setting and then click Apply to save the settings. Note: The WEP Key settings must be identical to the WEP settings of the wireless router/access point you wish to connect to. - Page 15 Key Value: Enter the applicable key values. Up to four key values may be entered. Note the following rules when entering Key values: ‧ 64-bit key length requires 10 Hexadecimal characters (0-9, A-F) or 5 ASCII characters (any number or letter). ‧...
- Page 16 1. Select TKIP for Encryption, WPA PSK for Authentication Mode, and click Apply. 2. Click on WPA Encryption Setting and click Change. 3. Enter the appropriate passphrase in the Passphrase field under the Pre-shared Key section and click Apply. (The passphrase must be identical to the passphrase set on your wireless router/access point and it has to be between 8 to 63 ASCII characters long).
-
Page 17: Configuring Profile
3.3 Configuring Profile After you have configured all the settings, you can save your settings as a profile so you don’t have to re-configure them the next time. Type in a name for the profile in the Profile name field and click Save Current. To load a profile, select the profile from the drop-down menu and click Load. -
Page 18: Advanced Settings
3.4 Advanced Settings Click on Advanced Setting from the More Setting window to configure the adapter’s advanced settings. User Interface: select the language for the adapter’s user interface. Power Consumption Setting: • Continuous Access Mode: provides the best signal throughput but least power save. -
Page 19: Information
3.5 Information Click on Information from the More Setting window to view the driver and utility’s information. -
Page 20: Configuring Usb Adapter As An Access Point
4. Configuring USB Adapter as an Access Point 4.1 Configuring Access Point You can configure the USB Adapter as an access point for other wireless clients on your network. Note: You will not be able to access the Internet if you configure the USB adapter as an access point. - Page 21 Click on Change to configure the settings. Channel: select the channel you want to use. Basic Rate: select the applicable transfer rate. Tx Rate: select from Auto to 54 Mbps. SSID: enter the desired SSID for the access point. Hide SSID (check box): check to disable the broadcast of SSID. Tx Power: select the transmission signal power.
-
Page 22: Configuring Encryption Security
4.2 Configuring Encryption Security Select Enable from the WEP drop-down menu and click Setting. Key Length: Select the appropriate encryption key length. Default Key ID: Select which of the four Key Value you want to use. Key Format: Select either Hexadecimal (0-9, A-F) or ASCII (any number or letter). Key Value: Enter the applicable key values. -
Page 23: Configuring Mac Address Filter
4.3 Configuring MAC Address Filter Filter Type: Disable: disables MAC address filter. Accept: only accepts connection from the MAC address listed. (Connection attempts from MAC address not in the list will be rejected). Reject: only rejects connection from the MAC address listed. (Connection attempts from MAC address not in the list will be accepted, provided the client matches the encryption settings as well). -
Page 24: Appendix
5. Appendix 5.1 Specifications Standard • IEEE 802.11g/b Compliant Interface • USB2.0, USB1.1 Compliant Access Method • Infrastructure Mode, Ad-Hoc Mode (802.11b Ad-Hoc), Roaming Media Access Protocol • CSMA/CA Operating Channels • 1-11 (US, Canada) • 1-13 (availability depends on local regulations) Transmit Power Settings •... - Page 25 Expand Network adapters and you should see IEEE 802.11g USB Wireless LAN. If there is no yellow question mark or exclamation mark, the driver is installed properly. If you do not see your wireless router/access point in the Available Network list, reset your wireless router/access point and click on Refresh.
- Page 26 Step 1 Go to Start, Run, type cmd and click OK. Step 2 At the command prompt, type ipconfig/release and press Enter. Step 3 After the IP address is released, type ipconfig/renew and press Enter. You should get an IP address like 192.168.x.y (where x and y are unique numbers assigned by your wireless router/access point).
-
Page 27: Technical Support
AirLink101. All other product or service names are the property of their respective holders. AirLink101 products are protected under numerous U.S. and foreign patents and pending applications, mask work rights, and copyrights.