FujiFilm Finepix S3000 Owner's Manual
Fujifilm finepix s3000: user guide
Hide thumbs
Also See for Finepix S3000:
- Specifications (3 pages) ,
- Quick start (2 pages) ,
- Service manual (82 pages)
Table of Contents
Advertisement
Advertisement
Table of Contents

Related Manuals for FujiFilm Finepix S3000


Summary of Contents for FujiFilm Finepix S3000
- Page 1 This manual will show you how to use your FUJIFILM DIGITAL CAMERA FinePix S3000 correctly. Please follow the instructions carefully. Getting Ready Basic Photography Advanced Features Photography Advanced Features Playback Settings Software Installation Viewing Images BL00332-200 ( 1 )
-
Page 2: Warning
Notes on the Grant: To comply with Part 15 of the FCC rules, this product must be used with a Fujifilm-specified ferrite-core USB cable and DC supply cord. For customers in Canada CAUTION This Class B digital apparatus complies with Canadian ICES - 003. -
Page 3: Table Of Contents
Contents Warning ... 2 Preface ... 6 Accessories included ... 7 Nomenclature ... 8 MACRO (CLOSE-UP) PHOTOGRAPHY ... 37 w PLAYBACK VIEWING YOUR IMAGES (PLAYBACK) ... 38 1 Getting Ready MULTI-FRAME PLAYBACK ... 39 PREFACE ... 11 PLAYBACK ZOOM ... 40 Attach the lens cap, strap and adapter ring ... -
Page 4: Preface
I Exif Print (Exif ver. 2.2) Flush your mouth thoroughly with water. Drink large quantities Exif Print Format is a newly revised digital camera file format that of water and induce vomiting. Then seek medical assistance. contains a variety of shooting information for optimal printing. -
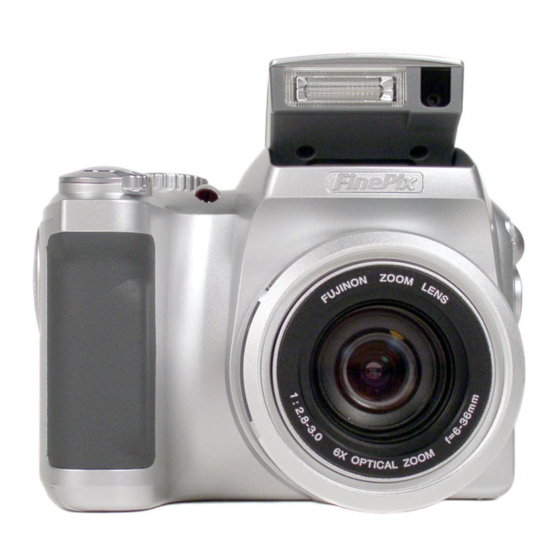
Page 5: Nomenclature
Nomenclature ✽ Refer to the pages in parentheses for information on using the camera features. Power switch Mode dial Photography mode (P.22) Playback mode (P.38) Power-OFF (P.17) Shutter button Self-timer lamp Flash (P.33) Flash control sensor Lens VIDEO OUT (Video output) socket Manual (P.44) Scene Position... -
Page 6: Getting Ready
Nomenclature (Sample display) I Still photography mode EV (Exposure compensation) Self-Timer Still photography mode Flash Macro (close-up) Zoom bar Date 1/ 1/2003 1/ 1/2003 I Playback mode Playback mode 100ー0001 100ー0001 DPOF Protection Zoom bar Date 1/ 1/2003 1/ 1/2003 Attach the lens cap, strap and adapter ring White balance Quality mode Number of available frames... -
Page 7: Attaching The Lens Cap
The wide conversion lens and built-in flash cannot be used together. The adapter ring enclosed with the FinePix S3000(AR-FX3) should be used with these conversion lenses. The adapter rings provided with these conversion lenses (AR-FX9 for FinePix 4900 zoom/6900 zoom/S602 zoom/S7000) cannot be used with the FinePix S3000. -
Page 8: Loading The Battery And Xd-Picture Card
LOADING THE BATTERY AND xD-Picture Card™ Compatible batteries hAA-size alkaline batteries (4) or AA-size Ni-MH rechageable batteries (4) (sold separately). Please use the same brand and grade AA-size alkaline batteries as those supplied with the camera. How to use the batteries h Never use the following types of batteries, as this could cause serious problems such as battery fluid leakage or overheating: 1. -
Page 9: Switching On And Off/Setting The Date And Time
LOADING THE BATTERY AND xD-Picture Card™ 1 Open the slot cover. 2 Firmly push the xD-Picture Card fully into the xD-Picture Card slot. 3 Close the slot cover. Opening the slot cover while the camera is still switched on, the camera is switched off. Take care not to remove your finger too quickly The xD-Picture Card will not slide fully into the slot if after the lock is released, as the card may spring... -
Page 10: Correcting The Date And Time
CORRECTING THE DATE AND TIME DATE/TIME DATE/TIME YYYY MM DD YYYY MM DD 2003 1 1 2003 1 1 12 : 00 AM 12 : 00 AM OK OK SET SET BACK BACK CANCEL CANCEL 1 Use “d” and “c” to select Year, Month, Day, 1 Press the “MENU/OK” button. Hour or Minute. 2 Press “d”... -
Page 11: Changing The Date Order
CHECKING THE REMAINING CHANGING THE DATE ORDER BATTERIES CHARGE Switch the camera on and check that no battery DATE/TIME DATE/TIME level warning ( LCD monitor. If no icon is displayed, there is MM DD YYYY MM DD YYYY ample charge left in the batteries. 9 18 2003... -
Page 12: Basic Photography
Basic TAKING PICTURES ( AUTO MODE ) Photography You’ve read the chapter on getting ready and the camera is now set up and ready to take pictures. The Basic Photography section explains the three basic steps of “taking pictures”, “viewing pictures”... - Page 13 TAKING PICTURES ( AUTO MODE ) Loop the strap over your wrist, brace your elbows firmly against your body and hold the To zoom in on the subject, press “a” (T TELE camera with both hands. Zoom). To zoom out, press “b” (W WIDE Zoom). Be careful to ensure that the lens and flash A “zoom bar”...
-
Page 14: I Indicator Lamp Display
Blinking red Though the FinePix S3000 uses an accurate autofocus mechanism, it may have difficulty focusing or not be able to focus at all for the types of subject and situation listed below. In such cases, the image may be out of focus. -
Page 15: Number Of Available Frames
AF/AE Lock On the FinePix S3000, when you press the Shutter button down half way, the focus and exposure settings are fixed (AF/AE lock). If you want to focus on a subject that is off to one side of the image or if you want to set the exposure before you compose the final shot, lock the AF and AE settings and then compose and shoot your picture to get the best results. -
Page 16: Framing Guideline Function
USING AF/AE LOCK Bebeep Pressing the Shutter button down halfway, the Continue to hold the Shutter button down halfway camera emits a short double-beep and focuses on (AF/AE lock). Move the camera back to the the subject. At that point, the AF frame on the original image and then fully press down on the screen becomes smaller and the camera sets the shutter button. -
Page 17: Digital Zoom
DIGITAL ZOOM The position of the “ Press “a” to zoom in on your subject and “b” to the current zoom setting. zoom out. When the limit of optical zooming is hIf the “ reached, the digital zoom can then be used to zoom is being used. -
Page 18: Auto Flash Mode (No Icon)
I FLASH Auto Flash Mode (no icon) Use this mode for ordinary photography. The Use this mode to ensure that the subject’s eyes flash fires automatically as required by the appear natural when photographing people in shooting conditions. low-light conditions. The flash fires a pre-flash just before the picture is taken and then fires again to take the actual picture. -
Page 19: Suppressed Flash
I FLASH h Check that the flash is popped up. Suppressed Flash Pressing the flash down switches the camera to Suppressed Flash mode. h When “,” (Landscape) or “t” (Continuous Use this mode for photography using indoor Shooting) is selected in “E” (Scene Position) lighting, for shots taken through glass, and for mode, the flash mode is set to “Suppressed photography in venues such as theaters or at... -
Page 20: Playback
“c” for approximately 1 second. You can use this camera to play back still images The displayed image does not change, but a recorded on an FinePix S3000 or still images progress bar indicates the approximate playback (excluding some uncompressed images) recorded on location on the xD-Picture Card. -
Page 21: Playback Zoom
PLAYBACK ZOOM PLAYBACK This function is useful for things such as checking the focus of shots you have taken. Pressing “a” during single-frame playback switches you to the zoom screen. Single-frame Playback Zoom DISP DISP PANNING PANNING Switch to zoom Change zoom scale View another frame View another frame... -
Page 22: Advanced Features Photography
ERASING SINGLE FRAME PLAYBACK 100−0002 100−0002 FRAME FRAME Pressing the “MENU/OK” button erases the frame (selected file) displayed. When erasing is complete, the next image appears and the ERASE OK? ERASE OK? “ § To erase another frame, repeat steps OK OK YES... -
Page 23: Still Image
AUTO/ MANUAL STILL IMAGE R Auto mode W Manual mode This is the simplest photography mode to use Manual mode lets you specify a range of and is suitable for the widest range of shots. different menu settings for taking pictures. hMenu options only available in Manual mode Brightness (exposure compensation), white balance, aperture priority, sharpness, flash... -
Page 24: Movie Tmovie (Video)
E SCENE POSITION q STILL IMAGE m Portrait Use this mode for shots of people. Portrait mode Use this mode for shots taken in the evening or provides soft-tone images with natural skin colors. at night. hWhen using the flash hShutter Auto Flash, Red-Eye Reduction, Forced Flash, Slow shutter speed mode with speeds as slow... - Page 25 T MOVIE ( VIDEO ) q MOVIE 60s 60s STANDBY STANDBY Shooting begins when you fully depress the Shutter button. Zoom bar When the camera is used to shoot a movie, you can get brighter images by using a light source such as a fluorescent lamp to illuminate the subject.
-
Page 26: Photography Menu Operation
PHOTOGRAPHY MENU OPERATION When you validate the settings, the respective 1 Press the “MENU/OK” button to display the icons appear at the top of the screen (Example menu. showing the camera in AUTO mode with the self 2 Use “d” and “c” to select the menu item and timer set.). -
Page 27: Self-Timer Photography
PHOTOGRAPHY MENU y SETTING QUALITY MODE ( NUMBER OF RECORDED PIXELS FOR IMAGES ) Still image ( R · E · W ) Movie ( u ) QUALITY QUALITY 19 19 25 25 33 33 FRAMES FRAMES 122 122 Any of 4 settings can be selected. You can select 2 levels of quality. -
Page 28: Ev (Exposure Compensation)
= SELF-TIMER PHOTOGRAPHY PHOTOGRAPHY MENU The self-timer lamp lights steadily for roughly 5 Until the picture is taken, a countdown appears seconds and then blinks for another 5 seconds, on the screen. after which the shot is taken. Self-timer mode is automatically cancelled after each shot. -
Page 29: White Balance (Selecting The Light Source)
PHOTOGRAPHY MENU a WHITE BALANCE ( SELECTING THE LIGHT SOURCE ) AUTO: Automatic adjustment WB WB AUTO AUTO This mode can be selected in the “ ” photography mode. Change the white balance setting when you want to take a picture with the white balance fixed for the surroundings and lighting when the ✽... -
Page 30: Naperture-Priority Auto
N APERTURE-PRIORITY AUTO PHOTOGRAPHY MENU A.PRIORITY A.PRIORITY F8.2 F8.2 F4.8 F4.8 F2.8 F2.8 AUTO AUTO If the shutter speed is displayed in red when the This mode can be selected in the “ ” photography Shutter button is pressed down halfway, the shot mode. - Page 31 It may not be possible to play back a movie file that was recorded on a camera other than the FinePix S3000. h To play back movie files on a computer, save the movie file on the xD-Picture Card to the computer’s hard disk and then play back the saved file.
-
Page 32: Playback Menu P Erasing Single/All Frames
p ERASING SINGLE/ALL FRAMES PLAYBACK MENU ERASE ERASE ALL FRAMES ALL FRAMES FRAME FRAME BACK BACK 1 Use “a” and “b” to select “FRAME” or “ALL FRAMES”. 2 Press “MENU/OK” button to confirm your selection. ALL FRAMES FRAME Erases all unprotected files. You should copy important files that you do not want to be erased to your computer or another media. -
Page 33: Protecting Images:frame/Set All/Reset All
p ERASING SINGLE/ALL FRAMES PLAYBACK MENU To stop the procedure mid-way ALL FRAMES ALL FRAMES ALL FRAMES ALL FRAMES BACK BACK CANCEL CANCEL Press the “BACK” button to stop erasing all the frames. Some unprotected frames (files) will be left unerased. Even if you stop the procedure immediately, some frames (files) will be erased. - Page 34 PROTECTING IMAGES:FRAME/SET ALL/RESET ALL PLAYBACK MENU PROTECT PROTECT RESET ALL RESET ALL SET ALL SET ALL FRAME FRAME 1 Press “a” or “b” to select “RESET ALL”, “SET ALL” or “FRAME”. 2 Press “MENU/OK” button to confirm your selection. RESET ALL FRAME SET Removes the protection from all the files.
- Page 35 PROTECTING IMAGES:FRAME/SET ALL/RESET ALL PLAYBACK MENU SET ALL RESET ALL 100−0005 100−0005 SET ALL SET ALL SET ALL OK? SET ALL OK? IT MAY IT MAY TAKE A WHILE TAKE A WHILE OK OK YES YES BACK BACK CANCEL CANCEL Press the “MENU/OK” button to protect all the Press the “MENU/OK” button to unprotect all the files.
-
Page 36: How To Specify Print Options (Dpof)
Card. The recorded specifications include information on which frames are to be printed. This section gives a detailed description of how to order your prints with the FinePix S3000. On the FinePix S3000, you can specify only one print per image in the DPOF settings. - Page 37 i DPOF SET FRAME ( FRAME SET/RESET ) PLAYBACK MENU DPOF DPOF RESET ALL RESET ALL WITHOUT DATE WITHOUT DATE When the data includes a frame with DPOF setting WITH DATE WITH DATE that were specified on another camera, ¥ “ Pressing the “MENU/OK” button erases all of the DPOF settings already specified for each frame.
-
Page 38: Dpof Set Frame (Reset All)
i DPOF SET FRAME ( RESET ALL ) PLAYBACK MENU 1Set the Power switch to “ ”. 2 Press the “MENU/OK” button. Press “d” or “c” to select “ DPOF DPOF RESET ALL RESET ALL WITHOUT DATE WITHOUT DATE WITH DATE WITH DATE ” DPOF. 1 Press “a” or “b” to select “RESET ALL”. 2 Press the “MENU/OK”... -
Page 39: Settings
g LCD BRIGHTNESS Settings Still Photography OPTION OPTION Screen SET−UP SET−UP LCD LCD You can use “ LCD” in any mode. 1 Use “d ” and “c ” to adjust the screen 1 Press the “MENU/OK” button to display the brightness. -
Page 40: Iset-Up Menu Options
g USING SET–UP I SET–UP Menu Options Default Settings Display setting This option specifies whether or not an image checking screen (photography results) is displayed after you take a shot. The photographed image is displayed for a few moments and then IMAGE DISP. -
Page 41: Format
✽ Note that the software configuration differs slightly depending on your operating system. RAW FILE CONVERTER LE Used when you open RAW files that were photographed on cameras that support the RAW file format. FinePix S3000 is not supported for CCD- RAW file. -
Page 42: Installation On A Windows Pc
6.2 INSTALLATION ON A Windows PC Pre-installation checklist ( For Windows ) To run this software, you must have the hardware and software described below. Check your system before you begin the installation. ✽1 Compatible PCs IBM PC/AT or compatible Operating System Windows 98 (including the Second Edition) Windows Millennium Edition (Windows Me) -
Page 43: Installation On A Mac Os 9.0 To 9.2
6.2 INSTALLATION ON A Windows PC Do not connect the camera to your PC until the software installation is completed. Install FinePixViewer as instructed in the Quick Start Guide. Launching the Installer Manually 1 Double-click the “My Computer” icon. ✽ Windows XP users should click “My Computer” in the “Start” menu. 2 Right-click “FINEPIX”... -
Page 44: Installation On A Mac Os X
6.3 INSTALLATION ON A Mac OS 9.0 TO 9.2 Note i Connect the camera directly to the Macintosh using the USB cable (included). The software may not operate correctly if you use an extension cable or connect the camera via a USB hub. i Push the USB connector fully into the socket to ensure that it is securely connected. - Page 45 6.3 INSTALLATION ON A Mac OS 9.0 TO 9.2 Select the installation destination for FinePixViewer. 1 Click the [Open] button to open the installation destination folder. 2 Click the [Save] button. Install ImageMixer VCD2 for FinePix as directed by the on-screen instructions. After restarting your Macintosh, the “FinePixViewer installation completed”...
- Page 46 6.4 INSTALLATION ON A Mac OS X Pre-installation Checklist I Hardware and software requirements To run this software, you must have the hardware and software described below. Check your system before you begin the installation. ✽1 Compatible Mac Power Macintosh G3 , PowerBook G3 Power Macintosh G4, iMac, iBook, Power Macintosh G4 Cube, or PowerBook G4...
- Page 47 6.4 INSTALLATION ON A Mac OS X FinePixViewer and RAW FILE CONVERTER LE are installed on Mac OS X. Switch your Macintosh on and start up Mac OS X. Do not launch any other applications. Load the enclosed CD-ROM into the CD-ROM drive. The “FinePix”...
-
Page 48: Viewing Images
Images 7.1.1 Using the AC power adapter ( sold separately ) Always use a FUJIFILM AC Power Adapter AC-5VH/AC-5VHS (➡P.109). Use the AC power adapter to avoid losing power at inconvenient times, such as when downloading photographed images to the computer. Using the AC power adapter also allows you to take pictures and play back images without worrying about depleting the batteries. -
Page 49: Connecting To A Tv
This function allows you to conduct videoconferencing sessions between PCs connected to the Internet. Videoconferencing (“PictureHello”) is not supported on Macintosh computers. Connection is only possible with a FUJIFILM camera equipped with a “PC Camera” function. CD-ROM (Software for FinePix SX) - Page 50 7.1 CAMERA CONNECTION For more information on using the software, refer to “How to use FinePixViewer” in the HELP menu which was installed from the CD- ROM. Switch between “ ” and “ PC” in the camera’s SET-UP screen. USE AT DSC MODE Set a camera 1 Insert an xD-Picture Card containing your shots into the camera.
- Page 51 7.1 CAMERA CONNECTION Set a computer Windows 98/98 SE/Me/2000 Professional/Macintosh The Windows CD-ROM may also be required during installation. In this event, switch CD-ROMs as directed by the on-screen instructions. h FinePixViewer automatically starts up. ✽ Screen for Windows 98 SE h A removable disk icon appears and you can use your PC to transfer files to and from the camera.
-
Page 52: Disconnecting The Camera
7.1 CAMERA CONNECTION 7.1.4 Disconnecting the camera 1 Quit all applications (FinePixViewer etc.) that are using the camera. 2 Check that the indicator lamp is lit green (no data is being exchanged with the computer). For a DSC connection, proceed to step For a PC CAMERA connection, proceed to step Even when “Copying”... -
Page 53: Using Finepixviewer
7.2 USING FinePixViewer 7.2.1 Mastering FinePixViewer For all information on FinePixViewer functions, refer to “How to Use FinePixViewer” in the Help menu for details. Macintosh h To read “How to Use FinePixViewer”... You must install Adobe Systems’ Acrobat Reader. See P.89 for information on installing Acrobat Reader. For more information on using Acrobat Reader, refer to the Acrobat Reader “Help”... - Page 54 7.2 USING FinePixViewer 7 When the confirmation message appears, click the [OK] button. Check your selection carefully since the process cannot be cancelled once you click the [OK] button. i Automatic uninstallation begins. When uninstallation ends, click the [OK] button. Macintosh Only perform this operation when you no longer require the installed software or when the software was not installed correctly.
-
Page 55: System Expansion Options
System Expansion Options e By using the FinePix S3000 together with other optional FUJIFILM products, your system can be expanded to fill a wide range of uses. FinePix S3000 Digital Camera xD-Picture Card Image Memory Card Reader DPC-R1 (PC card slot) -
Page 56: Notes On Using Your Camera Correctly
I Notes on Immersion in Water or Sand The FinePix S3000 is particularly adversely affected by water and sand. When you are at the beach or close to water, ensure that the camera is not exposed to water or sand. -
Page 57: Notes On The Power Supply
Keep the batteries out of reach of infant and young Do not use AA-size manganese or nickel-cadmium(Ni- children. Cd) batteries in your FinePix S3000 because the heat h When loading the batteries into the camera, ensure that the generated by the batteries could damage the camera or battery polarity (>... -
Page 58: Notes On Using The Ac Power Adapter
Plug the connection cord plug securely into the DC input terminal of the FUJIFILM Digital camera. h Turn off the power switch of the FUJIFILM Digital camera before disconnecting the connection cord from the FUJIFILM Digital camera’s DC input terminal. To disconnect, take hold of the plug and pull it out (do not disconnect it by pulling on the cord). -
Page 59: Warning Displays
FinePix S3000. the camera. The camera quality cannot be guaranteed when ISpecifications cards other than those manufactured by FUJIFILM Type are used. h The xD-Picture Card may feel warm when it is removed from the camera after extended periods of Memory type picture taking or image viewing. - Page 60 Card with a soft dry cloth. It may be necessary to format the xD-Picture Card. If the error message is still displayed, replace the xD-Picture Card. i Contact your FUJIFILM dealer. i Movies cannot be played back. Take the shot using a formatted xD-Picture Card.
-
Page 61: Troubleshooting
Troubleshooting e If you think the camera is faulty, check the following once more. Troubleshooting Possible causes No power. i The batteries are exhausted. i The AC power adapter plug has come out of the power outlet. i The batteries are loaded the wrong way round. Power cuts out during The batteries are exhausted. -
Page 62: Specifications
Card (16/32/64/128/256/512 MB) clean dry cloth. h File format Still image: JPEG (Exif Ver.2.2), DPOF-compatible i Set up the camera and the FinePix S3000 Movie: AVI format, Motion JPEG USB cable (included) correctly. ✽ Design rule for Camera File system compliant h Number of recorded pixels i Switch the PC on. -
Page 63: Explanation Of Terms
A number that denotes exposure. The EV is determined by the brightness of the subject and sensitivity (speed) of the film or CCD. The number is larger for bright subjects and smaller for dark subjects. As the brightness of the subject changes, a digital camera maintains the amount of light hitting the CCD at a constant level by adjusting the aperture and shutter speed. -
Page 64: Safety Notes
Safety Notes h To ensure that you use your FinePix S3000 camera correctly, read these Safety Notes and your Owner’s Manual carefully beforehand. When a fault arises, switch the camera off h After reading these Safety Notes, store them in a safe and then remove the batteries and place. -
Page 65: Ec Declaration Of Conformity
Build-up of dust in your camera can cause a fire or electric shock. Do not place heavy objects on the camera. h Contact your FUJIFILM dealer to request This can cause the heavy object to tip over or fall and cause injury. -
Page 66: Important
Be sure to read this page before using the Software. All copyrights and other proprietary rights to Software and Documentation are owned and retained by FUJIFILM or the third party suppliers as indicated on or in Software or Documentation. Nothing contained herein shall be construed, expressly or implicitly, as transferring or granting any right, license, or title to you other than those explicitly granted under this Agreement. - Page 67 26 - 30, Nishiazabu 2 - chome, Minato - ku, Tokyo 106 - 8620, Japan http://home.fujifilm.com/products/digital/ Printed on recycled paper. FGS - 305108 - FG Printed in Japan...