Table of Contents
Advertisement
Quick Links
Advertisement
Table of Contents

Related Manuals for Neatech Job Walker


Summary of Contents for Neatech Job Walker
- Page 1 MANUAL Rev 2016-08...
- Page 3 4/A, A. de Curtis, 80040, Cercola (NA), Italy under its responsibility, states that the wheelchair Job Walker satisfies the conditions laid down by the European Directive 93/42 and its subsequent updates; according to the criteria for classification of Annex IX of this directive, it is classified as...
-
Page 4: Table Of Contents
Index PRODUCT PRESENTATION ...................... 1 PREPARATION FOR FIRST USE ....................2 Checks to be made on delivery ..................2 Unpacking ........................3 ADJUSTMENTS ........................7 List of adjustments ......................7 Seat depth ........................8 Pushbar height ......................... 9 Pushbar depth ....................... 10 USE OF THE PRODUCT ...................... - Page 5 SPECIFICATIONS ........................33 Weight ........................... 36 Dimensions ........................37 WARRANTY TERMS ....................... 38 Serial number ........................ 38 Note ............................. 39...
- Page 6 Symbols in this manual WARNING This symbol means presence of danger for the user or damage for the product. Always follow instructions when this symbol is present. ELECTRICAL WARNING This symbol means presence of danger related to the presence of electrical energy.
- Page 7 TEMPERATURE The temperature of some surfaces may increase when the chair is exposed to external heat sources as sunlight. TIPPING HAZARD Tipping hazard is strongly reduced because of the design of the wheelchair according to EN 12182. In any case, please pay special attention during the adjustments and use of the wheelchair to prevent any damage to the user or objects.
- Page 8 WARNING: It is prohibited to use wheelchair or its parts for any purpose other than that indicated. For a correct use please follow the instructions given in this manual. NEATECH.IT disclaims any responsibility for damages caused by improper use of aids.
- Page 9 For any need not expressly explained in this manual, please contact the manufacturer. Neatech.it SRL 4/A, A. de Curtis, 80040, Cercola (NA), Italy www.neatech.it – info@neatech.it - +39 081 555 1946 INCIDENT REPORTING If an incident occurs, please contact an authorized service center. For a list of authorized service center please contact the manufacturer.
-
Page 10: Product Presentation
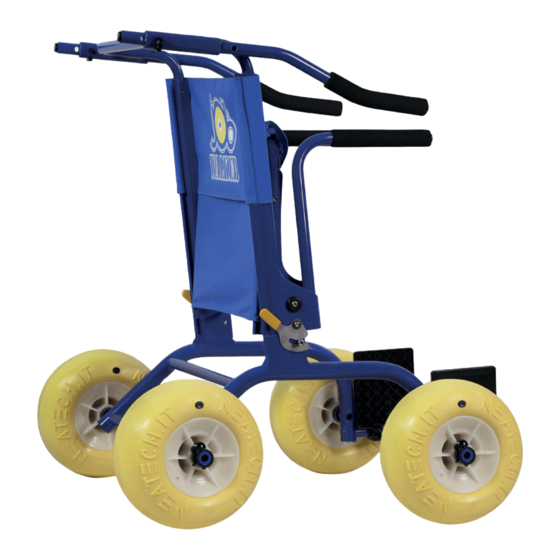
1 PRODUCT PRESENTATION The Job Walker is a walker that allows people with temporary or permanent disabilities to access harsh environments such as the beach or snow. This is obtained thanks to the use of patented innovative solutions from Neatech, as the wheels made of plastic material with controlled deformation that do not sink on soft soils. -
Page 11: Preparation For First Use
Make sure the surface of the device is not damaged, scratched, bent, etc. Any fault or damage found must be immediately reported on the shipping documents and promptly communicated to the carrier. For any other questions, please contact the manufacturer. www.neatech.it 2/38... -
Page 12: Unpacking
Before starting to mount the wheelchair please check if all described component are present. If not, please contact as soon as possible the vendor. No tools are required to mount the wheelchair. No parts weighted more than 10 kg are intended to be handled during the unpacking of the wheelchair www.neatech.it 3/38... - Page 13 Block the wheel with a fixing clip. Repeat the operation for all four wheels Figure 2 Insert the upper part of the wheelchair on the chassis. Block the upper part acting on the two handles shown in figure. www.neatech.it 4/38...
- Page 14 Figure 3. Figure 3 WEIGHT The weight of the upper part of the wheelchair is about 5 kg. Grab it with two hands at the same time on the bars shown in Figure 4. Figure 4 www.neatech.it 5/38...
- Page 15 Repeat the operation for both left and right side of the wheelchair. Figure 7 Figure 6 Insert the armrests on the upper part of the wheelchair. PACKAGING DIASPOSAL To properly recycle the packaging materials, follow the instructions provided by your local waste disposal service. www.neatech.it 6/38...
-
Page 16: Adjustments
Seat depth B - Assistant Pushbar height B – Assistant Push bar depth B – Assistant (if used as wheelchair) A – User (if used as walker aid) For more information, see section 4.3 and 4.4. Table 1 www.neatech.it 7/38... -
Page 17: Seat Depth
41.5 cm 44.0 cm Table 2 Allen wrench 5 mm Figure 8 Unscrew the two screws shown in figure. Pull or push the highlighted bar to adjust the seat depth. Screw again the two screws. www.neatech.it 8/38... -
Page 18: Pushbar Height
Allen wrench 5 mm Figure 9 Unscrew the screw shown in figure. Repeat the operation for both left and right side of the wheelchair. Adjust the height of the pushbar. Screw again the two screws. www.neatech.it 9/38... -
Page 19: Pushbar Depth
3.4 Pushbar depth POSSIBLE CHOICES 37.0 cm 40.0 cm 43.0 cm 46.0 cm 49.0 cm 52.0 cm 55.0 cm POSSIBLE CHOICES 31 cm 34 cm 37 cm 40 cm 43 cm 46 cm 49 cm Table 4 www.neatech.it 10/38... - Page 20 Remove the fixing clip. Adjust the depth of the push bar. Block the pushbar with the fixing clip. INFORMATION It is possible to adjust the depth of left and right pushbar depth separately. www.neatech.it 11/38...
-
Page 21: Use Of The Product
Do not install, maintain or operate your wheelchair without reading all warnings and this entire user’s manual. Always keep this manual in connection with your wheelchair. www.neatech.it 12/38... - Page 22 Don’t use the wheelchair in dark environments. Safety belt The wheelchair has the predisposition for a pelvic belt that can be purchased as an accessory. Pelvic belt is only designed to position the user and not for any protection in case of accident. www.neatech.it 13/38...
-
Page 23: Use Of Brake
Do not lift the wheelchair with a person on board, if you really need to do this it is suggested to lift the wheelchair using parts highlighted in Figure 10. Figure 10 4.1 Use of brake There are no brakes on the wheelchair. www.neatech.it 14/38... -
Page 24: Use As Seat In Motor Vehicle
Flip up the footplates. Put the pushbars as shown in Errore. L'origine riferimento non è stata trovata.. To move the push bars unlock the fixing clips, set their position and then block again the fixing clips. Figure 11 www.neatech.it 15/38... -
Page 25: Use As A Wheelchair
It is possible to use the product as a wheelchair. Flip down the seat. Put the pushbars as shown in Errore. L'origine riferimento non è stata trovata.. To move the pushbars unlock the fixing clips, set their position and then block again the fixing clips. Figure 12 www.neatech.it 16/38... -
Page 26: Transport And Storage
If it is necessary to transport the wheelchair, to facilitate the operation, follow these instructions. Figure 13 Remove the fixing clip. Remove the pushbar. Repeat the operations for both left and right side of the wheelchair. Figure 14 Remove the armrests www.neatech.it 17/38... - Page 27 Water and dust resistant Strong enough to protect the wheelchair from any hurts When inserting the wheelchair into the package protect any protruding parts with some foam or similar. To mount again the wheelchair, follow instruction in reverse order. www.neatech.it 18/38...
-
Page 28: Maintenance
To clean the chair do not use high-pressure water spray devices. For plastic and metal parts use a soft cloth dampened with mild detergent. For the upholstery, linings, seat and back covers use warm water and mild detergent. Do not use stain removers, solvents, acids, etc. www.neatech.it 19/38... -
Page 29: Controls To Be Performed On The Product
For more information, see Figure 7 (pag. 6) Checking tires usury Monthly B – Assistant Checking tires circumference Weekly B – Assistant Check if the circumference of wheels is equal to the value indicated in section 5.2.1 . www.neatech.it 20/38... -
Page 30: Tire Circumference
Make sure that the circumference of the wheel is between 81 cm and 84 cm. If not inflate or deflate the wheel until its circumference is in the recommended range. Mount again the wheel following instructions in reverse order. Repeat the operation for all four wheels. www.neatech.it 21/38... -
Page 31: Tire Puncture
When surface is dry; apply few drops of a glue for rigid PVC. Wait some minutes to let glue dry, then inflate wheels as described in section 5.2.1 . If this doesn’t result in a solution you have to substitute the wheel. Code Description Note R107-0010 Wheel www.neatech.it 22/38... -
Page 32: Spare Part
The use of spare parts or accessories not approved by the manufacturer may make the wheelchair unstable or uncontrollable. For each order, always contact an authorized service center For any other parts not described in this manual please contact the manufacturer www.neatech.it 23/38... -
Page 33: Footplate
5.4.1 Footplate Allen wrench 5 mm Figure 16 Unscrew the screw shown in figure. Substitute the footplate. Screw again the screw. Code Description Note R107-0020 Footplate www.neatech.it 24/38... -
Page 34: Front Seat Padding
5.4.2 Front seat padding Figure 17 Remove the old front seat padding. Mount the new front seat padding Code Description Note R107-0030 Front seat padding www.neatech.it 25/38... -
Page 35: Push Bar
Figure 18 Remove the fixing clip. Substitute the push bar. Block it with the fixing clip. If necessary, it is also possible to substitute only the pushbar padding. Code Description Note R107-0040 Pushbar R107-0041 Pushbar/armrest padding www.neatech.it 26/38... -
Page 36: Armrest
5.4.4 Armrest Figure 20 Figure 19 Remove old armrest. Mount the new armrest. If necessary, it is also possible to substitute only the pushbar padding. Code Description Note R107-0050 Armrest R107-0042 Pushbar/armrest padding www.neatech.it 27/38... -
Page 37: Upper Part Of The Wheelchair
Mount both left and right pushbars following instruction in section 5.4.3 in reverse order. • Mount both left and right armrests following instruction in section 5.4.4 in reverse order. Code Description Note R107-0060 Upper part of the wheelchair www.neatech.it 28/38... -
Page 38: Backrest Upper Bar
Unscrew the screws shown in figure. Substitute the backrest upper bar. Screw again the screws. Mount again both left and right pushbars following instruction in reverse order. Code Description Note R107-0061 Backrest upper bar www.neatech.it 29/38... -
Page 39: Front Seat Bar Bar
Remove the old front seat bar. Mount the new front seat bar. Screw again the two screws. Mount the old front seat padding following instruction in section 5.4.6 in reverse order. Code Description Note R107-0062 Front seat bar www.neatech.it 30/38... -
Page 40: Backrest Sling
Mount again the backrest upper part following instruction in reverse order. Mount again both left and right pushbars following instruction in reverse order. Unscrew the screws shown in figure. Substitute the backrest upper bar. Screw again the screws. Code Description Note R107-0070 Backrest sling www.neatech.it 31/38... -
Page 41: Seat Sling
5.4.9 Seat sling Figure 25 Flip down the seat Swipe the old seat sling. Mount the new seat sling Code Description Note R107-0080 Seat sling www.neatech.it 32/38... -
Page 42: Specifications
6 SPECIFICATIONS Expected lifetime 5 years Intended use The Job Walker is intended to all those categories of users with temporary or permanent mobility difficulties who need to make trips to the beach and other types of impervious surfaces. Maximum user weigh... - Page 43 Manufacturer Neatech.it Address via A. de Curtis 4/A – 80040 – Cercola (NA) - Italy Model S107 -Job Walker Description Value Overall length with legrest 380 mm Overall width 900 mm Folded length Not applicable Folded width Not applicable Folded height...
- Page 44 Footrest to seat distance 360 mm Leg to seat surface angle 90° Armrest to seat distance 250 mm www.neatech.it 35/38...
-
Page 45: Weight
~1.8 kg each wheel N. 1 Chassis of the wheelchair ~4.0 kg N. 1 Upper part of the wheelchair ~5.0 kg N. 2 Armrests ~1 kg each armrest ~0.5 kg each pushing N. 2 Pushing bar N. 6 fixing clips www.neatech.it 36/38... -
Page 46: Dimensions
C – Total height 880 – 960 mm D – Seat depth 390 – 440 mm E – Armrest height 250 mm F – Legrest 360 mm G – Seat height 480 mm H – Total length 380 mm www.neatech.it 37/38... -
Page 47: Warranty Terms
The product is globally guaranteed for 24 months. The warranty covers defects in materials or workmanship. The warranty doesn’t cover parts subject to usury or damaged parts by: overload, misuse, alterations and repairs made by unauthorized third parties from Neatech.it s.r.l. . The warranty expires in case of tampering, improper storage, unauthorized or incorrect maintenance. -
Page 48: Note
Note... - Page 52 MANUAL WALKER www.neatech.it...