Table of Contents
Advertisement
Available languages
Available languages
Quick Links
Operating Instructions & Parts Manual
Please read and save these instructions. Read carefully before attempting to assemble, install, operate or maintain the product described. Protect yourself and
others by observing all safety information. Failure to comply with instructions could result in personal injury and/or property damage! Retain instructions for
future reference.
Attention: Campbell Hausfeld recommends that servicing other than that shown in the instruction manual should be performed by an
authorized service facility.
Description
High volume, low pressure (HVLP)
paint spray ers are de signed to de liv er
a fine finish with low overspray. The
sprayer can be used to apply various
acrylics, stains, sealers, lacquers, latexes,
and primers. This unit can be used for
painting cabinets, fur ni ture, ma chin ery,
equip ment, walls and trim work. Spray-
ers of this type are not recommended
for au to mo tive final coat. This por ta ble
unit is an ideal alternative to con ven tion-
al spray guns. The HVLP's high transfer
efficiency pro vides pro fes sion al re sults
with much less material waste and en vi-
ron men tal con tam i na tion than other
con ven tion al spray paint ing sys tems.
Unpacking
When unpacking the sprayer, inspect
carefully for any damage that may
have occurred during transit. Make
sure any loose fittings, bolts, etc., are
tightened before putting sprayer into
service. Each sprayer has been tested
before shipment.
NOTE: The packing nut may need
additional adjustment due to the
packing material relaxing during
shipment.
The fluid used for testing the sprayer
has been drained, but some of this fluid
will remain in the spray gun. This fluid
should be flushed from the spray gun to
prevent contamination of the coating
material. Use a solvent compatible with
the coating to be sprayed.
Table Of Contents
Description . . . . . . . . . . . . . . . . . . . . 1
Unpacking. . . . . . . . . . . . . . . . . . . . . 1
General Safety Information. . . . . . . 1
Setup . . . . . . . . . . . . . . . . . . . . . . . .2-3
Operation . . . . . . . . . . . . . . . . . . . . . 4
Maintenance. . . . . . . . . . . . . . . . . .4-5
Troubleshooting . . . . . . . . . . . . . . . . 6
Warranty. . . . . . . . . . . . . . . . . . . . . 10
©2007 Campbell Hausfeld/ Scott Fetzer
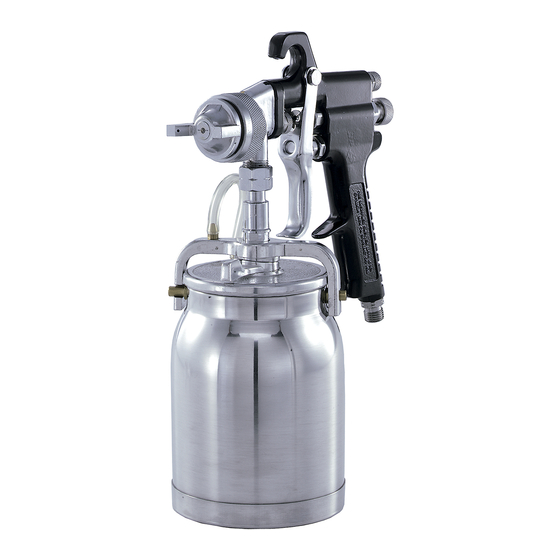
HVLP Spray Gun
Oval To Round
Pattern Ad just ment
Figure 1 - Features
General Safety
Danger means a
DANGER
!
hazard that will cause
death or serious injury if the warning is ignored.
WARNING
!
Warning means a
hazard that could cause death or serious
injury if the warning is ignored.
Caution means a
CAUTION
!
hazard that may cause
minor or moderate injury if the warning is
ignored. It also may mean a hazard that will
only cause damage to property.
Notice means any
NOTICE
additional
information pertaining to the product or its
proper usage.
Read all instructions and safety
precautions before operating the unit.
Risk
WARNING
!
of fire
or explosion! Solvent and
paint fumes can explode or
ignite, causing severe injury
and property damage.
For parts, product & service information
visit www.chpower.com
HVLP Spray Gun
Quick Connect Fitting
Air Flow Control
Material Flow
Control Knob
Locking Lever For
Quick-Release Paint Cup
1 Quart Cup
Paints and solvents containing
HALOGENATED HYDROCARBONS can react
explosively with aluminum. Always check
the product's label before using these
materials in the unit.
Make sure the room is well-ventilated.
Avoid all ignition sources, such as static
electricity sparks, open flames, hot objects,
sparks from connecting and disconnecting
power cords, and working light switches.
Follow the material and solvent
manufacturers' safety precautions and
warnings. Do not use liquids with flash
points less than 100 degrees Fahrenheit (38
degrees Celsius).
Do not carry TURBINE while spraying.
Keep the turbine at the maximum distance
from the spraying area.
Static electricity can be produced by
HVLP spraying. Make sure any electrically
conductive object being sprayed is
grounded to prevent static sparking. The
sprayer is grounded through the electric
cord. If an extension cord is necessary, the
cord must be a grounded, 115 volt, three
wire type cord.
IN206701AV 9/07
Advertisement
Chapters
Table of Contents
Troubleshooting

Related Manuals for Campbell Hausfeld HV2002


Summary of Contents for Campbell Hausfeld HV2002
- Page 1 Failure to comply with instructions could result in personal injury and/or property damage! Retain instructions for future reference. Attention: Campbell Hausfeld recommends that servicing other than that shown in the instruction manual should be performed by an authorized service facility.
-
Page 2: Installation
Operating Instructions and Parts Manual General Safety (continued) Hazardous vapors: Paints, solvents, insecticides, and other materials may be harmful if inhaled, causing severe nausea, fainting, or poisoning. Use a respirator or mask whenever there is a chance that vapors may be inhaled. Read all instructions with the mask to ensure that the mask will provide the necessary protection against the inhalation of harmful... -
Page 3: Setup
Setup (continued) 6. Install the appropriate needle/nozzle assembly se lect ed for the material to be sprayed (Fig. 2, 3 & 4 ). 7. Reassemble the needle assembly, spring, ma te ri al con trol knob, nozzle, air cap, and retainer ring. ADJUSTING PACKING Occasionally the packing nut, located forward of the trigger as sem bly, will... -
Page 4: Operation
Operating Instructions and Parts Manual Preparation (continued) 6. Attach the air hose quick-connect fitting to the gun. The quick-connect NOTICE fitting outer sleeve is spring load ed and must be pulled back to attach or remove it from the gun (See Figure 10). -
Page 5: Maintenance
Maintenance (continued) 3. Place the parts and the paint cup in a bucket or other suitable container. Soak the parts in a suitable solvent, or in soap and water if latex was used (See Figure 16). To clean the gun, flush a suitable cleaning solvent through the material tube until the so lu tion begins to clear. -
Page 6: Troubleshooting
Operating Instructions and Parts Manual Troubleshooting Chart Symptom Possible Cause(s) No material flow 1. Clogged noz zle/air cap 2. Clogged cup pressure tube or fit tings 3. Clogged gun 4. Clogged ma te ri al tube 5. Cup seal leaking 6. -
Page 7: Troubleshooting Chart
Troubleshooting Chart Symptom Possible Cause(s) Spray not uniform 1. Material too thick (spitting) 2. Wrong nee dle/nozzle assembly 3. Cup seal leak ing 4. Loose pack ing 5. Material not properly mixed, or im prop er ly filtered Poor pattern 1. - Page 8 For Replacement Parts, or technical assistance, Call 1-800-626-4401 Please provide following information: -Model number -Serial number (if any) -Part descriptions and number as shown in parts list www.chpower.com Address parts correspondence to: Campbell Hausfeld 100 Production Drive Harrison, OH 45030...
- Page 9 Air flow control knob assembly (Includes items 12, 19-21) ❉ Gun body assembly (as shown, includes 9-13, & 16-24) Note: Air Cap Kit includes #5, 6 & 8 Air Cap only (guns with Campbell Hausfeld embossed in handle) Needle/Nozzle Set Thin Material All-Purpose...
-
Page 10: Warranty
8. RESPONSIBILITIES OF PURCHASER UNDER THIS WARRANTY: A. Provide dated proof of purchase and maintenance records. B. Deliver or ship the Campbell Hausfeld product or component to the nearest Campbell Hausfeld Authorized Service Center. Freight costs, if any, must be borne by the purchaser. -
Page 11: Table Of Contents
Conserver ces instructions comme référence. Attention: Campbell Hausfeld recommande que l’entretien autre que celui décrit dans le manuel d’instruction devrait être performé par un centre de service authorisé. -
Page 12: Généralités Sur La Sécurité
Instructions D’Utilisation Et Manuel De Pièces Généralités Sur La Sécurité (suite) Garder la turbine à la distance max i mum de l’endroit de pulvérisation. La pulvérisation HVLP peut produire l’électricité statique. Assurer que n’importe quel objet pour pulvérisation qui a une conductivité... - Page 13 Montage (suite) 7. Rassembler le montage d’aiguille, ressort, bouton de réglage du matériel, buse, bouchon d’air et bague de retenue. AJUSTEMENT DE GARNITURE De temps à temps, il est nécessaire d’ajuster l’écrou de garniture situé en avant du montage de la détente. Additionnellement, l’écrou de garniture nécessite un ajustement si le montage d’aiguille/buse est changé...
-
Page 14: Fonctionnement
Instructions D’Utilisation Et Manuel De Pièces Préparation (suite) 4. Pour serrer et fermer le récipient, placer les bras de retenues sûrement autour des goupilles de retenues sur la tasse de peinture. 5. Diriger le levier de serrage dans le sens des aiguilles d’une montre dans la position fermée (Voir Fig. -
Page 15: Entretien
Entretien NETTOYAGE Assurer AVERTISSEMENT que la chambre est bien ventilée pendant l’utilisation des solvants. Mettre au rebut, tous matériaux conformément aux régulations lo cales. 1. Enlever le bouton de réglage du matériel, le ressort et l’aiguille. (Tirer la gâchette pour aider à enlever l’aiguille). -
Page 16: Dépannage
Instructions D’Utilisation Et Manuel De Pièces Guide de dépannage Symptôme Cause(s) Possible(s) Manque de débit de 1. Buse/bouchon d’air obstrué matériel 2. Tuyau de pression de la tasse ou raccords obstrués 3. Pistolet obstrué 4. Tuyau de matériel obstrué 5. Joint étanche du récipient obstrué 6. - Page 17 Guide De Dépannage Symptôme Cause(s) Possible(s) Pulvérisation 1. Matériel trop épais pas uniforme (crachement) 2. Assemblage d’aiguille/buse in cor rect 3. Joint étanche du récipient qui coule 4. Garnissage dégagé 5. Matériel pas bien mélangé ou filtré Configuration 1. Accumulation de matériel sur la buse inférieure ou bouchon d’air 2.
- Page 18 Pour pièces de rechange, ou l’assistance technique, composer le 1-800-626-4401 S’il vous plaît fournir l’information suivant: -Numéro du modèle -Numéro de série (si présent) -Description de la pièce et son numéro sur la liste Correspondance: Campbell Hausfeld 100 Production Drive Harrison, OH 45030 18 Fr...
- Page 19 Assemblage du bouton de réglage du flux d’air (Pièces 12, 19-21 inclus) ❉ Ensemble du corps de pistolet (tel qu’indiqué, comprend 9-13, &16-24) Remarque: Jeu de bouchon d’air comprend #5, 6 & 8 Bouchon d’air seulement (pistolets avec Campbell Hausfeld estampé dans le manche) Ensemble d’aiguille/buse Matériel mince Tous usages Matériel épais...
-
Page 20: Garantie
8. RESPONSABILITÉS DE L’ACHETEUR AUX TERMES DE CETTE GARANTIE : A. Fournir une preuve d’achat datée et un état d’entretien. B. Livraison ou expédition du produit ou de la pièce Campbell Hausfeld au Centre De Service Autorisé Campbell Hausfeld. Taux de frais, si applicables, sont la responsabilité de l’acheteur. -
Page 21: Descrição
Se essas instruções não forem seguidas poderão resultar em ferimentos pessoais e/ou danos de propriedade. Guarde estas instruções para referência futura. Atenção: A Campbell Hausfeld recomenda que os reparos diferentes daqueles mencionados no manual de instrução sejam realizados por um centro de serviço autorizado. -
Page 22: Instalação
Manual de Instruções de Operação e Peças Segurança Geral (Continuação) Mantenha a turbina a uma distância máxima da área de pulverização. A eletricidade estática pode ser produzida por pulverização de HVLP. Certifique- se de que qualquer objeto que conduz eletricidade que esteja sendo pulverizado seja aterrado para evitar centelhas estáticas. - Page 23 Instalação (Continuação) 6. Instale a montagem de agulha/bocal apropriada selecionada para o material a ser pulverizado (Figura 2, 3 e 4). 7. Monte novamente a montagem da agulha, mola, botão de controle de material, bocal, tampa de ar e anel de retenção.
-
Page 24: Operação
Manual de Instruções de Operação e Peças Preparação (Continuação) 4. Para apertar e travar o recipiente, coloque os braços do retentor firmemente em torno dos pinos de retenção no recipiente da tinta. 5. Mova a alavanca de travamento no sentido horário para a posição travada (veja a Figura 9). -
Page 25: Manutenção
Manutenção LIMPEZA AVISO Certifique-se de que a sala esteja bem ventilada ao usar solventes. Descarte todos os materiais corretamente, de acordo com as regulamentações locais. 1. Remova o botão de controle de material, mola e agulha (puxe o gatilho para ajudar a remover a agulha). -
Page 26: Solução De Problemas
Manual de Instruções de Operação e Peças Tabela de Solução de Problemas Sintoma Causa(s) possível(eis) Sem fluxo 1. Bocal/tampa de ar obstruídos de material 2. Conexões ou tubo de pressão do recipiente obstruídos 3. Pistola obstruída 4. Tubo de material obstruído 5. - Page 27 Tabela de Solução de Problemas Sintoma Causa(s) possível(eis) Pulverização não 1. Material muito espesso uniforme (Formação de 2. Montagem da agulha/bocal errada saliências) 3. Vedação do recipiente vazando 4. Gaxeta frouxa 5. Material não misturado adequadamente ou filtrado inadequadamente Padrão deficiente 1.
- Page 28 Forneça as seguintes informações: -Número do modelo -Número de série -Descrição e número da peça conforme apresentado na lista Correspondência referente a peças deve ser endereçada a: Campbell Hausfeld Attn: Parts Department 100 Production Drive Harrison, OH 45030 28 Pg...
- Page 29 Montagem do corpo da pistola (conforme demonstrado, inclui 9-13 e 16-24) Nota: O Conjunto de tampa de ar inclui os números 5, 6 e 8 Somente a tampa de ar (pistolas com o nome Campbell Hausfeld gravado na alça) Jogo de agulhas/bocais Material fino...
-
Page 30: Garantia
A. Fornecer comprovante de compra, datado, e registros de manutenção. B. Entregar ou remeter o produto ou componente da Campbell Hausfeld ao Centro de Serviço Autorizado Campbell Hausfeld mais próximo. Os custos de frete, se houver, devem ser por conta do comprador. -
Page 31: Descripción
El no seguir las instrucciones podría resultar en heridas y/o daños a su propiedad. Guarde este manual como referencia. Atención: Campbell Hausfeld le recomienda que cualquier otro servicio no indicado en el manual de instrucciones debe darse en un centro autorizado de servicio. -
Page 32: Ensamblaje
Manual de Instrucciones & Lista de Partes Información General de Seguridad ( continuación) Siga las medidas de precaución de los fabricantes de materiales y solventes. No use líquidos con puntos de ignición menores de 100 grados Fahr en heit (38 grados Celsius). No transporte la TURBINA mientras esté... - Page 33 Ensamblaje ( continuación) 6. Instale el ensamblaje de aguja/ boquilla adecuado para el material que va a rociar (Fig. 2, 3 & 4). 7. Ensamble una vez más la aguja, el resorte, la manilla de control de salida de material, la boquilla, la tapa y el anillo retenedor.
-
Page 34: Funcionamiento
Manual de Instrucciones & Lista de Partes Preparación ( continuación) 6. Conecte el conector rápido de la manguera a la pistola. AVISO cubierta del conector rápido tiene un resorte y debe tirarlo hacia atrás para conectarlo o desconectarlo (Vea la Figura 10). Fig. - Page 35 Mantenimiento ( continuación) 3. Coloque todas las piezas y el envase de pintura en un cubo u otro recipiente adecuado. Remójelas en un solvente adecuado o en agua y jabón si usó pinturas látex (Vea la Figura 16). Para limpiar la pistola, circule un solvente adecuado por el tubo de material hasta que comience a aclararse.
-
Page 36: Diagnóstico De Averías
Manual de Instrucciones & Lista de Partes Guía de Diagnóstico de Averías Problema Posible(s) Causa(s) El material no circula 1. La boquilla/tapa está atascada 2. El tubo de presión del envase o las uniones están atascados 3. La pistola está atascada 4. - Page 37 Guía de Diagnóstico de Averías Problema Posible(s) Causa(s) El rociado es incorrecto 1. El material está muy espeso (salpicado) 2. Ha colocado el ensamblaje de la aguja/ boquilla equivocado 3. Hay un escape en el empaque del envase 4. El sistema de control de salida está flojo 5.
- Page 38 Llamar al Distribuidor Más Cercano a Su Domicilio Sírvase darnos la siguiente -Número del modelo -Número de serie (de haberlo -Descripción y número del repuesto según la lista de repuestos Puede escribirnos a: Campbell Hausfeld 100 Production Drive Harrison, OH 45030 38 Sp...
- Page 39 9-13 & 16-24) Nota: El juego de piezas de la tapa de aire incluye #5, 6 & 8 Sólo la tapa de aire (pistolas con la marca Campbell Hausfeld grabada en el mango) Juego de Aguja/Boquilla Material claro...
-
Page 40: Garantía
A. Proporcionar prueba de fecha de la compra y registros de mantenimiento. B. Entregar o embarcar el producto de Campbell Hausfeld al Centro de Servicio Autorizado de Campbell Hausfeld más cercano. El costo de fletes, si lo hubiera, será sufragado por el comprador.