Crestron 4 Series Quick Start
Hide thumbs
Also See for 4 Series:
- Product manual (74 pages) ,
- Quick start manual (12 pages) ,
- Getting started (2 pages)
Advertisement
Quick Links
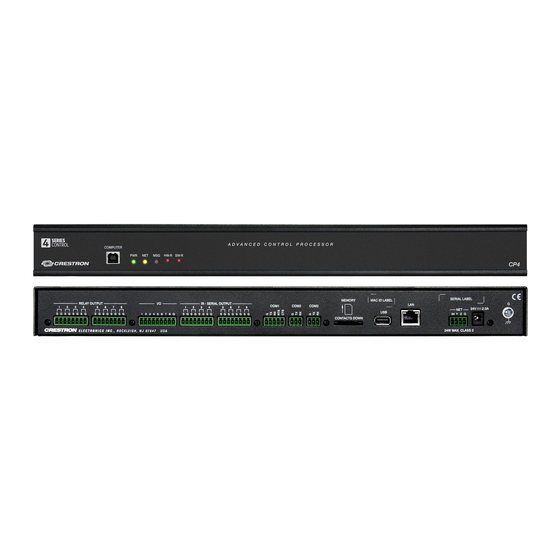
CP4/CP4N
4-Series Control System
The Crestron®
CP4
and
CP4N
are secure, high-performance control
processors with a powerful 4-Series control engine. The CP4 and
CP4N are designed to integrate and automate technology within any
modern networked home, commercial building, or government facility. An
isolated control subnet port provides a Gigabit Ethernet LAN dedicated to
Crestron devices (CP4N Only).
NOTE: The CP4 and CP4N are functionally similar. For simplicity within
this guide, the term "control system" is used to refer to both the CP4
and CP4N unless otherwise noted.
In the Box
1
CP4 or CP4N, 4-Series Control System
Additional Items
2
Bracket, Rack Ear (2032122)
4
Foot, Rubber (2002389)
2
Connector, 3-Pin (2003575)
1
Connector, 4-Pin (2003576)
1
Connector, 5-Pin (2003577)
4
Connector, 8-Pin (2003580)
1
Connector, 9-Pin (2003581)
1
Power Cord, 5 ft, 10 in. (1.78 m) (2042043)
1
Power Pack, 24 VDC, 100–240 VAC (2045873)
Install the Device
The device may be mounted into a rack or placed onto a flat surface.
Rack Mounting
The control system occupies 1U of rack space.
1. Use a #1 Phillips screwdriver to remove the six required screws from
the control system assembly (shown in the illustration below).
2. Attach the two included rack ears with the removed screws.
3. Mount the control system into the rack with four mounting screws
(not included).
Surface Placement
1. Attach the four adhesive rubber feet near the corners on the underside
of the control system.
2. Place onto a flat surface or stack with other equipment.
Quick Start
1
Advertisement

Related Manuals for Crestron 4 Series


Summary of Contents for Crestron 4 Series
- Page 1 An The device may be mounted into a rack or placed onto a flat surface. isolated control subnet port provides a Gigabit Ethernet LAN dedicated to Crestron devices (CP4N Only). Rack Mounting NOTE: The CP4 and CP4N are functionally similar. For simplicity within The control system occupies 1U of rack space.
-
Page 2: Connect The Device
Observe the following when connecting the control system: Port RS-232 RS-422 RS-485 Use Crestron power supplies for Crestron equipment. The control system may be powered with the included 24 VDC power supply or via Cresnet® network power with the NET port. TX (from CP4/CP4N) TX- (from CP4/CP4N) -
Page 3: Configure The Device
Configuration via IP Address www.crestron.com/xio-cloud-registration. To access the web configuration interface using the control system 4. Claim the device to the service as described in the Crestron XiO Cloud IP address: User Guide (Doc. 8214) at www.crestron.com/manuals. 5. Select the device from the cloud interface to view its settings. -
Page 4: Set The Time Zone
A similar message correct time settings are pushed to controlled devices. is displayed when connecting to the device in Crestron Toolbox software if To set the time zone: an admin account has not already been created. - Page 5 Service Providers (CSPs) under a limited nonexclusive, nontransferable Software Development Tools License Agreement. Crestron product operating system software is licensed to Crestron dealers, CSPs, and end-users under a separate End-User License Agreement. Both of these Agreements can be found on the Crestron website at www.crestron.com/legal/software_license_agreement. www.crestron.com/model/6510420 The product warranty can be found at www.crestron.com/warranty.