Table of Contents
Advertisement
Quick Links
Advertisement
Table of Contents

Related Manuals for Senco Fusion F-15XP


Summary of Contents for Senco Fusion F-15XP
- Page 1 F-15XP / F-16XP / F-18XP CORDLESS FINISH NAILERS Operating Instructions IMPORTANT: Read before use. KYOCERA-SENCO Industrial Tools, Inc. NFD810LMNENG • Issued March 23, 2021 8450 Broadwell Road Cincinnati, OH 45244 1-800-543-4596 www.senco.com © 2021 by KYOCERA-SENCO Industrial Tools, Inc.
-
Page 2: Table Of Contents
Table of Contents Symbols .............................3 General Power Tool Safety Warnings ..................4 Work Area Safety ........................4 Electrical Safety ........................4 Personal Safety ........................4 Power Tool Use and Care .......................5 Battery Tool Use and Care ......................5 Service ...........................6 Nailer Safety Warnings ......................6 Additional Tool Safety Warnings ....................7 Safety Warnings for Charger and Battery .................9 Functional Description ......................11 Tool Operation .........................12... -
Page 3: Symbols
SYMBOLS The following signal words and meanings are intended to explain the levels of risk associated with this product. SYMBOL SIGNAL MEANING DANGER: Indicates a hazardous situation, which, if not avoided, will result in death or serious injury. WARNING: Indicates a hazardous situation, which, if not avoided, could result in death or serious injury. -
Page 4: General Power Tool Safety Warnings
General Power Tool Safety Warnings WARNING Read all safety warnings, instructions, illustrations and specifications provided with this power tool. Failure to follow all instructions listed below may result in electric shock, fire and/or serious injury. Save all warnings and instructions for future reference. The term “power tool”... -
Page 5: Power Tool Use And Care
GENERAL POWER TOOL SAFETY WARNINGS 15. Dress properly. Do not wear loose clothing or jewelry. Keep your hair, clothing and gloves away from moving parts. Loose clothes, jewelry or long hair can be caught in moving parts. 16. If devices are provided for the connection of dust extraction and collection facilities, ensure these are connected and properly used. -
Page 6: Service
GENERAL POWER TOOL SAFETY WARNINGS 32. Follow all charging instructions and do not charge the battery pack or tool outside the temperature range specified in the instructions. Charging improperly or at temperatures outside the specified range may damage the battery and increase the risk of fire. SERVICE 33. -
Page 7: Additional Tool Safety Warnings
Deliberate tampering with the drive assembly may result in the release of the driver. Any repair or upgrade requiring access to the pressure chamber may be handled by an authorized Senco dealer or service center. Disconnect tool from battery when: • Outside of the operator’s supervision or control. - Page 8 Keep hands and other body parts away from the area shown in the circle to avoid possible injury during operation. Do not use tool without Danger Label on tool. If label is missing, damaged or unreadable, contact your SENCO representative to obtain a new label at no cost.
- Page 9 This manual contains important safety and operating instructions for SENCO battery charger VB0156 (US). Before using SENCO battery charger VB0156 (US), read all instructions and cautionary markings on battery charger and battery. Do not expose charger to water, rain, or snow.
- Page 10 BATTERY AND CHARGER SAFETY WARNINGS Do not disassemble charger or battery cartridge; take it to a SENCO Authorized Service Center when service or repair is required. Incorrect reassembly may result in a risk of electric shock or fire. To reduce risk of electric shock, unplug charger from outlet before attempting any maintenance or cleaning.
-
Page 11: Depth Of Drive Adjustment
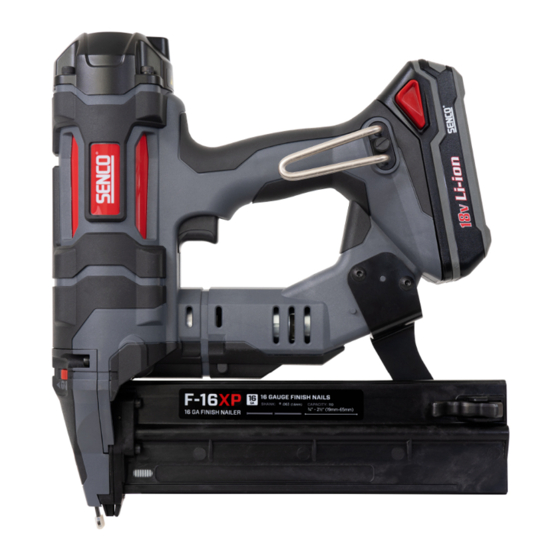
Functional Operation (F-15XP) Trigger Removeable Cap Belt Hook Battery Magazine Release Pressure Release Port *For authorized service center use only. Depth of Drive Adjustment Fastener Feeder and Release Workpiece Contact Grasping Surface ON/OFF/Mode Selector... - Page 12 Functional Operation (F-16XP and F-18XP) Trigger Battery Removeable Cap Belt Hook Magazine Release Latch Pressure Release Port *For authorized service center use only. Depth of Drive Adjustment Magazine Release Latch Workpiece Contact Grasping Surface ON/OFF/Mode Selector...
- Page 13 TOOL OPERATION LOADING THE TOOL, F-15XP: Insert strip of nails into rear of magazine. • Use only genuine SENCO fasteners (see Fastener Specifications). • Do not load with workpiece contact (safety element) or trigger depressed. Pull feeder shoe back. UNLOADING THE TOOL, F-15XP: Push Button on feeder shoe to release feeder from strip.
- Page 14 TOOL OPERATION Sequential Indicator LED ON-Solid Pressing the side of the selector switch toward the T symbol (as shown) for 0.5 sec. will turn the tool on in sequential mode. This is indicated by the solid green LED of the selector switch.
-
Page 15: Fastener Jam
TOOL OPERATION This tool is equipped with an indicator light at the ON/OFF/MODE switch. See page 14 for detailed instructions. Note: When the tool is in the sequential mode, a fastener cannot be driven by pulling the trigger before activating the work piece contact element. If the workpiece contact is activated for more than 10 seconds, the workpiece contact must be released to start over. - Page 16 TOOL OPERATION This tool is equipped with an electronic “Time-Out” feature. This tool will temporarily be disabled under any of the following conditions: 1. Workpiece contact element is depressed against the work piece, but the trigger is not pressed within approximately 10 seconds. 2.
- Page 17 TOOL OPERATION Whenever possible, hold the tool at a right angle to the work surface. Always turn the tool off before storing. As an added protection feature, the tool will Indicator LED ON-Flashing automatically turn off 34 minutes after the last activation. If a nail jam occurs, the red light at the mode selector switch will flash red.
- Page 18 TOOL OPERATION TO CHARGE BATTERY Red and green light flashing indicates defective battery pack. Return battery pack to your nearest SENCO Authorized Service Center for inspection or replacement. Authorized Service Solid red indicates that the battery is charging. Center When your battery pack becomes 80% charged, the red light will stay on and the green light will flash.
-
Page 19: Battery Disposal
Accessories SENCO offers a full line of accessories for your SENCO tools, including: • Battery • Belt Hook • Battery Charger • Safety Glasses For more information or a complete illustrated catalogue of SENCO accessories, ask your representative or www.senco.com. -
Page 20: Fastener Specifications
Fastener Specifications F-16XP F-18XP F-15XP .062 in. .050 in. 1,57 mm 1,27 mm Code Code Inches Inches M001000 AX10 .072 in. M001001 AX11 M001002 1 1/4 1,83 mm AX13 M001003 1 1/2 AX15 1 1/4 M001004 1 3/4 AX16 1 3/8 M001005 AX17 1 1/2... -
Page 21: Troubleshooting
Remove battery, then inspect jammed. tool to assure free movement of workpiece contact element. Drive piston has failed. Return tool to authorized SENCO service representative. Workpiece contact element or Return tool to authorized SENCO trigger switches are damaged. service representative. - Page 22 • Keep your Cordless Nailer as clean and free of debris as possible. • Service your SENCO tool periodically to insure your tool is productive and helping you earn money on the job. See the service guide below for recommended service intervals.
- Page 23 KYOCERA-SENCO Industrial Tools, Inc. (“SENCO”) designs and constructs its products using the highest standards of material and workmanship. SENCO warrants to the original retail purchaser that the following products will be free from defects in material or workmanship for the warranty period...