Table of Contents
Advertisement
Quick Links
Declaration of Conformity—Mercury Diesel QSD Inboard
This inboard engine when installed in accordance to Mercury Marine's instructions complies with the requirements of the
following directives by meeting the associated standards, as amended:
Recreational Craft Propulsion Engines with the Requirements of Directive 94/25/EC as amended by 2003/44/EC
Name of engine manufacturer: V M MOTORI, s.p.a.
Address: VIA FERRARESE, 29
Town: CENTO (FE)
Name of Authorized Representative: Brunswick Marine in EMEA Inc.
Address: Parc Industriel de Petit‑Rechain
Town: Verviers
Name of Notified Body for exhaust emission assessment: T Ü V PRODUCT SERVICE Gmbh
Address: RIDLERSTRASSE, 65
Town: MÜNICH
Conformity assessment module used for exhaust emissions:
Other Community Directives applied: Electromagnetic Compatibility Directive 2004/108/EC
Description of Engines and Essential Requirements
Engine Type:
☒
Inboard engine
Identification of Engines Covered by this Declaration of Conformity
Name of engine model or engine
family:
QSD 4.2L 350/320/270
QSD 2.8L 230/220/210/170
QSD 2.0L 170/150/130/115
Essential requirements
Annex I.B – Exhaust Emissions
B.1 engine identification
B.2 exhaust emission
requirements
B.3 durability
B.4 owner's manual
Annex I.C – Noise Emissions
Post Code: 44042
Post Code: 4800
Post Code: 80339
Fuel Type:
☒
Diesel
Unique engine identification
number(s) or engine family code(s)
MR706LX / MR706LH / MR706LS
MR704LX / MR704LY / MR704LH /
MR704LS
MR504LX / MR504LH / MR504LS /
MR504LB
normative
Standards
document/
☐
☒*
☐
☒
see Declaration of Conformity of the craft in which the engine(s) has (have) been
Country: Belgium
Country: Germany
☒ B+C
☐ B+D
Combustion Cycle:
☒
4 stroke
EC Type–examination certificate or
type‑approval certificate number
SB5 06 08 57278 006
SB5 08 07 57278 008
SB5 07 07 57278 007
Other
Technical
file
method
☐
☒
☐
☐
☐
☒
☐
☐
installed
Country: Italy
ID Number: 0123
☐ B+E
☐ B+F
☐ G ☐ H
Please specify in more detail
(* = mandatory standard)
*EN ISO 8178‑1:1996
ISO 8665:1995
Advertisement
Table of Contents
Troubleshooting

Related Manuals for Mercury 92‑813054A2


Summary of Contents for Mercury 92‑813054A2
- Page 1 Declaration of Conformity—Mercury Diesel QSD Inboard This inboard engine when installed in accordance to Mercury Marine’s instructions complies with the requirements of the following directives by meeting the associated standards, as amended: Recreational Craft Propulsion Engines with the Requirements of Directive 94/25/EC as amended by 2003/44/EC Name of engine manufacturer: V M MOTORI, s.p.a.
- Page 2 Length Exhaust Gas Emissions Certification Number The serial numbers are the manufacturer’s keys to numerous engineering details that apply to your Mercury Diesel power package. When contacting Mercury Marine about service, always specify model and serial numbers. Descriptions and specifications contained herein were in effect at the time this guide was approved for printing. Mercury Marine, whose policies are based on continuous improvement, reserves the right to discontinue models at any time or to change specifications or designs without notice and without incurring obligation.
- Page 3 Warranty Message The product you have purchased comes with a limited warranty from Mercury Marine; the terms of the warranty are set forth in the Warranty sections of this manual. The warranty statement contains a description of what is covered, what is not covered, the duration of coverage, how to best obtain warranty coverage, important disclaimers and limitations of damages, and other related information.
-
Page 5: Table Of Contents
Conditions That Must Be Met to Obtain Warranty How to Obtain Warranty Coverage......... 5 Coverage................ 3 What Is Not Covered............5 What Mercury Marine Will Do......... 3 Transfer of Warranty............5 Section 2 - Getting to Know Your Power Package Identification................8 System Link Digital Gauges......... - Page 6 Section 4 - Specifications Fuel Requirements..............32 Fluid Specifications..............34 Recommended Fuels............. 32 Engine................34 Diesel Fuel in Cold Weather........... 32 QSD 2.0..............34 Coolant (Antifreeze)..............33 Transmission..............35 Engine Oil................33 Approved Paints..............35 Engine Specifications............. 34 Section 5 - Maintenance Owner and Operator Responsibilities........
- Page 7 Starter Motor Will Not Crank Engine, or Cranks Slow..82 Low Engine Oil Pressure..........83 Engine Will Not Start, or Is Hard to Start......82 Battery Will Not Charge............ 83 Engine Runs Rough, Misses, or Backfires....... 82 Remote Control Operates Hard, Binds, Has Excessive Poor Performance.............
- Page 8 Page iv 90-8M0069748 APRIL 2012...
-
Page 9: Section 1 - Warranty
Conditions That Must Be Met to Obtain Warranty How to Obtain Warranty Coverage ......5 Coverage ..............3 What Is Not Covered ..........5 What Mercury Marine Will Do ........3 Transfer of Warranty............5 90-8M0069748 APRIL 2012 Page 1... -
Page 10: Warranty Information
Warranty Registration United States and Canada To be eligible for warranty coverage, the product must be registered with Mercury Marine. At the time of sale, the dealer should complete the warranty registration and immediately submit it to Mercury Marine via MercNET, E‑mail, or mail. Upon receipt of this warranty registration, Mercury Marine will record the registration. -
Page 11: High-Output Rating
Warranty coverage is available only to retail customers that purchase from a Dealer authorized by Mercury Marine to distribute the product in the country in which the sale occurred, and then only after the Mercury Marine specified pre‑delivery inspection process is completed and documented. Warranty coverage becomes available upon proper registration of the product by the authorized dealer. -
Page 12: 3-Year Limited Warranty Against Corrosion-Diesel Models (Recreational Use Only)
Section 1 - Warranty • Use of an accessory or part that was not manufactured or sold by Mercury Marine and that damages the Mercury product • Jet pump impellers and liners • Operation with fuels, oils, or lubricants that are not suitable for use with the product (see the Operation, Maintenance &... -
Page 13: How To Obtain Warranty Coverage
Warranty claims shall be made by delivering the product for inspection to a Mercury dealer authorized to service the product. If purchaser cannot deliver the product to such a dealer, written notice must be given to Mercury. We will then arrange for the inspection and any covered repair. - Page 14 Section 1 - Warranty Notes: Page 6 90-8M0069748 APRIL 2012...
-
Page 15: Section 2 - Getting To Know Your Power Package
Section 2 - Getting to Know Your Power Package Section 2 - Getting to Know Your Power Package Table of Contents Identification................8 System Link Digital Gauges ........11 Serial Number Decal............8 System Tachometer or Speedometer......12 Engine Data Label............8 Switches................ -
Page 16: Identification
Section 2 - Getting to Know Your Power Package Identification The serial numbers are the manufacturer's keys to numerous engineering details that apply to your Mercury Marine power package. When contacting Mercury Marine about service, always specify model and serial numbers. -
Page 17: Data Label Location
Section 2 - Getting to Know Your Power Package Data Label Location The engine data label is located on the front of the engine as shown below. Serial number and part number label, with bar codes Engine data label 50480 Technodrive Transmissions The transmission identification plate indicates gear ratio, serial number, and model. -
Page 18: Features And Controls
If you cannot determine the cause, consult an authorized repair facility. Digital Throttle and Shift Digital Throttle and Shift (DTS) operating instructions are provided in a separate manual. Refer to Mercury Diesel's SmartCraft and DTS Operator's Manual. -
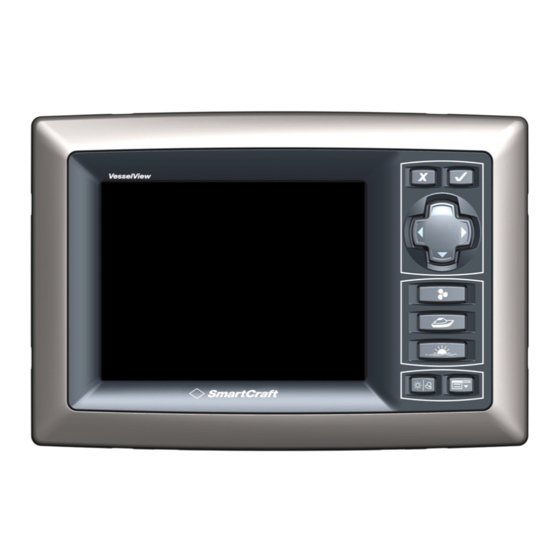
Page 19: Smartcraft Speedometer And Tachometer Digital Gauges
Section 2 - Getting to Know Your Power Package SmartCraft Speedometer and Tachometer Digital Gauges The SmartCraft instrument package, if equipped, augments the information provided by VesselView. The instrument package may display: • Engine RPM • Boat speed • Coolant temperature •... -
Page 20: System Tachometer Or Speedometer
"FAULT THROTTLE" The throttle sensor is registering a fault. "FAULT BATTERY" The ECM battery voltage is out of range. This code corresponds to a number of different engine related faults. Refer to your Mercury Diesel "CHECK ENGINE" authorized repair facility. Switches Four‑Position Key Switch... -
Page 21: Emergency Stop Switch
Section 2 - Getting to Know Your Power Package Dual‑Engine Start‑Stop Switch A start‑stop switch is optional equipment. The start‑stop switch works in conjunction with the key switch. There is one start‑stop switch for each engine. Each button on a multi‑engine start‑stop switch functions independently. -
Page 22: Lanyard Stop Switch
30 seconds will restart the engine but cause fault codes to be set. Unless you are in a potentially hazardous situation, turn the key switch off and wait at least 30 seconds before restarting the engine or engines. If after restarting, some fault codes are still being displayed, contact your authorized Mercury Diesel repair facility. Lanyard Stop Switch The purpose of a lanyard stop switch is to turn off the engine when the operator moves outside the operator's position (as in accidental ejection from the operator's position). -
Page 23: Remote Controls
Remote Controls Your boat may be equipped with Mercury Precision Parts or Quicksilver remote controls. All controls may not have all features shown. Consult your dealer for a description or demonstration of your remote control. -
Page 24: Engine Electrical System Overload Protection
If the replacement fuse also blows, then the electrical overload has not been eliminated. Further checks must be made on the electrical system. Do not circumvent the electrical overload protection provided on fused circuits by installing a Contact your Mercury Diesel authorized repair facility. higher amperage fuse or shorting across the fuse block terminals. -
Page 25: Vessel Integration Panel (Vip) Overload Protection
Section 2 - Getting to Know Your Power Package After finding and correcting the cause of the overload, replace any open (blown) fuses. 27000 2.0 fuse panel Location on fuse panel Reference Fuse Protection (From Front of Engine) 20‑amp Unswitched power to helm Lower left 10‑amp Switched power to ECM... - Page 26 Section 2 - Getting to Know Your Power Package Notes: Page 18 90-8M0069748 APRIL 2012...
- Page 27 Section 3 - On the Water Section 3 - On the Water Table of Contents Safe Boating Suggestions............ 20 While Boat is in Operation ..........25 Be Alert to Carbon Monoxide Poisoning......21 While the Boat is Stationary ......... 25 Good Ventilation ............
-
Page 28: Safe Boating Suggestions
Mercury Marine strongly recommends that all powerboat operators complete a boating safety course. Courses are offered in the U.S.A. by the U.S. Coast Guard Auxiliary, the Power Squadron, the Red Cross, and your state or provincial boating law enforcement agency. -
Page 29: Be Alert To Carbon Monoxide Poisoning
IMPORTANT: Install the bilge drain plug before launching the boat. Duty Cycle Rating Requirements IMPORTANT: Damage caused by incorrect application or failure to operate the power package within the specified operating parameters will not be covered by the Mercury Marine Limited Warranty. 90-8M0069748 APRIL 2012... -
Page 30: High-Output Rating
The power package must be equipped with a gear ratio and propeller that allows the engine to operate at wide open throttle (WOT) at the engine's rated speed (RPM). Use of Mercury Diesel engines in applications that do not meet specified operational parameters is not approved. -
Page 31: Drain Plug And Bilge Pump
At temperatures of –20° C (–4° F) and below, use a coolant heater to improve cold starting. • If operating in arctic temperatures of –29° C (–20° F) or lower, consult your Mercury Diesel authorized repair facility for information about special cold weather equipment and precautions. -
Page 32: Important Information - Smartstart
Check the engine and the transmission, oil filter, oil lines, oil line connectors, and oil pan for leaks. Check the coolant hoses, heat exchanger connections, aftercooler, water pump, and drain fittings for leaks. Locate and correct any problems, or see your Mercury Diesel authorized repair facility if you are unable to determine the problem. -
Page 33: Shifting
Section 3 - On the Water Shifting NOTICE Shifting into gear at engine speeds above idle will damage the transmission. Shift into gear only when the engine is operating at idle. NOTICE Failure to rotate the propeller shaft when shifting gears or forcing the shift mechanism while the engine is not operating can result in product damage. -
Page 34: High-Speed And High-Performance
If your boat is considered a high‑speed or high‑performance boat, we recommend that you never operate it at its high‑speed capability without first requesting an initial orientation and demonstration ride with your dealer or an operator experienced with your boat. For additional information, refer to the Hi‑Performance Boat Operation booklet from your Mercury Diesel authorized repair facility. -
Page 35: Impact With Underwater Hazards
Operating a boat or engine with impact damage can result in product damage, serious injury, or death. If the vessel experiences any form of impact, have an authorized Mercury Marine dealer inspect and repair the vessel or power package. Conditions Affecting Operation... -
Page 36: Bottom Of Boat
Getting Started Initial Break‑In Procedure It is important to follow this procedure to properly break in the engine. IMPORTANT: Mercury Marine recommends that the boat not be accelerated hard until this procedure has been completed. Page 28 90-8M0069748 APRIL 2012... -
Page 37: Engine Break-In
Check the engine oil level frequently. Add oil as needed. High oil consumption is normal during the break‑in period. After the 20-Hour Break-In Period To help extend the life of your power package, Mercury Marine recommends the following: • Change the engine oil and filter and the transmission fluid at the interval indicated in the Maintenance Schedule. Refer to Specifications and Maintenance. - Page 38 Section 3 - On the Water Notes: Page 30 90-8M0069748 APRIL 2012...
- Page 39 Section 4 - Specifications Section 4 - Specifications Table of Contents Fuel Requirements............... 32 Fluid Specifications............... 34 Recommended Fuels............32 Engine................34 Diesel Fuel in Cold Weather..........32 QSD 2.0 ..............34 Coolant (Antifreeze).............. 33 Transmission..............35 Engine Oil................33 Approved Paints..............
-
Page 40: Fuel Requirements
Section 4 - Specifications Fuel Requirements WARNING Failure to comply with regulations can result in injury from fire or explosion. Electrical system components on this engine are not rated as external ignition–protected (EIP). Do not store or use gasoline on boats equipped with these engines, unless provisions have been made to exclude gasoline vapors from the engine compartment (REF: 33 CFR). -
Page 41: Coolant (Antifreeze)
We strongly recommend the use of: Description Where Used Part Number Mercury 4‑ Cycle 15W40 Marine Engine Oil Engine crankcase 92‑877695K1 This oil is a specially blended 15W40 oil with marine additives for all–temperature operation. It exceeds requirements for API CF‑2, CF‑4, CG‑4 and CH‑4 oils. -
Page 42: Engine Specifications
Texaco Ursa Super TD Engine crankcase Obtain Locally Wintershall Multi‑Rekord Veedol Turbostar Wintershall VIiva 1 These oils are approved by Mercury Marine and Marine Power Europe. For all temperature operation use 15W40 oil. Engine Specifications Specifications Description QSD 2.0 Engine type In‑line 4‑cylinder diesel... -
Page 43: Transmission
SAE 20W ‑ 40 or 2.6 L (2.75 US qt ) Obtain locally 485‑A SAE 15W ‑ 40 engine oil Approved Paints Description Part Number Marine Cloud White 8M0071082 Mercury Light Gray Primer 92‑80287852 Mercury Phantom Black 92‑802878Q1 90-8M0069748 APRIL 2012 Page 35... - Page 44 Section 4 - Specifications Notes: Page 36 90-8M0069748 APRIL 2012...
- Page 45 Section 5 - Maintenance Section 5 - Maintenance Table of Contents Owner and Operator Responsibilities........38 Removal................. 55 Dealer Responsibilities............38 Inspection..............56 Maintenance................. 38 Installation..............56 Do‑It‑Yourself Maintenance Suggestions......38 Water‑Separating Fuel Filter..........57 General Inspection............... 38 Draining................. 57 Engine Cover................
-
Page 46: Owner And Operator Responsibilities
It is the operator's responsibility to perform all safety checks, to ensure that all lubrication and maintenance instructions are complied with for safe operation, and to return the unit to a Mercury Diesel authorized repair facility for a periodic checkup. -
Page 47: Engine Cover
Check electrical connections and leads for damage or corrosion. Remove and inspect the propeller. If badly nicked, bent, or cracked, contact your Mercury Diesel authorized repair facility. Repair nicks and corrosion damage on power package exterior finish. Contact your Mercury Diesel authorized repair facility. -
Page 48: Scheduled Maintenance
Section 5 - Maintenance • Check the engine oil level. (This interval can be extended based on operator experience with the product.) Each day start • Check the engine coolant level. • Check the transmission oil level. • If operating in saltwater, brackish water, or polluted water, flush the seawater section of the cooling system after each use. -
Page 49: Maintenance Log
Section 5 - Maintenance After first 25 hours and not to • Change the engine oil and filter. exceed 30 hours • Clean the transmission oil filter and change the transmission oil. After first 50 hours • Touch up the power package with paint and spray with Corrosion Guard. Annually •... - Page 50 Section 5 - Maintenance Date Maintenance Performed Engine Hours Page 42 90-8M0069748 APRIL 2012...
-
Page 51: Engine Oil
Section 5 - Maintenance Engine Oil Oil Level—Overfilled NOTICE Discharge of oil, coolant, or other engine/drive fluids into the environment is restricted by law. Use caution not to spill oil, coolant, or other fluids into the environment when using or servicing your boat. Be aware of the local restrictions governing the disposal or recycling of waste, and contain and dispose of fluids as required. -
Page 52: Filling
Section 5 - Maintenance Remove the dipstick and observe the oil level. The oil level must be between the marks on the dipstick. If necessary, add oil. See Filling. Engine oil level markings Dipstick Minimum operating level Full mark and maximum operating level 14624 Install engine oil dipstick Filling... -
Page 53: Changing Oil And Filter
Section 5 - Maintenance IMPORTANT: When refilling the engine with oil always use the dipstick to confirm the oil level. Install the oil fill cap. Changing Oil and Filter See the Maintenance Schedule for the change interval. You should change the engine oil before placing the boat in storage. IMPORTANT: Change the engine oil when the engine is warm from operation. - Page 54 Section 5 - Maintenance Contain and dispose of the waste oil and used filter element as directed by all applicable ordinances. Remove the crankcase oil pump and install the crankcase oil drain hose fitting when the crankcase is empty. Tighten securely.
-
Page 55: Tm 345 Technodrive Transmission Fluid
Section 5 - Maintenance Seawater Oil Cooler Description lb–in. lb–ft Drain plug – 15. Lubricate and install a new cover O‑ring. Tube Ref No. Description Where Used Part No. 15W40 4-cycle Diesel Oil filter O-rings 92-858042K01 Engine Oil 16. Push the filter element into the cover until it is locked. Listen for a click. 33986 Engine coolant oil cooler Seawater oil cooler... -
Page 56: Filling
If the oil level is low, add transmission oil to bring the level up to the maximum mark on the dipstick. See Filling. NOTE: If the transmission oil level was extremely low, see your local Mercury Diesel authorized repair facility. - Page 57 Section 5 - Maintenance Remove the transmission oil drain plug and drain the transmission into a suitable container. 27977 Transmission drain plug Contain and dispose of the oil and oil waste according to applicable regulations. Reinstall the transmission oil drain plug. Torque the drain plug.
-
Page 58: Tm 485-A Technodrive Transmission Fluid
If the fluid level is low, add transmission fluid to bring the level up to the maximum mark on the dipstick. See Add Fluid. NOTE: If the transmission fluid level was extremely low, see your local Mercury Diesel authorized repair facility. -
Page 59: Add Fluid
Section 5 - Maintenance Add Fluid If necessary, add specified transmission fluid through the dipstick threaded hole to bring the level up to the maximum mark on the dipstick. Dipstick Maximum fluid level Minimum fluid level 24604 NOTE: Always use the dipstick to determine the quantity of oil or fluid required. Model Capacity Fluid type... - Page 60 Section 5 - Maintenance Description lb‑in. lb‑ft Transmission fluid drain plug Clean the exterior of the transmission around the fluid filter assembly. Loosen the assembly nut, and rotate the securing tab in the direction shown. Assembly nut Securing tab 24608 Remove the filter element.
-
Page 61: Engine Coolant
Section 5 - Maintenance 11. Reinstall the filter element. Filter element O‑ring 24620 NOTICE Improper installation of the transmission fluid filter assembly may cause the fluid to foam or leak out, resulting in decreased efficiency and damage to the transmission. Properly seat the transmission fluid filter during installation. 12. -
Page 62: Filling
14142 The pressure cap maintains pressure on the cooling system and may not be holding pressure properly. To have the cap tested, contact your Mercury Diesel authorized repair facility. Add the specified coolant as necessary. See Filling. IMPORTANT: When installing the pressure cap, be sure to tighten it securely to prevent coolant loss. -
Page 63: Changing
Section 5 - Maintenance If the coolant is low in the coolant expansion tank, add the specified coolant as necessary to bring the level to within 25 mm (1 in.) of the bottom of the fill neck. Engine coolant fill location (engine cover removed) Pressure cap Coolant expansion tank... -
Page 64: Inspection
Section 5 - Maintenance Remove the air filter element from the air filter housing Air filter housing Air filter element 25893 Inspection The air filter cannot be cleaned. Replace the air filter if it is dirty or contaminated. Replace the air filter if the foam element is deteriorated or torn. Replace the air filter at the recommended interval. -
Page 65: Water-Separating Fuel Filter
Section 5 - Maintenance Install the oil separator vent hose. Tighten the oil separator vent hose clamp securely. Air filter housing Air filter housing Oil separator vent hose Air filter retaining clamp 25357 Tighten the oil separator vent hose clamp to specification. Description lb–in. -
Page 66: Replacing
Section 5 - Maintenance Open the drain by turning the drain cap counterclockwise (as viewed from the bottom of the filter) until fuel starts draining. Do not remove the drain cap. Typical water-separating fuel filter WIF sensor wire connection Filter Drain cap 23318 Drain until the fuel is clear in appearance. - Page 67 Section 5 - Maintenance Remove the drain cap and O‑ring seal from the bottom of the existing fuel filter. Note the position of the O‑ring seal. Typical Drain cap O‑ring seal 24566 Discard the used filter and O‑ring seal as defined by local authorities. Install the O‑ring and drain cap on the new water‑separating fuel filter.
-
Page 68: Filling
13. Connect the battery cables. 14. Start and operate the engine. Check the filter connection for fuel leaks. If leaks exist, recheck the filter installation. If leaks continue, stop the engine immediately and contact your Mercury Diesel authorized repair facility. Filling A type of hand pump and primer plunger is located on the fuel filter bracket and is used to •... -
Page 69: Fuel System
Section 5 - Maintenance Move the primer plunger up and down repeatedly. The filter is full when an air‑free stream of fuel flows from the air vent screw. Typical Air vent screw Primer plunger 23468 Securely tighten the air vent screw. Typical Air vent screw 23469... -
Page 70: Fuel Tank Cleaning And Flushing
Section 5 - Maintenance Fuel Tank Cleaning and Flushing IMPORTANT: Diesel fuel should not be left in the tank during winter storage, as an accumulation of rust, sludge, and wax residue will form. Refer to the boat manufacturer's instructions and clean the fuel tank at specified intervals. Unless specified otherwise, flush and clean the diesel fuel tank every 1000 hours or five years, whichever occurs first. - Page 71 Section 5 - Maintenance Attach a temporary drain hose to the barbed fitting of the seawater drain valve. 33990 Coolant oil cooler Seawater oil cooler Seawater drain valve Oil filter housing Open the seawater drain valve. A small diameter wire bore brush or stiff piece of ware can be used to clear the seawater drain valve of any debris. Disconnect the seawater inlet hose from the connector on the seawater pump.
-
Page 72: Checking The Seawater Pickups
Section 5 - Maintenance After the seawater has completely drained, remove the temporary drain hose and close the heat exchanger seawater drain valve. 10. Reconnect all seawater hoses. 11. Tighten all hose clamps to specification. Description lb–in. lb–ft Hose clamp –... - Page 73 Section 5 - Maintenance Remove the seawater strainer cover by turning it counterclockwise by hand. Seawater inlet Seawater outlet Seawater strainer cover 25831 Remove the strainer from the strainer housing and clean out any debris. Flush the strainer with clean water. Clean out any debris from the strainer housing and flush with clean water.
-
Page 74: Engine Seawater Pump Inspection
Diesel authorized repair facility. Replacing the Engine Coolant Draining the Closed‑Cooling System IMPORTANT: Due to the complex nature of this service Mercury Diesel strongly recommends that this service be performed by a Mercury Diesel authorized repair facility. NOTICE Discharge of oil, coolant, or other engine/drive fluids into the environment is restricted by law. Use caution not to spill oil, coolant, or other fluids into the environment when using or servicing your boat. -
Page 75: Filling The Closed Cooling System
25768 Ensure that the coolant has drained completely. If required, clean the closed cooling system. See your local Mercury Diesel authorized repair facility. Install and tighten the engine coolant drain plug. Reinstall the water–separating fuel filter. Refer to Water–Separating Fuel Filter, Replacing. -
Page 76: Corrosion Protection
To help control the effects of galvanic corrosion, Mercury power packages come with several sacrificial anodes and other corrosion protection devices. For a more comprehensive explanation of corrosion and corrosion protection refer to the Marine Corrosion Protection Guide. -
Page 77: Cleaning And Inspection
Section 5 - Maintenance Remove the anode assembly (anode plug, sealing washer, and the sacrificial anode) from the aftercooler end cover. Sacrificial anode 25583 Cleaning and Inspection NOTE: Using sandpaper, fiber brush, or cleaning pad, remove the deposits from the surface of the anode before trying to determine the amount of erosion. -
Page 78: Antifouling Paint
IMPORTANT: Corrosion damage that results from the improper application of anti‑fouling paint is not covered by the limited warranty. In some areas it may be advisable to paint the bottom of the boat to help prevent marine growth. Contact a Mercury Diesel authorized repair facility for recommendations for your boat. -
Page 79: Shift Cable
All drive belts must be periodically inspected for proper tension and condition. Belts that show signs of wear such as cracking, fraying, or glazing of the belt surface should be replaced. If the serpentine belt needs to be replaced, consult your Mercury Diesel authorized repair facility. Inspect the belt for proper tension and for the following: •... -
Page 80: Battery
See your Mercury Diesel authorized repair facility for all of your repair needs. There is no adjustment available for the serpentine belt. If the belt becomes loose or noisy it has worn out and must be replaced. - Page 81 Section 5 - Maintenance Battery Switches. Battery switches should always be positioned so that each engine is operating off of its own battery. Do not operate engines with switches in the both or all position. In an emergency, another engine's battery can be used to start an engine with a dead battery.
- Page 82 Section 5 - Maintenance Notes: Page 74 90-8M0069748 APRIL 2012...
-
Page 83: Section 6 - Storage
Section 6 - Storage Section 6 - Storage Table of Contents Cold Weather (Freezing Temperature), Seasonal Storage, Seasonal Storage............77 and Extended Storage............76 Extended Storage Instructions........78 Cold Weather (Freezing Temperature) Storage.... 76 Battery................78 Preparing Your Power Package for Seasonal or Recommissioning.............. -
Page 84: Cold Weather (Freezing Temperature), Seasonal Storage, And Extended Storage
Cold Weather (Freezing Temperature), Seasonal Storage, and Extended Storage IMPORTANT: Mercury Marine strongly recommends that this service be performed by a Mercury Diesel authorized repair facility. Damage caused by freezing is not covered by the Mercury Marine Limited Warranty. NOTICE Water trapped in the seawater section of the cooling system can cause corrosion or freeze damage. -
Page 85: Preparing Your Power Package For Seasonal Or Extended Storage
Section 6 - Storage Preparing Your Power Package for Seasonal or Extended Storage NOTICE Without sufficient cooling water, the engine, the water pump, and other components will overheat and suffer damage. Provide a sufficient supply of water to the water inlets during operation. IMPORTANT: If the boat has already been removed from the water, supply water to the water inlet holes before starting the engine. -
Page 86: Extended Storage Instructions
Read all precautions and perform all procedures found in Seasonal Storage Instructions. IMPORTANT: The seawater pump impeller material can be damaged by prolonged exposure to direct sunlight. Remove the seawater pump impeller and store away from direct sunlight. Refer to a Mercury Diesel authorized repair facility for additional information and service. - Page 87 Section 6 - Storage NOTICE Without sufficient cooling water, the engine, the water pump, and other components will overheat and suffer damage. Provide a sufficient supply of water to the water inlets during operation. 10. Supply cooling water to the water inlet openings. 11.
- Page 88 Section 6 - Storage Notes: Page 80 90-8M0069748 APRIL 2012...
-
Page 89: Section 7 - Troubleshooting
Section 7 - Troubleshooting Section 7 - Troubleshooting Table of Contents Diagnosing Electronically Controlled Fuel System Problems Poor Performance............83 ....................82 Incorrect Engine Temperature........83 Troubleshooting Charts............82 Low Engine Oil Pressure..........83 Starter Motor Will Not Crank Engine, or Cranks Slow... 82 Battery Will Not Charge.......... -
Page 90: Troubleshooting Charts
Diagnosing Electronically Controlled Fuel System Problems A Mercury Diesel authorized repair facility has the proper service tools for diagnosing problems on electronically controlled fuel systems. The engine control module (ECM) on these engines has the ability to detect problems with the system when they occur, and store a trouble code in the ECM's memory. -
Page 91: Poor Performance
Boat overloaded or improperly distributed. Reduce load or redistribute more evenly. Boat bottom fouled or damaged. Clean or repair as necessary. Have electronic fuel system checked by a Mercury Diesel authorized repair Electronic fuel system fault. facility. Incorrect Engine Temperature... -
Page 92: Remote Control Operates Hard, Binds, Has Excessive Free-Play, Or Makes Unusual Sounds
Obstruction in the shift or throttle linkages. Remove the obstruction. Check all throttle linkages. If any are loose or missing, see a Mercury Loose or missing shift and throttle linkages. Diesel authorized repair facility immediately. Straighten cable or have a Mercury Diesel authorized repair facility Shift or throttle cable kinked. - Page 93 Section 8 - Customer Assistance Information Section 8 - Customer Assistance Information Table of Contents Owner Service Assistance............ 86 Muut kielet ..............87 Local Repair Service ............ 86 Autres langues .............. 87 Service Away From Home ..........86 Andere Sprachen ............87 Stolen Power Package ..........
-
Page 94: Owner Service Assistance
If your power package is stolen, immediately advise the local authorities and Mercury Marine of the model number, serial number and to whom the recovery is to be reported. This information is filed at Mercury Marine to aid authorities, dealers and distributors in the recovery process. -
Page 95: Customer Service Literature
Pour obtenir un Manuel d'utilisation et d'entretien dans une autre langue, contactez le centre de service après‑vente international Mercury Marine ou Marine Power le plus proche pour toute information. Une liste des numéros de pièces en d'autres langues accompagne votre bloc‑moteur. -
Page 96: Otros Idiomas
Para obtener un Manual de operación y mantenimiento en otro idioma, póngase en contacto con el centro de servicio más cercano de Mercury Marine o Marine Power International para recibir información. Con su conjunto motriz se entrega una lista de los números de pieza para los otros idiomas. - Page 97 Section 8 - Customer Assistance Information Quantity Item Stock Number Price Total Total Due 90-8M0069748 APRIL 2012 Page 89...